Clustering the IoT Serever
Entgra IoT Deployment Pattern
The following diagram illustrates a typical deployment pattern for the Entgra IoT Server.
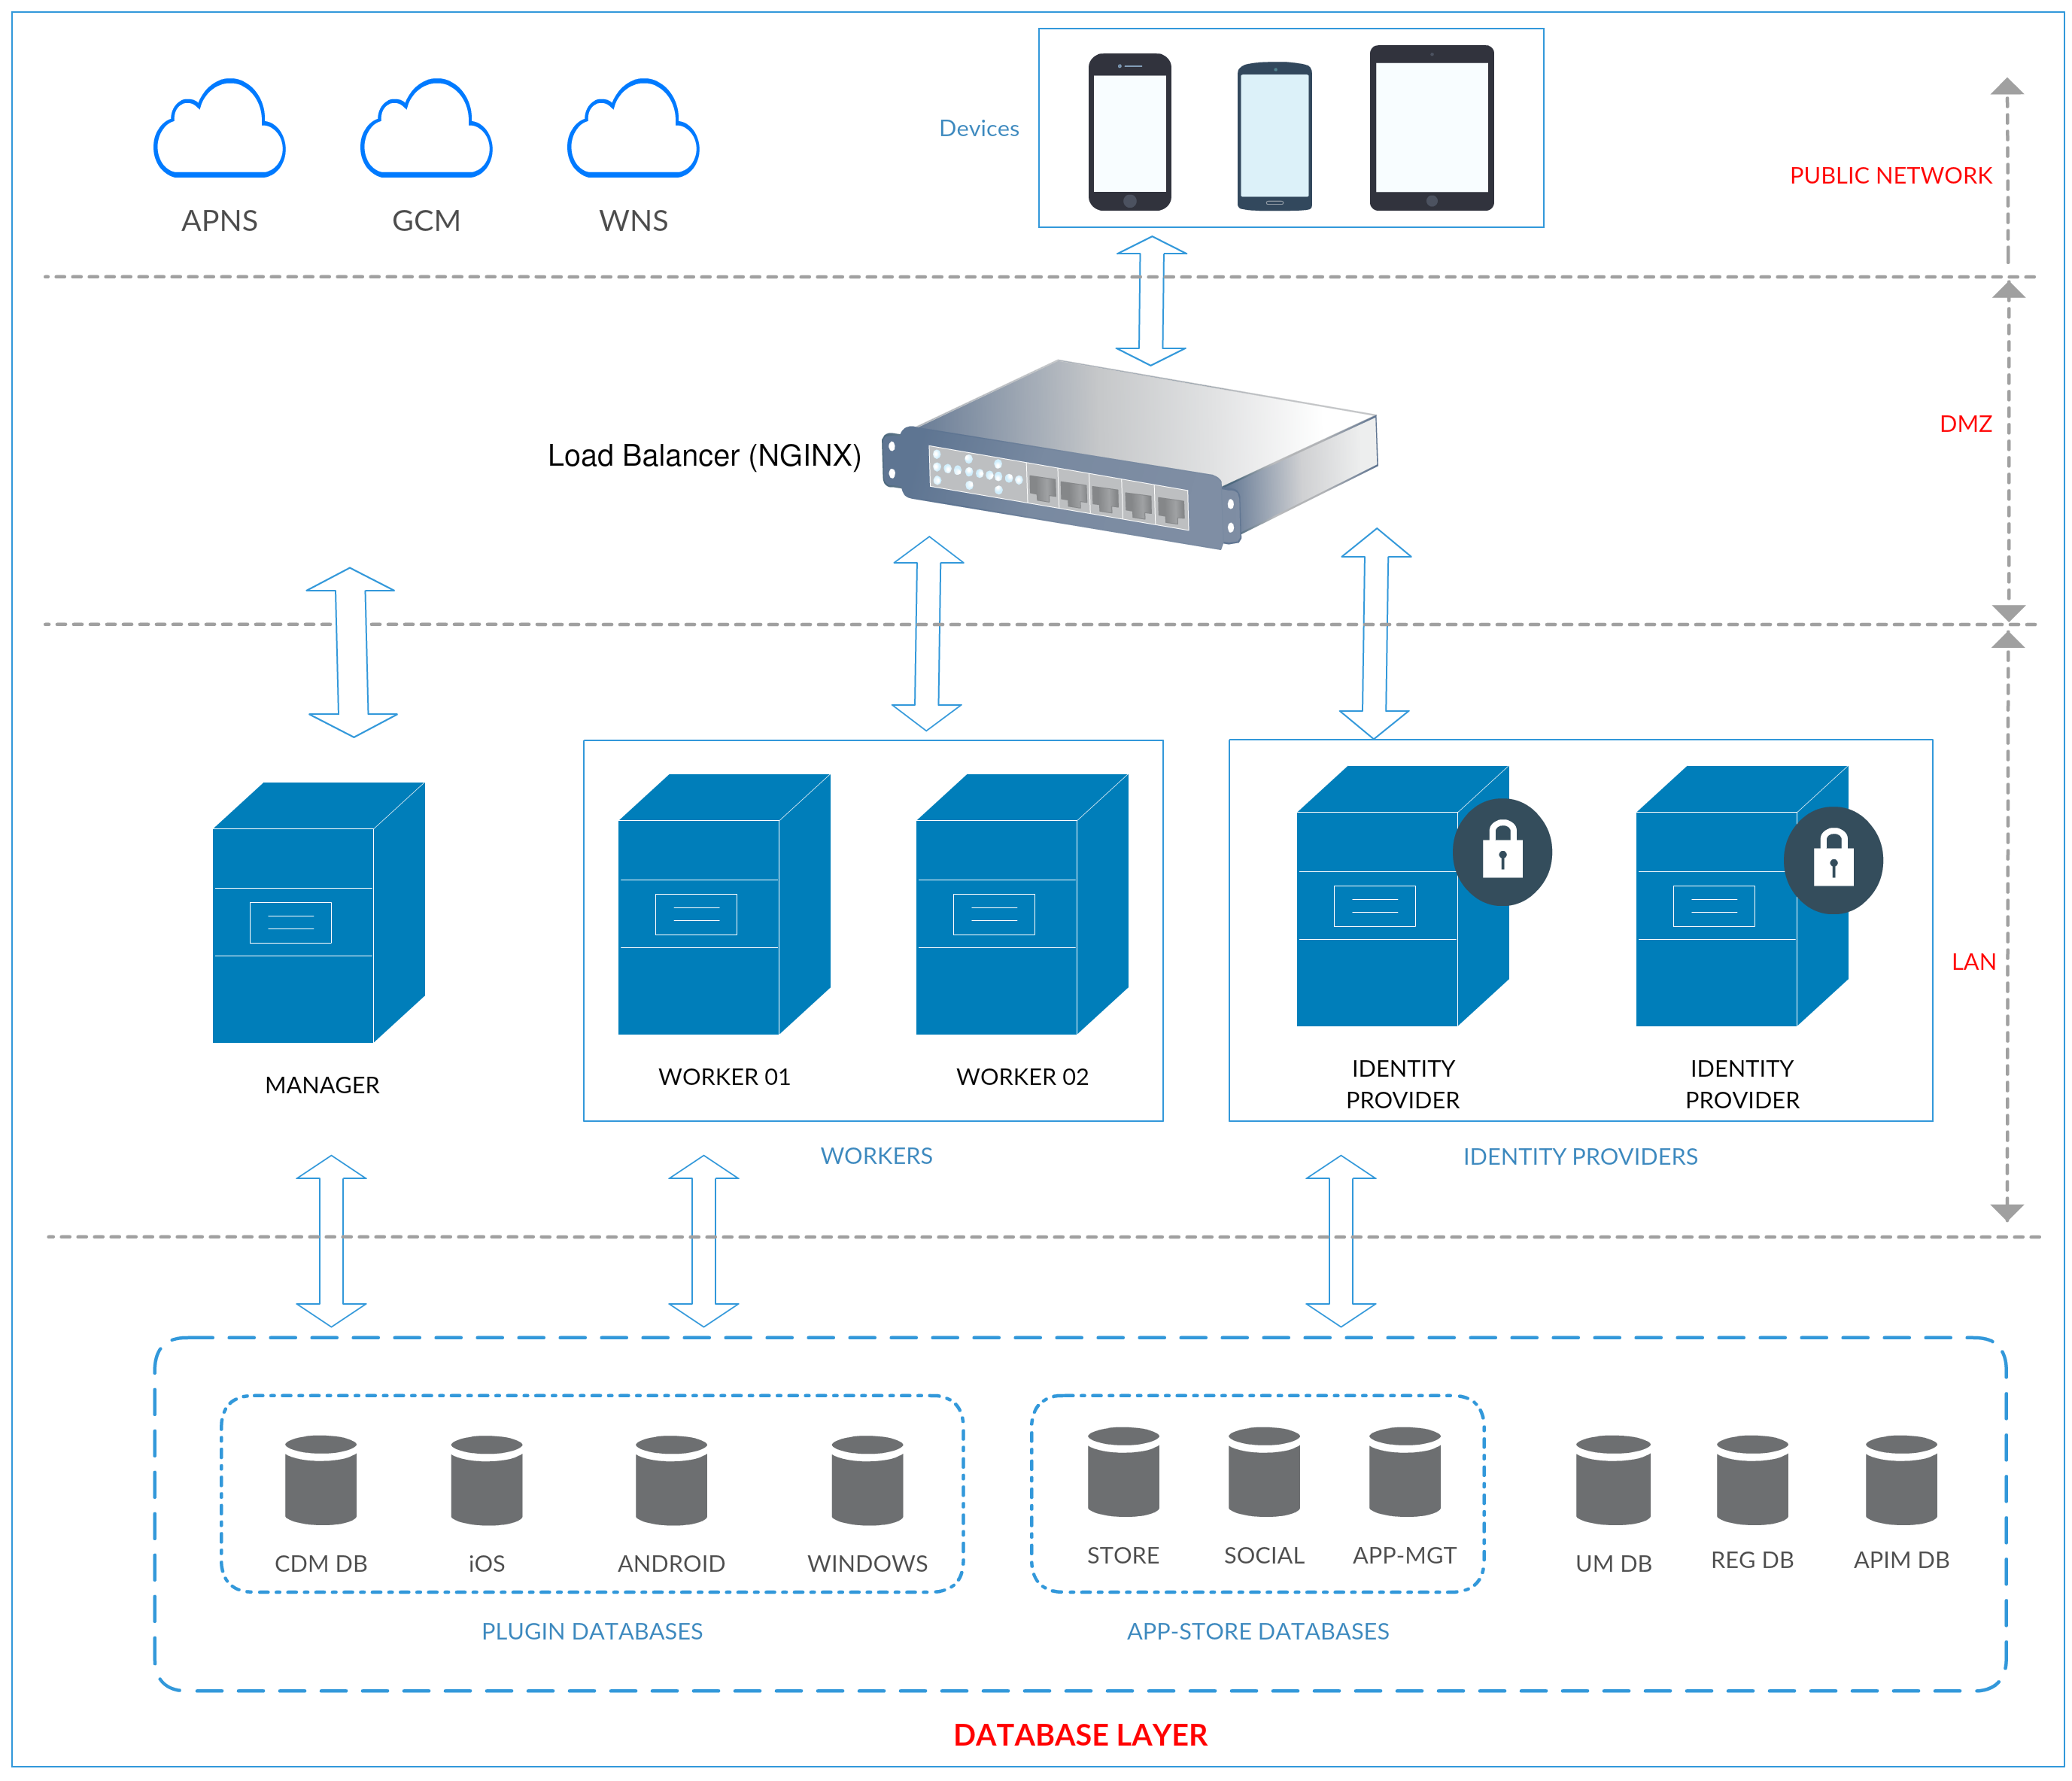
As indicated in the above diagram, when clustering the IoT Server, there is worker manager separation. In a standard WSO2 product cluster, worker and manager separation is derived from deployment synchronization. However, this differs from standard WSO2 Carbon worker manager separation.
Entgra IoT Server includes an admin console that can be used by any user with administrative privileges. These users can perform operations on enrolled devices and the devices can retrieve those actions by requesting for the pending operations. This is done by either walking the device through a push notification or configuring the device to poll at a pre-configured frequency.
Normally administrative tasks should be run from a manager node.
There are two major deployment patterns for the manager node. One could be running the manager node in the private network due to security constraints and other is allowing end users to access the management node so that they can control and view their devices.
A manager node is used to run background tasks that are necessary to update device information such as location and the list of installed applications. For more information on creating different profiles in the IoT Server, see Product Profiles.
Before you begin, you need the following to cluster the IoT Server:
Virtual Machines
Used in a high availability cluster The following is a list of virtual machines (VMs) that are used in a high availability cluster and their details.
- Manager - 1 VM
- Worker - 2 VMs
- Key manager - 2 VMs
- DBs - 1 MySQL instance
All the VMs have 4 cores and 4GB memory.
Open ports
80 and 443 are from the NGINX server.
The following ports need to be opened for Android and iOS devices so that it can connect to GCM (Google Cloud Message) and APNS (Apple Push Notification Service) and enroll to WSO2 IoT Server.
Android
The ports to open are 5228, 5229 and 5230. GCM typically uses only 5228, but it sometimes uses 5229 and 5230.
GCM does not provide specific IPs, so it is recommended to allow the firewall to accept outgoing connections to all IP addresses contained in the IP blocks listed in Google’s ASN of 15169.
iOS
- 5223 - TCP port used by devices to communicate to APNS servers
- 2195 - TCP port used to send notifications to APNS
- 2196 - TCP port used by the APNS feedback service
- 443 - TCP port used as a fallback on Wi-Fi, only when devices are unable to communicate to APNS on port 5223
The APNS servers use load balancing. The devices will not always connect to the same public IP address for notifications. The entire 17.0.0.0/8 address block is assigned to Apple, so it is best to allow this range in the firewall settings.
Let’s take a look at the steps to cluster the IoT Server:
- Configuring the Load Balancer
- Setting Up the Databases for Clustering
- Mounting the Registry
- Configuring the Key Manager Node
- Configuring the Manager Node
- Configuring the Worker Nodes
- Clustering the iOS Server
Configuring the Load Balancer
This section provides instructions on how to configure Nginx as the load balancer. You can use any load balancer for your setup.
The location of the file varies depending on how you installed the software on your machine. For many distributions, the file is located at /etc/nginx/nginx.conf. If it does not exist there, it may also be at /usr/local/nginx/conf/nginx.conf or /usr/local/etc/nginx/nginx.conf. You can create separate files inside the conf.d directory for each configuration. Three different configuration files are used for the Manager, Key Manager and Worker nodes in the example provided in this page.
Before You Begin:
You need to have a signed SSL certificate before starting. When generating the certificate make sure to add the following four URLs as Server Name Indications (SNI).
| Worker | iots310.wso2.com |
| gateway.iots310.wso2.com | |
| Manager | mgt.iots310.wso2.com |
| Key Manager | keymgt.iots310.wso2.com |
Steps
1.Create a file named mgt.conf in the /nginx/conf.d directory and add the following to it. This will be used by the Manager node to load balance.
upstream mgt.iots310.wso2.com {
        ip_hash;
        server 192.168.57.124:9763;
}

server {
        listen 80;
        server_name mgt.iots310.wso2.com;
        client_max_body_size 100M;
        location / {
               proxy_set_header X-Forwarded-Host $host;
               proxy_set_header X-Forwarded-Server $host;
               proxy_set_header X-Forwarded-For $proxy_add_x_forwarded_for;
               proxy_set_header Host $http_host;
               proxy_read_timeout 5m;
               proxy_send_timeout 5m;
               proxy_pass http://mgt.iots310.wso2.com;

               proxy_http_version 1.1;
               proxy_set_header Upgrade $http_upgrade;
               proxy_set_header Connection "upgrade";
        }
}


upstream ssl.mgt.iots310.wso2.com {
    ip_hash;
    server 192.168.57.124:9443;

}

server {
listen 443;
    server_name mgt.iots310.wso2.com;
    ssl on;
    ssl_certificate /opt/keys/star_wso2_com.crt;
    ssl_certificate_key /opt/keys/iots310_wso2_com.key;
 client_max_body_size 100M;
    location / {
               proxy_set_header X-Forwarded-Host $host;
               proxy_set_header X-Forwarded-Server $host;
               proxy_set_header X-Forwarded-For $proxy_add_x_forwarded_for;
               proxy_set_header Host $http_host;
               proxy_read_timeout 5m;
               proxy_send_timeout 5m;
               proxy_pass https://ssl.mgt.iots310.wso2.com;

               proxy_http_version 1.1;
               proxy_set_header Upgrade $http_upgrade;
               proxy_set_header Connection "upgrade";
        }
}
2.Create a file named wkr.conf in the /nginx/conf.d directory and add the following to it. This will be used by the first worker node to load balance.
upstream iots310.wso2.com {
        ip_hash;
        server 192.168.57.125:9763;
        server 192.168.57.126:9763;
}

server {
        listen 80;
        server_name iots310.wso2.com;
        location / {
               proxy_set_header X-Forwarded-Host $host;
               proxy_set_header X-Forwarded-Server $host;
               proxy_set_header X-Forwarded-For $proxy_add_x_forwarded_for;
               proxy_set_header Host $http_host;
               proxy_read_timeout 5m;
               proxy_send_timeout 5m;
               proxy_pass http://iots310.wso2.com;

               proxy_http_version 1.1;
               proxy_set_header Upgrade $http_upgrade;
               proxy_set_header Connection "upgrade";
        }
}


upstream ssl.iots310.wso2.com {
    ip_hash;
    server 192.168.57.125:9443;
    server 192.168.57.126:9443;
}

server {
listen 443;
    server_name iots310.wso2.com;
    ssl on;
    ssl_certificate /opt/keys/star_wso2_com.crt;
    ssl_certificate_key /opt/keys/iots310_wso2_com.key;
    location / {
               proxy_set_header X-Forwarded-Host $host;
               proxy_set_header X-Forwarded-Server $host;
               proxy_set_header X-Forwarded-For $proxy_add_x_forwarded_for;
               proxy_set_header Host $http_host;
               proxy_read_timeout 5m;
               proxy_send_timeout 5m;
               proxy_pass https://ssl.iots310.wso2.com;

               proxy_http_version 1.1;
               proxy_set_header Upgrade $http_upgrade;
               proxy_set_header Connection "upgrade";
        }
}
3.Create a file named gateway.conf in the /nginx/conf.d directory and add the following to it. This will be used by the gateway worker node to load balance.
upstream gateway.iots310.wso2.com {
        ip_hash;
        server 192.168.57.125:8280;
        server 192.168.57.126:8280;
}

server {
        listen 80;
        server_name gateway.iots310.wso2.com;
        location / {
               proxy_set_header X-Forwarded-Host $host;
               proxy_set_header X-Forwarded-Server $host;
               proxy_set_header X-Forwarded-For $proxy_add_x_forwarded_for;
               proxy_set_header Host $http_host;
               proxy_read_timeout 5m;
               proxy_send_timeout 5m;
               proxy_pass http://gateway.iots310.wso2.com;

               proxy_http_version 1.1;
               proxy_set_header Upgrade $http_upgrade;
               proxy_set_header Connection "upgrade";
        }
}


upstream ssl.gateway.iots310.wso2.com {
    ip_hash;
    server 192.168.57.125:8243;
    server 192.168.57.126:8243;
}

server {
listen 443;
    server_name gateway.iots310.wso2.com;
    ssl on;
    ssl_certificate /opt/keys/star_wso2_com.crt;
    ssl_certificate_key /opt/keys/iots310_wso2_com.key;
    location / {
               proxy_set_header X-Forwarded-Host $host;
               proxy_set_header X-Forwarded-Server $host;
               proxy_set_header X-Forwarded-For $proxy_add_x_forwarded_for;
               proxy_set_header Host $http_host;
               proxy_read_timeout 5m;
               proxy_send_timeout 5m;
               proxy_pass https://ssl.gateway.iots310.wso2.com;

               proxy_http_version 1.1;
               proxy_set_header Upgrade $http_upgrade;
               proxy_set_header Connection "upgrade";
        }
}
4.Create a file named keymgt.conf in the /nginx/conf.d directory and add the following to it. This will be used by the key manager node to load balance.
upstream keymgt.iots310.wso2.com {
        ip_hash;
        server 192.168.57.127:9763;
}

server {
        listen 80;
        server_name keymgt.iots310.wso2.com;
        location / {
               proxy_set_header X-Forwarded-Host $host;
               proxy_set_header X-Forwarded-Server $host;
               proxy_set_header X-Forwarded-For $proxy_add_x_forwarded_for;
               proxy_set_header Host $http_host;
               proxy_read_timeout 5m;
               proxy_send_timeout 5m;
               proxy_pass http://keymgt.iots310.wso2.com;

               proxy_http_version 1.1;
               proxy_set_header Upgrade $http_upgrade;
               proxy_set_header Connection "upgrade";
        }
}

upstream ssl.keymgt.iots310.wso2.com {
    ip_hash;
    server 192.168.57.127:9443;

}

server {
listen 443;
    server_name keymgt.iots310.wso2.com;
    ssl on;
    ssl_certificate /opt/keys/star_wso2_com.crt;
    ssl_certificate_key /opt/keys/iots310_wso2_com.key;
    location / {
               proxy_set_header X-Forwarded-Host $host;
               proxy_set_header X-Forwarded-Server $host;
               proxy_set_header X-Forwarded-For $proxy_add_x_forwarded_for;
               proxy_set_header Host $http_host;
               proxy_read_timeout 5m;
               proxy_send_timeout 5m;
               proxy_pass https://ssl.keymgt.iots310.wso2.com;

               proxy_http_version 1.1;
               proxy_set_header Upgrade $http_upgrade;
               proxy_set_header Connection "upgrade";
        }
}
Setting Up the Databases for Clustering
The following databases are needed when clustering WSO2 IoT Server.
| Database Name | Description | Database Script Location |
|---|---|---|
| APIM Database (WSO2AM_DB) | This database stores data related to JAX-RS APIs and OAuth token data. | <IOTS_HOME>/dbscripts/apimgt/ |
| App management database | This database store the mobile and IoT device application details. | <IOTS_HOME>/dbscripts/appmgt |
| CDM core database (DM_DS) | This database stores generic data about devices (such as a unique identifier, device type, ownership type), device enrollment information, device operations, policy management related data, etc. | <IOTS_HOME>/dbscripts/cdm/ |
| Certificate management database | This database stores the mutual SSL certificate details. | <IOTS_HOME>/dbscripts/certmgt |
| Registry database (REG_DB) | This database acts as the registry database and stores governance and config registry data. The registry database must be mounted to all nodes in the cluster. | Example: The mysql.sql script to create the database for MySQL. |
| Social database | The database used by the WSO2 App Manager Store to gather the likes, comments, and rating of an application. | <IOTS_HOME>/dbscripts/social |
| Social database (WSO2_SOCIAL_DB) | The database used by the WSO2 App Manager Store to gather the likes, comments, and rating of an application. | <IOTS_HOME>/dbscripts/social |
| Storage database | The database is used by the WSO2 App Manager to store web application data, such as URI templates, subscriptions, and more. | <IOTS_HOME>/dbscripts/storage |
| User manager database (UM_DB) | This database stores the user details and user permission related details. | <IOTS_HOME>/dbscripts Example: The mysql.sql script to create the database for MySQL. |
The following databases are related to plugins. These enable you to keep the data that is essential for these devices to work (such as APNS related keys) and this data is not available in the CDM core database.
| Database Name | Description | Database Script Location |
|---|---|---|
| iOS database (MobileIOSDM_DS) | Stores the iOS related the data. If you have not configured WSO2 IoT Server for iOS, you won't have the database scripts in the given location. For more information on configuring WSO2 IoT Server for iOS, see iOS Configurations. | <IOTS_HOME>/dbscripts/cdm/plugins/ios |
| Android database (MobileAndroidDM_DS) | Stores the Android related data. | <IOTS_HOME>/dbscripts/cdm/plugins/android |
| Windows database (MobileWindowsDM_DS) | Stores the Microsoft Windows related data. | <IOTS_HOME>/dbscripts/cdm/plugins/windows |
To change the datasource configurations, please change the following files.
NOTE: Make sure to add the relevant JDBC library to the <IOTS_HOME>/lib directory. For example, add the mysql-connector-java-{version}.jar file to the <IOTS_HOME>/lib directory when using the MySQL database.
| Files to change | Datasource |
|---|---|
<IOTS_HOME>/repository/conf/datasources/master-datasources.xml |
This file must include the datasource configuration for the following databases: APIM database, User management database, App Manager database, Store database, Social database |
<IOTS_HOME>/repository/conf/datasources/cdm-datasources.xml |
This file must include the datasource configuration for the CDM core database. |
<IOTS_HOME>/repository/conf/datasources/android-datasources.xml |
This file must include the datasource configuration for the Android plugin database. |
<IOTS_HOME>/repository/conf/datasources/ios-datasources.xml |
This file must include the datasource configuration for the iOS plugin database. |
<PRODUCT_HOME>/repository/conf/datasources/windows-datasources.xml |
This file must include the datasource configuration for the Windows Plugin database. |
Mounting the Registry
A registry is a virtual directory based repository system. It can be federated among multiple databases, which is referred to as Registry mounting. All WSO2 servers support registry mounting.
There are three types of registry-repositories.
| Local | Stores the data related to the local instances. |
| Config | Contains product specific configurations that are shared across multiple instances of the same product. |
| Governace | Contains data and configurations that are shared across all the products in the platform. |
For more information on sharing registry spaces across multiple product instances, see here.
See Remote Instance and Mount Configuration Details for more information on registry mounting and why it is useful. These must be done on all nodes.
Follow the steps given below:
- Add the following to the
<IOTS_HOME>/conf/ datasources/master-datasources.xmlfile to configure the Key Manager registry mounting.
<dbConfig name="mounted_registry">
   <dataSource>jdbc/WSO2REG_DB</dataSource>
</dbConfig>

<remoteInstance url="https://localhost:9443/registry">
   <id>instanceid</id>
   <dbConfig>mounted_registry</dbConfig>
   <readOnly>false</readOnly>
   <enableCache>true</enableCache>
   <registryRoot>/</registryRoot>
   <cacheId>root@jdbc:mysql://192.168.57.123:3306/govreg</cacheId>
</remoteInstance>

<mount path="/_system/config" overwrite="true">
   <instanceId>instanceid</instanceId>
   <targetPath>/_system/config/iot</targetPath>
</mount>
<mount path="/_system/governance" overwrite="true">
   <instanceId>instanceid</instanceId>
   <targetPath>/_system/governance</targetPath>
</mount>
- Add the following configurations to the
<IOTS_HOME>/conf/registry.xmlfile to configure the Worker and Manager registry mounting.
<dbConfig name="mounted_registry">
   <dataSource>jdbc/WSO2REG_DB</dataSource>
</dbConfig>

<remoteInstance url="https://localhost:9443/registry">
   <id>instanceid</id>
   <dbConfig>mounted_registry</dbConfig>
   <readOnly>false</readOnly>
   <enableCache>true</enableCache>
   <registryRoot>/</registryRoot>
   <cacheId>root@jdbc:mysql://192.168.57.123:3306/govreg</cacheId>
</remoteInstance>

<mount path="/_system/config" overwrite="true">
   <instanceId>instanceid</instanceId>
   <targetPath>/_system/config/iot</targetPath>
</mount>
<mount path="/_system/governance" overwrite="true">
   <instanceId>instanceid</instanceId>
   <targetPath>/_system/governance</targetPath>
</mount>
Configuring the Key Manager Node
Through out this guide you have configured keymgt.iots310.wso2.com as the key manager node.
Before you begin
- Mount the registry as explained here.
- Configure the following databases for the Key Manager in the
/conf/datasources/master-datasources.xml file. - For more information, see Setting Up the Databases for Clustering.
- Registry Database
- User manager database
- APIM Database
Let's start configuring the Key Manager node.
1.Configure the HostName and MgtHostName properties in the <IOTS_HOME>/conf/carbon.xml file as shown below.
<HostName>keymgt.iots310.wso2.com</HostName>
<MgtHostName>keymgt.iots310.wso2.com</MgtHostName>
Note: Make sure to have the Offset property configured to zero. If it is set to a value other than zero, you need to update the NGINX configuration based on the port offset.
2.Configure the <IOTS_HOME>/bin/iot-server.sh file as shown below:
-Diot.keymanager.host="keymgt.iots310.wso2.com" \
-Diot.keymanager.https.port="443" \
3.Configure all the following properties in the <IOTS_HOME>/conf/identity/sso-idp-config.xml file by replacing https://localhost:9443 with https://mgt.iots310.wso2.com:443.
- AssertionConsumerServiceURL
- DefaultAssertionConsumerServiceURL
4.Start the WSO2 IoT Server's core profile.
cd <IOTS_HOME>/bin
iot-server.sh
Configuring the Manager Node
Throughout this guide, you have configured mgt.iots310.wso2.com as the manager node.
Before you begin
- Mount the registry as explained here.
- Configure the following databases for the Key Manager in the
<IOTS_HOME>/conf/datasources/master-datasources.xmlfile. - For more information, see Setting Up the Databases for Clustering.
- Registry database
- User manager database
- APIM database
- App manager database and include the social and storage database schemas to the same database.
- CDM database and include the certificate management, android, iOS and windows database schemas to the same database.
Let's start configuring the Manager node.
1.Configure the HostName and MgtHostName properties in the <IOTS_HOME>/conf/carbon.xml file as shown below.
<HostName>iots310.wso2.com</HostName>
<MgtHostName>mgt.iots310.wso2.com</MgtHostName>
Note: Make sure to have the Offset property configured to zero. If it is set to a value other than zero, you need to update the NGINX configuration based on the port offset.
2.Configure the <IOTS_HOME>/bin/iotserver.sh file as shown below:
-Diot.manager.host="mgt.iots310.wso2.com" \
-Diot.manager.https.port="443" \
-Diot.core.host="iots310.wso2.com" \
-Diot.core.https.port="443" \
-Diot.keymanager.host="keymgt.iots310.wso2.com" \
-Diot.keymanager.https.port="443" \
-Diot.gateway.host="gateway.iots310.wso2.com" \
-Diot.gateway.https.port="443" \
-Diot.gateway.http.port="80" \
-Diot.gateway.carbon.https.port="443" \
-Diot.gateway.carbon.http.port="80" \
-Diot.apimpublisher.host="gateway.iots310.wso2.com" \
-Diot.apimpublisher.https.port="443" \
-Diot.apimstore.host="gateway.iots310.wso2.com" \
-Diot.apimstore.https.port="443" \
3.The publisher and store of the app manager run on manager node. Configuring the app manager:
a.Configure the following properties in the <IOTS_HOME>/repository/deployment/server/jaggeryapps/store/config/store.json file for SSO by replacing https://localhost:9443 with https://keymgt.iots310.wso2.com.
- identityProviderURL
- storeAcs
"ssoConfiguration":{
      "enabled":true,
      "issuer":"store",
      "identityProviderURL":"https://keymgt.iots310.wso2.com/samlsso",
      "keyStorePassword":"wso2carbon",
      "identityAlias":"wso2carbon",
      "responseSigningEnabled":"true",
      "storeAcs":"https://mgt.iots310.wso2.com/store/acs",
      "keyStoreName":"/repository/resources/security/wso2carbon.jks",
      "validateAssertionValidityPeriod":true,
      "validateAudienceRestriction":true,
      "assertionSigningEnabled":true
},
b.Configure the following properties in the <IOTS_HOME>/repository/deployment/server/jaggeryapps/publisher/config/publisher.json file for SSO by replacing https://localhost:9443 with https://keymgt.iots310.wso2.com.
- identityProviderURL
- publishereAcs
"ssoConfiguration":{
      "enabled":true,
      "issuer":"publisher",
      "identityProviderURL":"https://keymgt.iots310.wso2.com/samlsso",
      "keyStorePassword":"wso2carbon",
      "identityAlias":"wso2carbon",
      "responseSigningEnabled":"true",
      "publisherAcs":"https://mgt.iots310.wso2.com/publisher/sso",
      "keyStoreName":"/repository/resources/security/wso2carbon.jks",
      "validateAssertionValidityPeriod":true,
      "validateAudienceRestriction":true,
      "assertionSigningEnabled":true
 }
c.Configure the AppDownloadURLHost property in the <IOTS_HOME>/conf/app-manager.xml to point to http://mgt.iots310.wso2.com .
<Config name="AppDownloadURLHost">http://mgt.iots310.wso2.com</Config>
4.Configure the following properties in the <IOTS_HOME>/repository/deployment/server/jaggeryapps/api-store/site/conf/site.json file for SSO by replacing https://localhost:9443 with https://keymgt.iots310.wso2.com .
"ssoConfiguration":{
      "enabled":"true",
      "issuer":"API_STORE",
      "identityProviderURL":"https://keymgt.iots310.wso2.com/samlsso",
      "keyStorePassword":"",
      "identityAlias":"",
      "responseSigningEnabled":"true",
      "assertionSigningEnabled":"true",
      "keyStoreName":"",
      "passive":"false",
      "signRequests":"true",
      "assertionEncryptionEnabled":"false"
},
5.Configure the <IOTS_HOME>/repository/deployment/server/jaggeryapps/android-web-agent/app/conf/config.json file to update the Android agent download URL.
"generalConfig":{
      "host":"https://mgt.iots310.wso2.com",
      "companyName":"WSO2 IoT Server",
      "browserTitle":"WSO2 IoT Server",
      "copyrightText":"\u00A9 %date-year%, WSO2 Inc. (http://www.wso2.org) All Rights Reserved."
},
6.Configure the <IOTS_HOME>/repository/deployment/server/jaggeryapps/devicemgt/app/conf/config.json file to update the URL of the QR code, which will be used to enroll a device by scanning the QR code.
"generalConfig":{
      "host":"https://mgt.iots310.wso2.com",
      "companyName":"WSO2 Carbon Device Manager",
      "browserTitle":"WSO2 Device Manager",
      "copyrightPrefix":"\u00A9 %date-year%, ",
      "copyrightOwner":"WSO2 Inc.",
      "copyrightOwnersSite":"http://www.wso2.org",
      "copyrightSuffix":" All Rights Reserved."
},
7.Start the core profile of WSO2 IoT Server.
cd <IOTS_HOME>/bin
./iot-server.sh
8.Optionally, enable the device status monitoring task on the manager node and disable it on the other nodes. Open the <IOTS_HOME>/conf/cdm-config.xml file and make sure the DeviceStatusTaskConfig is enabled. This configuration is enabled by default. For more information, see Monitoring the Device Status.
Note: In a clustered environment make sure to enable this task only in the manager node and not the worker nodes. Else, the server crashes when the worker nodes start pushing notifications along with the manager node.
9.Optionally, open the <IOTS_HOME>/conf/cdm-config.xml file and make sure the SchedulerTaskEnabled that is under PushNotificationConfiguration is enabled. This configuration is enabled by default. For more information, see Scheduling the Push Notification Task.
Note: In a clustered environment make sure to enable this task only in the manager node and not the worker nodes. Else, the server crashes when the worker nodes start pushing notifications along with the manager node.
Configuring the Worker Nodes
Throughout this guide, you have configured iots310.wso2.com and gateway.iots310.wso2.com as the worker node.
Before you begin:
-
Mount the registry as explained here.
-
Configure the following databases for the Key Manager in the
<IOTS_HOME>/conf/datasources/master-datasources.xmlfile.
For more information, see Setting Up the Databases for Clustering.
- Registry Database
- User manager database
- APIM Database
- App manager database and include the social and storage database schemas to the same database.
- CDM database and include the certificate management, android, iOS and windows database schemas to the same database.
Let's start configuring the worker nodes.
- Configure the HostName and MgtHostName properties in the
<IOTS_HOME>/conf/carbon.xmlfile as shown below.
<HostName>iots310.wso2.com</HostName>
<MgtHostNam>mgt.iots310.wso2.com</MgtHostNam>
Note: Make sure to have the Offset property configured to zero. If it is set to a value other than zero, you need to update the NGINX configuration based on the port offset.
- Configure the
<IOTS_HOME>/bin/iot-server.shfile as shown below:
-Diot.manager.host="mgt.iots310.wso2.com" \
-Diot.manager.https.port="443" \
-Diot.core.host="iots310.wso2.com" \
-Diot.core.https.port="443" \
-Diot.keymanager.host="keymgt.iots310.wso2.com" \
-Diot.keymanager.https.port="443" \
-Diot.gateway.host="gateway.iots310.wso2.com" \
-Diot.gateway.https.port="443" \
-Diot.gateway.http.port="80" \
-Diot.gateway.carbon.https.port="443" \
-Diot.gateway.carbon.http.port="80" \
-Diot.apimpublisher.host="mgt.iots310.wso2.com" \
-Diot.apimpublisher.https.port="443" \
-Diot.apimstore.host="mgt.iots310.wso2.com" \
-Diot.apimstore.https.port="443" \
- Disable task monitoring in the
android.xmlandwindows.xmlfiles that are in the<IOTS_HOME>/repository/deployment/server/devicetypes directory as shown below:
<TaskConfiguration>
<Enable>false</Enable>
……...
<TaskConfiguration>
- Enable API publishing in both the worker nodes by configuring the
<IOTS_HOME>/ conf/etc/webapp-publisher-config.xmlfile as shown below: Why is this needed?
This is to publish the synapse configs to the <IOTS_HOME>/repository/deployment/server/synapse-configs/default/api directory. The configs are published when the server starts up. Therefore, disable this setting after the server finishes starting up.
<PublishAPI>true</PublishAPI>
<EnabledUpdateApi>true</EnabledUpdateApi>
- Start the core profile of the WSO2 IoT Server.
cd <IOTS_HOME>/bin
./iot-server.sh
Now you are done clustering WSO2 IoT Server. You can now start enrolling Android, Windows and IoT devices with WSO2 IoT Server and manage them.
Use the Gateway node gateway.iots310.wso2.com to start enrolling Android devices.
Clustering the iOS Server
Let’s take a look at the steps you need to follow to cluster WSO2 IoT Server with iOS. This section is not required if you don’t want to enroll and manage iOS devices.
Note: Before you begin, make sure to install the iOS features.
Follow the steps given below:
- Run the following scripts in the given order to create the CA, RA and SSL certificates. Make sure to create the output folder and use the NGINX private key
iots310_wso2_com.key)` as the CA.
Note: Run the scripts only on one server and copy them to the other servers.
SSL_PASS="wso2carbon"
CA_SUBJ="/C=SL/ST=Western/L=Colombo/O=WSO2/OU=CDM/CN=*.iots310.wso2.com/EMAILADDRESS=noreply@wso2.com"
RA_SUBJ="/C=SL/ST=Western/L=Colombo/O=WSO2/OU=CDM/CN=iots310.wso2.com/EMAILADDRESS=noreply@wso2.com"
SSL_SUBJ="/C=SL/ST=Western/L=Colombo/O=WSO2/OU=CDM/CN="$1

echo “Generating CA”
openssl req -new -key ./output/iots310_wso2_com.key -out ./output/ca.csr -subj $CA_SUBJ
openssl x509 -req -days 365 -in ./output/ca.csr -signkey ./output/iots310_wso2_com.key -out ./output/ca.crt -extensions v3_ca -extfile ./needed_files/openssl.cnf
openssl rsa -in ./output/iots310_wso2_com.key -text > ./output/ca_private.pem
openssl x509 -in ./output/ca.crt -out ./output/ca_cert.pem


echo “Generating RA”
openssl genrsa -out ./output/ra_private.key 4096
openssl req -new -key ./output/ra_private.key -out ./output/ra.csr -subj $RA_SUBJ
openssl x509 -req -days 365 -in ./output/ra.csr -CA ./output/ca.crt -CAkey ./output/iots310_wso2_com.key -set_serial 12132121241241 -out ./output/ra.crt -extensions v3_req -extfile ./needed_files/openssl.cnf
openssl rsa -in ./output/ra_private.key -text > ./output/ra_private.pem
openssl x509 -in ./output/ra.crt -out ./output/ra_cert.pem


echo “Generating SSL”
openssl genrsa -out ./output/ia.key 4096
openssl req -new -key ./output/ia.key -out ./output/ia.csr  -subj $SSL_SUBJ
openssl x509 -req -days 730 -in ./output/ia.csr -CA ./output/ca_cert.pem -CAkey ./output/ca_private.pem -set_serial 34467867966445 -out ./output/ia.crt


echo “Export to PKCS12”
openssl pkcs12 -export -out ./output/KEYSTORE.p12 -inkey ./output/ia.key -in ./output/ia.crt -CAfile ./output/ca_cert.pem -name “ioscluster” -password pass:$SSL_PASS
openssl pkcs12 -export -out ./output/ca.p12 -inkey ./output/ca_private.pem -in ./output/ca_cert.pem -name “cacert” -password pass:$SSL_PASS
openssl pkcs12 -export -out ./output/ra.p12 -inkey ./output/ra_private.pem -in ./output/ra_cert.pem -chain -CAfile ./output/ca_cert.pem -name “racert” -password pass:$SSL_PASS


echo “Export PKCS12 to JKS”
keytool -importkeystore -srckeystore ./output/KEYSTORE.p12 -srcstoretype PKCS12 -destkeystore ./output/wso2carbon.jks -deststorepass wso2carbon -srcstorepass wso2carbon -noprompt
keytool -importkeystore -srckeystore ./output/KEYSTORE.p12 -srcstoretype PKCS12 -destkeystore ./output/client-truststore.jks -deststorepass wso2carbon -srcstorepass wso2carbon -noprompt
keytool -importkeystore -srckeystore ./output/ca.p12 -srcstoretype PKCS12 -destkeystore ./output/wso2certs.jks -deststorepass wso2carbon -srcstorepass wso2carbon -noprompt
keytool -importkeystore -srckeystore ./output/ra.p12 -srcstoretype PKCS12 -destkeystore ./output/wso2certs.jks -deststorepass wso2carbon -srcstorepass wso2carbon -noprompt
Configure the <IOTS_HOME>/conf/iot-api-config.xml file in the manager node as shown below:


https://iots310.wso2.com/api/certificate-mgt/v1.0/admin/certificates/verify/
https://keymgt.iots310.wso2.com/client-registration/v0.11/register
https://gateway.iots310.wso2.com/token
- Configure the
/conf/iot-api-config.xml file in the manager node as shown below:
<VerificationEndpoint>https://iots310.wso2.com/api/certificate-mgt/v1.0/admin/certificates/verify/</VerificationEndpoint>
<DynamicClientRegistrationEndpoint>https://keymgt.iots310.wso2.com/client-registration/v0.11/register</DynamicClientRegistrationEndpoint>
<OauthTokenEndpoint>https://gateway.iots310.wso2.com/token</OauthTokenEndpoint>
- Configure the
<IOTS_HOME>/conf/certificate-config.xmlfile as shown below:
Note: wso2carbon was used as the password when generating the CA and RA certificates using the scripts given in step 1. If you used a different password, make sure to update the properties given below accordingly.
<CAPrivateKeyPassword>wso2carbon</CAPrivateKeyPassword> <RAPrivateKeyPassword>wso2carbon</RAPrivateKeyPassword>
- Disable the task server in the
<IOTS_HOME>/repository/deployment/server/devicetypes/ios.xmlfile on the worker node.
<TaskConfiguration>
    <Enable>false</Enable>
    ......
</TaskConfiguration>
- Configure the following properties in the
<IOTS_HOME>/repository/deployment/server/jaggeryapps/ios-web-agent/app/conf/config.jsonfile as shown below.
"httpsURL": "https://mgt.iots310.wso2.com",
"httpURL": "http://mgt.iots310.wso2.com",
"tokenServiceURL": "https://gateway.iots310.wso2.com/token"
"location": "https://mgt.iots310.wso2.com/ios-web-agent/public/mdm.page.enrollments.ios.download-agent/asset/ios-agent.ipa",
Start the manager node, Sign in to the device management console, and navigate to the platform configurations section to configure the iOS configurations.
Make use you have the MDM certificate and the MDM APNS certificate before you configure the iOS configurations. For more information, see Generating Certificates from the Apple Developer Portal.
Configure the iOS platform settings. For more information, see iOS Platform Configurations. You can now start enrolling iOS devices with the IoT Server.
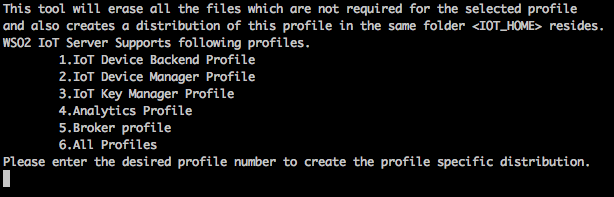
Product Profiles
When a WSO2 product starts, it starts all components, features and related artifacts bundled with it. The main functionality of WSO2 IoT Server can be divided into six different profiles that each contain a bundle of specific components, features, and artifacts related to the profile. This section guides you on how to create a profile distribution in order to support a distributed setup.
By default, each profile is started on a different port number. The following table lists out the profiles available in the WSO2 IoT Server and their respective port numbers.
| Profile | Port Numbers | Description |
|---|---|---|
| Device Manager Backend | 9444/9763 | This profile consists of the core services and device types that are used by the WSO2 IoT core framework and handles external traffic for the backend services. The Device Manager Backend profile does not consist of any Graphical User Interface (GUI) applications that need to be used directly by the end user./dbscripts/appmgt |
| Device Manager Backend | 9444/9763 | This profile consists of the core services and device types that are used by the WSO2 IoT core framework and handles external traffic for the backend services. The Device Manager Backend profile does not consist of any Graphical User Interface (GUI) applications that need to be used directly by the end user./dbscripts/appmgt |
| Device Manager | 9443/9763 | This profile mainly consists of the GUI for all applications that facilitate device management. These applications include the following: Device management application, Application manager, Publisher and store, API store, Dashboard Portal. Additionally, there are some exposed REST APIs for the publisher and store in WSO2 App Manager and WSO2 API Manager. These APIs can be called remotely and some actions, which can also be performed through the GUI applications, can be performed through the API itself. |
| Key Manager | 9447/9767 | This profile acts as both a key manager, and an identity provider. The user operations done in the Device Manager profile are authenticated via this profile. |
| IoT Analytics | 9445/9764 | This profile receives various device information and analytics (real-time and batch analytics) on the events that are received. The events can be published to the analytics server directly or it can be pushed via a broker profile. |
| Broker | 1886 | This profile acts as the MQTT broker that can be published and subscribed to from profiles such as the device backend profile and the analytics profile. |
Creating Profile Distributions
The distributions for the profiles are created by executing a script from the WSO2 IoT distribution. Follow the steps given below to create the respective profiles:
-
Download WSO2 IoT Server.
-
Unzip the WSO2 IoT Server distribution in any preferred location. This location is referred to as
<IOTS_HOME>throughout this document. -
Navigate to the
<IOTS_HOME>/bindirectory on a command prompt or terminal window, and execute the profile creator script.
Linux/Mac OS
cd <IOTS_HOME>/bin
./profile-creator.sh
Windows
cd<IOTS_HOME>\bin
profile-creator.bat
- Enter the profile number of the profile you want to create. You can either enter the profile numbers separately to create multiple profiles or select the ‘All Profiles’ option (number 6) to create all the profiles in one go.
- Once the profile number is entered, the profiles archive is created in the target directory. The target directory resides in the same directory as
<IOTS_HOME>. Copy the respective archives into the preferred machines and locations.
Multi-profiling
Tip: A particular profile contains only a subset of features bundled in the product. In order to identify what feature bundles apply to which profile, the product maintains a set of bundles.info files. In WSO2 IoT Server, these files can be found in the <IOTS_HOME>/wso2/components/<profile-name>/configuration/org.eclipse.equinox.simpleconfigurator directories. The bundles.info files contain references to the actual bundles.
Note that the <profile-name> in the directory path refers to the name of the profile. For example, when there’s a product profile named device-backend, references to all the feature bundles required for the device-backend profile to function, are in a bundles.info file saved in the <IOTS_HOME>/wso2/components/device-backend/configuration/org.eclipse.equinox.simpleconfigurator directory.