Configurations
Manage Users
Users are the people who interact with Entgra UEM Server. Users can belong to either the administrator or user role type. The super tenant administrator and a tenant administrator belongs to the administrator role type; while, all other end-users belong to the user role type. The organization does not need to add users manually, if Entgra UEM Server is connected to a user store. UEM Server users are not allowed to edit user details once they have been added. You need to delete the current user and create a new user, if the need arises to change user details.
Add Users
Follow the instructions below to add a user:
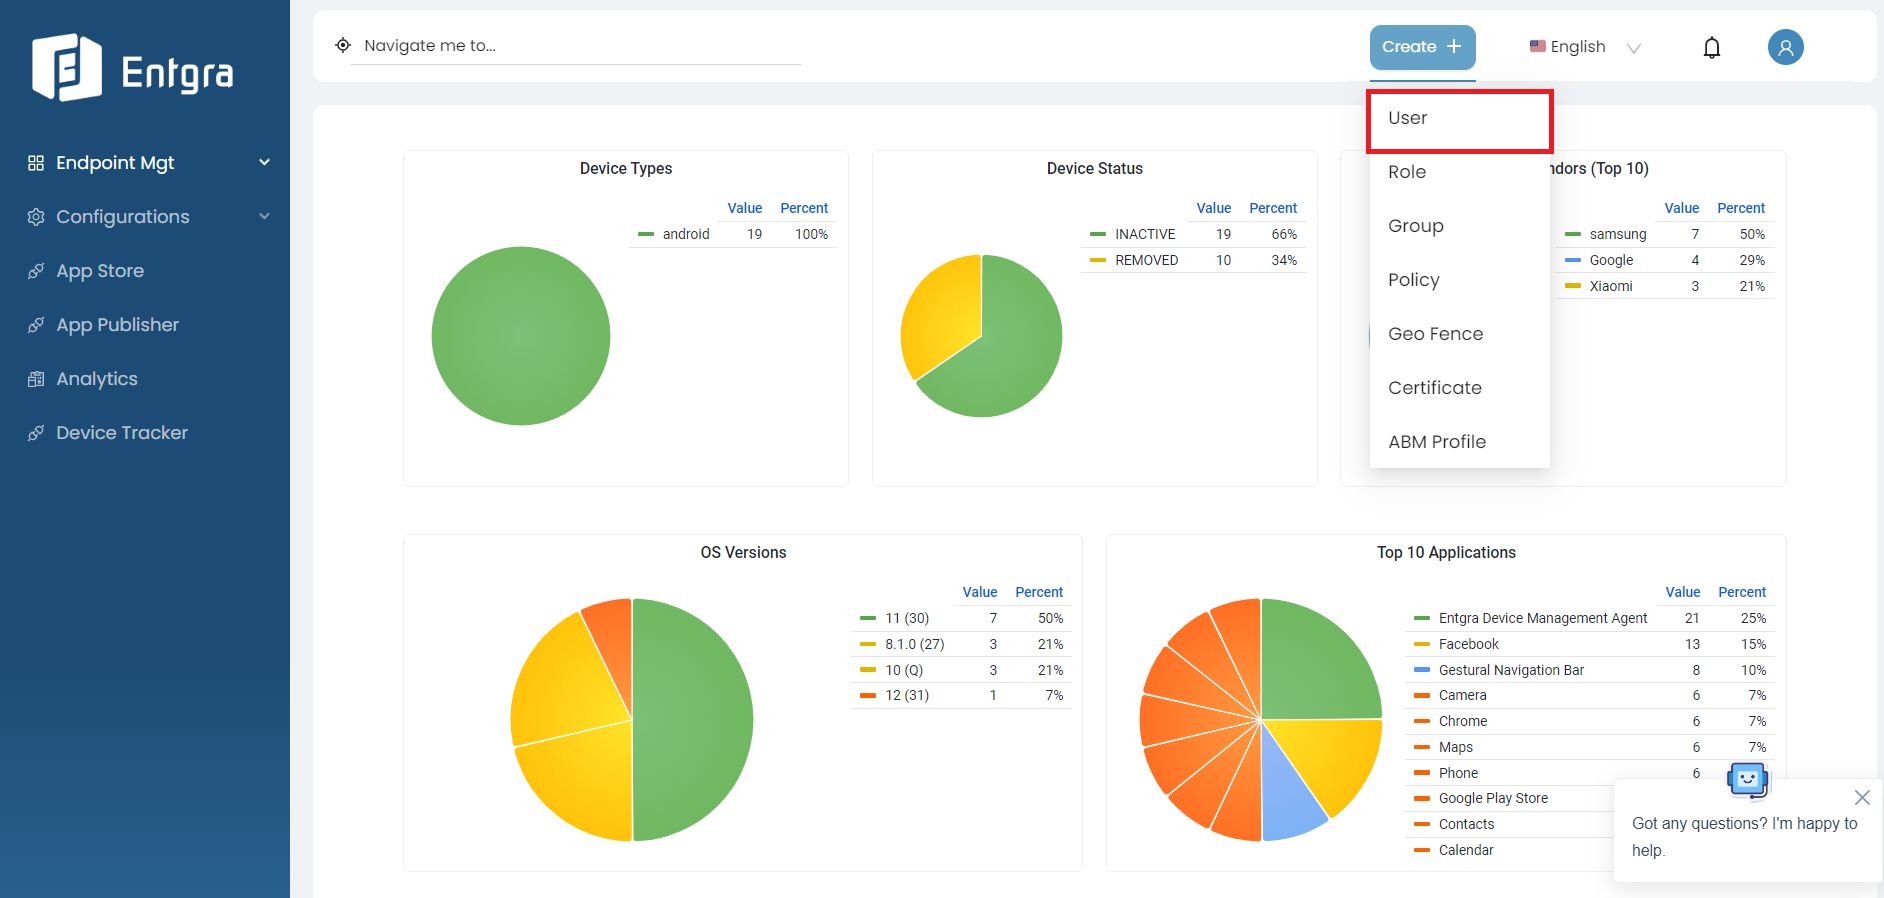
- Sign in to the Entgra UEM Server console.
-
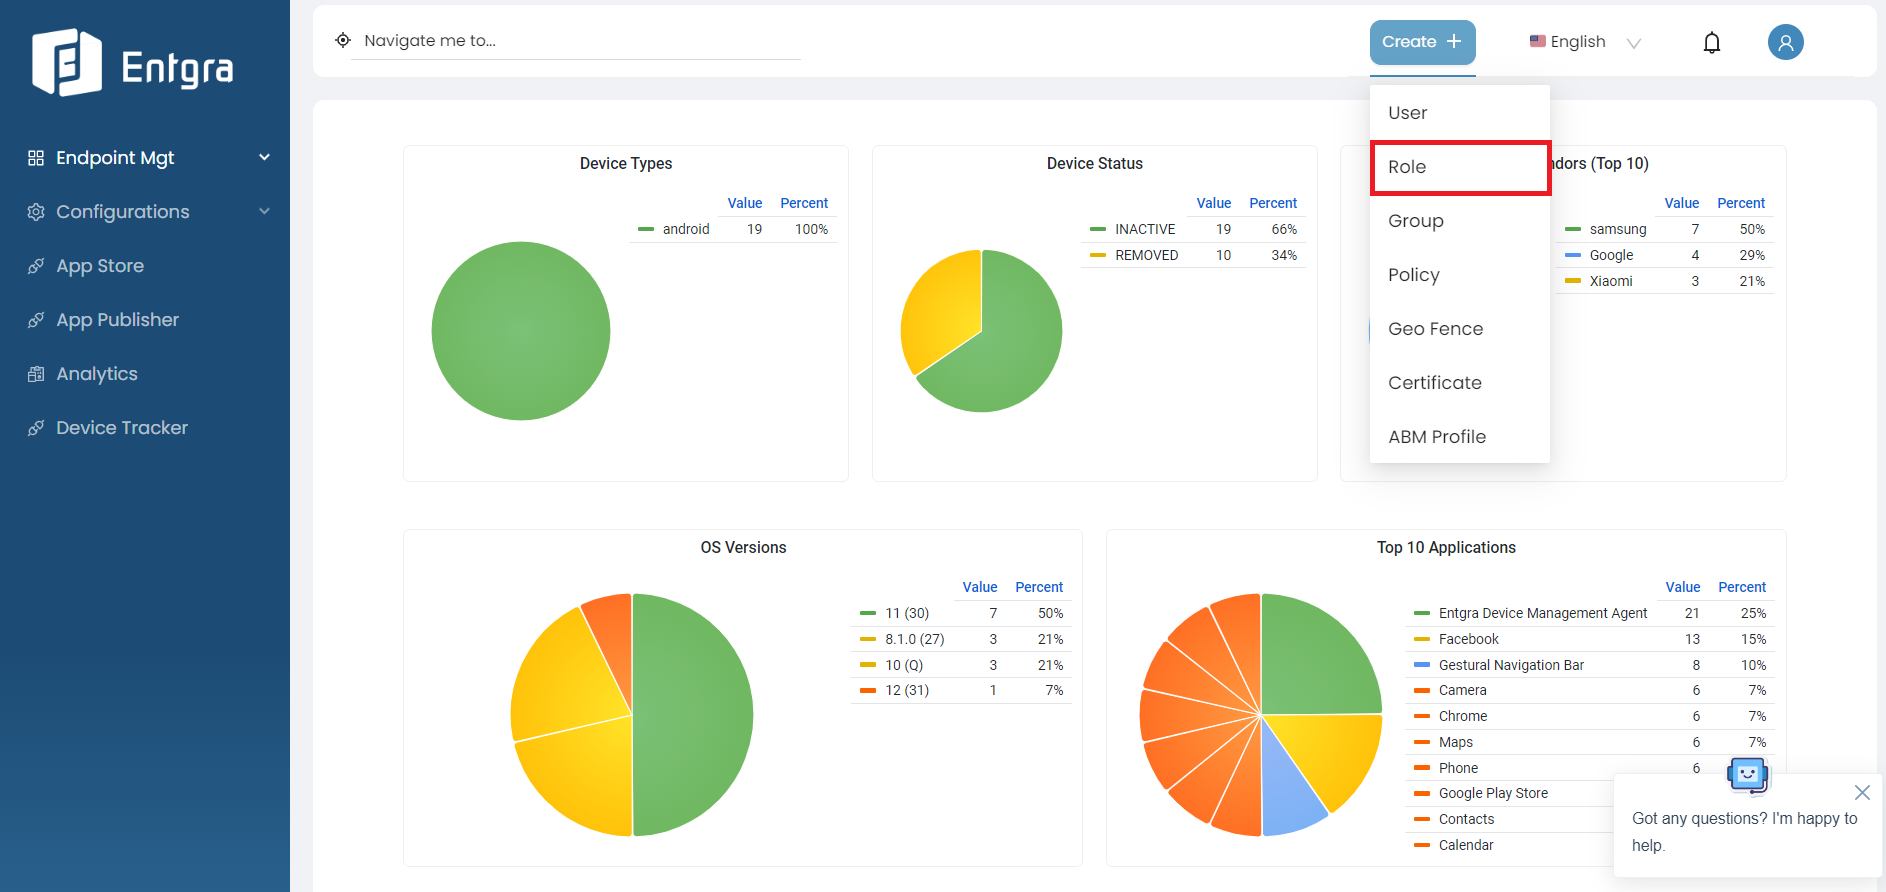
Click Create + in the top right corner and select User.
-
Provide the required details and click Add.
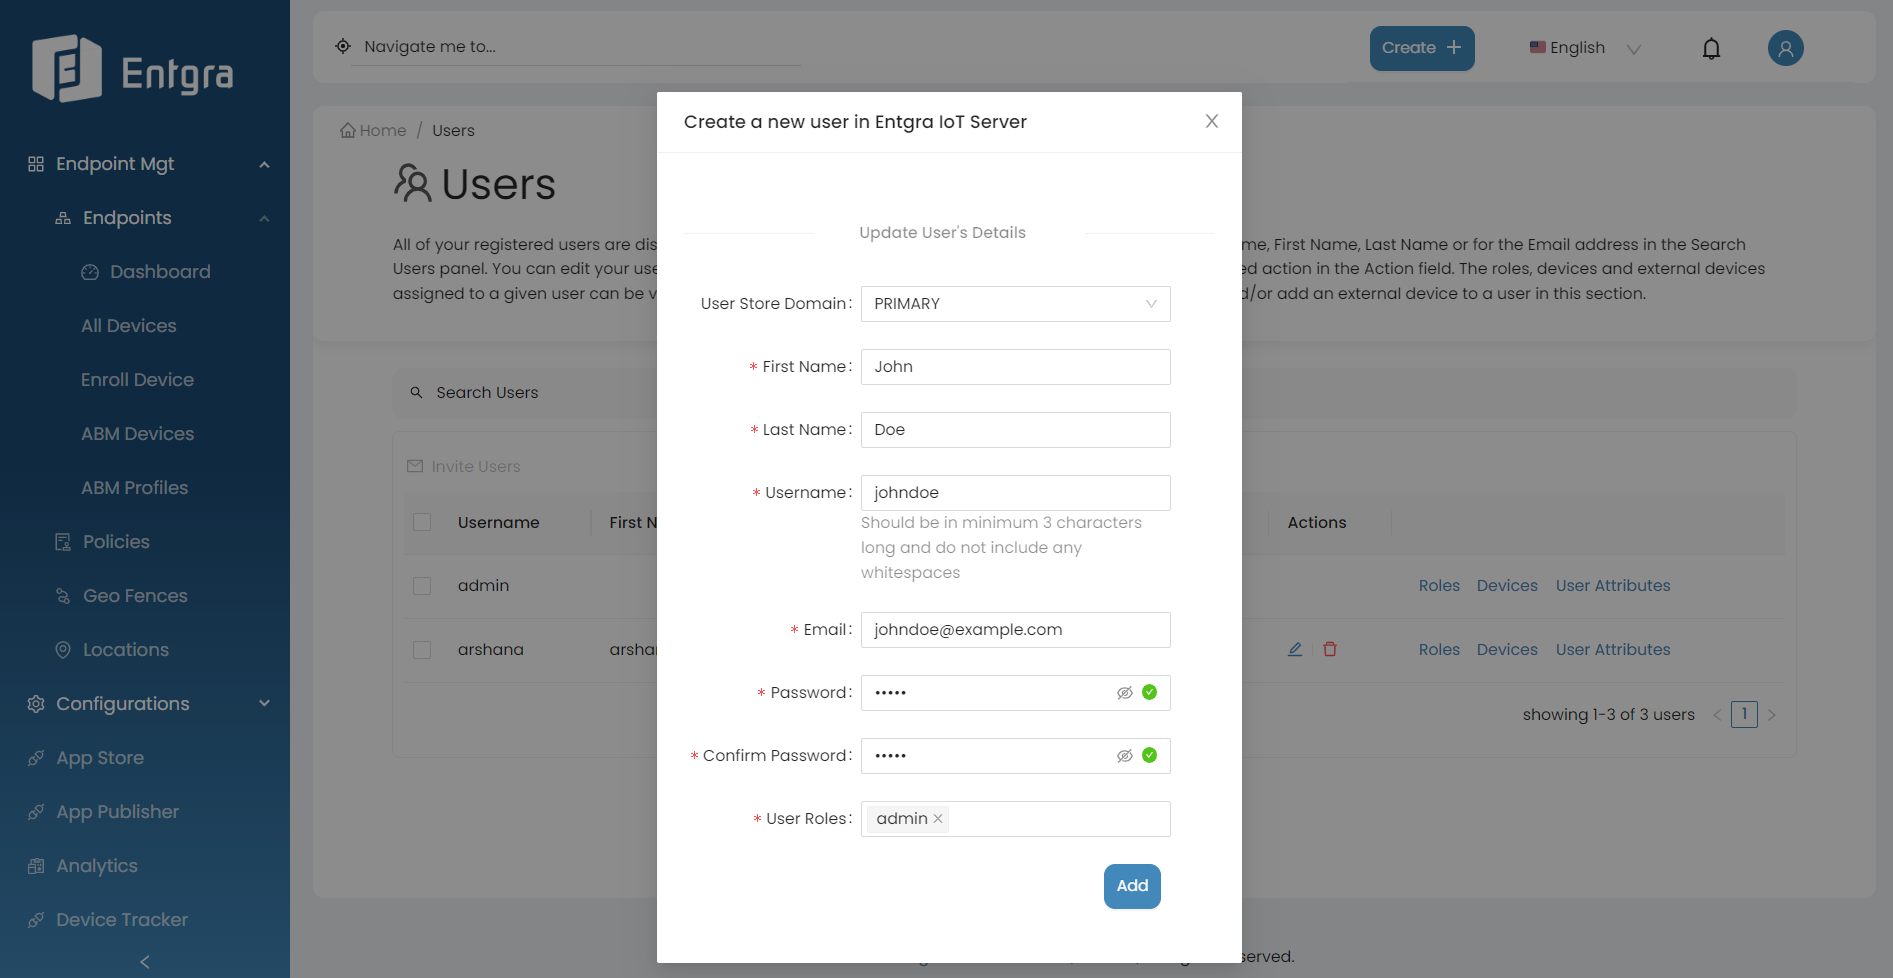
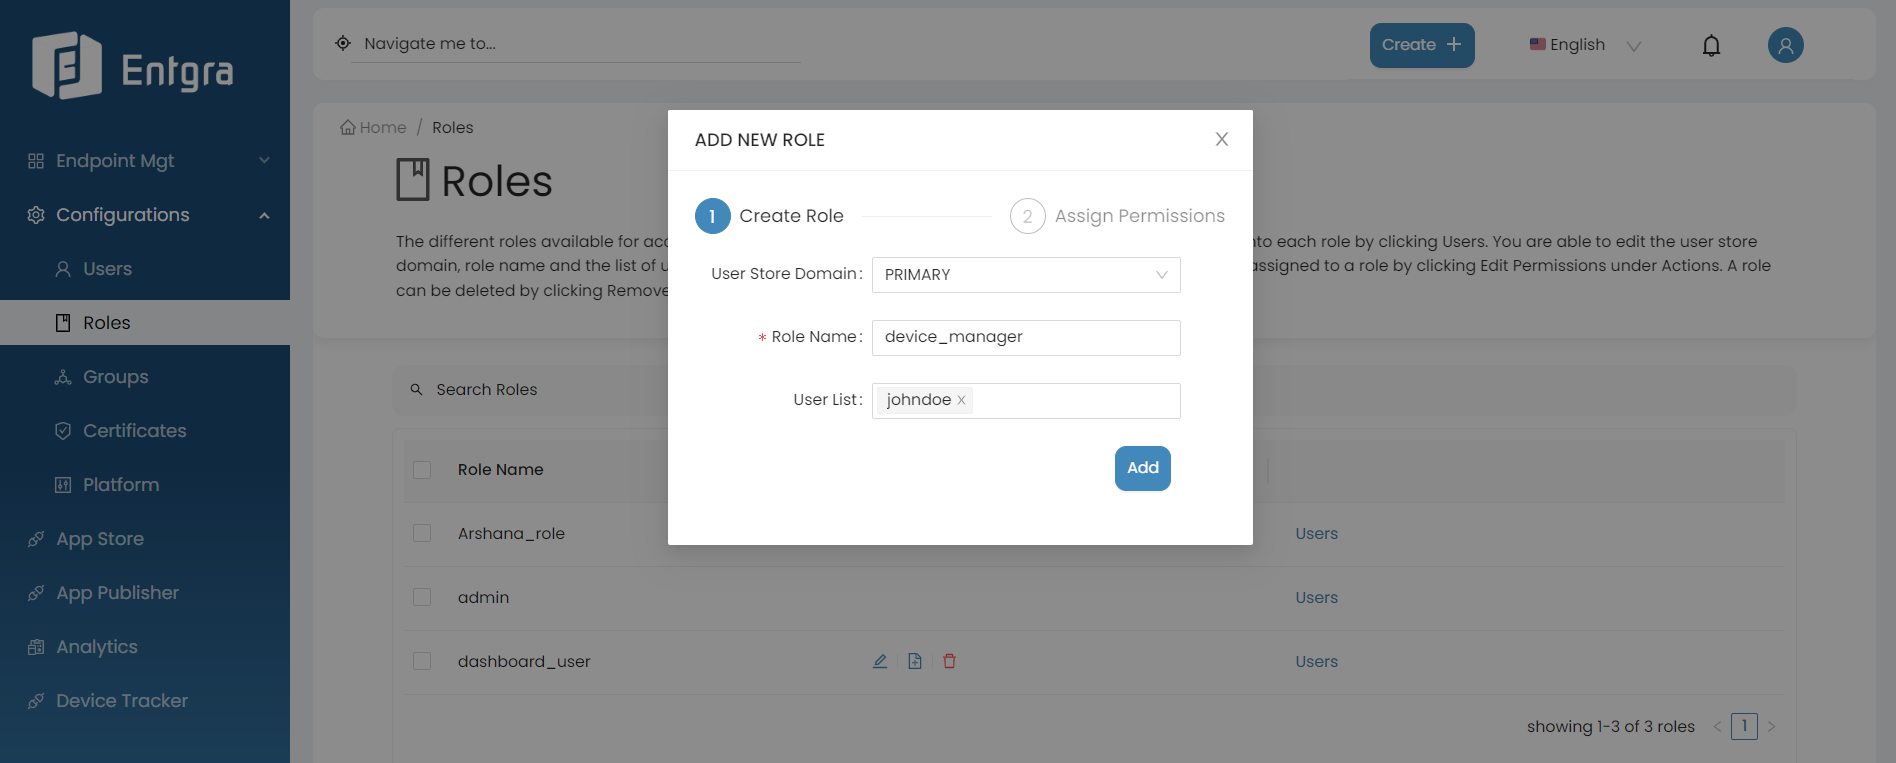
Field Description User Store Domain Specify the user store domain. First Name Provide the first name. Last Name Provide the last name. Username Provide the user name. This should be minimum 3 characters long and without any whitespaces. Email Address Provide the email address. Password Provide a passowrd. Confirm Password Re-type the password to confirm it. User Roles Specify the role of the user. A single user can can have many roles.
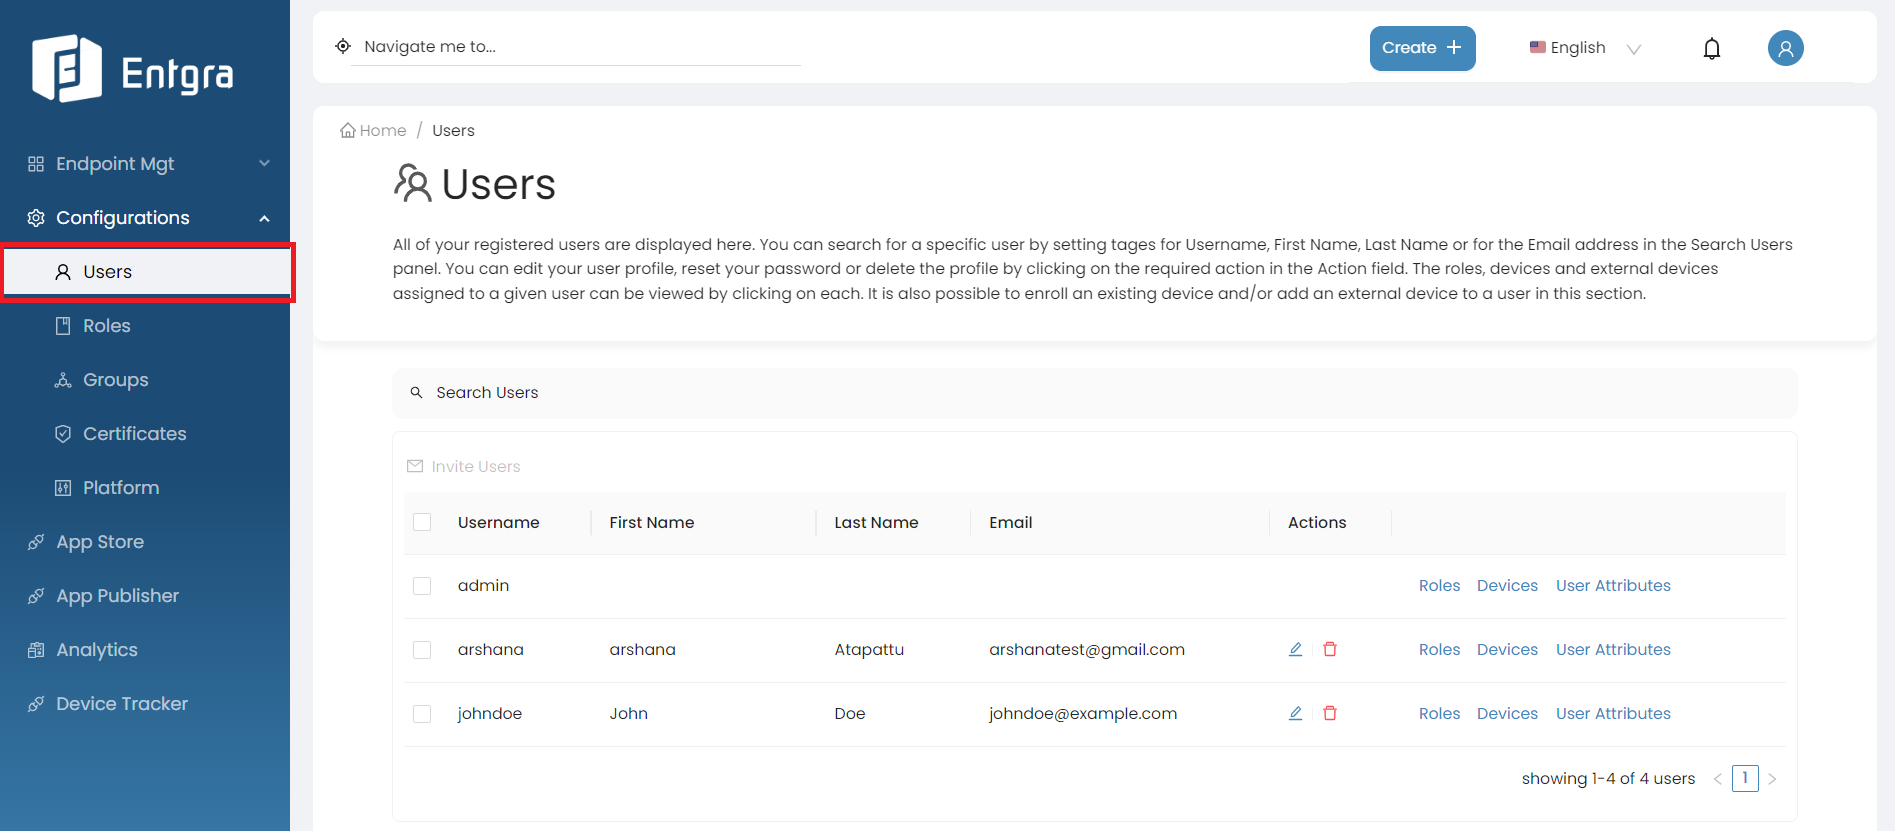
View Users
-
You can view existing users via the user table.
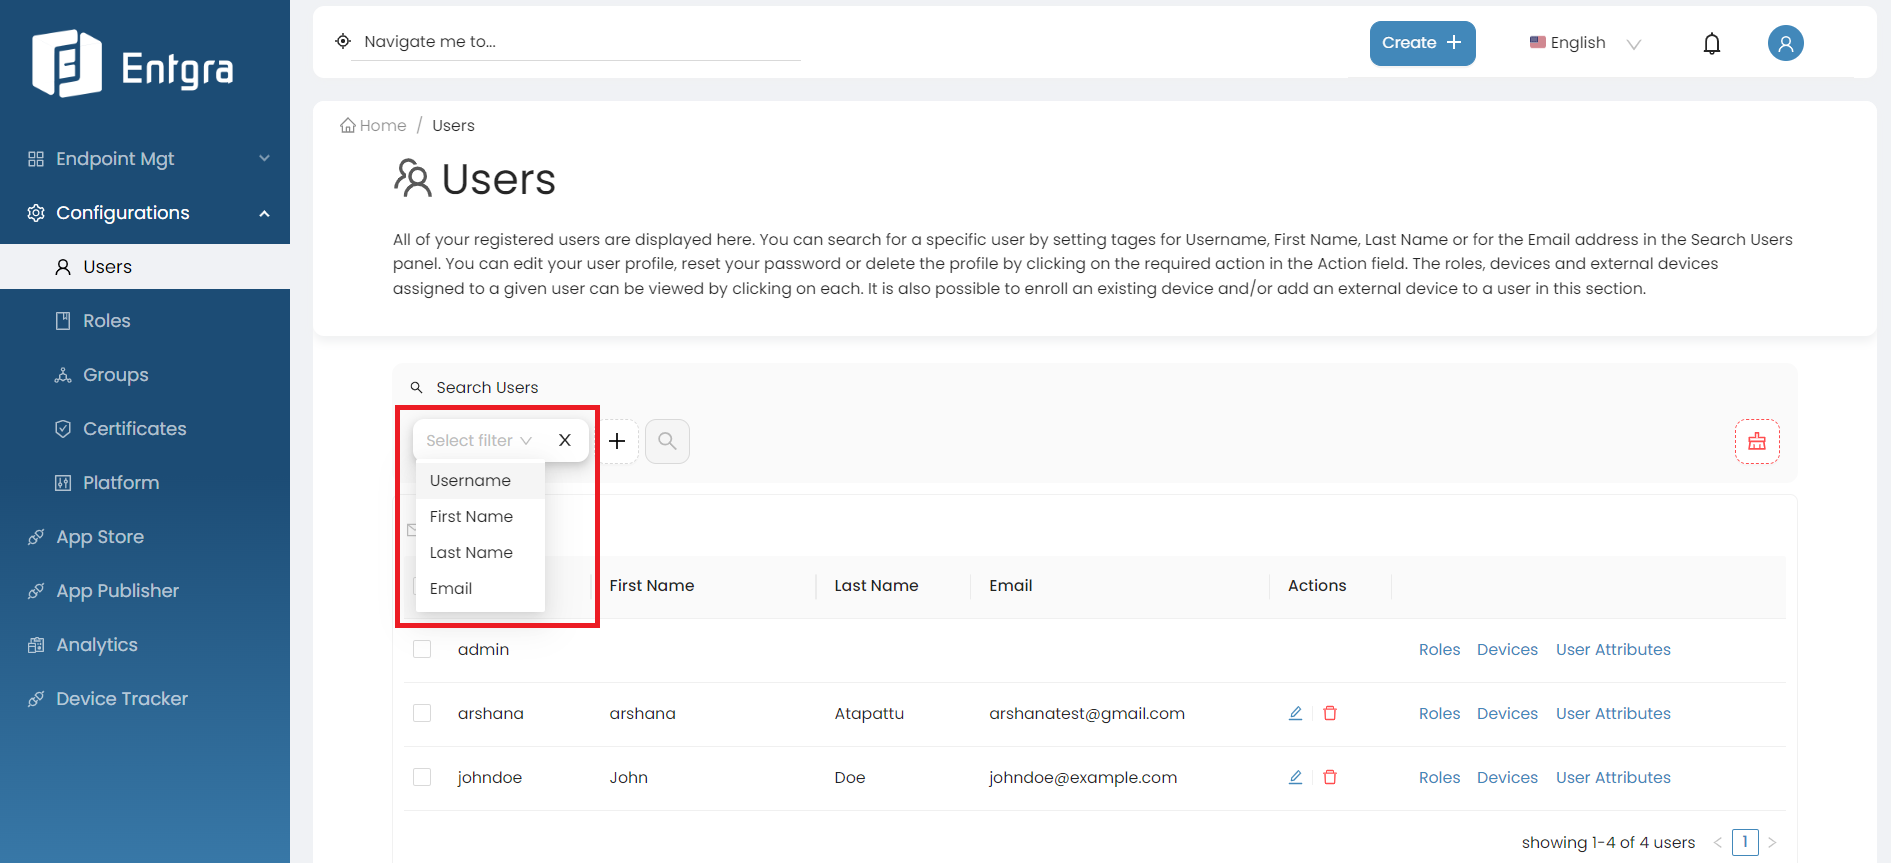
Search Users
-
Click on the Search Users bar on top of the users table.
-
Add the searching tags and then click Search.
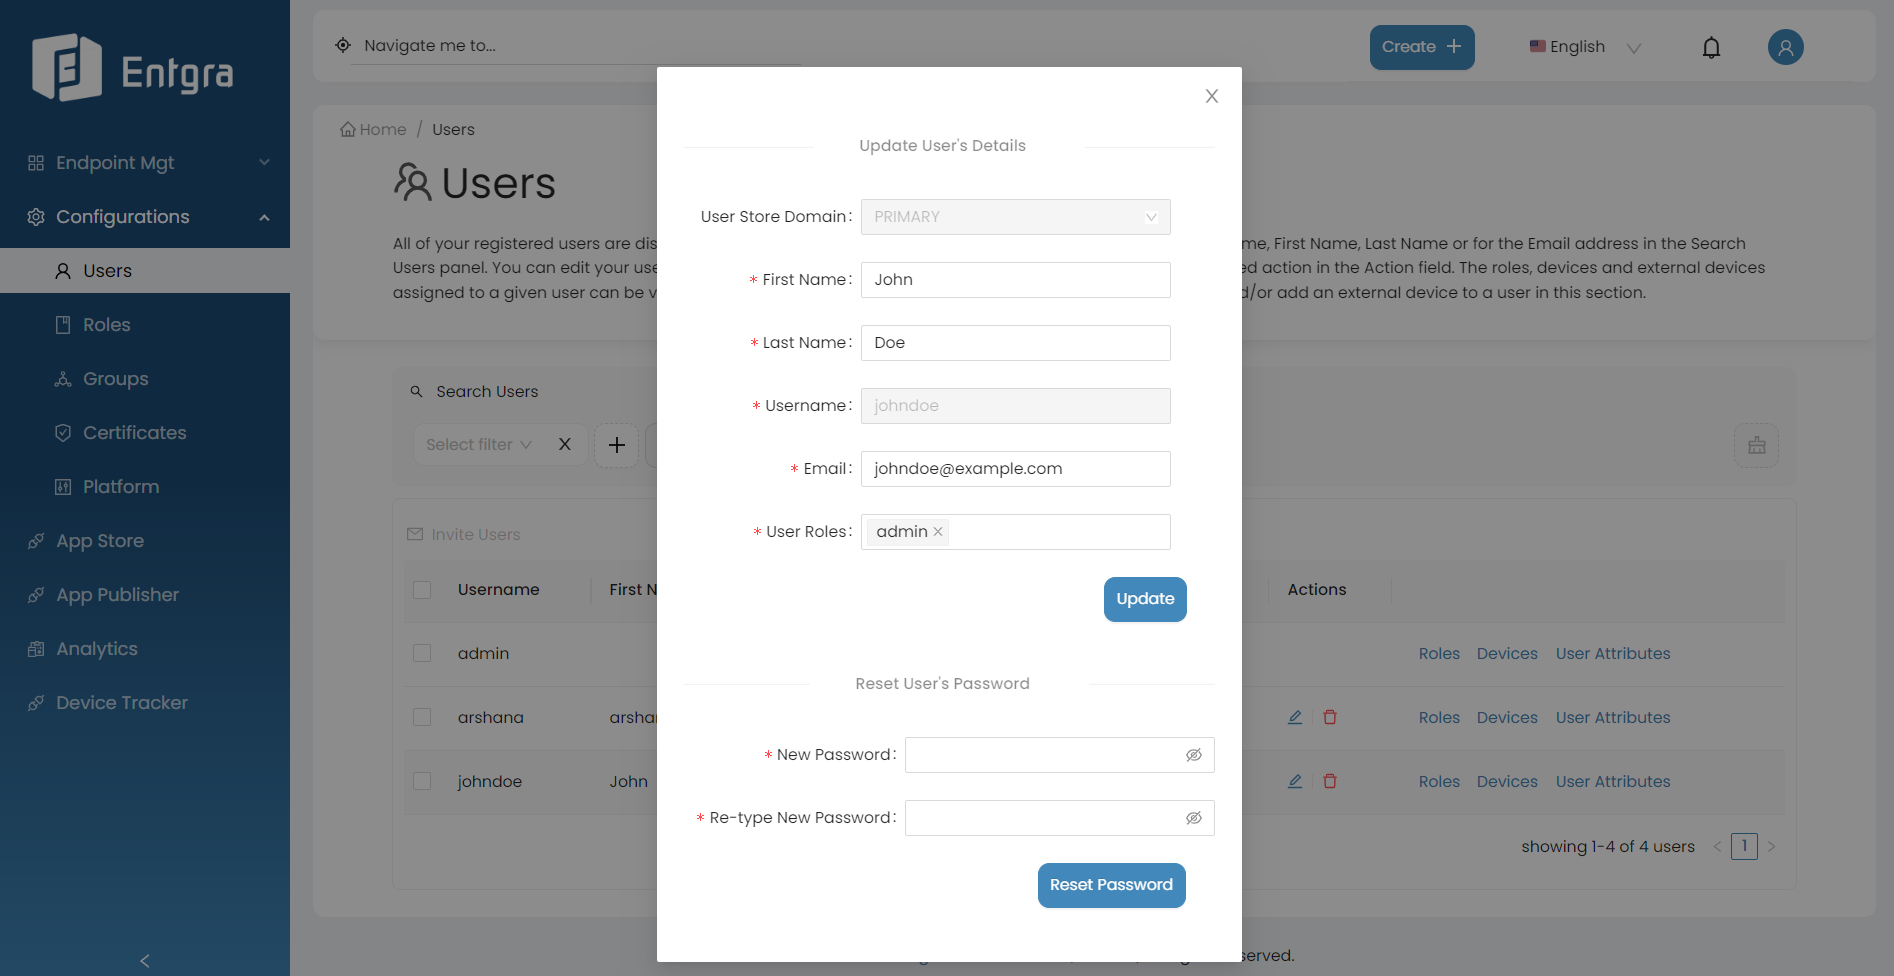
Update Users
- Go to Actions section of the user you want to update.
- Click Edit User.
- Edit the required fields and click Update.
-
If you wish to reset the password, add the new password and click Reset Password.
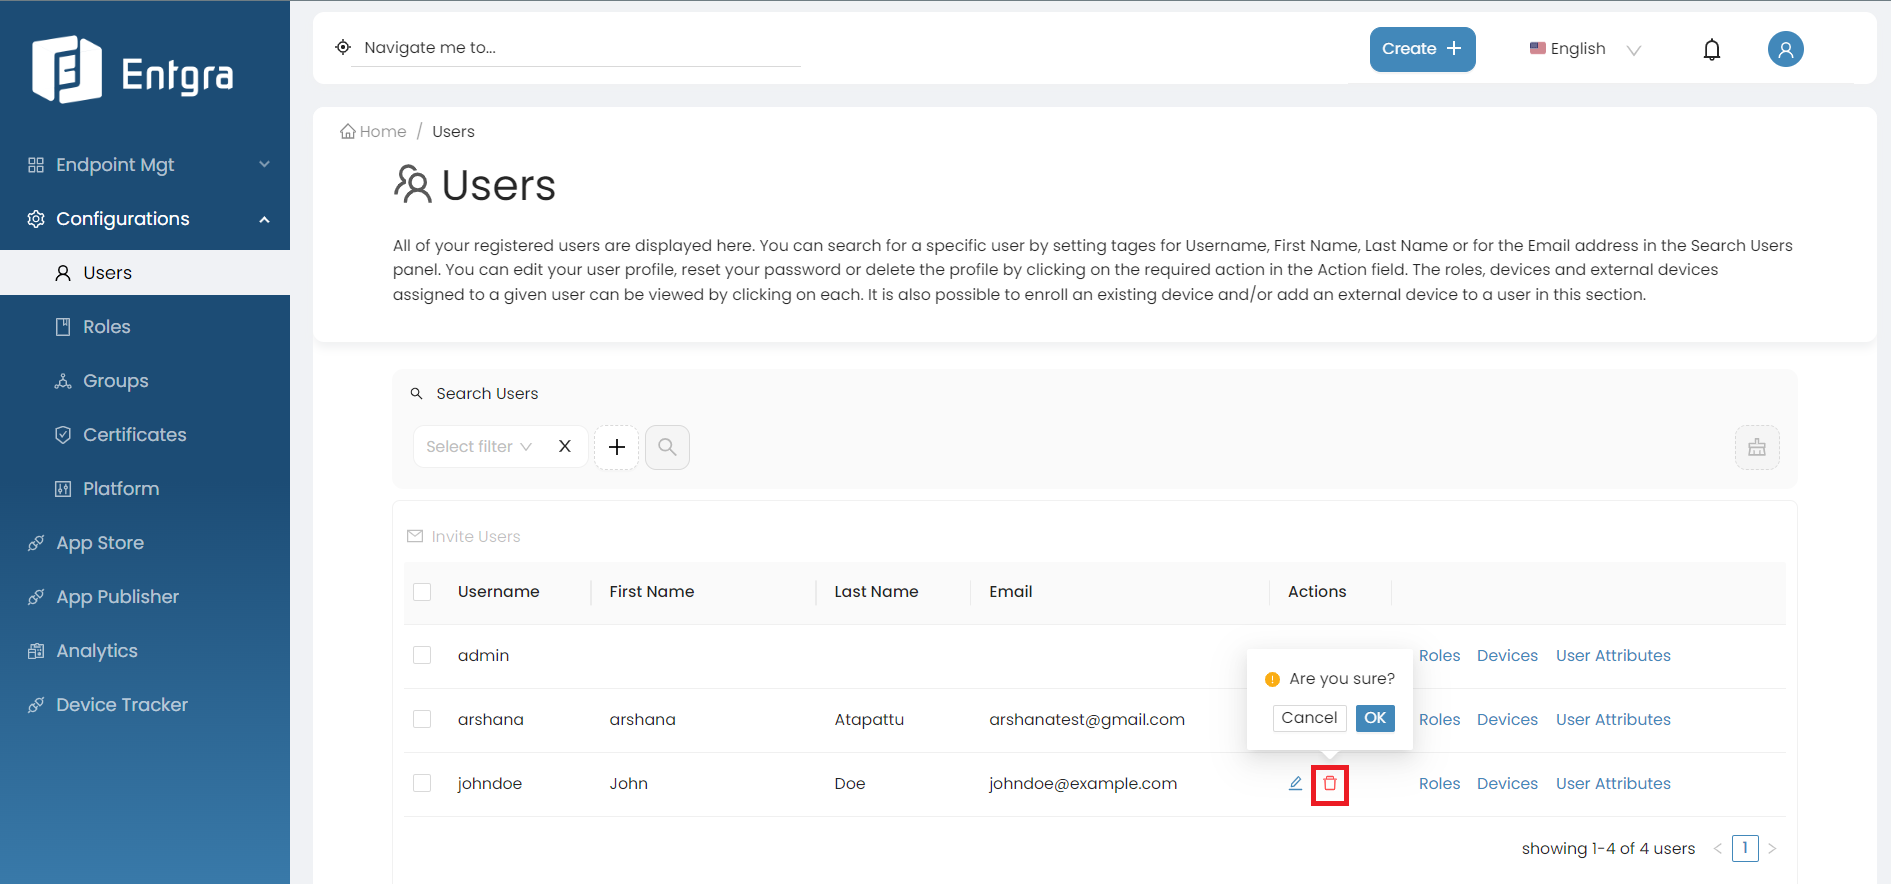
Remove Users
- Go to the Users tab in the navigation bar.
- Go to the Actions section of the user you want to remove.
-
Click Remove Role.
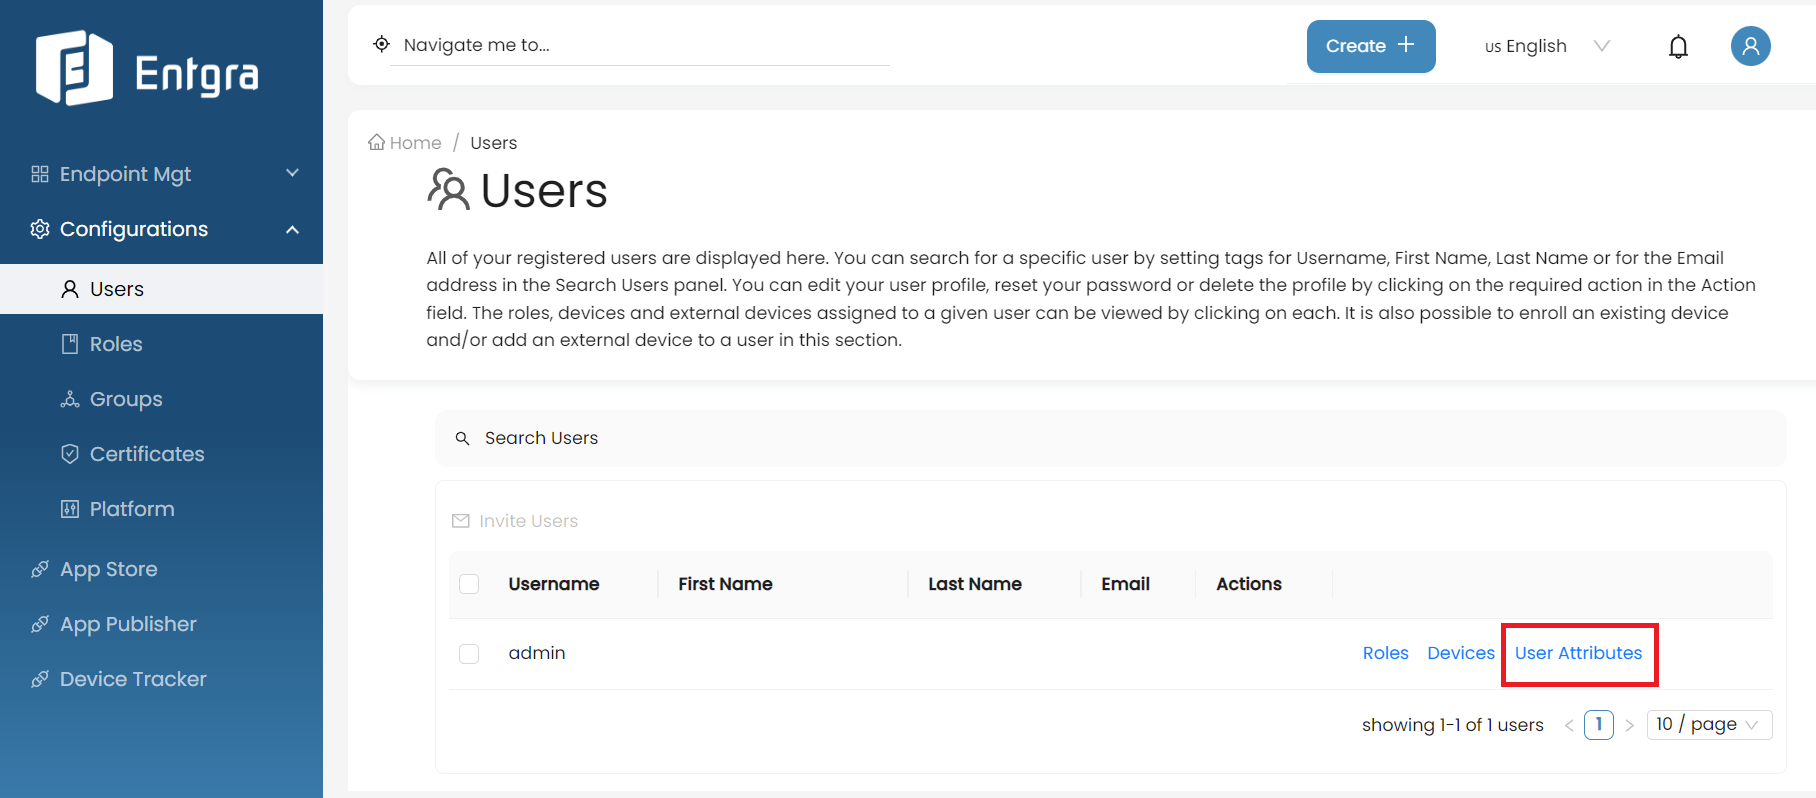
User Attributes
- Go to the Users tab in the navigation bar.
- Go to the Actions section of the user you want to remove.
-
Click User Attributes.
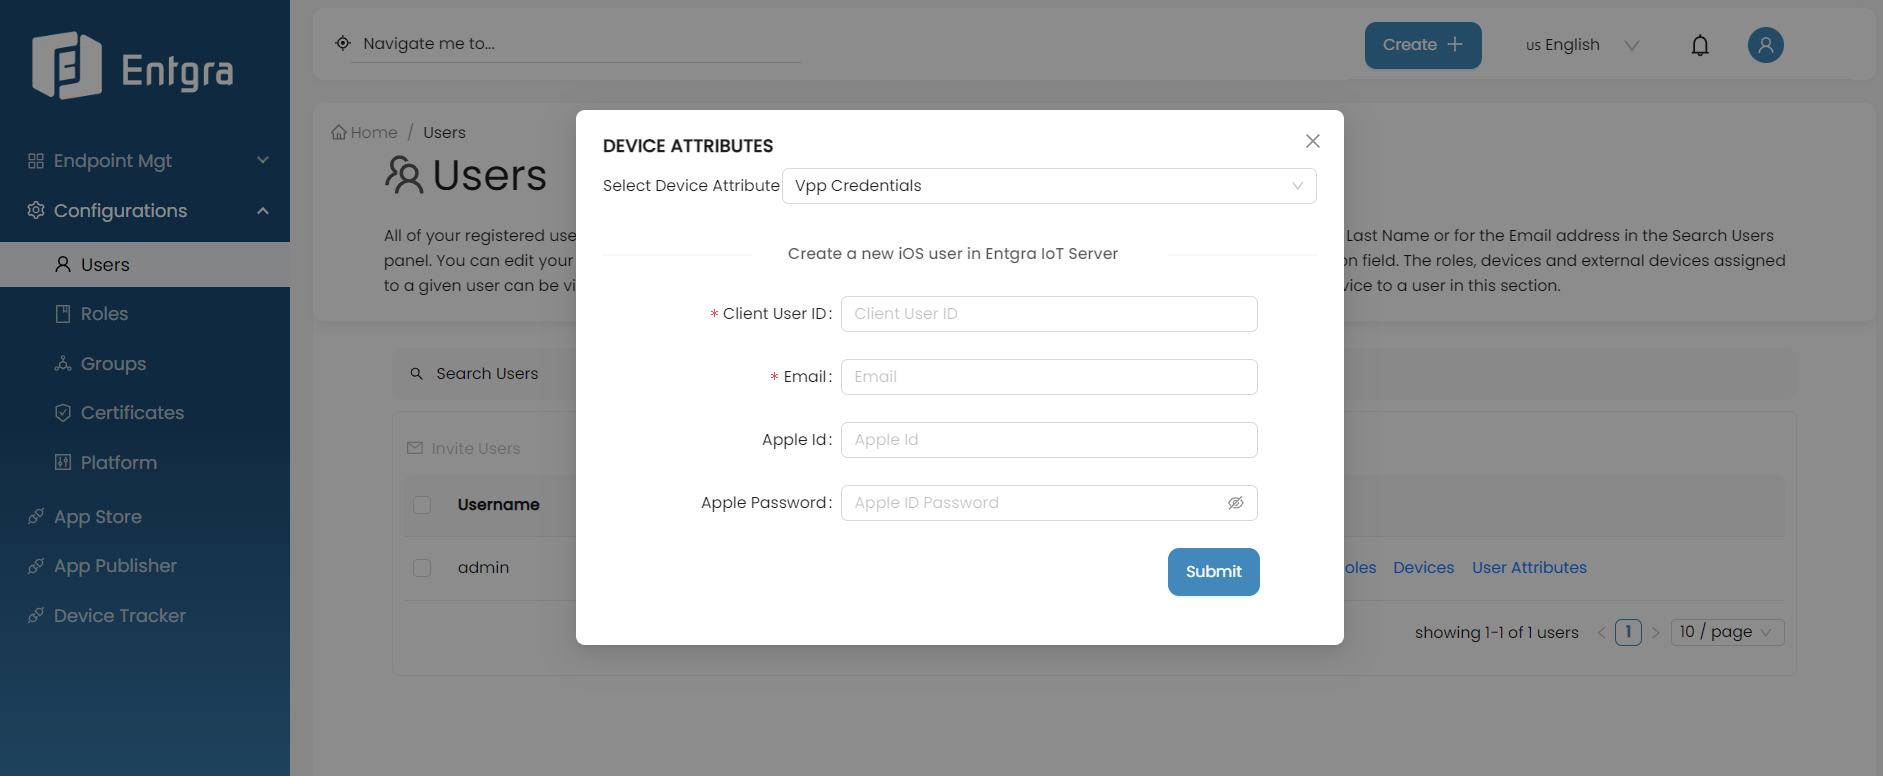
Create a new iOS user in the Entgra UEM Server
- Select VPP Credentials from the dropdown menu.
-
Next, fill in the required fields and submit the form. (The Apple ID and Apple Password refer to the individual account credentials of your Apple account.)
Manage Roles
Entgra UEM Server is shipped with a set of default roles. However, if required, tenant administrators are able to create new customized roles. Tenant administrators can use roles to manage the users and their devices, while end users allocated with device operation permissions can manage their own devices via the Entgra UEM Server Console. Administrators can create roles, assign them to a user or a group of users, and edit or delete existing roles.
Add New Roles and Assigning Permissions
Follow the instructions below to add a role:
-
Sign in to the Entgra UEM Server console.
-
Click Create + in the top right corner and select Role.
-
Provide the required details and click Add.
-
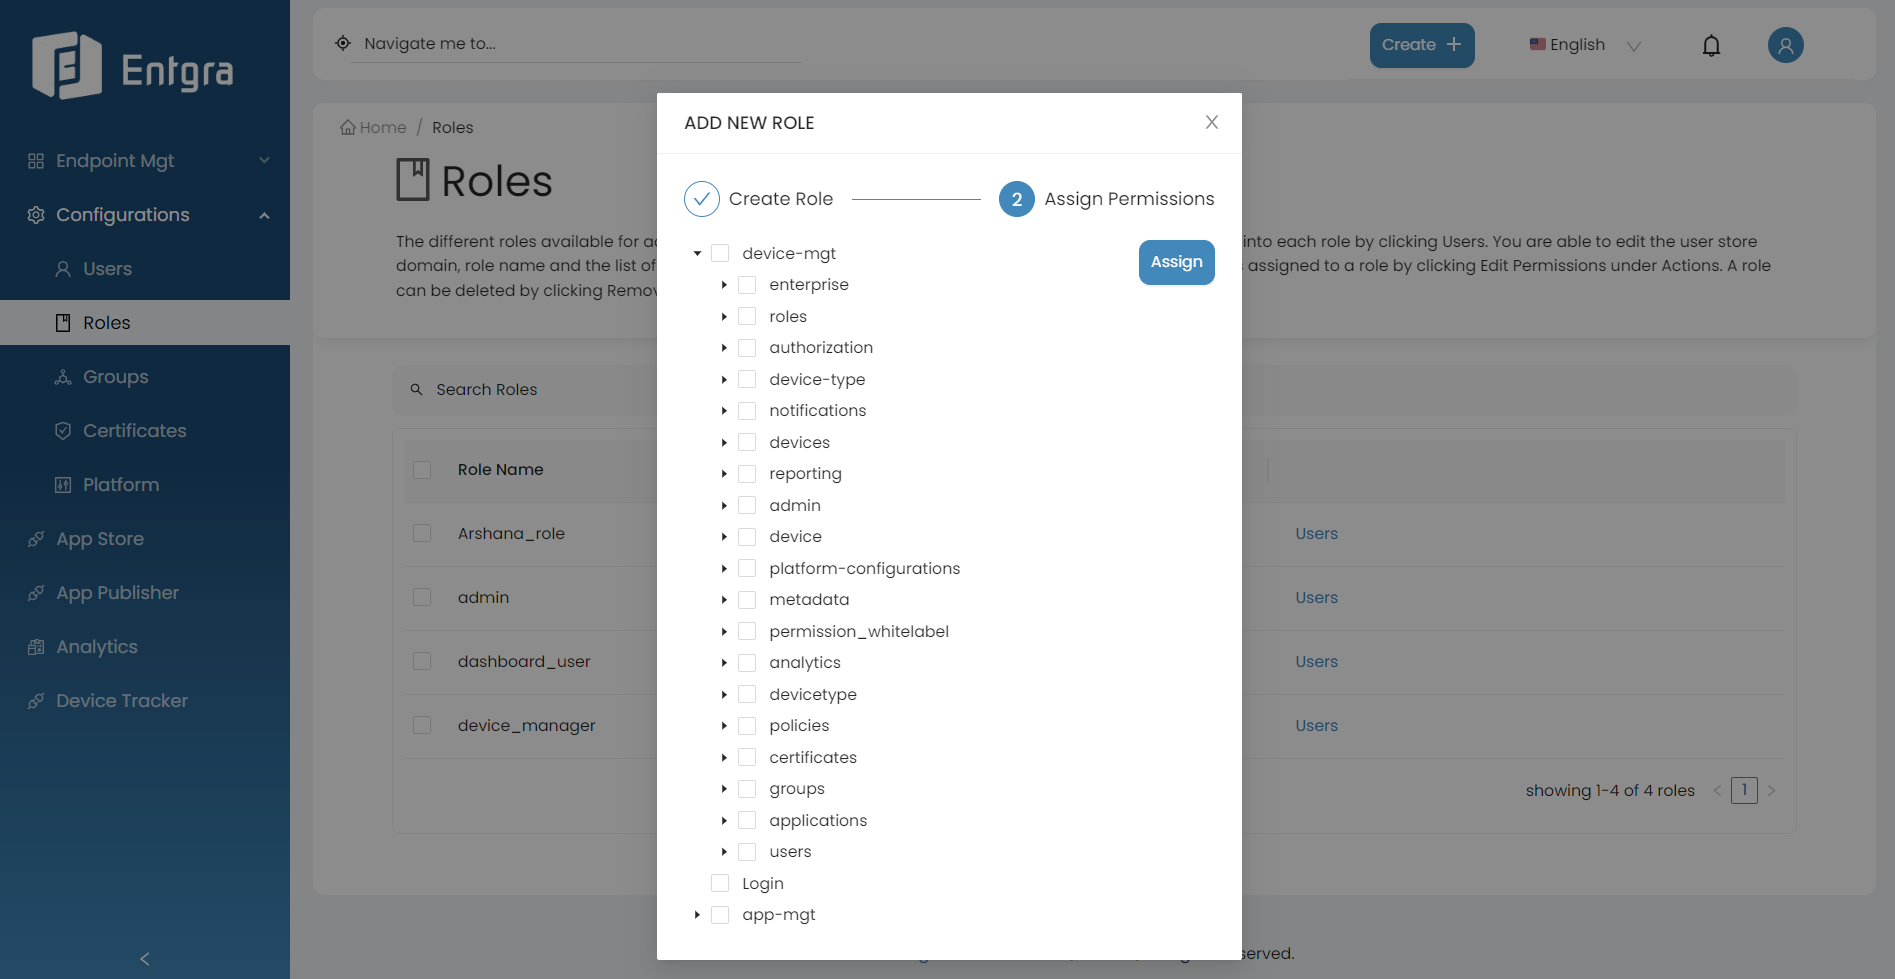
Define the permissions that need to be associated with the role you created by selecting the permissions from the permission tree.
Device Management Permissions
Permissions related to Android Enterprise Services
Permission Description device-mgt/enterprise/user/modify Permission to access the API for the management of enterprise users in the system device-mgt/enterprise/user/view Permission to access the API for viewing enterprise users in the system Permissions related to User Role Management Services
Permission Description device-mgt/roles/combined-role/add Permission to access the API for adding a combined role device-mgt/roles/add Permission to access the API for adding a user role device-mgt/roles/view Permission to access the API for viewing a user role device-mgt/roles/view-permissions Permission to access the API for getting permission details of a role device-mgt/roles/update Permission to access the API for updating role details device-mgt/roles/view-details Permission to access the API for getting the list of roles device-mgt/roles/delete Permission to access the API for deleting a role device-mgt/roles/assign-user Permission to access the API for adding users to a role Permissions related to Device Authorization Administrative Service
Permission Description device-mgt/authorization/verify Permission to access the API that enable to verify authorization Permissions related to Device Type Management Services
Permission Description device-mgt/device-type/features/view Permission to access the API for retrieving feature details of a specific device type device-mgt/device-type/config/view Permission to access the API for retrieving configuration details of a specific device type device-mgt/device-type/view Permission to access the API that provides information about supported device platforms Permissions related to Device Notification Management Services
Permission Description device-mgt/notifications/view Permission to access the API for getting all device notification details device-mgt/notifications/update Permission to access the API for updating the device notification status Permissions related to User Device Management Services
Permission Description device-mgt/devices/dep/add Permission to access the API for enrolling devices with Apple Business Manager(ABM) device-mgt/devices/dep/view Permission to access the API for retrieving devices enrolled with ABM device-mgt/devices/disenroll/android Permission to access the API for disenrolling android devices device-mgt/devices/enroll/windows Permission to access the API for enrolling windows devices device-mgt/devices/enroll/ios Permission to access the API for enrolling ios devices device-mgt/devices/enroll/android Permission to access the API for enrolling android devices device-mgt/devices/any-device/permitted-action-under-owning-device Permission to access the API for displaying devices on the device listing page device-mgt/devices/view/sim Permission to access the API for viewing sim details device-mgt/devices/change-status Permission to access the change device status API device-mgt/devices/owning-device/view-analytics Permission to access the API to view analytics of owning devices device-mgt/devices/owning-device/delete Permission to access the API to delete the device specified by device id device-mgt/devices/owning-device/remote-session Permission to access the API to create a remote session connection device-mgt/devices/owning-device/manage-geo-fence Permission to access the API to manage geo fence on owning devices device-mgt/devices/owning-device/update Permission to access the API to update the device specified by device id device-mgt/devices/owning-device/activities/view Permission to access the API to get the details of device operations/activities device-mgt/devices/owning-device/search Permission to access the API to advanced search for devices device-mgt/devices/owning-device/modify Permission to access the API to modify a device device-mgt/devices/owning-device/policies/view Permission to access the API to get the details of the policy that is enforced on a device device-mgt/devices/owning-device/manage-alerts Permission to access the API to manage alerts device-mgt/devices/owning-device/features/view Permission to access the API to get feature details of a device device-mgt/devices/owning-device/add Permission to access the API to enroll a device device-mgt/devices/owning-device/remove Permission to access the API to remove a device device-mgt/devices/owning-device/operations/mac-os/shut-down Permission to access the shut down macOS devices API device-mgt/devices/owning-device/operations/mac-os/app-store-restriction Permission to access the API that enable app store restriction on macOS devices device-mgt/devices/owning-device/operations/mac-os/restart Permission to access the restrat macOS devices API device-mgt/devices/owning-device/operations/mac-os/login-window-preference Permission to access the API that allows adding preferences to the login window device-mgt/devices/owning-device/operations/view Permission to access the API to view device operation details device-mgt/devices/owning-device/operations/ios/enterprise-app Permission to access the API for adding enterprise applications device-mgt/devices/owning-device/operations/ios/vpn Permission to access the vpn API device-mgt/devices/owning-device/operations/ios/email Permission to access the email API device-mgt/devices/owning-device/operations/ios/per-app-vpn Permission to access the per app vpn API device-mgt/devices/owning-device/operations/ios/get-restrictions Permission to access the API for adding restrictions device-mgt/devices/owning-device/operations/ios/profile-list Permission to access the API for adding a profile list device-mgt/devices/owning-device/operations/ios/webclip Permission to access the API for setting a Web Clip on ios devices device-mgt/devices/owning-device/operations/ios/remove-profile Permission to access the API for removing a profile device-mgt/devices/owning-device/operations/ios/cal-subscription Permission to access the API for calendar subscription device-mgt/devices/owning-device/operations/ios/location Permission to access the location API device-mgt/devices/owning-device/operations/ios/wipe-data Permission to access the wipe data API device-mgt/devices/owning-device/operations/ios/applications Permission to access the view ios applications API device-mgt/devices/owning-device/operations/ios/wifi Permission to access the wifi API device-mgt/devices/owning-device/operations/ios/cellular Permission to access the cellular data API device-mgt/devices/owning-device/operations/ios/app-list Permission to access the application list API device-mgt/devices/owning-device/operations/ios/airplay Permission to access the API that enables airplay device-mgt/devices/owning-device/operations/ios/app-configurations Permission to access the app configuration API device-mgt/devices/owning-device/operations/ios/caldav Permission to access the API that enables CalDav device-mgt/devices/owning-device/operations/ios/passcode-policy Permission to access the passcode policy API device-mgt/devices/owning-device/operations/ios/external-profile Permission to access the API for adding an external profile device-mgt/devices/owning-device/operations/ios/store-app Permission to access the API for adding a store application device-mgt/devices/owning-device/operations/ios/install-font Permission to access the install font policy API device-mgt/devices/owning-device/operations/ios/restriction Permission to access the restriction policy API device-mgt/devices/owning-device/operations/ios/lock Permission to access the device lock policy API device-mgt/devices/owning-device/operations/ios/apn Permission to access the APN policy API device-mgt/devices/owning-device/operations/ios/app-attributes Permission to access the API for adding app attributes device-mgt/devices/owning-device/operations/ios/enterprise-wipe Permission to access the enterprise wipe policy API device-mgt/devices/owning-device/operations/ios/ldap Permission to access the API for adding LDAP device-mgt/devices/owning-device/operations/ios/boolean-setting Permission to access the boolean setting policy API device-mgt/devices/owning-device/operations/ios/device-info Permission to access the API related to device info device-mgt/devices/owning-device/operations/ios/app-lock Permission to access the API related to device app lock device-mgt/devices/owning-device/operations/ios/notification Permission to access the API related to notifications device-mgt/devices/owning-device/operations/ios/wallpaper Permission to access the API related to device wallpaper policy device-mgt/devices/owning-device/operations/ios/clear-passcode Permission to access the API related to clear passcode policy device-mgt/devices/owning-device/operations/ios/ring Permission to access the API related to ring device device-mgt/devices/owning-device/operations/ios/app-to-per-app-vpn Permission to access the API related to app policyto per app VPN policy device-mgt/devices/owning-device/operations/ios/remove-app Permission to access the API related to remove apps on ios device device-mgt/devices/owning-device/operations/ios/global-proxy Permission to access the API related to global proxy setting policy device-mgt/devices/owning-device/operations/android/change-LockTask Permission to access the API related to change lock task policy device-mgt/devices/owning-device/operations/android/update-default-sim Permission to access the API for updating the default sim device-mgt/devices/owning-device/operations/android/mute Permission to access the API related to mute android device device-mgt/devices/owning-device/operations/android/vpn Permission to access the API related to VPN setting policy device-mgt/devices/owning-device/operations/android/display-message Permission to access the API related to display message policy device-mgt/devices/owning-device/operations/android/global-proxy Permission to access the API related to global proxy setting policy device-mgt/devices/owning-device/operations/android/logcat Permission to access the API related to logcat device-mgt/devices/owning-device/operations/android/device-theme-audio Permission to access the API related to device theme audio device-mgt/devices/owning-device/operations/android/file-transfer Permission to access the API related to file transfering device-mgt/devices/owning-device/operations/android/update-app Permission to access the API related to update apps on android devices device-mgt/devices/owning-device/operations/android/change-lock-code Permission to access the API related to change lock code on android device device-mgt/devices/owning-device/operations/android/webclip Permission to access the API for setting a Web Clip on Android devices device-mgt/devices/owning-device/operations/android/encrypt Permission to access the API related to encryption policy device-mgt/devices/owning-device/operations/android/enterprise-wipe Permission to access the API related to enterprise wipe device-mgt/devices/owning-device/operations/android/password-policy Permission to access the API related to password policy device-mgt/devices/owning-device/operations/android/alternate-install Permission to access the API related to alternate app installation policy device-mgt/devices/owning-device/operations/android/clear-password Permission to access the API related to clear password on android device device-mgt/devices/owning-device/operations/android/send-app-conf Permission to access the API related to send application configurations to android device device-mgt/devices/owning-device/operations/android/camera Permission to access the API related to camera on android device device-mgt/devices/owning-device/operations/android/upgrade Permission to access the API for upgrading firmware of Android devices device-mgt/devices/owning-device/operations/android/wipe Permission to access the API related to wipe android device device-mgt/devices/owning-device/operations/android/suspend-package Permission to access the API for suspending packages on Android devices device-mgt/devices/owning-device/operations/android/authenticate-account Permission to access the API for removing accounts on Android devices device-mgt/devices/owning-device/operations/android/clear-application-data Permission to access the API related to clear application data on android device device-mgt/devices/owning-device/operations/android/google-account Permission to access the API for adding a google account on Android devices device-mgt/devices/owning-device/operations/android/reboot Permission to access the API related to reboot android device device-mgt/devices/owning-device/operations/android/unlock Permission to access the API related to unlock android device device-mgt/devices/owning-device/operations/android/applications Permission to access the API related to android device applications device-mgt/devices/owning-device/operations/android/ring Permission to access the API related to ring android device device-mgt/devices/owning-device/operations/android/location Permission to access the API related to android device location device-mgt/devices/owning-device/operations/android/dvice-theme-wallpaper Permission to access the API related to device theme wallpaper policy device-mgt/devices/owning-device/operations/android/info Permission to access the API related to android device information device-mgt/devices/owning-device/operations/android/lock Permission to access the API related to lock android device device-mgt/devices/owning-device/operations/android/wifi Permission to access the API related to wifi setting on android device device-mgt/devices/owning-device/operations/android/send-notification Permission to access the API related to send notifications to android device device-mgt/devices/owning-device/operations/android/uninstall-app Permission to access the API related to uninstall applications on android device device-mgt/devices/owning-device/operations/android/blacklist-app Permission to access the API related to blacklist applications on android device device-mgt/devices/owning-device/operations/android/install-app Permission to access the API related to install applications on android device device-mgt/devices/owning-device/operations/windows/ring Permission to access the API related to ring windows device device-mgt/devices/owning-device/operations/windows/enterprise-application Permission to access the API related to enterprise applications on windows device device-mgt/devices/owning-device/operations/windows/lock-reset Permission to access the API related to reset lock on windows device device-mgt/devices/owning-device/operations/windows/disenroll Permission to access the API related to disenroll windows device device-mgt/devices/owning-device/operations/windows/scan Permission to access the API for scanning windows device device-mgt/devices/owning-device/operations/windows/location Permission to access the APIs related to windows device location device-mgt/devices/owning-device/operations/windows/applications Permission to access the API related to applications on windows device device-mgt/devices/owning-device/operations/windows/reboot Permission to access the API related to reboot windows device device-mgt/devices/owning-device/operations/windows/wipe Permission to access the API related to wipe windows device device-mgt/devices/owning-device/operations/windows/lock Permission to access the API related to lock windows device device-mgt/devices/owning-device/apps/view Permission to access the API related to view installed application details of a device device-mgt/devices/owning-device/details/view Permission to access the API related to view details of a device device-mgt/devices/owning-device/compliance/view Permission to access the API related to view policy compliance details of a device device-mgt/devices/owning-device/event/modify Permission to access the API to add or delete event definition for device type device-mgt/devices/owning-device/event/publish Permission to access the API to publish device event device-mgt/devices/owning-device/event/view Permission to access the API to view events details of a device type device-mgt/devices/owning-device/ios/view Permission to access the API to view info of ios devices device-mgt/devices/owning-device/disenroll Permission to access the API to disenroll a device device-mgt/devices/owning-device/view Permission to access the API to view details of registered devices device-mgt/devices/sim/communication/deactivate Permission to access the API for deactivating SIM communication device-mgt/devices/sim/communication/activate Permission to access the API for activating SIM communication device-mgt/devices/sim/admin/enrol Permission to access the API for adding SIM card device-mgt/devices/sim/admin/update Permission to access the API for updating SIM card status device-mgt/devices/sim/admin/permanant-delete Permission to access the API for deleting SIM card permanently device-mgt/devices/sim/types/add Permission to access the API for adding SIM card types device-mgt/devices/sim/types/view Permission to access the API for retrieving SIM card types device-mgt/devices/sim/types/update Permission to access the API for updating SIM card types device-mgt/devices/enrollment_guide/view Permission to access the API for retrieving enrollment guide Permissions related to Device Management Admin Services
Permission Description device-mgt/admin/device-type/modify Permission to access the API to add or edit device type device-mgt/admin/device-type/view Permission to access the API to get details of a device type device-mgt/admin/device-type/config Permission to access the API to add platform configurations of a device type device-mgt/admin/certificates/verify Permission to access the API related to verify certificates device-mgt/admin/certificates/details Permission to access the API related to certificates details device-mgt/admin/certificates/delete Permission to access the API related to delete certificates device-mgt/admin/certificates/view Permission to access the API related to view certificates device-mgt/admin/certificates/add Permission to access the API related to add new certificates device-mgt/admin/groups/view Permission to access the API related to view groups device-mgt/admin/groups/count Permission to access the API related to count groups device-mgt/admin/groups/add Permission to access the API related to add new groups device-mgt/admin/applications/uninstall Permission to access the API related to uninstall an application (Internal API) device-mgt/admin/applications/install Permission to access the API related to install an application (Internal API) device-mgt/admin/devices/view Permission to access the API related to view details of devices device-mgt/admin/devices/usage/view Permission to access the API related to view usages of devices device-mgt/admin/devices/permanent-delete Permission to access the API related to permanently delete devices device-mgt/admin/devices/update enrollment Permission to access the API related to update enrollment device-mgt/admin/users/view Permission to access the API related to view users device-mgt/admin/users/delete Permission to access the API related to delete users device information Permission related to Device API Management Services
Permission Description device-mgt/device/api/subscribe Permission to access the API that enabling subscribe to APIs Permissions related to Grafana API Management Services
Permission Description device-mgt/permission_grafana/view Permission to access the API that required for Grafana iframes Permissions related to Configuration Management Services
Permission Description device-mgt/platform-configurations/windows/manage Permission to access the API for managing windows platform configurations device-mgt/platform-configurations/windows/view Permission to access the API for viewing windows platform configurations device-mgt/platform-configurations/android/view Permission to access the API for viewing android platform configurations device-mgt/platform-configurations/android/manage Permission to access the API for managing android platform configurations device-mgt/platform-configurations/ios/view Permission to access the API for viewing ios platform configurations device-mgt/platform-configurations/ios/manage Permission to access the API for managing ios platform configurations device-mgt/platform-configurations/view Permission to access the API for viewing general platform configurations device-mgt/platform-configurations/manage Permission to access the API for managing general platform configurations Permissions related to Device Metadata Management Services
Permission Description device-mgt/metadata/view Permission to access the API for viewing metadata device-mgt/metadata/remove Permission to access the API for removing metadata device-mgt/metadata/update Permission to access the API for updating metadata device-mgt/metadata/create Permission to access the API for creating metadata Permissions related to Whitelabel Management Services
Permission Description device-mgt/permission-whitelabel/update Permission to access the API for updating whitelabel device-mgt/permission-whitelabel/view Permission to access the API for retrieving whitelabel details Permissions related to Analytics Artifacts Management Services
Permission Description device-mgt/analytics/artifacts/stream/add Permission to access the API for creating event stream artifacts device-mgt/analytics/artifacts/stream/delete Permission to access the API for deleting event stream artifacts device-mgt/analytics/artifacts/publisher/add Permission to access the API for creating event publisher artifacts device-mgt/analytics/artifacts/publisher/delete Permission to access the API for deleting publisher artifacts device-mgt/analytics/artifacts/siddhi-script/add Permission to access the API for creating siddhi script artifacts device-mgt/analytics/artifacts/siddhi-script/delete Permission to access the API for deleting siddhi script artifacts device-mgt/analytics/artifacts/receiver/add Permission to access the API for creating event receiver artifacts device-mgt/analytics/artifacts/receiver/delete Permission to access the API for deleting event receiver artifacts Permissions related to Device Type Deployment Administrative Services
Permission Description device-mgt/devicetype/deploy Permission to access the API that enable device type to be deployed Permissions related to Policy Management Administrative Services
Permission Description device-mgt/policies/deactivate Permission to access API to deactivate a policy device-mgt/policies/view Permission to access the API to view all policies device-mgt/policies/view-details Permission to access the API to view all details of a policy device-mgt/policies/add Permission to access the API to add a new policy device-mgt/policies/view-effective-policy Permission to access the API to fetch effective policy device-mgt/policies/remove Permission to access the API to remove multiple policies device-mgt/policies/apply-changes Permission to access the API to apply changes on policies device-mgt/policies/update Permission to access the API to update a policy device-mgt/policies/update-priority Permission to access the API to update policy priority device-mgt/policies/activate Permission to access API to activate a policy Permissions related to Simple Certificate Enrollment Protocol (SCEP) Management Services
Permission Description device-mgt/certificates/manage Permission to access the API for Certificate Signing Request (CSR) Permissions related to Group Management Services
Permission Description device-mgt/groups/add Permission to access the add new group API device-mgt/groups/device-groups/view Permission to access API to view list of groups that have the device device-mgt/groups/specified-groups/view Permission to access API to view groups specified device-mgt/groups/device-types/view Permission to access API to view whether the groups has relevant device types device-mgt/groups/view Permission to access the API to get the list of groups belongs to current user device-mgt/groups/devices/count Permission to access the API to view list of device count in the device group device-mgt/groups/devices/view Permission to access the API to view list of devices in the device group device-mgt/groups/devices/assign Permission to access the API to assign devices to groups device-mgt/groups/devices/add Permission to access the API to add devices to groups device-mgt/groups/devices/remove Permission to access the API to remove devices from groups device-mgt/groups/remove Permission to access the API to remove a group device-mgt/groups/update Permission to access the API to update a group device-mgt/groups/share Permission to access the API to manage group sharing with a user device-mgt/groups/roles/view Permission to access the API to view roles of a group device-mgt/groups/count Permission to access the API to get the count of groups belongs to current user Permissions related to User Management Administrative Service
Permission Description device-mgt/users/details/view Permission to access the API to get details of a user device-mgt/users/existence/view Permission to access the API to get the User existence status device-mgt/users/delete Permission to access the API to delete a user device-mgt/users/search Permission to access the API to advanced search a user device-mgt/users/update Permission to access the API to update user details device-mgt/users/roles/view Permission to access the API to get the Role Details of a User device-mgt/users/invite Permission to access the API to send user invitations device-mgt/users/view Permission to access the view all users API device-mgt/users/add Permission to access the API to add new users device-mgt/users/count Permission to access the API to get the users count device-mgt/users/password/update Permission to access the API to change password App Management Permissions
Permissions related to Application Life Cycle Management Service
Permission Description app-mgt/life-cycle/application/approve Permission to access the API for updating the app status to 'approve' stage app-mgt/life-cycle/application/create Permission to access the API for updating the app status to 'create' stage app-mgt/life-cycle/application/reject Permission to access the API for updating the app status to 'reject' stage app-mgt/life-cycle/application/block Permission to access the API for updating the app status to 'block' stage app-mgt/life-cycle/application/review Permission to access the API for updating the app status to 'review' stage app-mgt/life-cycle/application/retire Permission to access the API for updating the app status to 'retire' stage app-mgt/life-cycle/application/deprecate Permission to access the API for updating the app status to 'deprecate' stage app-mgt/life-cycle/application/publish Permission to access the API for updating the app status to 'publish' stage Permissions related to App Store Management Service
Permission Description app-mgt/store/application/view Permission to access the API for retrieving app store applications app-mgt/store/application/modify Permission to access the API for modifying app store applications app-mgt/store/review/update Permission to access the API for updating app store reviews app-mgt/store/review/view Permission to access the API for retrieving app store reviews app-mgt/store/subscription/install Permission to access the API for installing applications via store app-mgt/store/subscription/uninstall Permission to access the API for uninstalling applications via store app-mgt/store/admin/subscription/view Permission to access the API for retrieving app store subscriptions app-mgt/store/admin/subscription/modify Permission to access the API for modifying app store subscriptions app-mgt/store/admin/review/update Permission to access the API for updating app store reviews app-mgt/store/vpp/assets/modify Permission to access the API for modifying VPP assets app-mgt/store/vpp/assets/view Permission to access the API for retrieving VPP assets app-mgt/store/vpp/user/modify Permission to access the API for modifying VPP users app-mgt/store/vpp/user/view Permission to access the API for retrieving VPP users Permissions related to App Publisher Management Service
Permission Description app-mgt/publisher/service-provider/application/view Permission to access the API for getting service provider application details app-mgt/publisher/service-provider/application/connect Permission to access the API for connecting to new identity server app-mgt/publisher/service-provider/application/detach Permission to access the API for removing an application from service provider app-mgt/publisher/service-provider/application/attach Permission to access the API for mapping an application from service provider app-mgt/publisher/service-provider/application/create Permission to access the API for creating an application and attaching (map) to service provider app-mgt/publisher/admin/review/view Permission to access the API that enable app publisher reviews to be viewed app-mgt/publisher/admin/application/update Permission to access the API that enable app publisher applications to be updated app-mgt/publisher/application/view Permission to access the API that enable app publisher applications to be viewed app-mgt/publisher/application/update Permission to access the API that enable app publisher applications to be updated Other Permissions
Permission Description Login Permission to access the API for logging into the portal Tenants/view Permission to access the API for getting details of device tenants
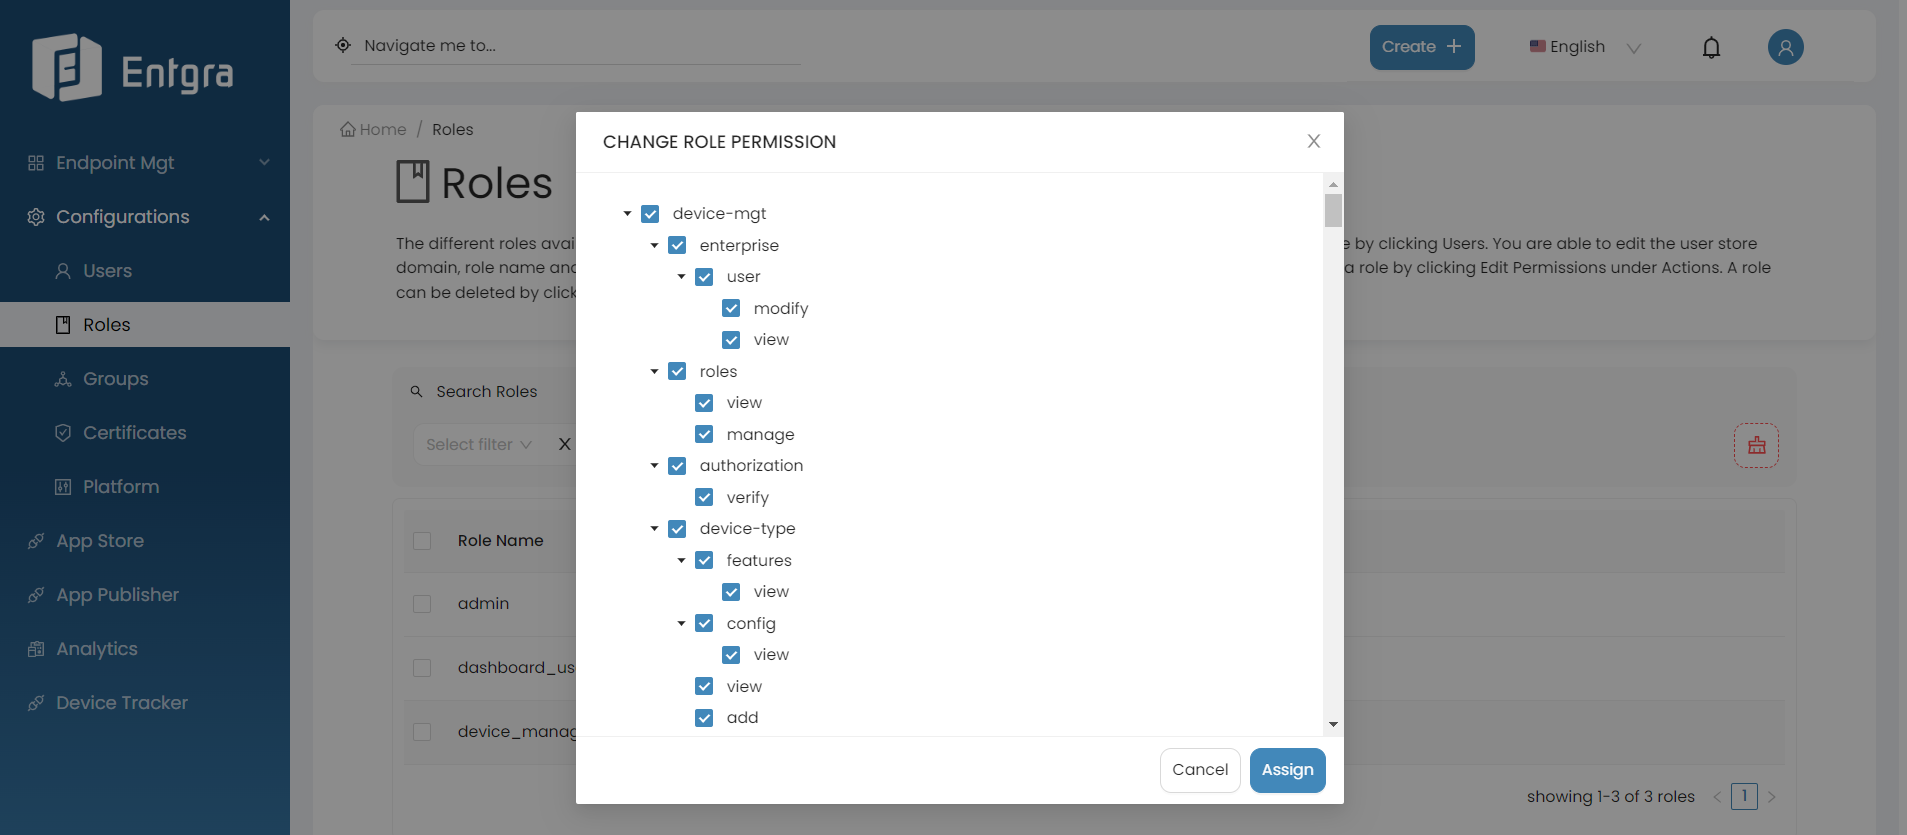
6 Click Assign.
Remove Roles
-
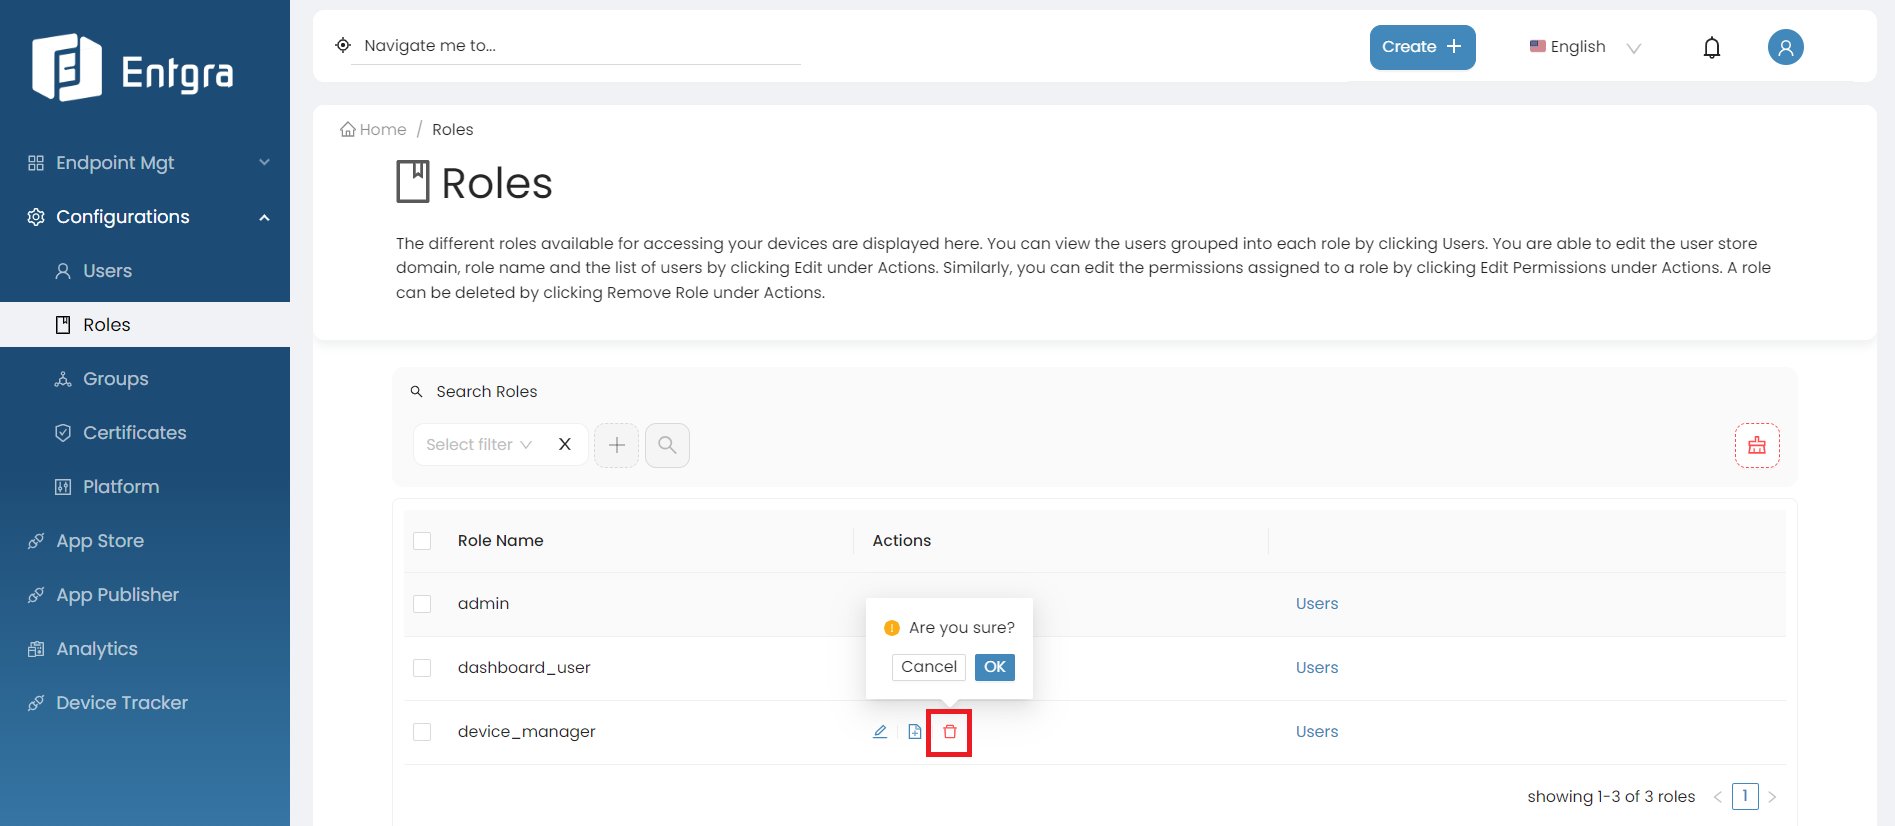
Go to the Roles tab in the navigation bar.
-
Go to the Actions section of the role you want to remove.
-
Click Remove Role.
Search Roles
-
Click on the Search Roles bar on top of the roles table.
-
Add the searching tags and then click Search.
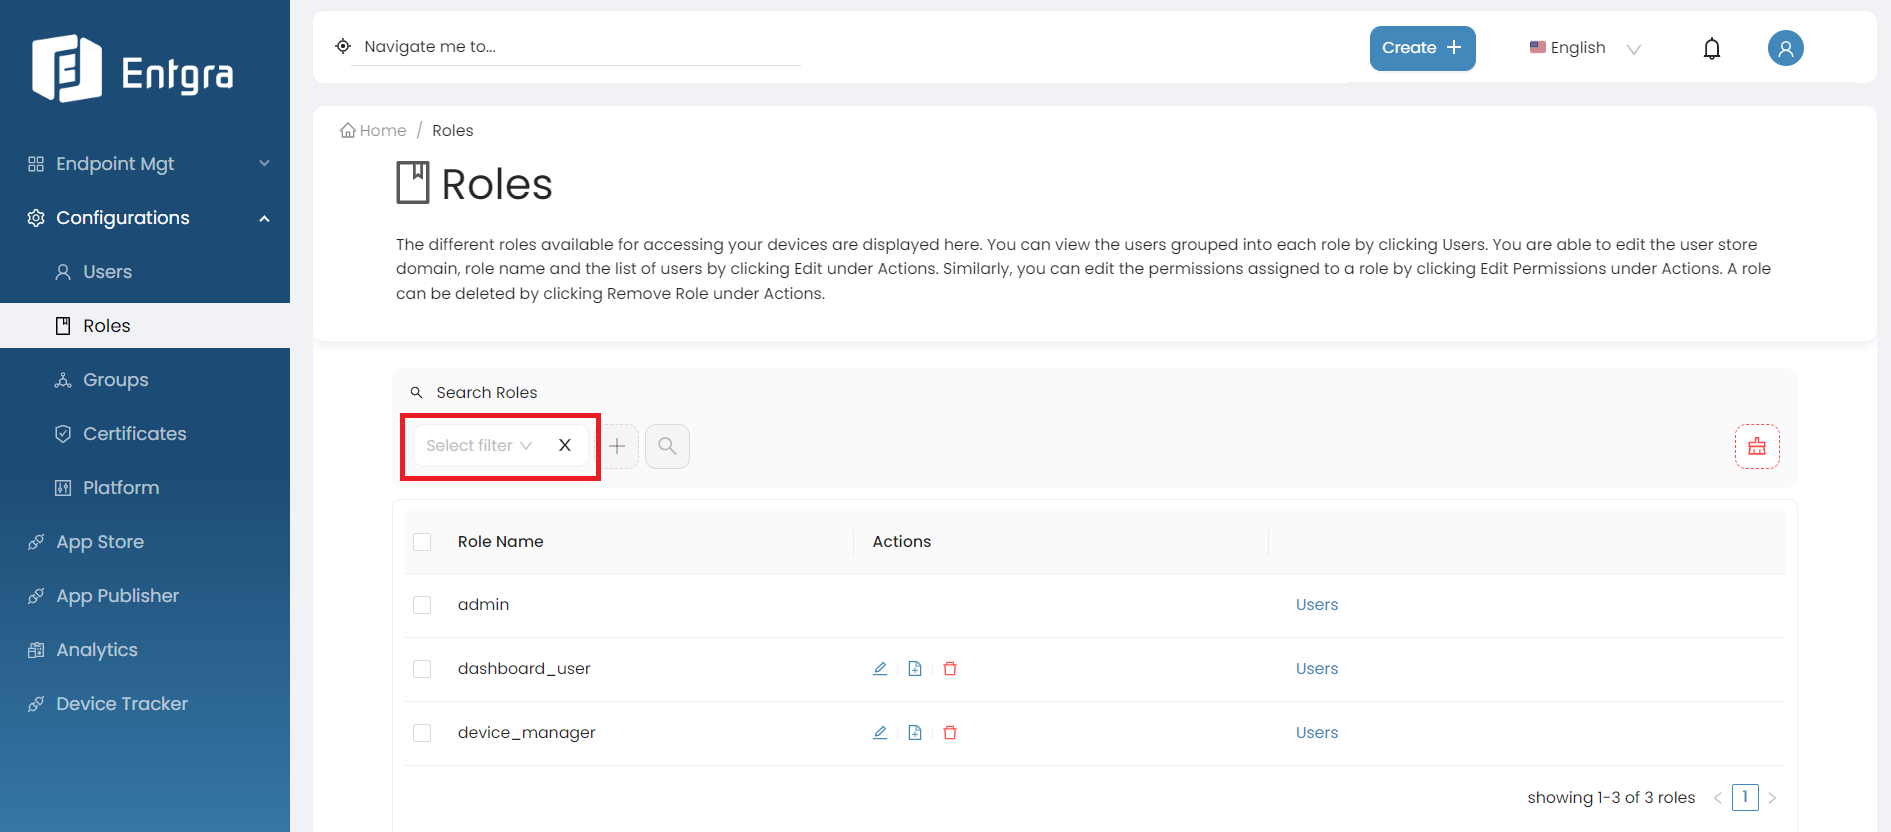
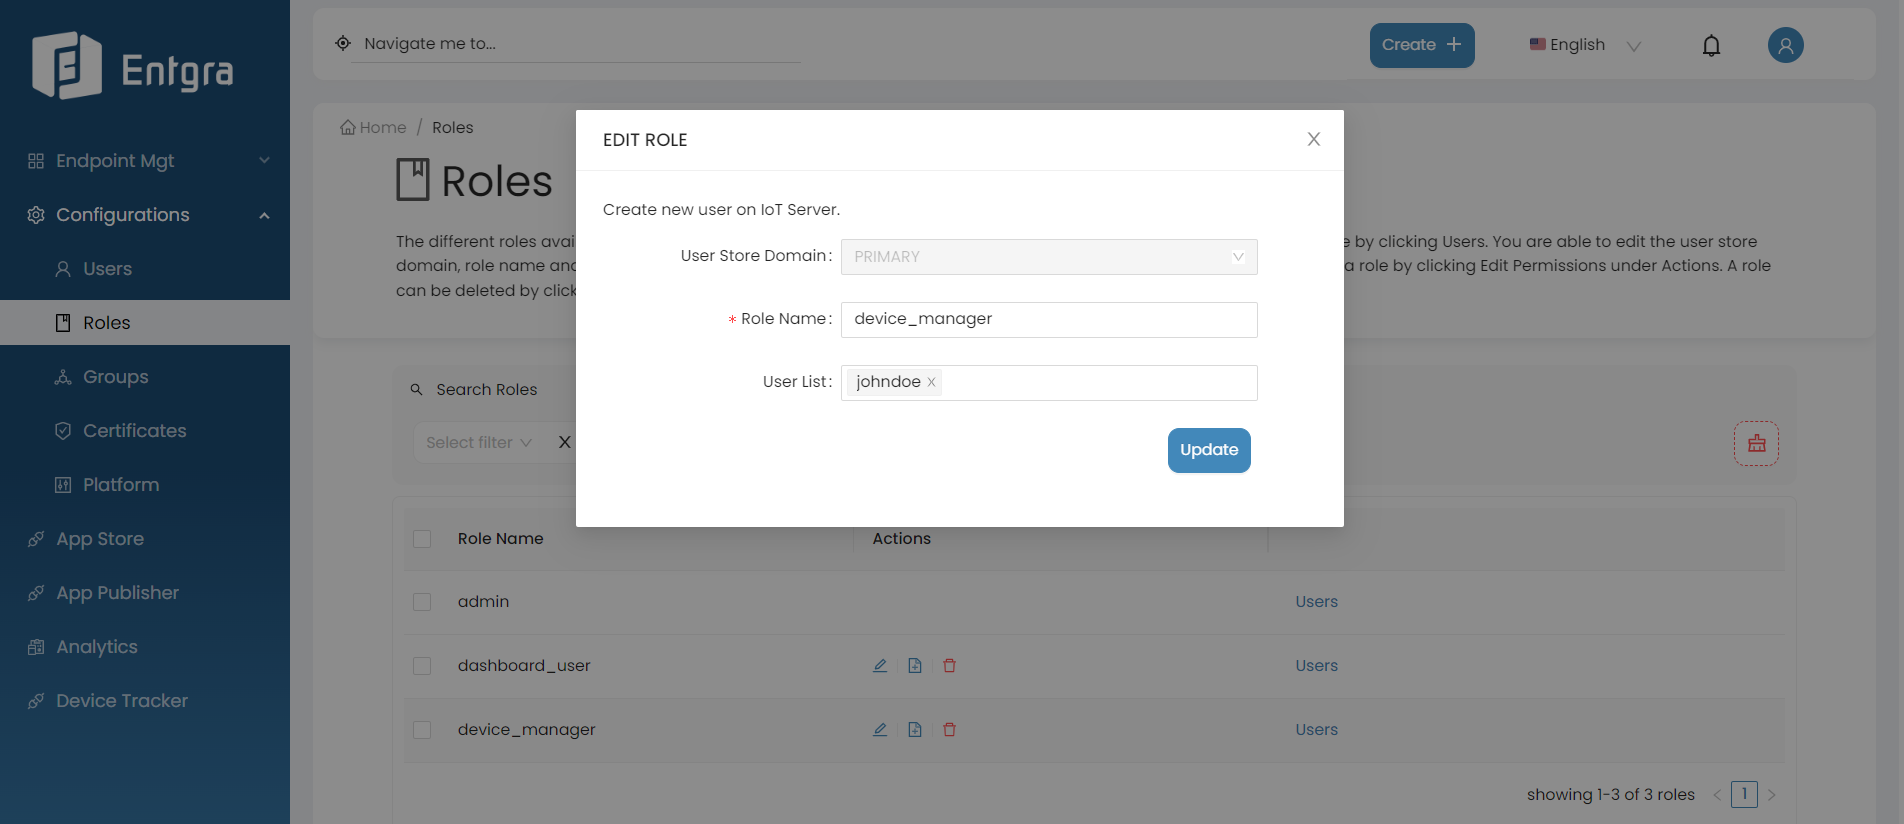
Update Roles
-
Go to the Actions section of the role you want to edit.
-
Click Edit Role.
-
Edit the required fields and click Update.
Update Role Permissions
-
Go to the Actions section of the role of which you want to update the permissions.
-
Click Edit Permissions button.
-
Add the required permissions and click Assign.
Default Roles and Permissions
By default, Entgra UEM Server includes a set of roles. These default roles and permissions have been explained in the following subsections.
Default User Roles
The admin role is available by default in Entgra UEM Server:
-
If you are defining the permissions for a UEM Server administrator who needs to perform operations and configure policies, make sure to select admin. The admin permission allows the user to perform operations and configure policies for devices.
-
If you wish to create a user with administrative permission other than the default administrator in Entgra UEM Server, follow the steps given below:
- Add a new a role.
- Configure role permissions by specifically selecting the admin permission.
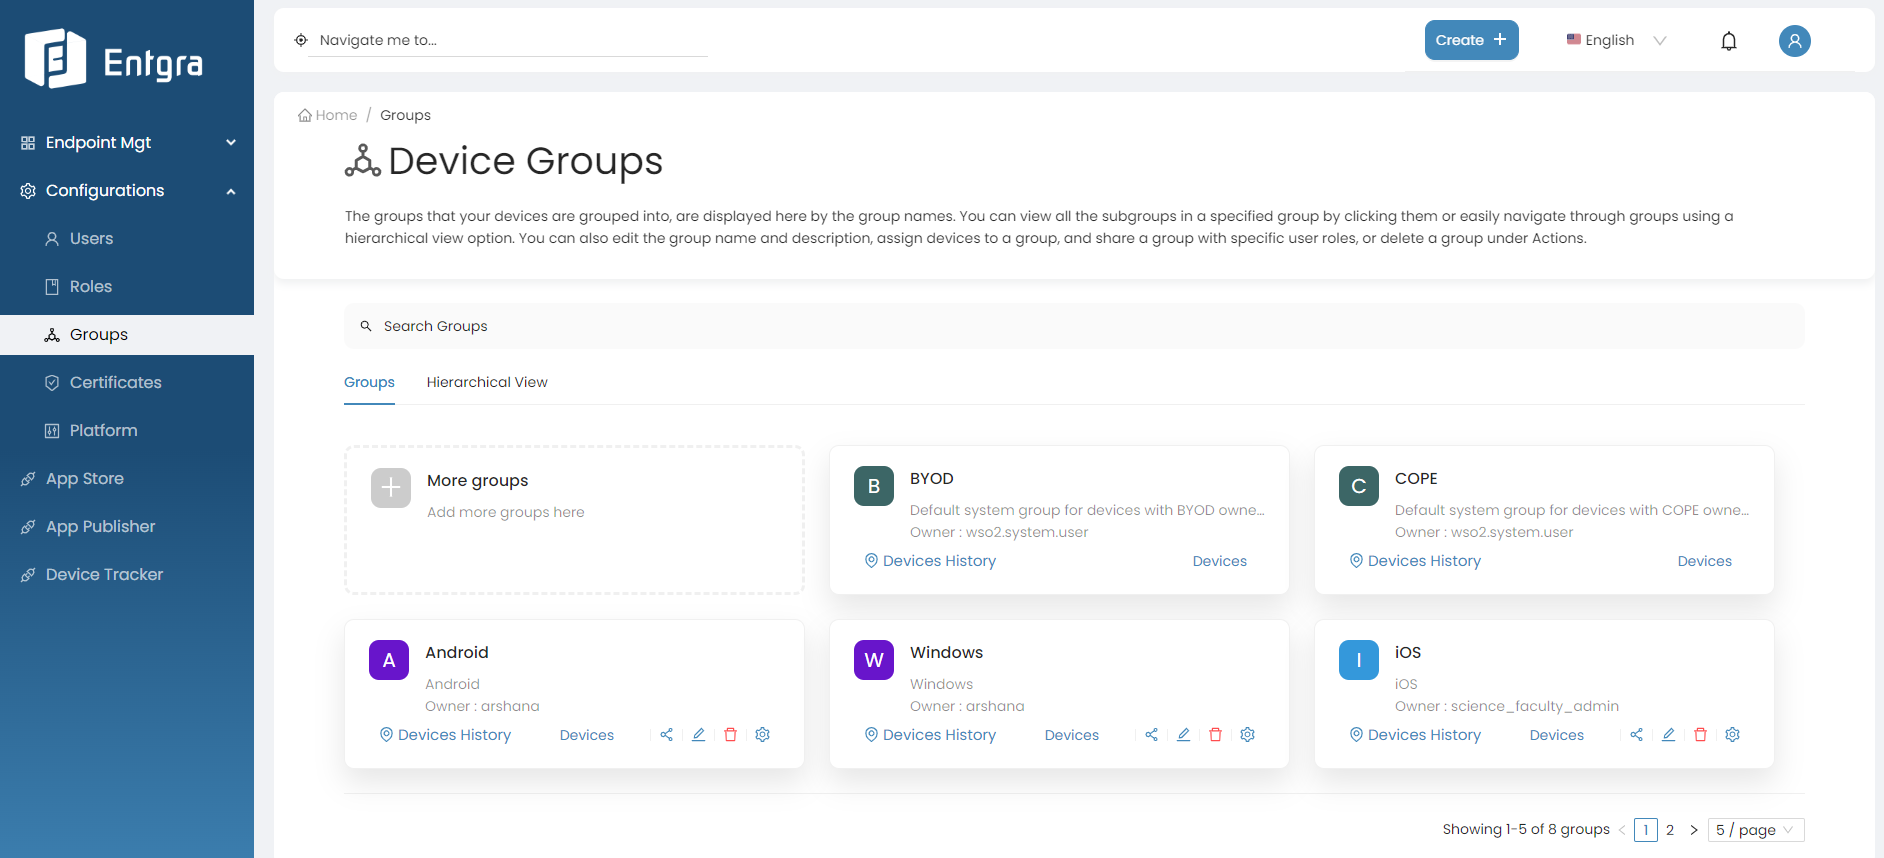
Manage Groups
This tutorial takes you through on how to group your enrolled devices. Grouping allows you to monitor and view device data of several devices at once.
Entgra UEM lets you to create groups in a Hierarchical Manner. It involves creating top-level groups as main categories and then further divide them into more specific groups (subgroups).
This way you can view any abnormal behavior of the devices at a glance and take necessary actions to prevent it.
Example
For example, sharing the devices in your lobby with your technician. For this purpose, you can create a group named Lobby, add the devices in the lobby to the created group, and share the group with the technician. Now the technician is able to view the devices in the group, analyze the data gathered by the devices and come to a conclusion on the devices that need attention.
By default, Entgra UEM Server has following groups:
- Bring Your Own Device (BYOD)
- Corporate-Owned Personally Enabled (COPE)
Let’s get started!
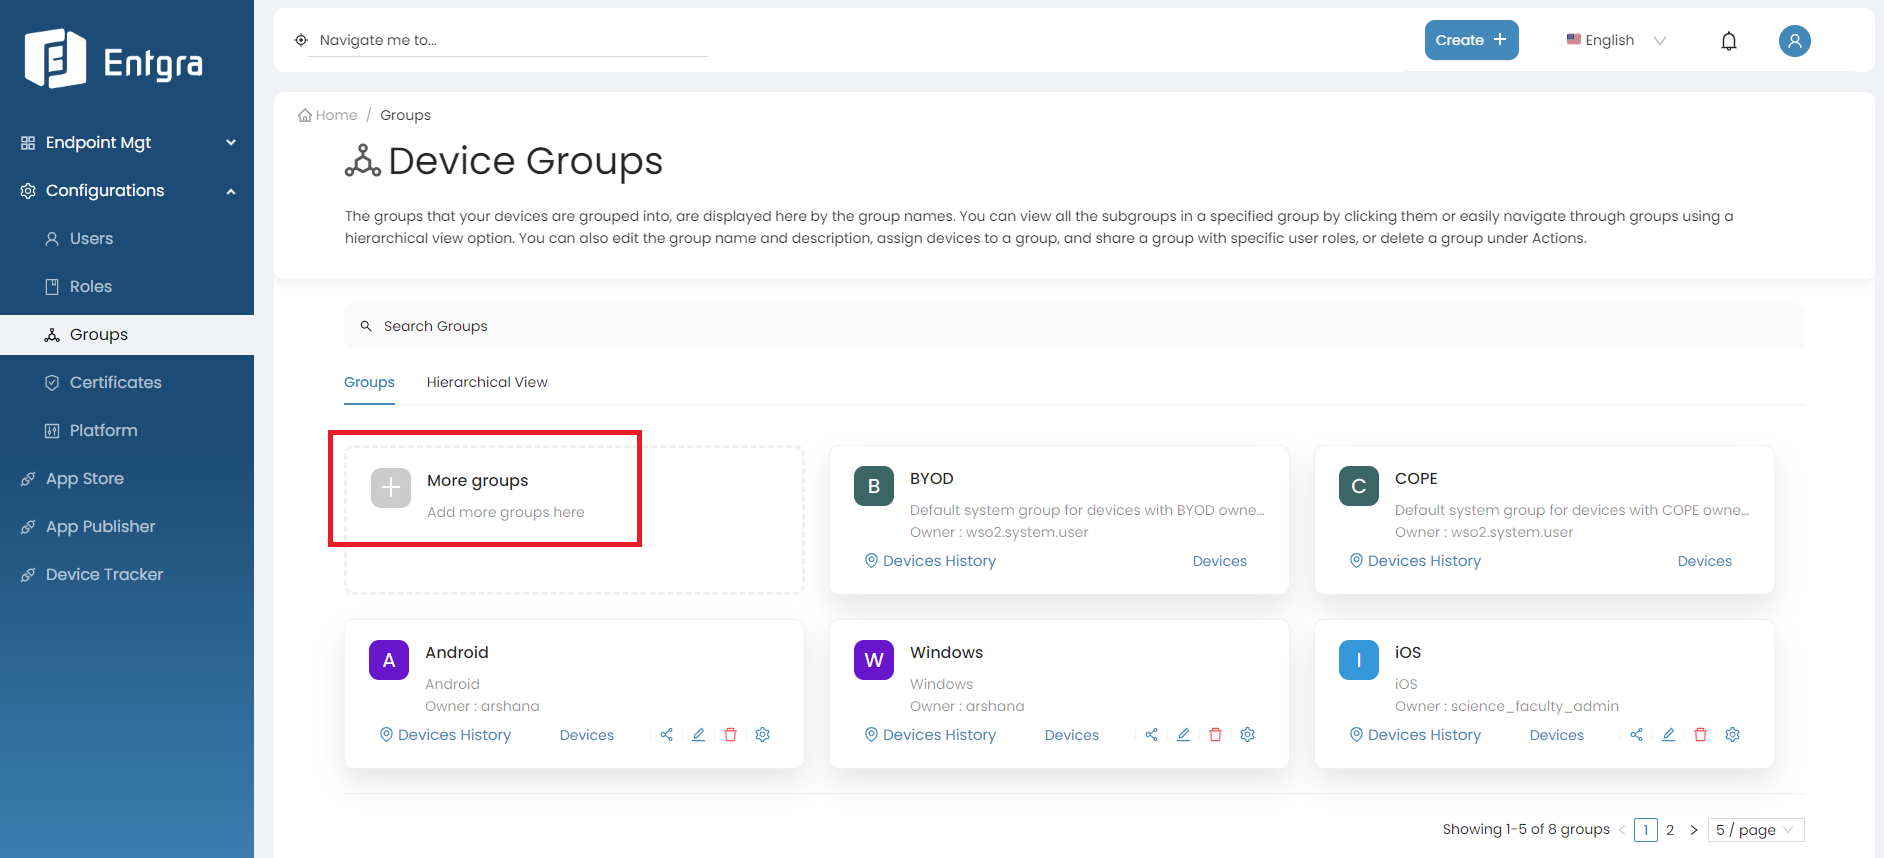
Add New Groups
Start off by creating a new device group in the Entgra UEM Server:
-
Sign in to the Entgra UEM Server console.
-
Click Create + in the top right corner and select Group.
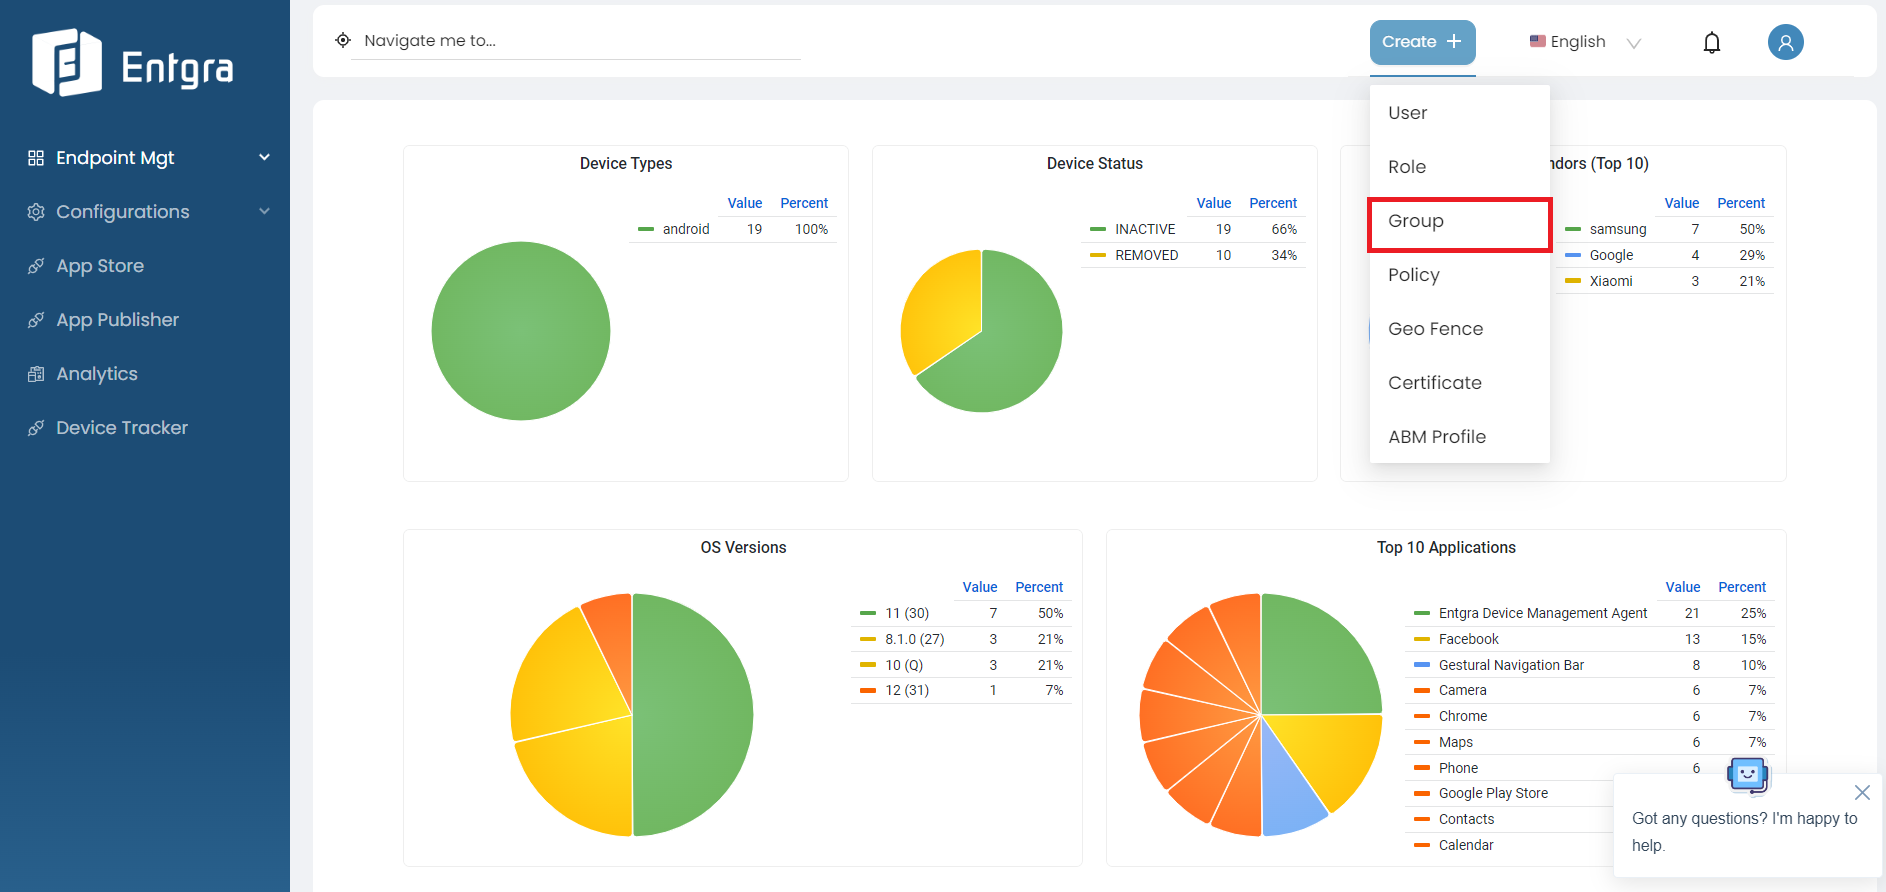
Or go to Configurations, select Groups and click More groups.
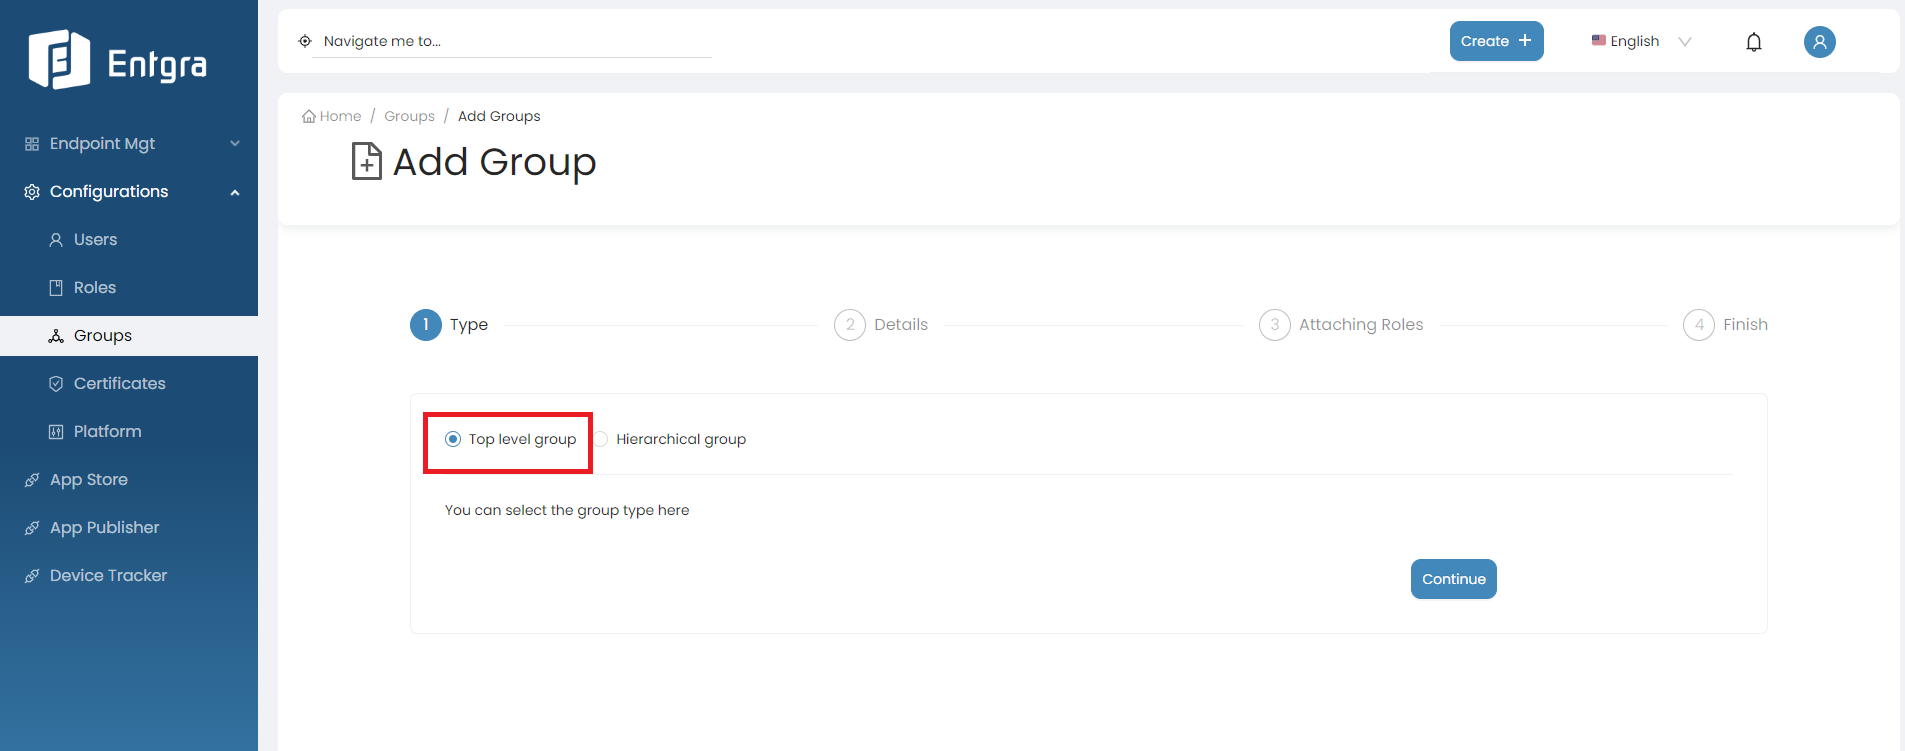
-
Select the group type.
-
Top Level Group
- A top-level group, also known as a parent group, is the highest level in the hierarchical structure.
- To create a top-level group, Click Continue after selecting this option.
-
Hierarchical Group
-
When you select this option, the new group you are creating will be placed as a sub-group under the selected top-level group in the hierarchical structure.
-
Select Hierarchical Group.
-
Click on the group you want to create a sub group.
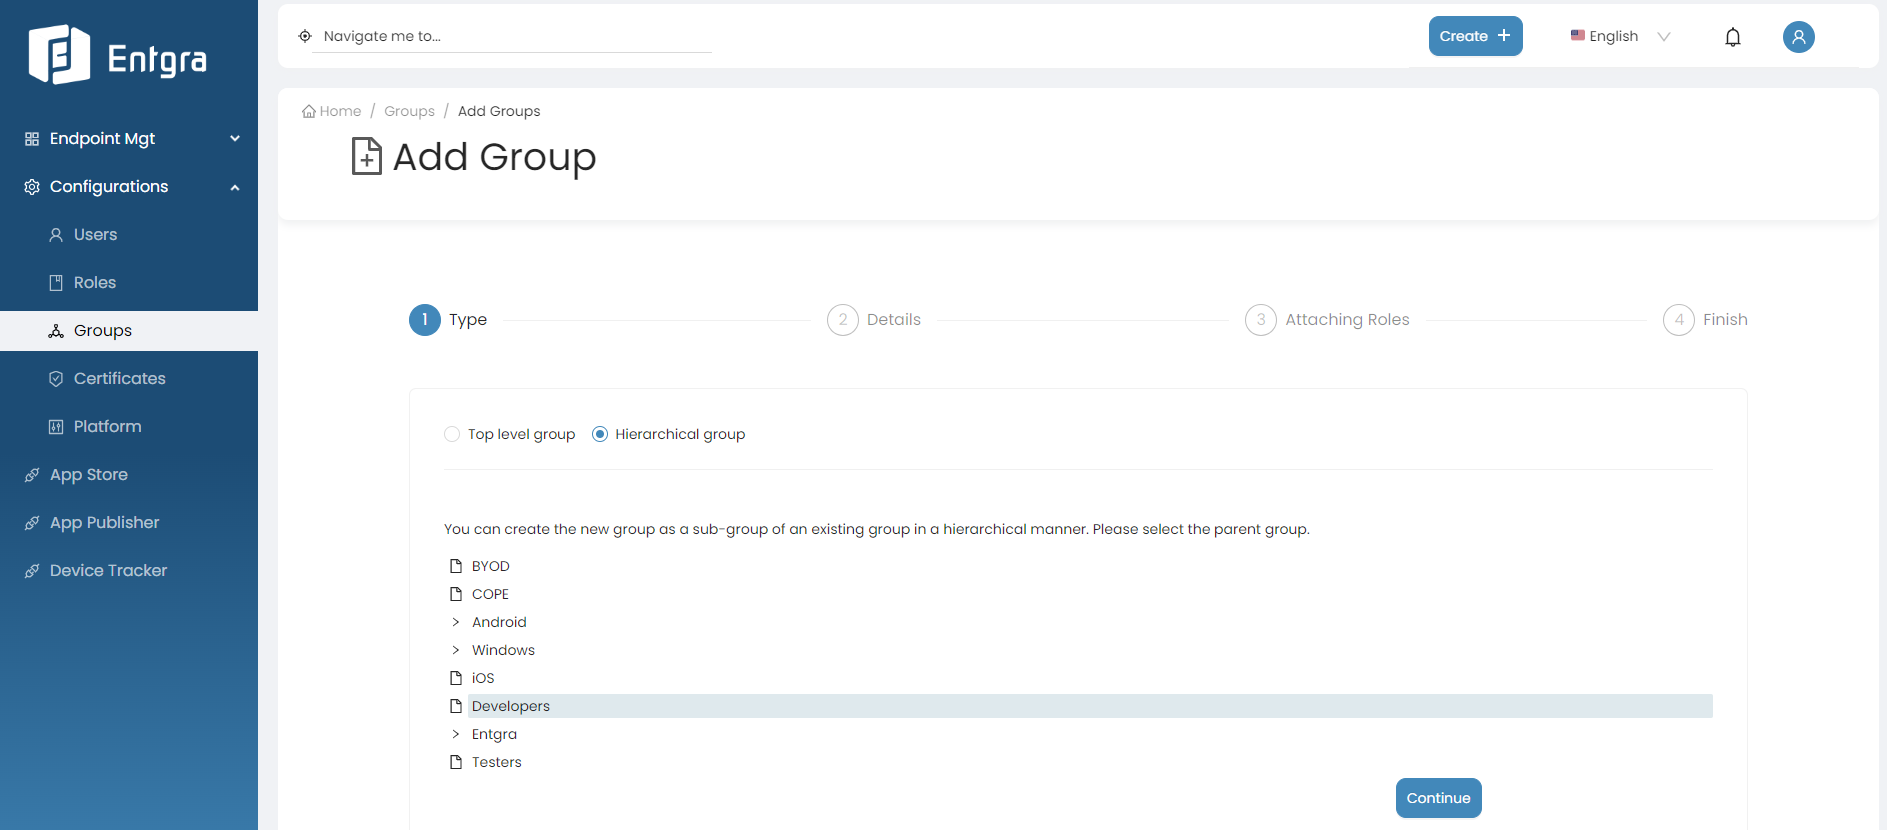
-
Click Continue.
-
-
-
Enter the appropriate Group Name and Group Description. Click Continue.
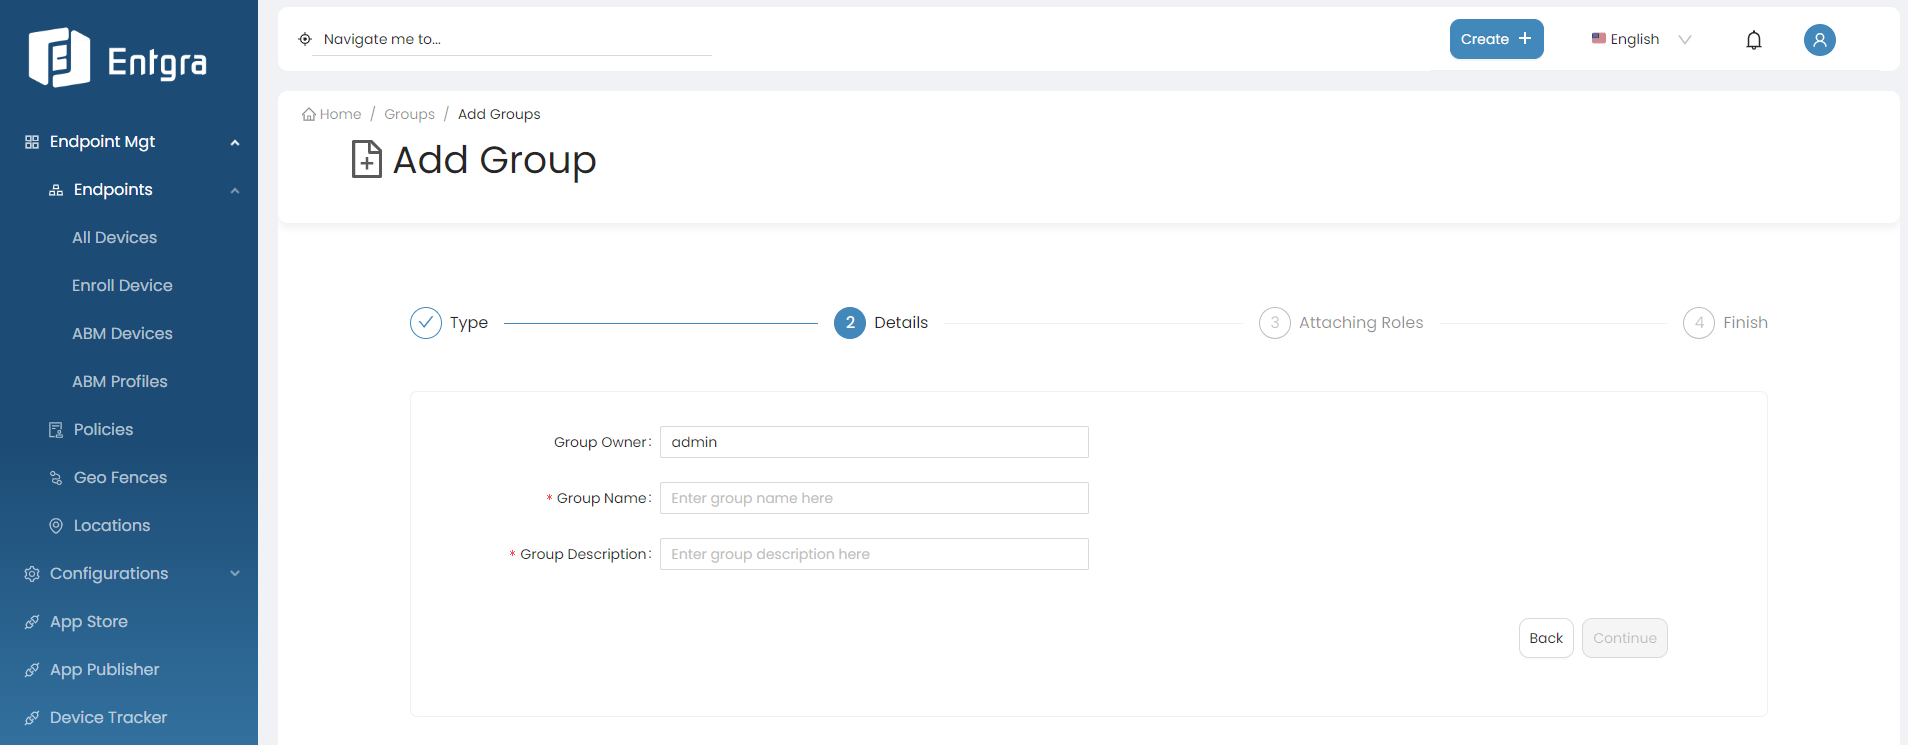
-
Select user roles from the dropdown to share the new group (Optional). Click Continue.
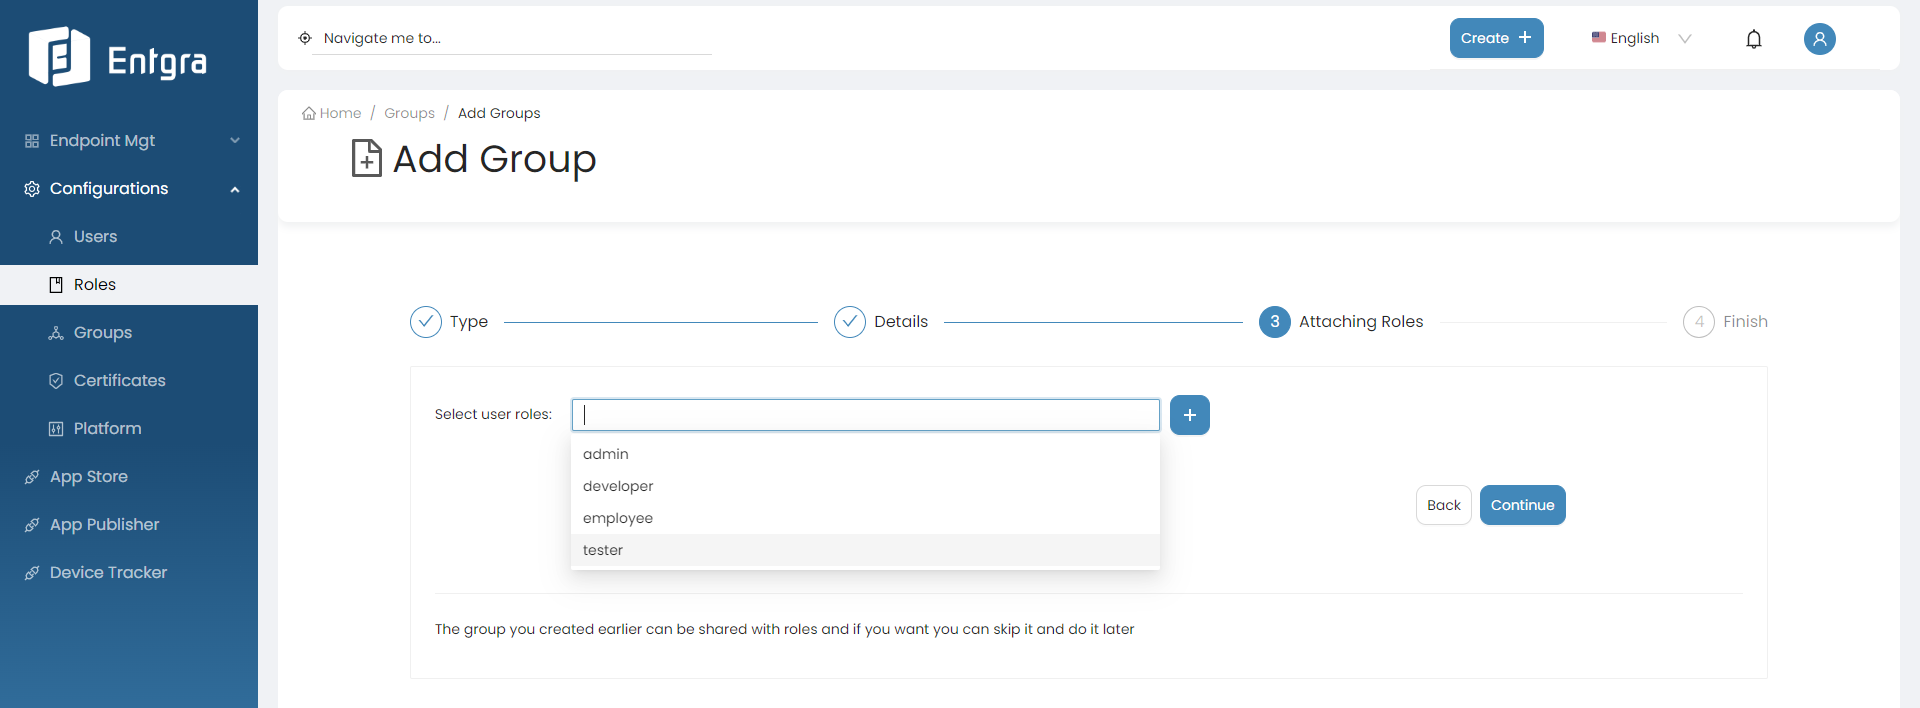
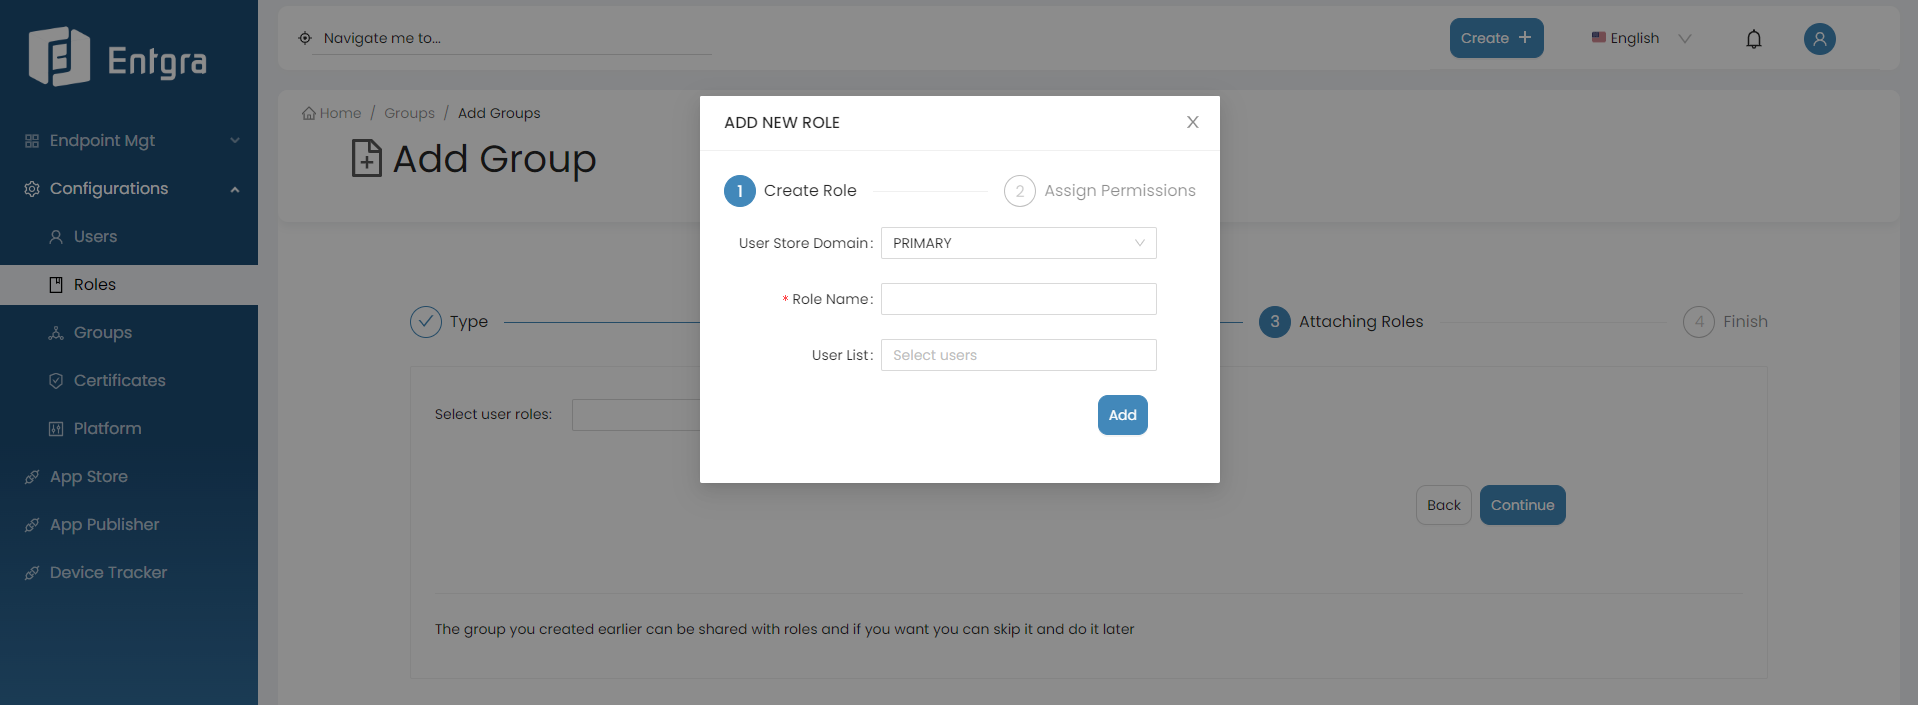
Click + icon to create a new user role and share the new group.
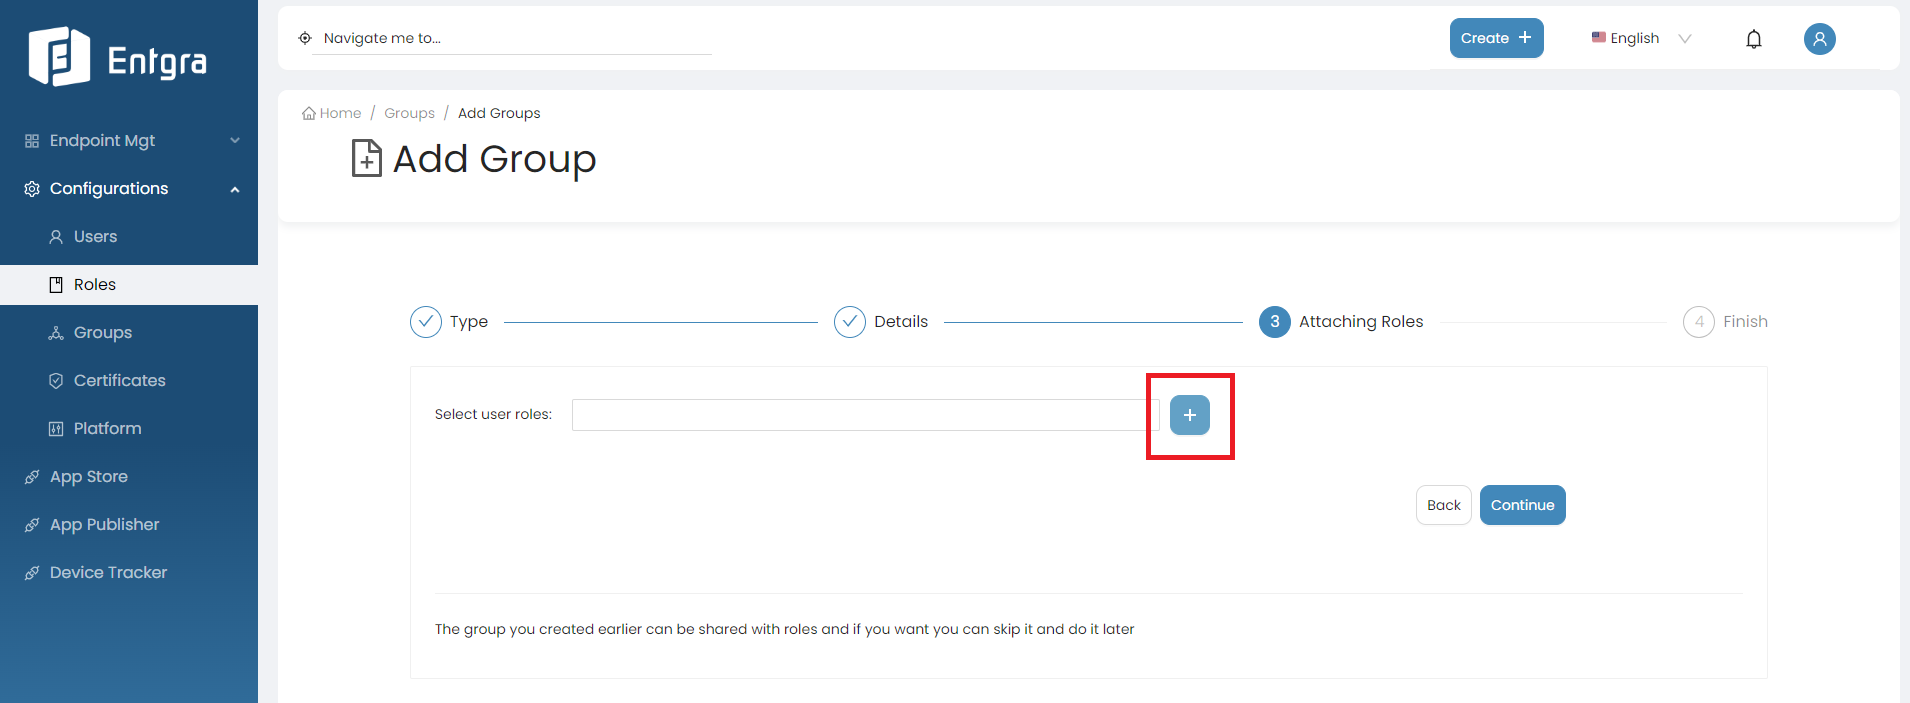
Refer to Create User Role for more details.
View Groups
Grid View
-
Sign in to the Entgra UEM Server console.
-
Go to Configurations and select Groups.
-
You can view all the existing top level groups here.
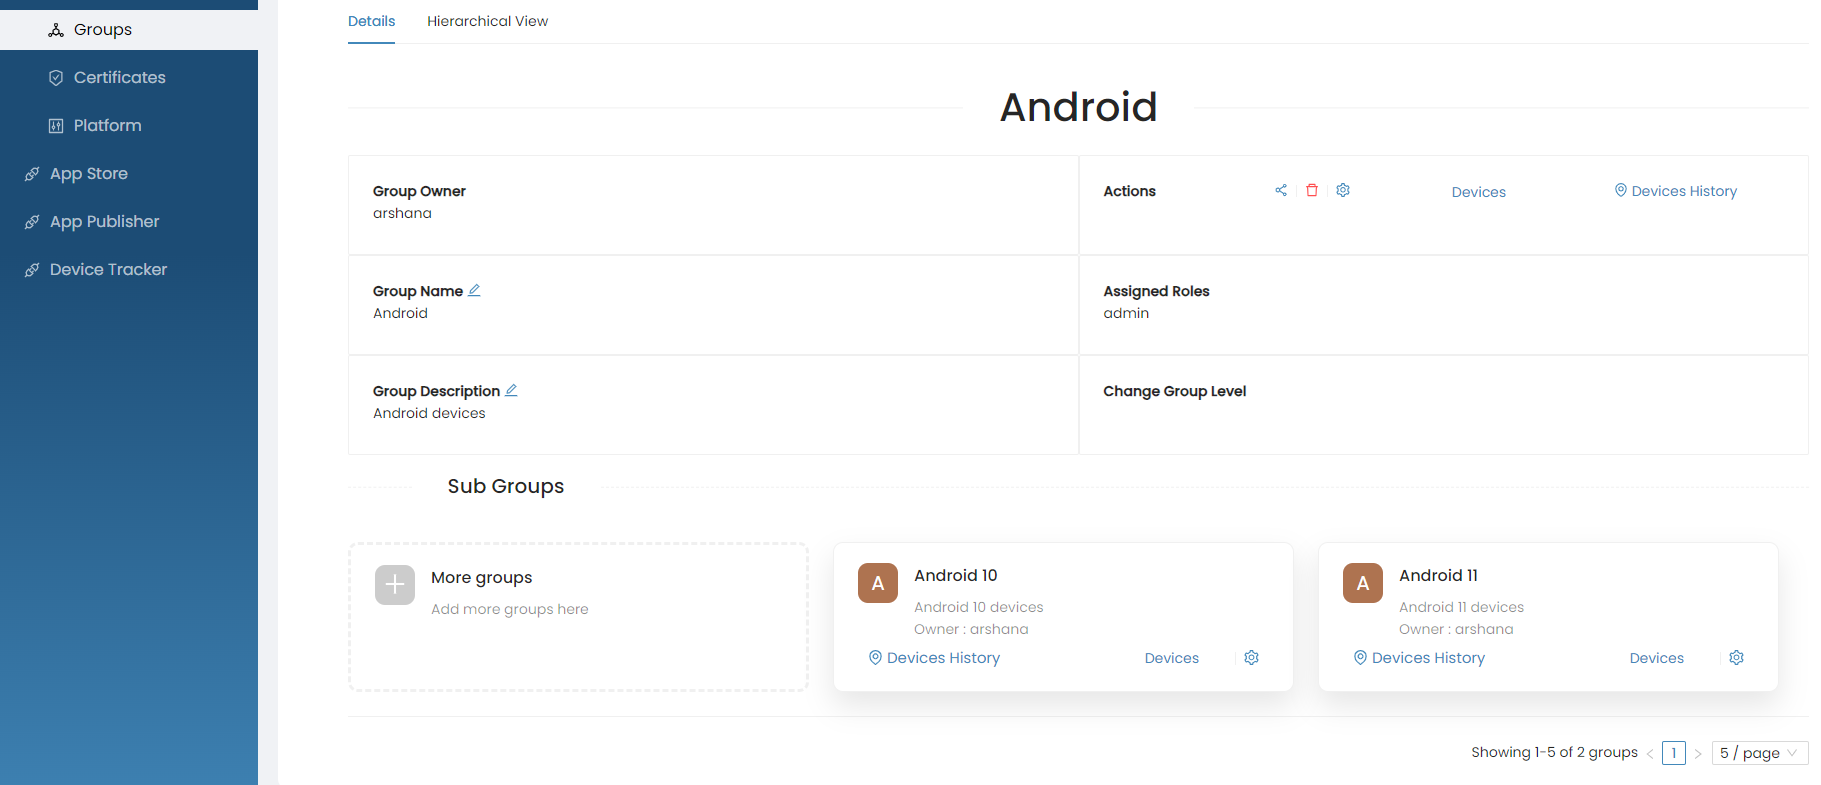
Single Group View
-
Click on a specific group that you want to view more info.
-
You can view all the available group actions and sub groups of the selected group in the detailed view.
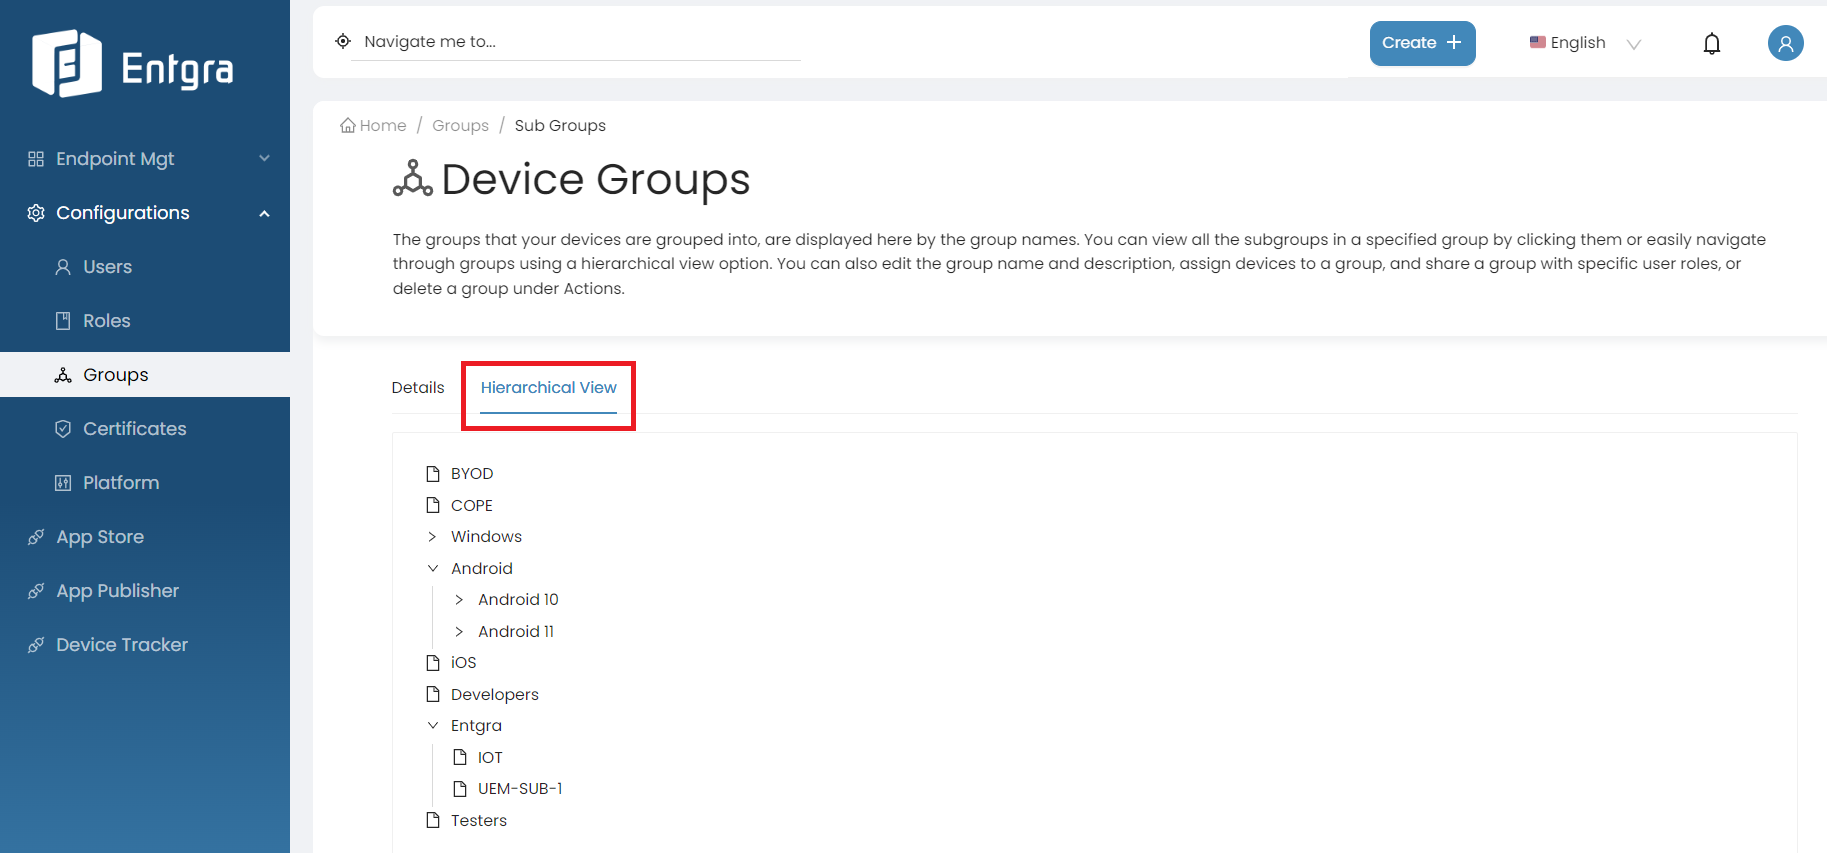
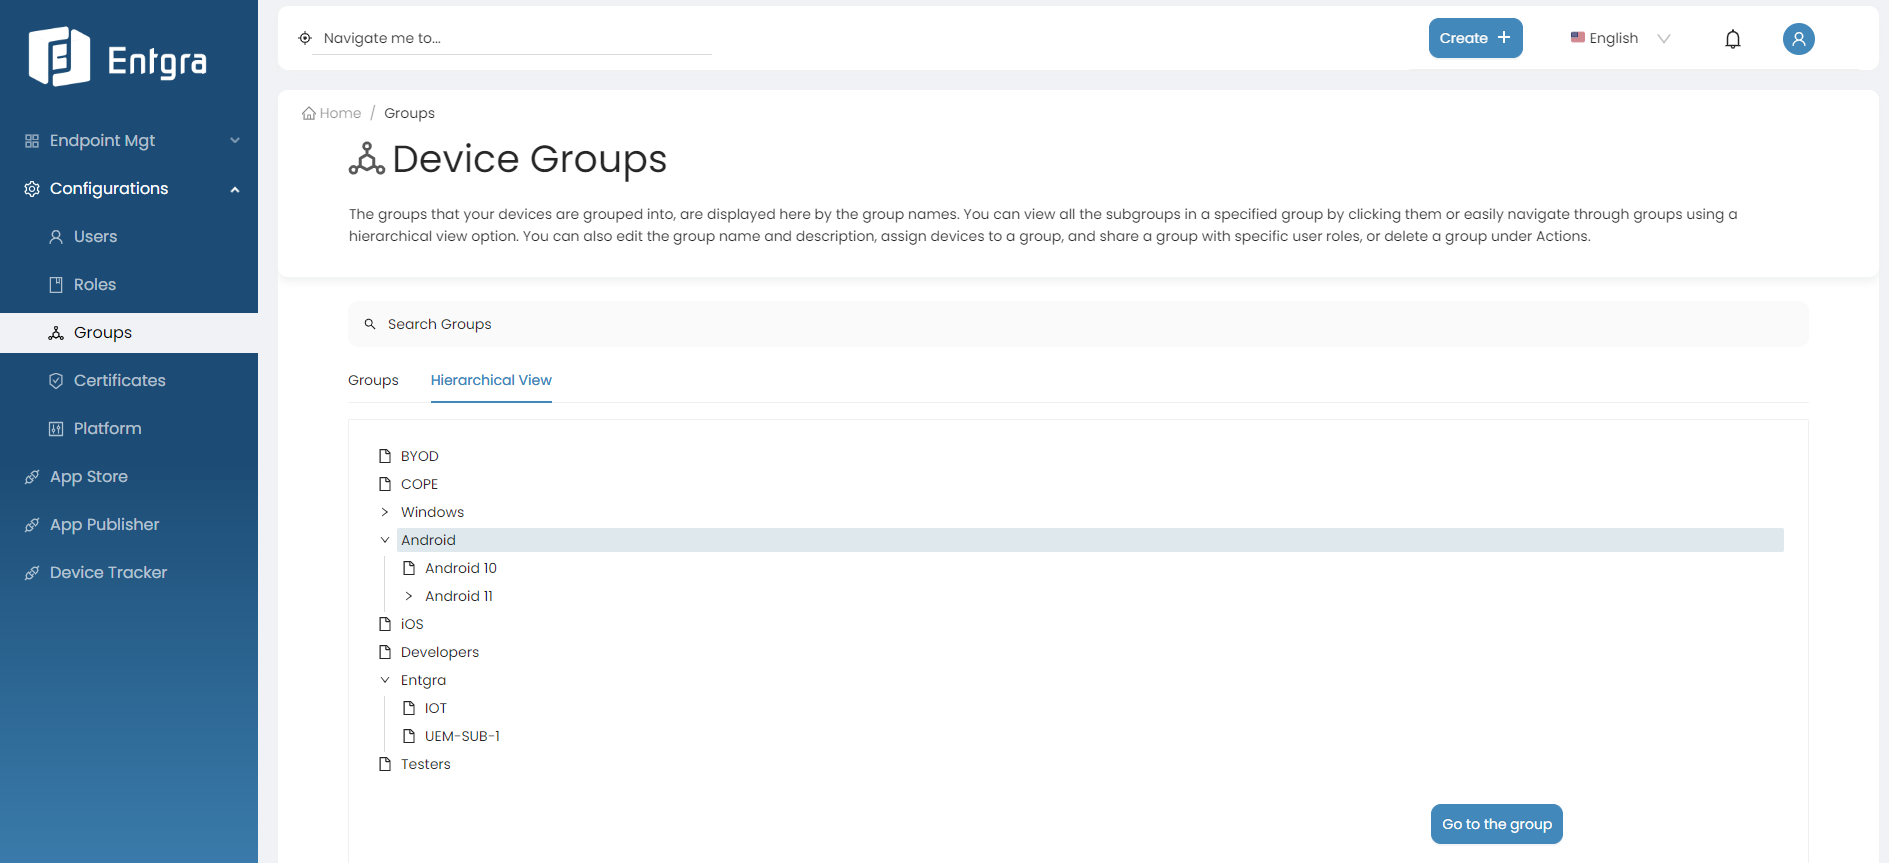
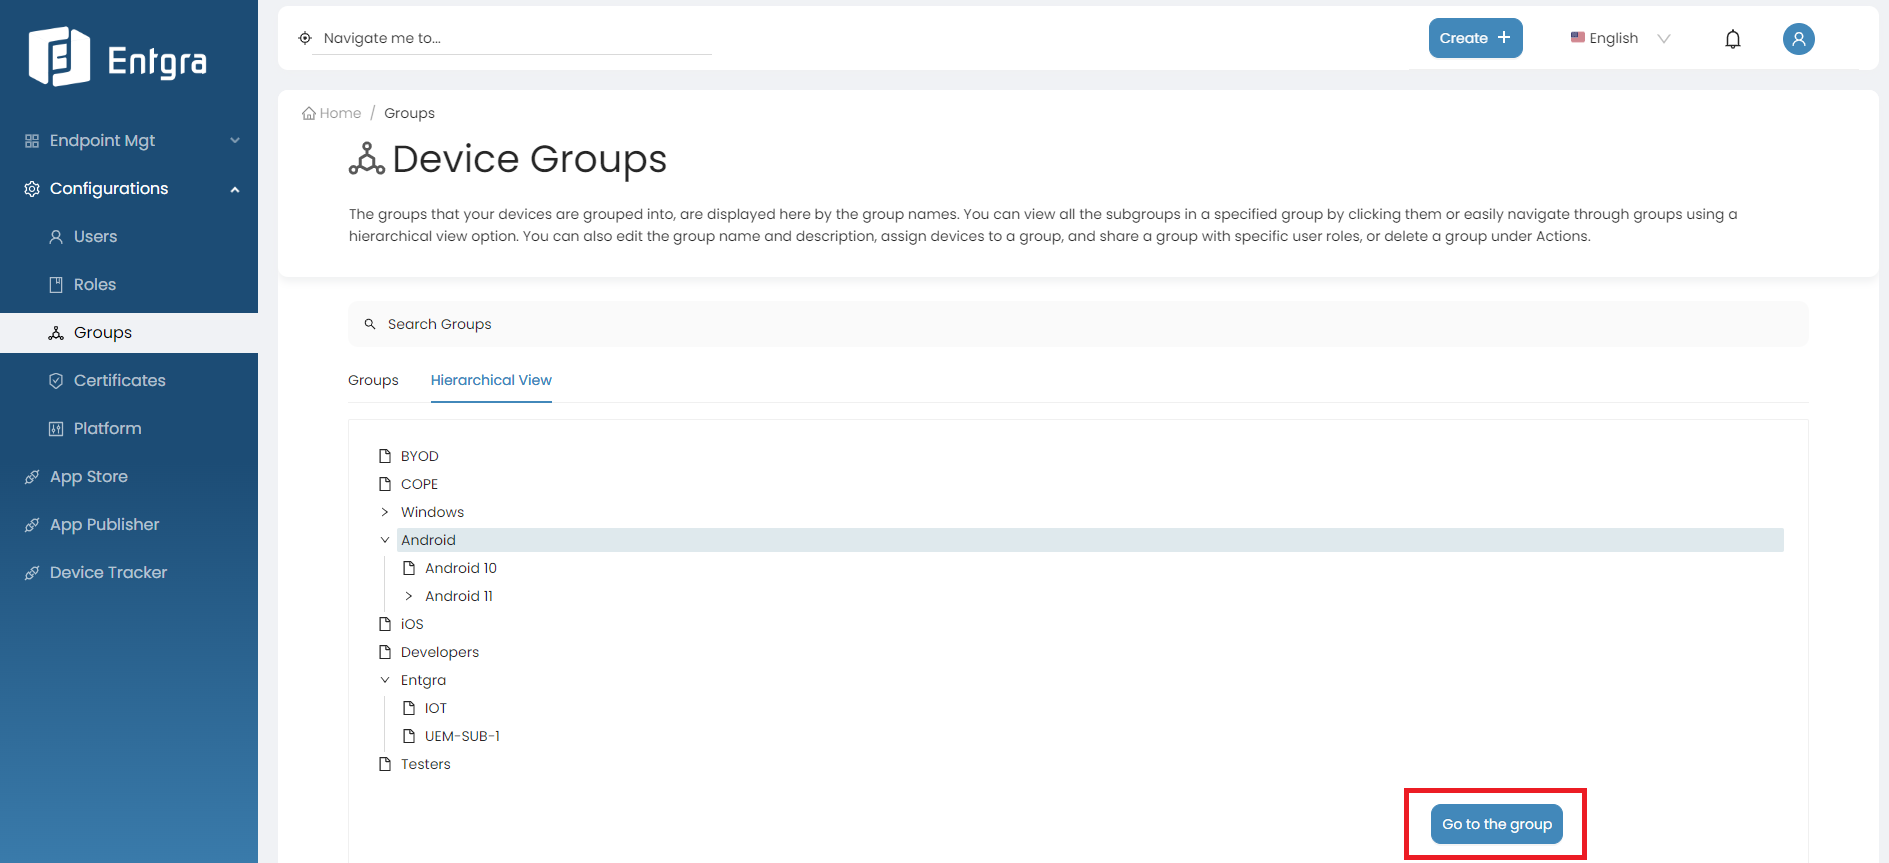
Hierarchical View
-
Click Hierarchical View to view all available top-level groups and sub groups in hierarchical manner.
-
Select a specific group you want to view more info.
-
Click Go to the group.
-
You can view all the available group actions and sub groups of the selected group.
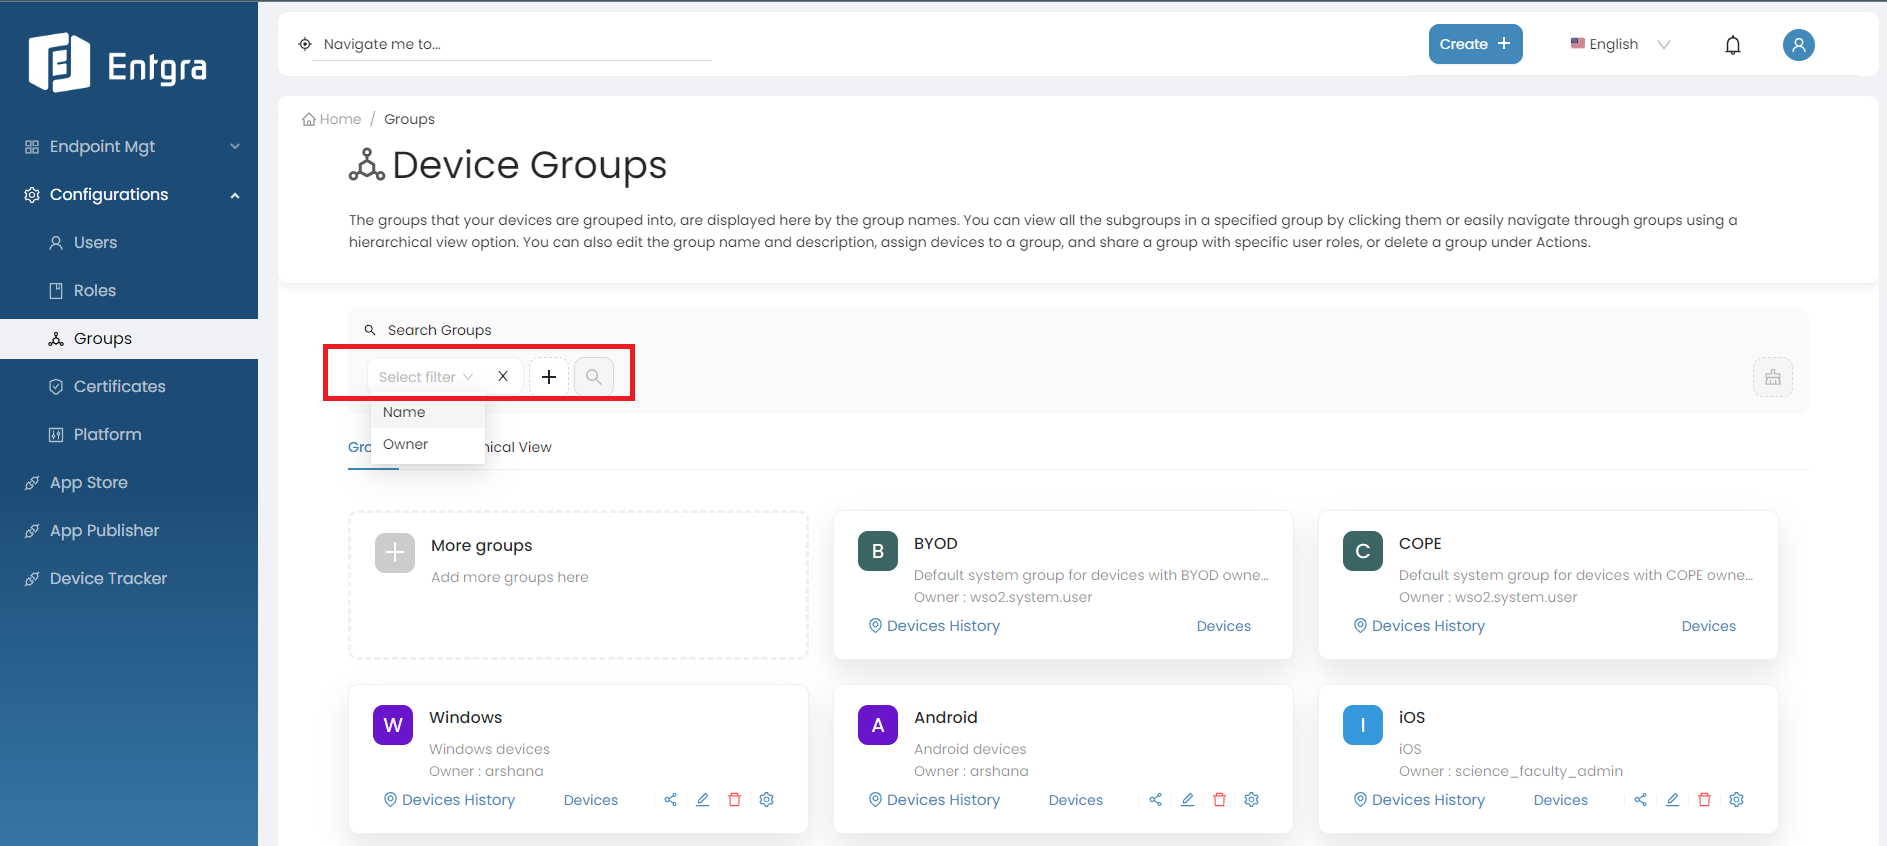
Search Groups
-
Click on the Search Groups bar.
-
Add relevant tags for searching and then click Search icon.
Note
- You can perform following actions to both top-level groups and subgroups. In this tutorial, we will focus on top-level groupsbut the same process can be used for subgroups.
- Additionally, you can perform the same actions within the Single Group View as well.
Add Devices to Groups
Follow the steps given below to add device/s to the group that you created:
-
Click Devices under the group you want to add the devices to.
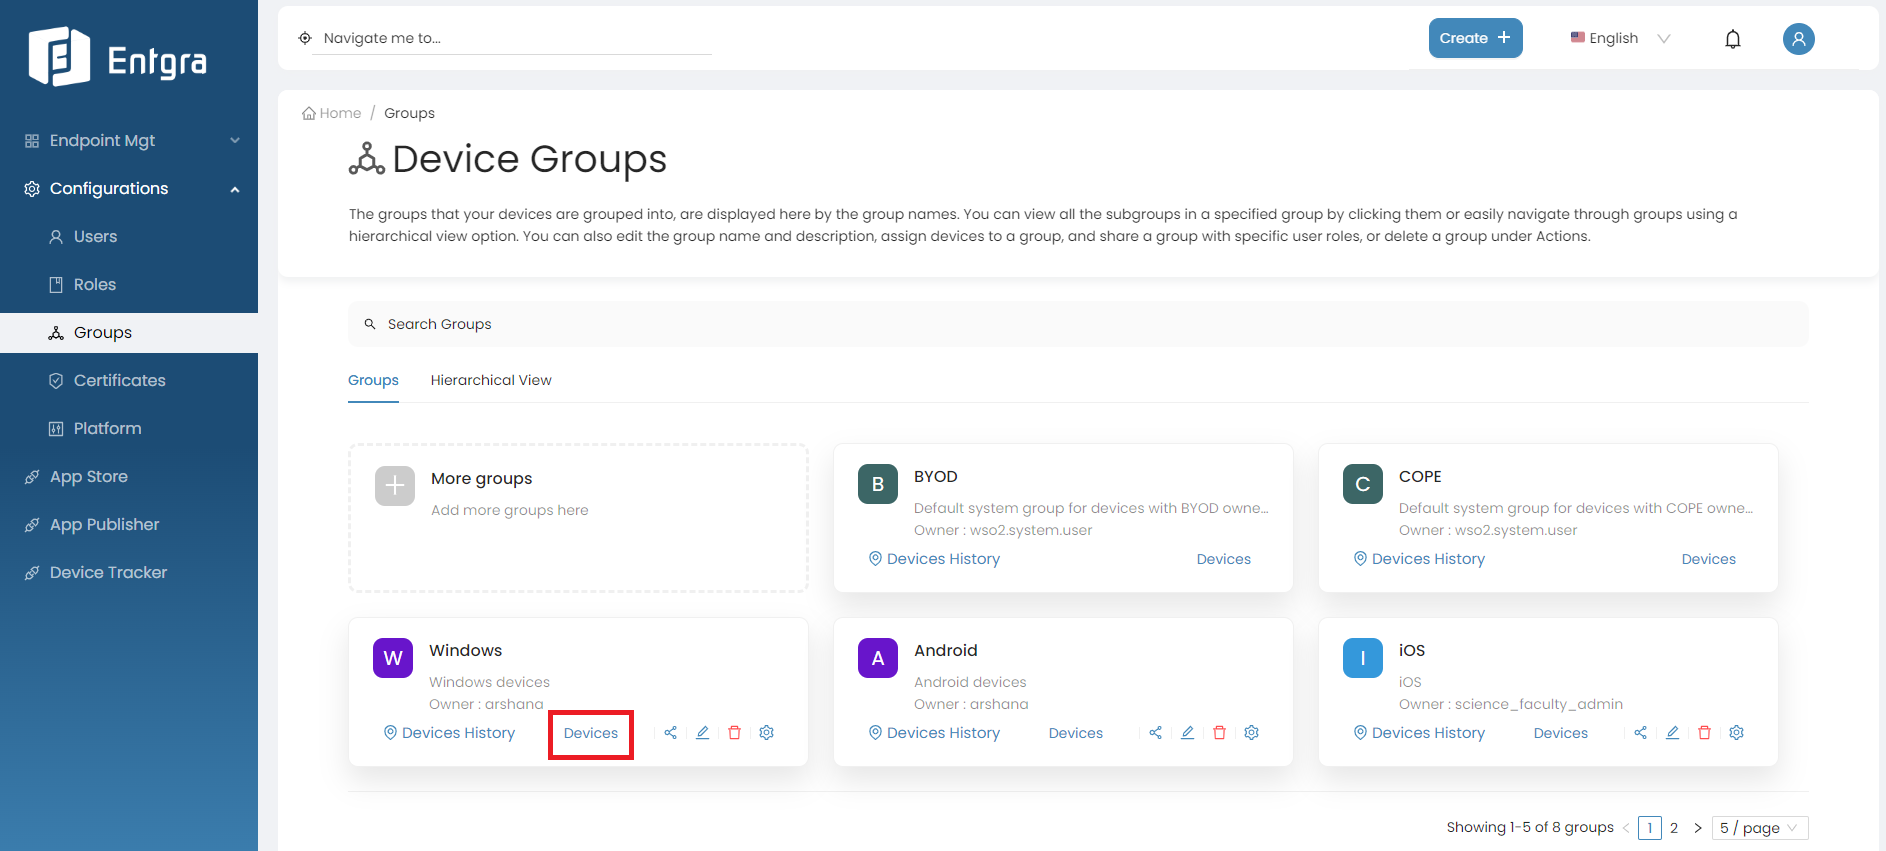
-
Select the devices you need to add to the group and click Assign Devices.
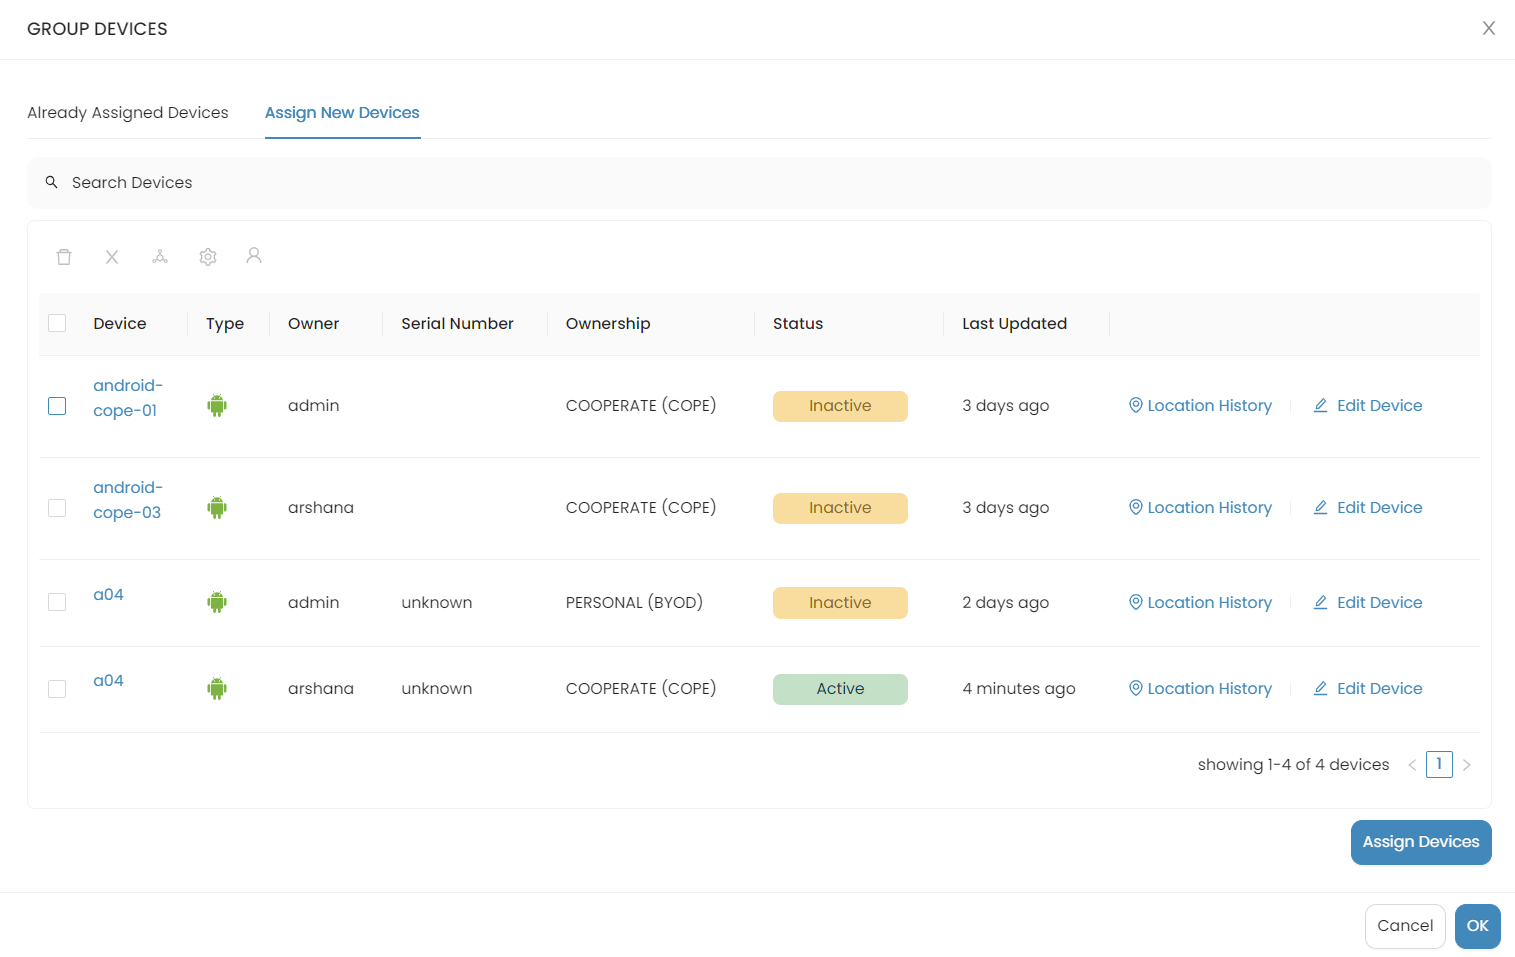
-
To ensure that the devices have been added to the group, click on the device group and check if the devices are listed under the Already Assigned Devices section.
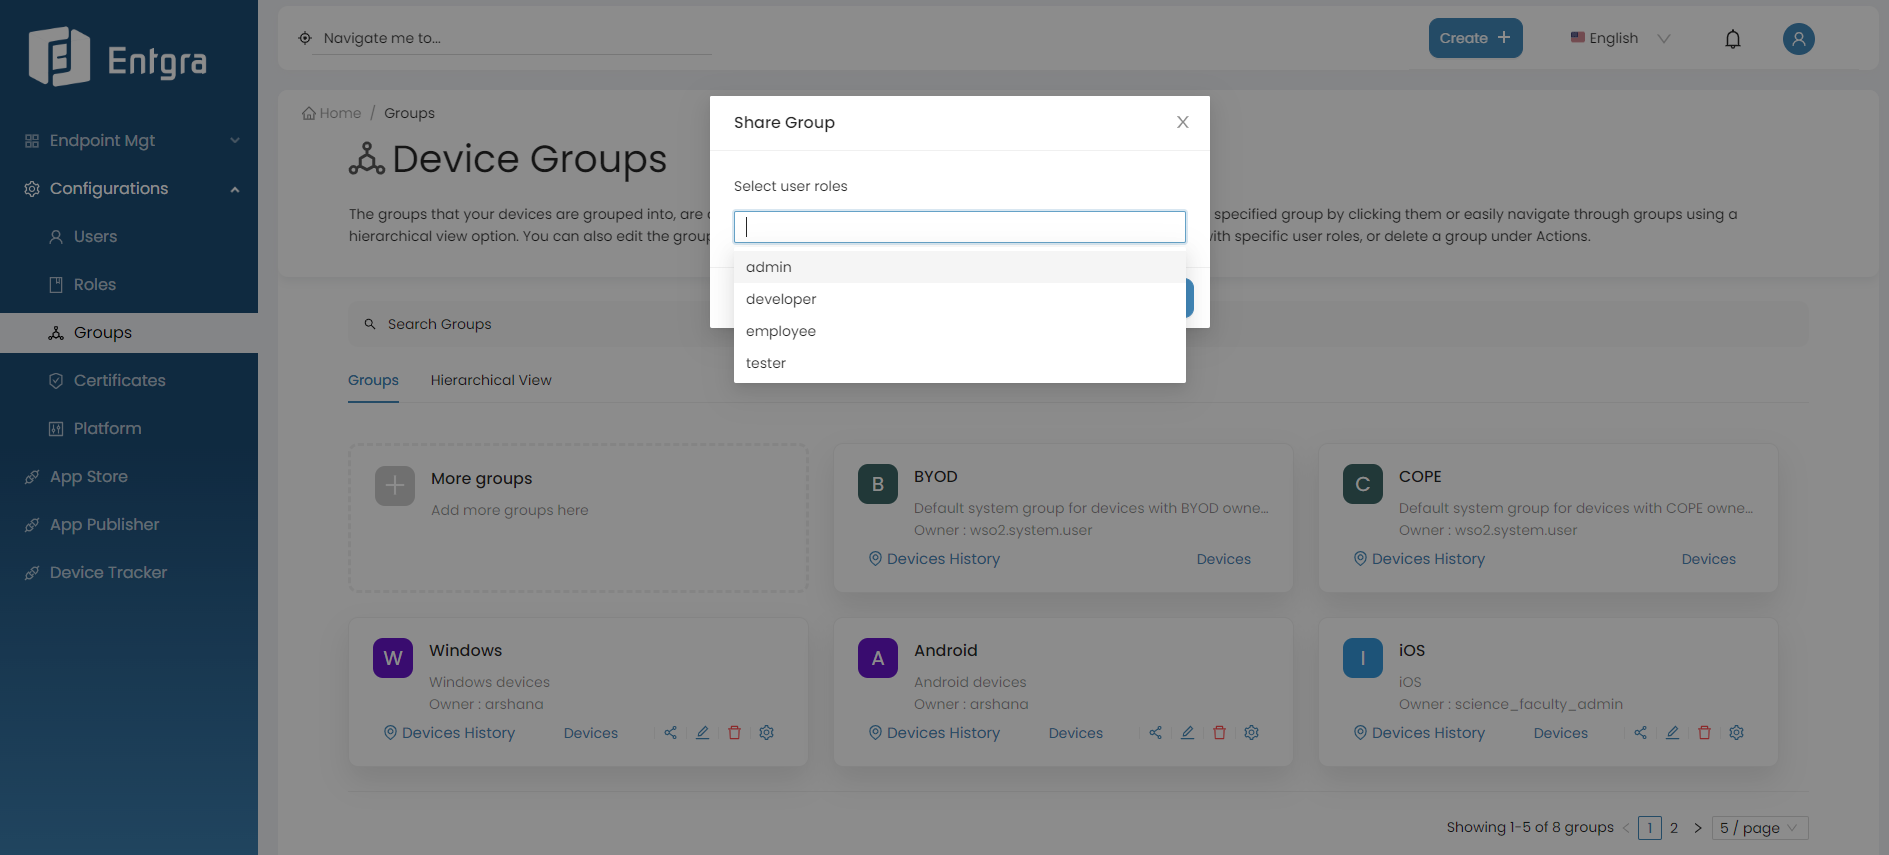
Share Groups with User Roles
You need to share the device groups you created with other users so that they too can access the devices.
Follow the steps given below:
-
Click the Share icon on the group you want to share.
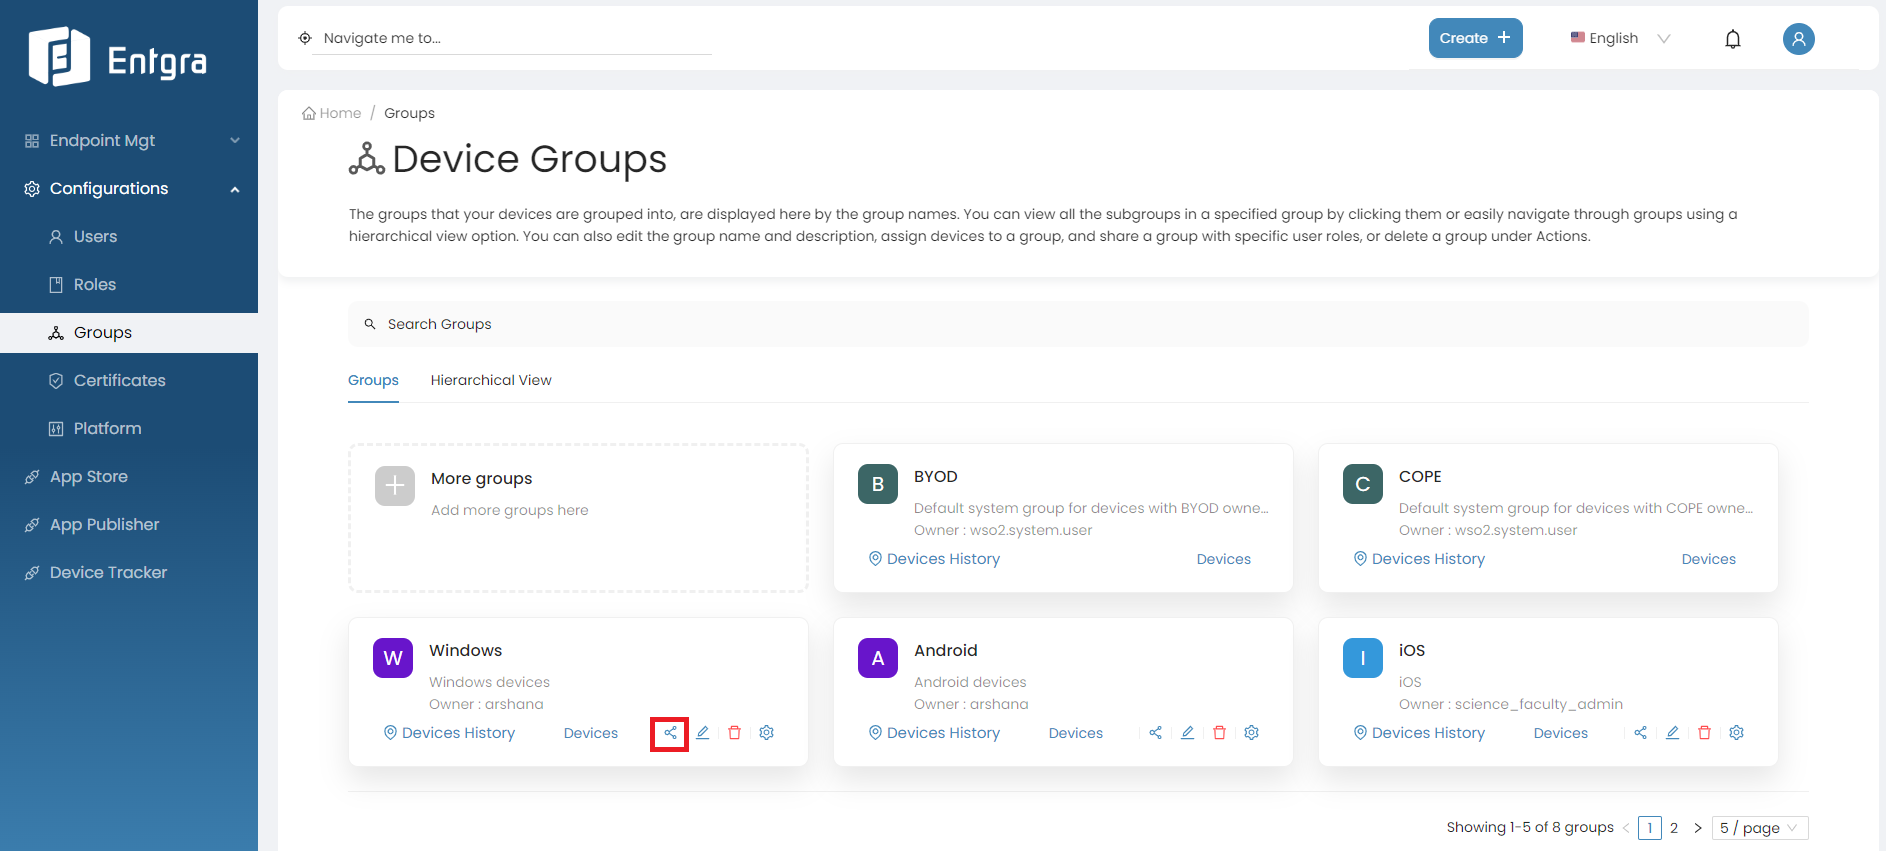
-
Share the groups with user roles.
-
Share the group with existing user roles by selecting the role name or names and clicking Share.
-
Do you want to create a new role and share with the group? Click New Role and create the new role.
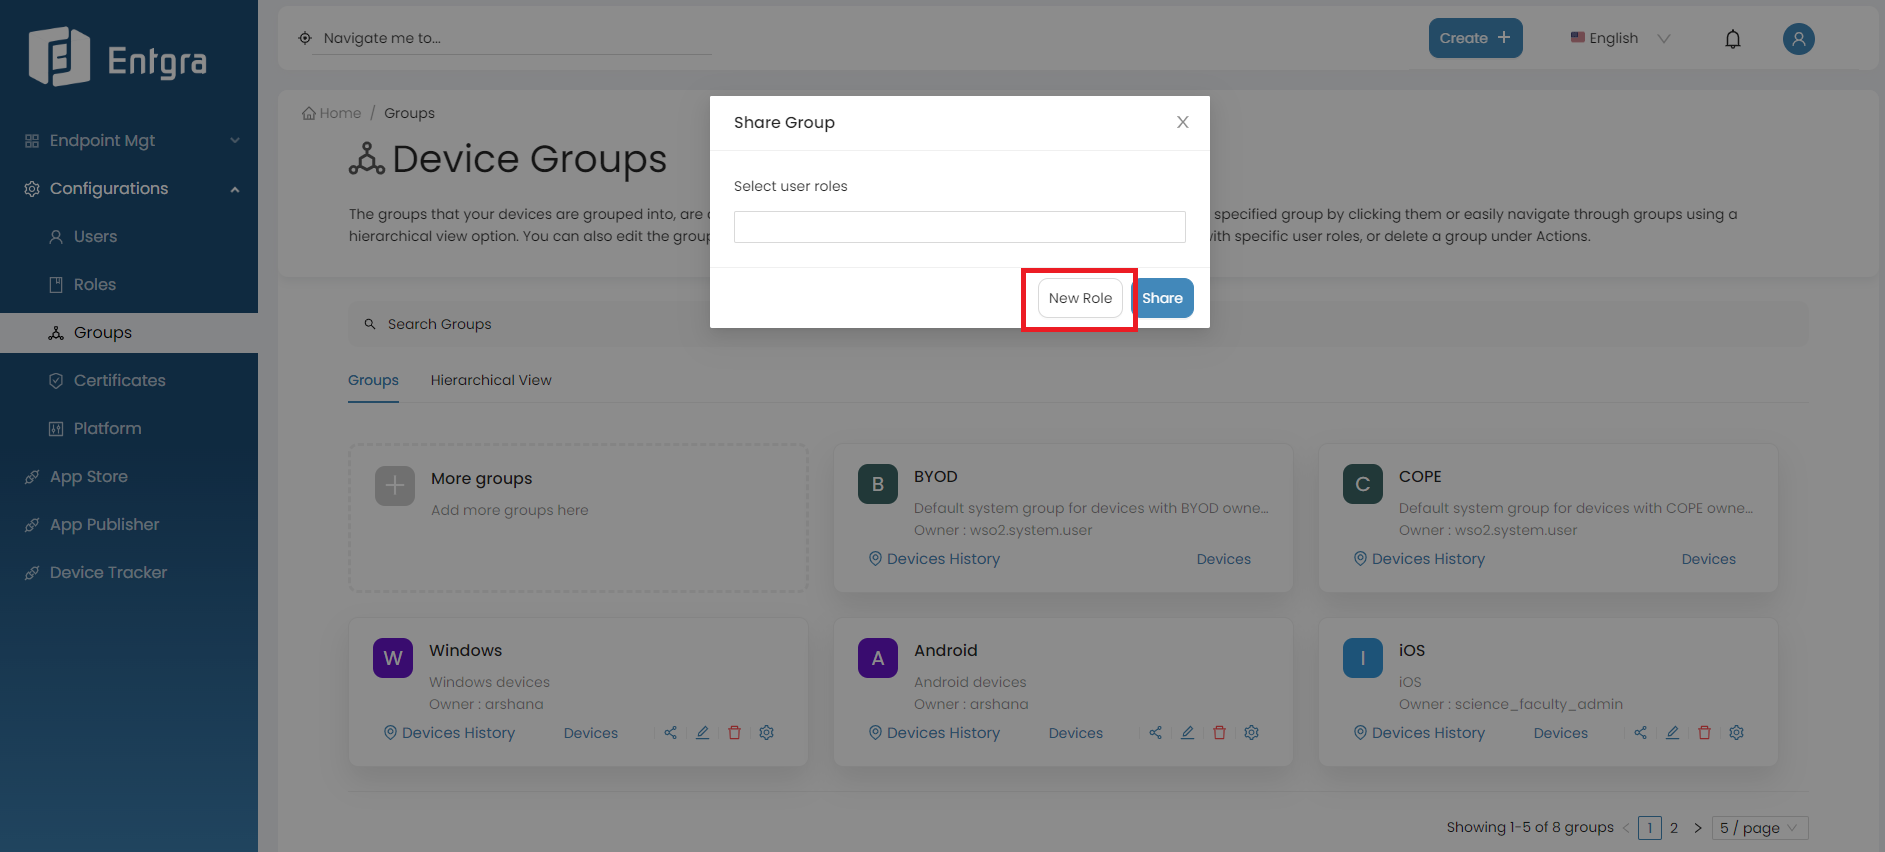
-
Next, share the group with the user role you just created by selecting the role name from the same dropdown and clicking Share
The permissions of the roles you selected will be merged to create the permissions for the new role.
-
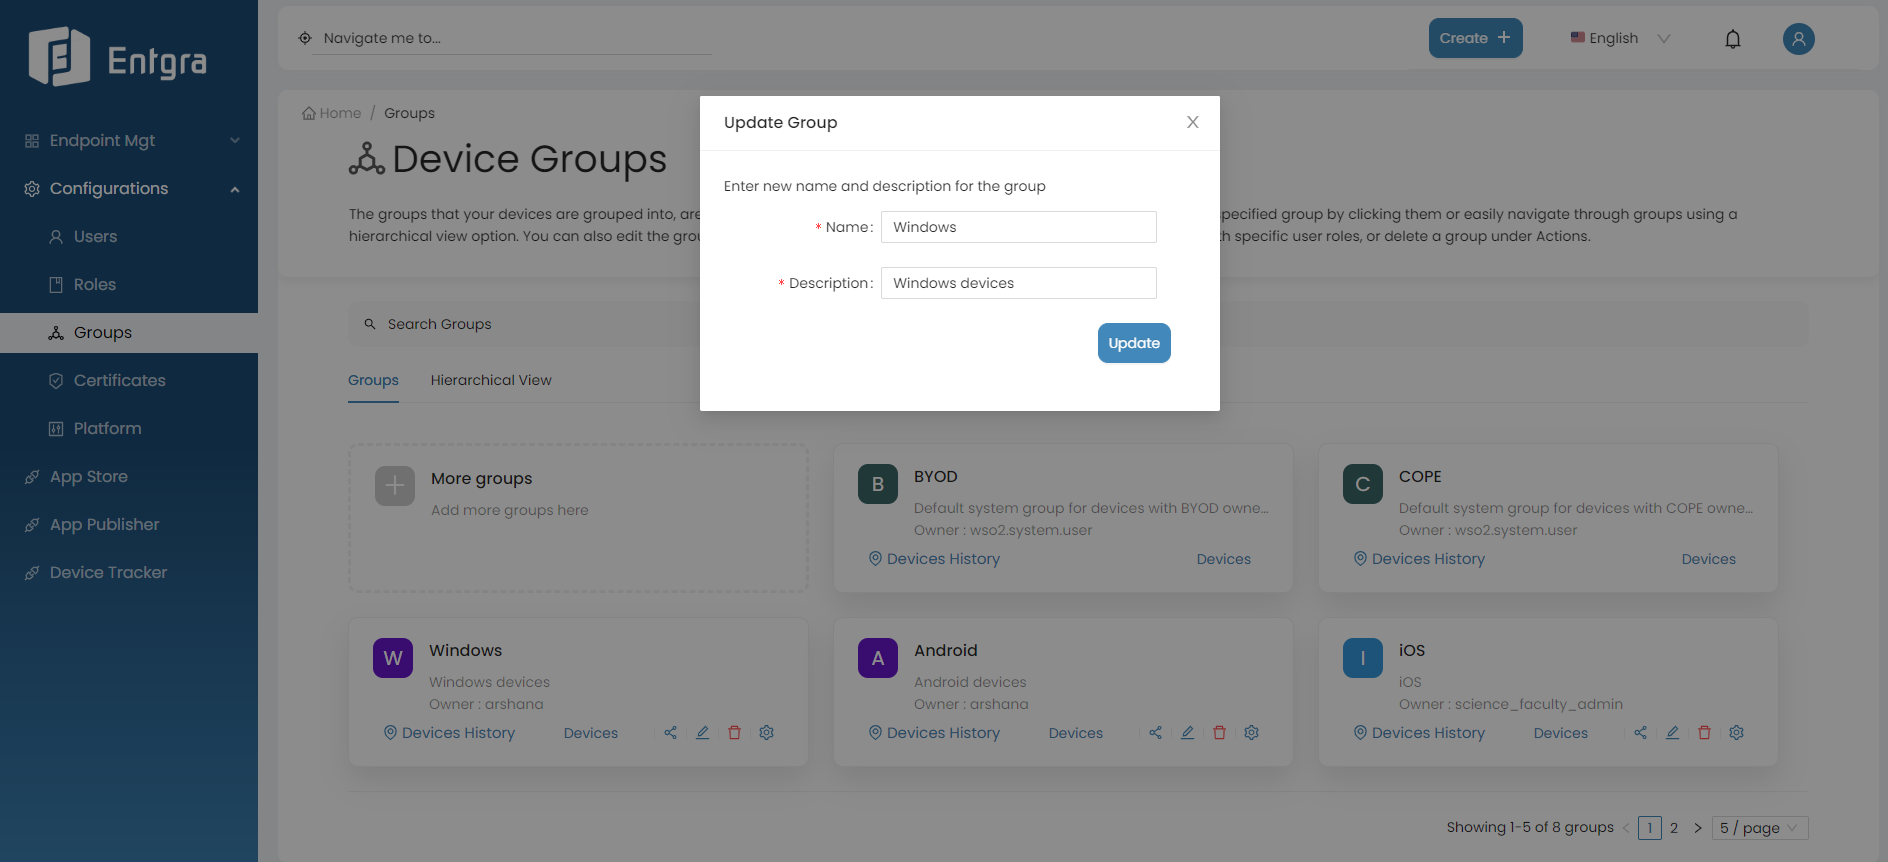
Update Group Details
Follow the steps given below, to update the group name or description.
-
Click the Edit icon on the group you want to update.

-
Update the details and click Update.
Remove a Group
Note
After deleting a group with subgroups, those subgroups will be elevated to the same hierarchical level as the deleted group. This ensures that the structure and organization of the remaining groups are maintained even after the deletion.
Follow the steps given below, to delete a group from Entgra UEM Server.
-
Click the Remove icon on the group you want to remove.
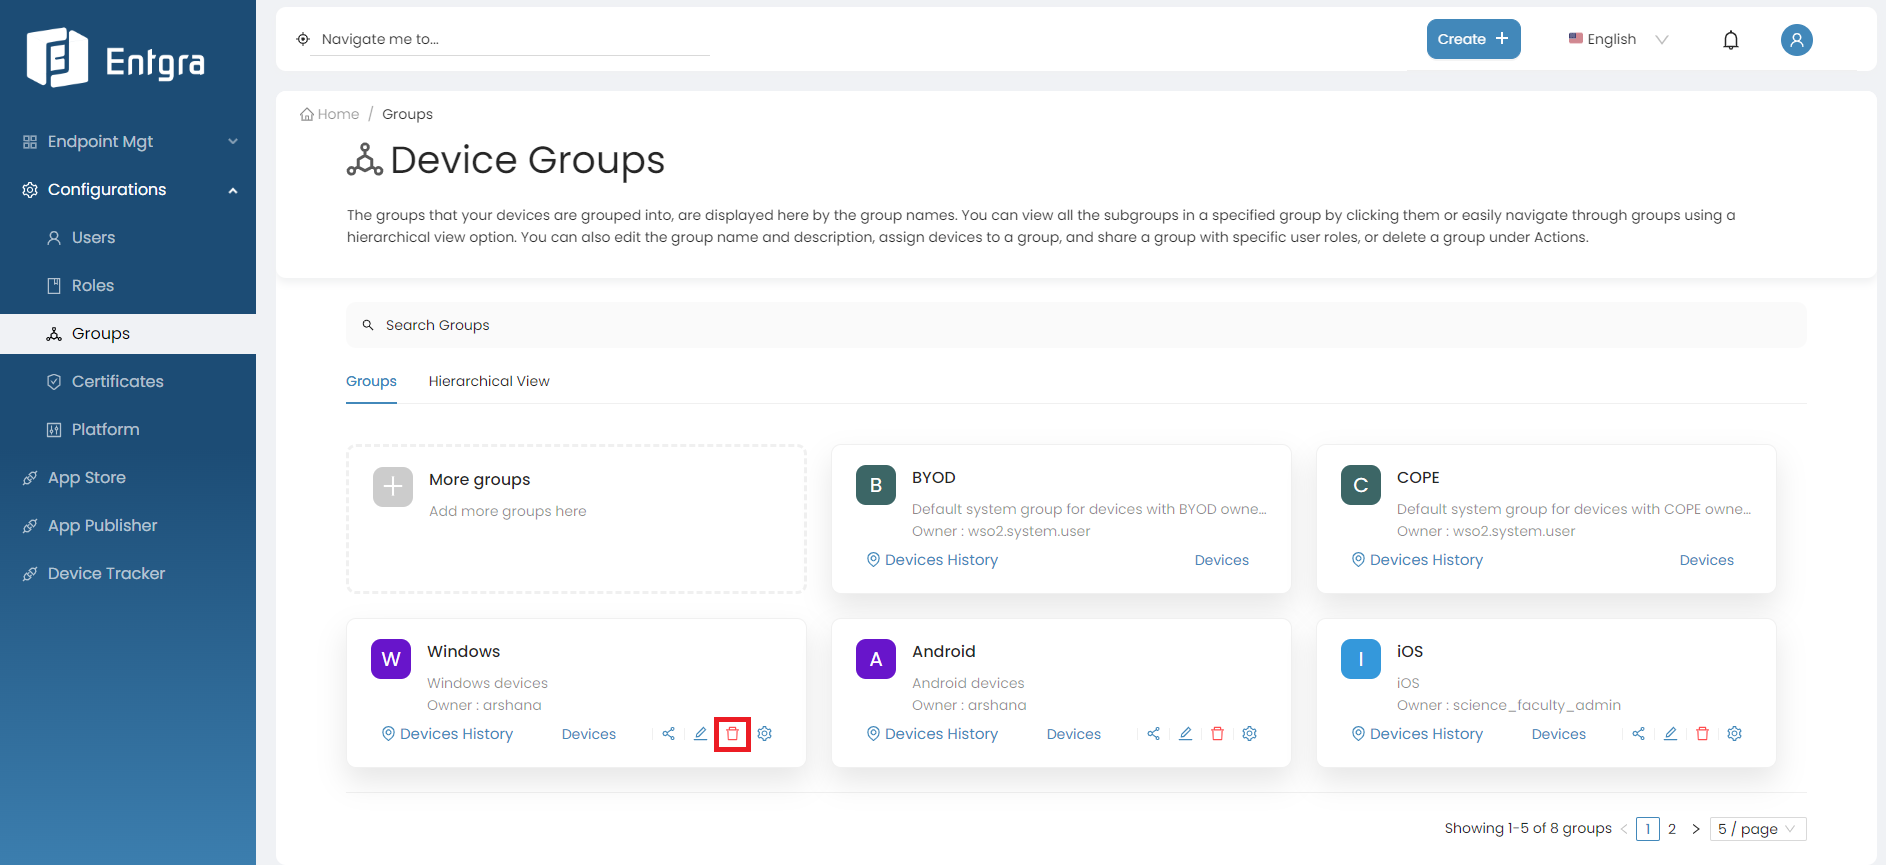
-
Click Yes, to confirm that you want to delete the group.
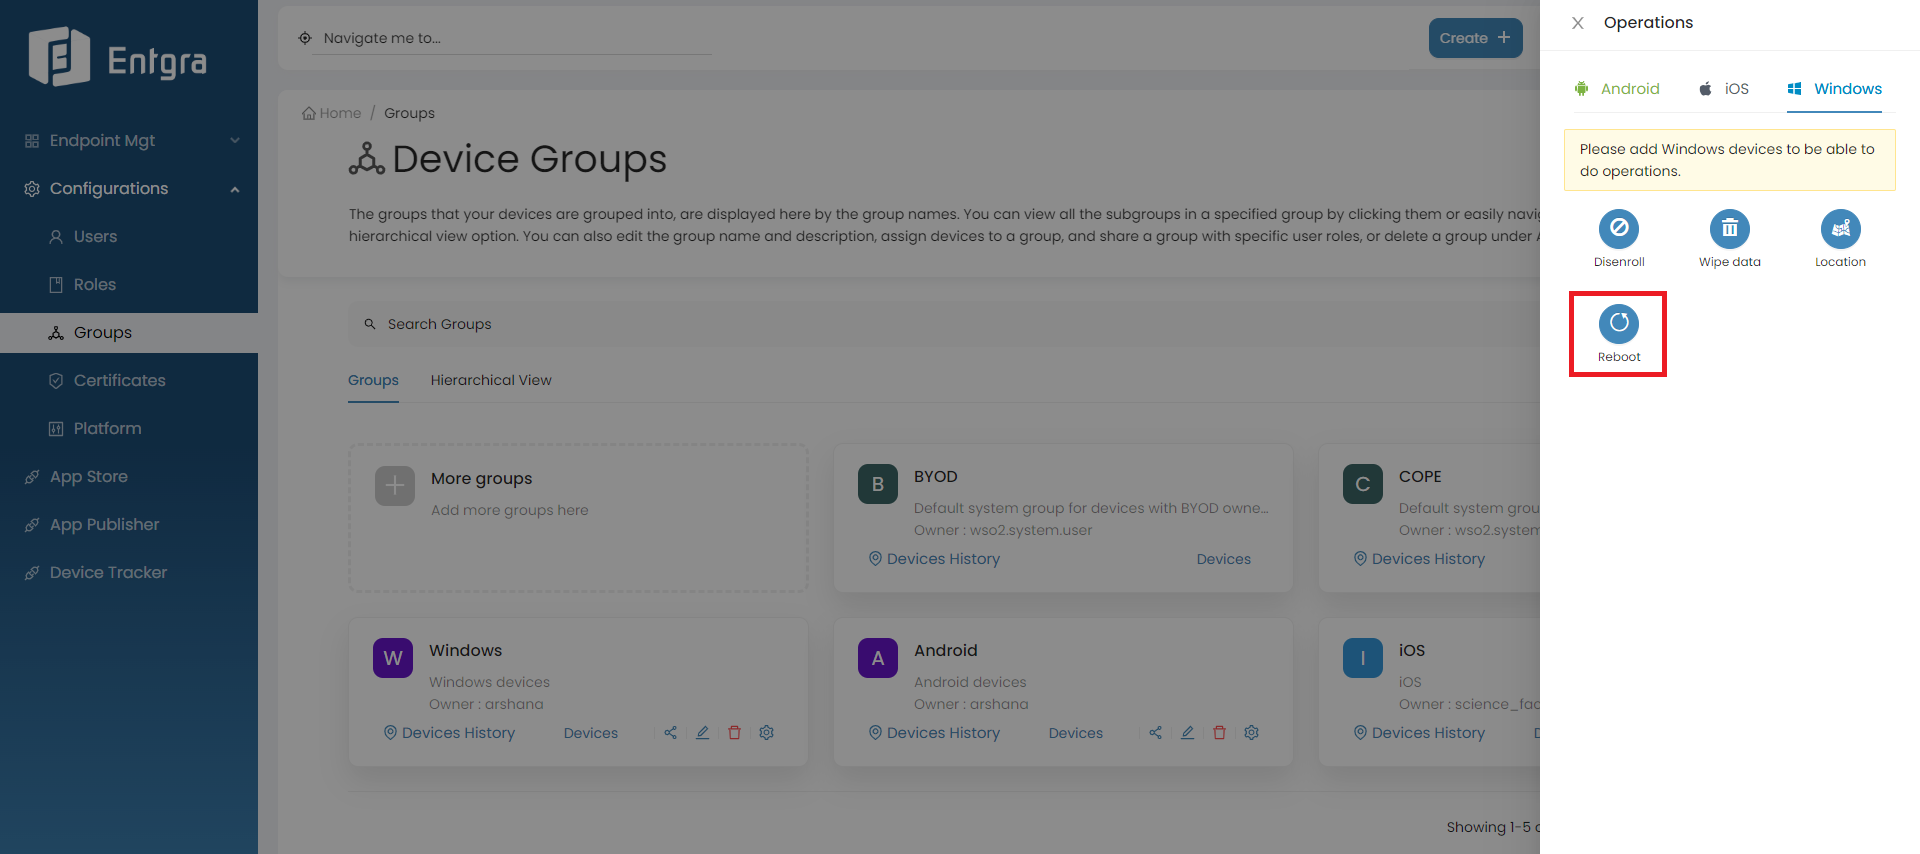
Add Operations to Groups
-
Click the Operations icon on the group you want to trigger operations.
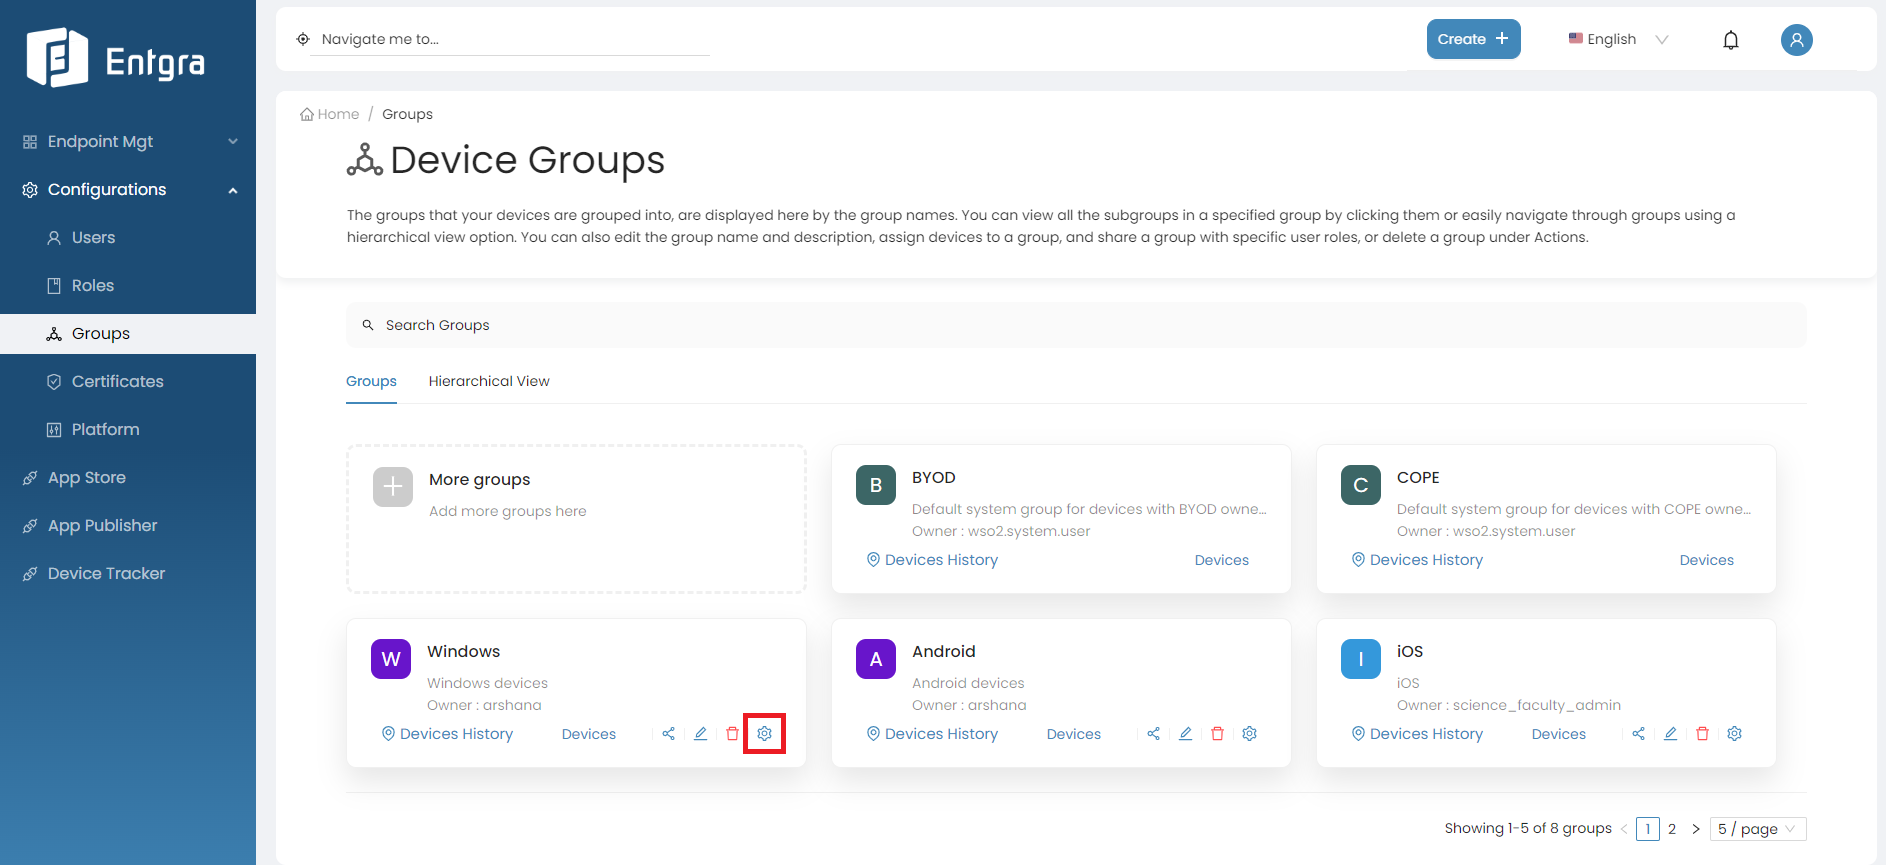
-
Click on the operation that you need to apply to the group. (Example: Reboot)
View Devices Location History
-
Click Devices History on the group you want to view the location history of its corresponding devices.
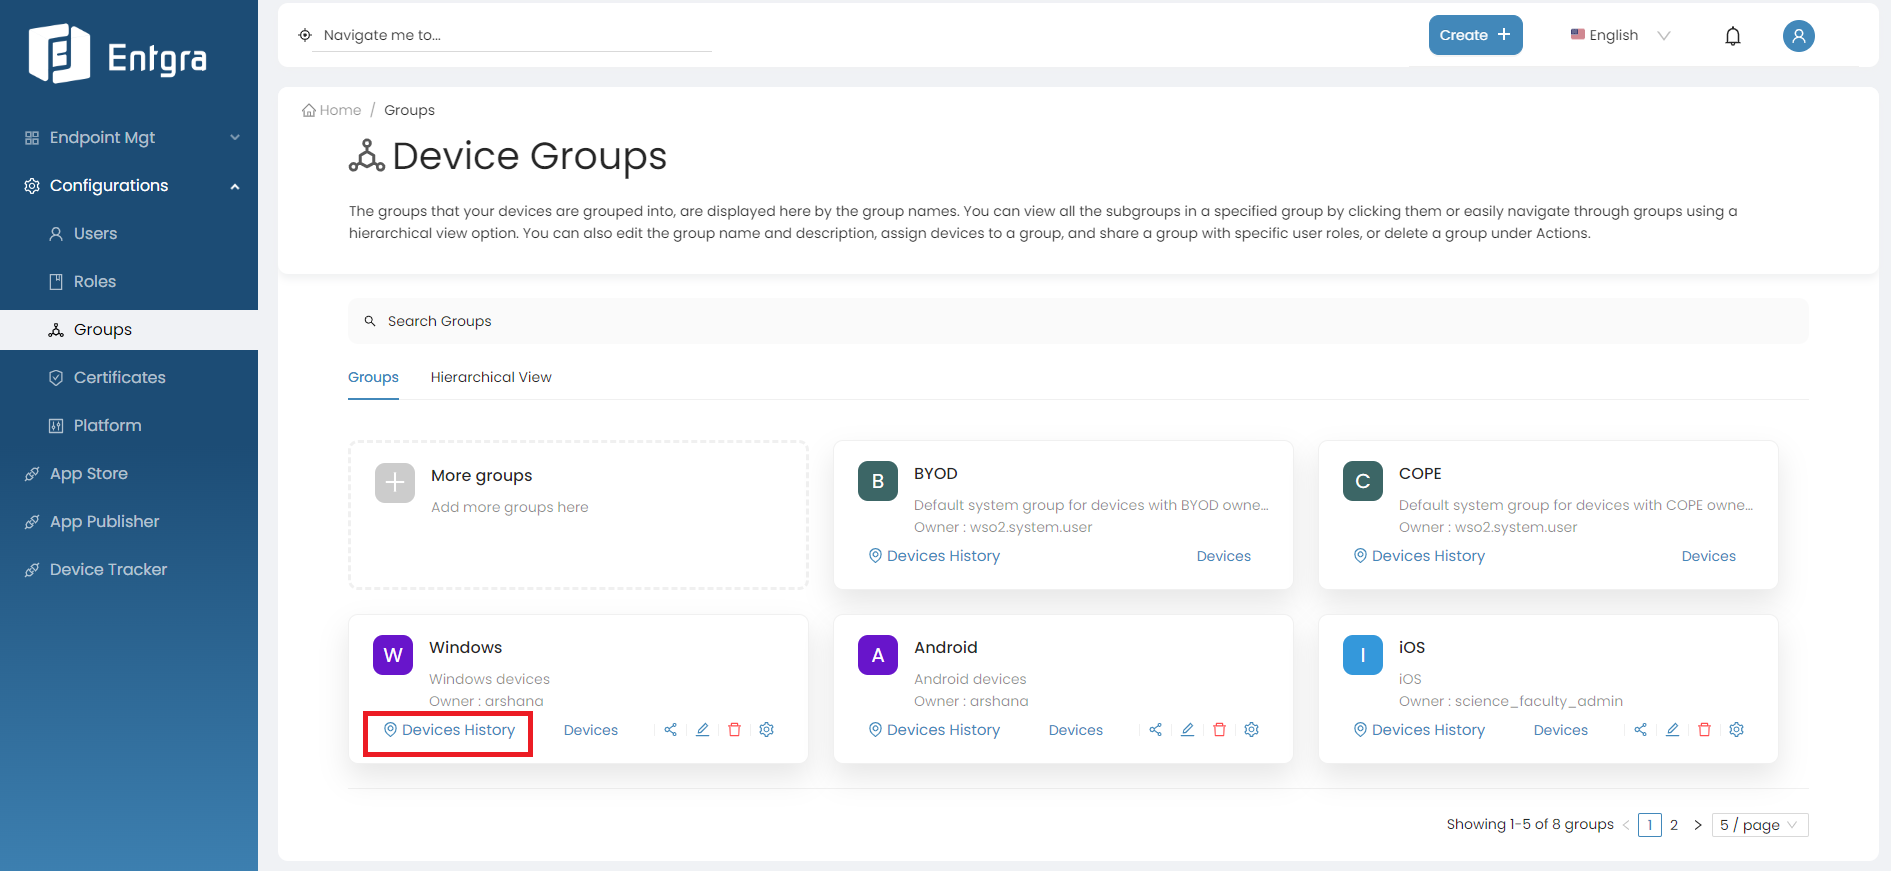
-
Provide duration you want to see devices history and click on the serach icon.

-
You can view the location history of devices belongs to the selected group.
Manage Certificates
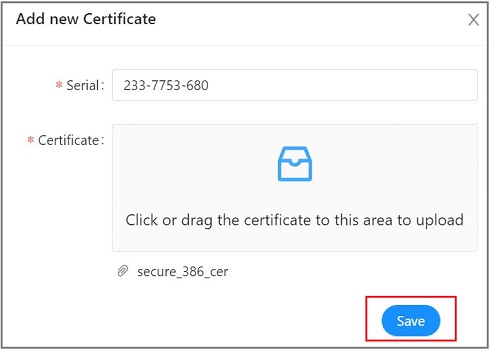
Add Certificates
-
Sign in to the Entgra UEM Server console.
-
Click Create + in the top right corner and select Certificate.
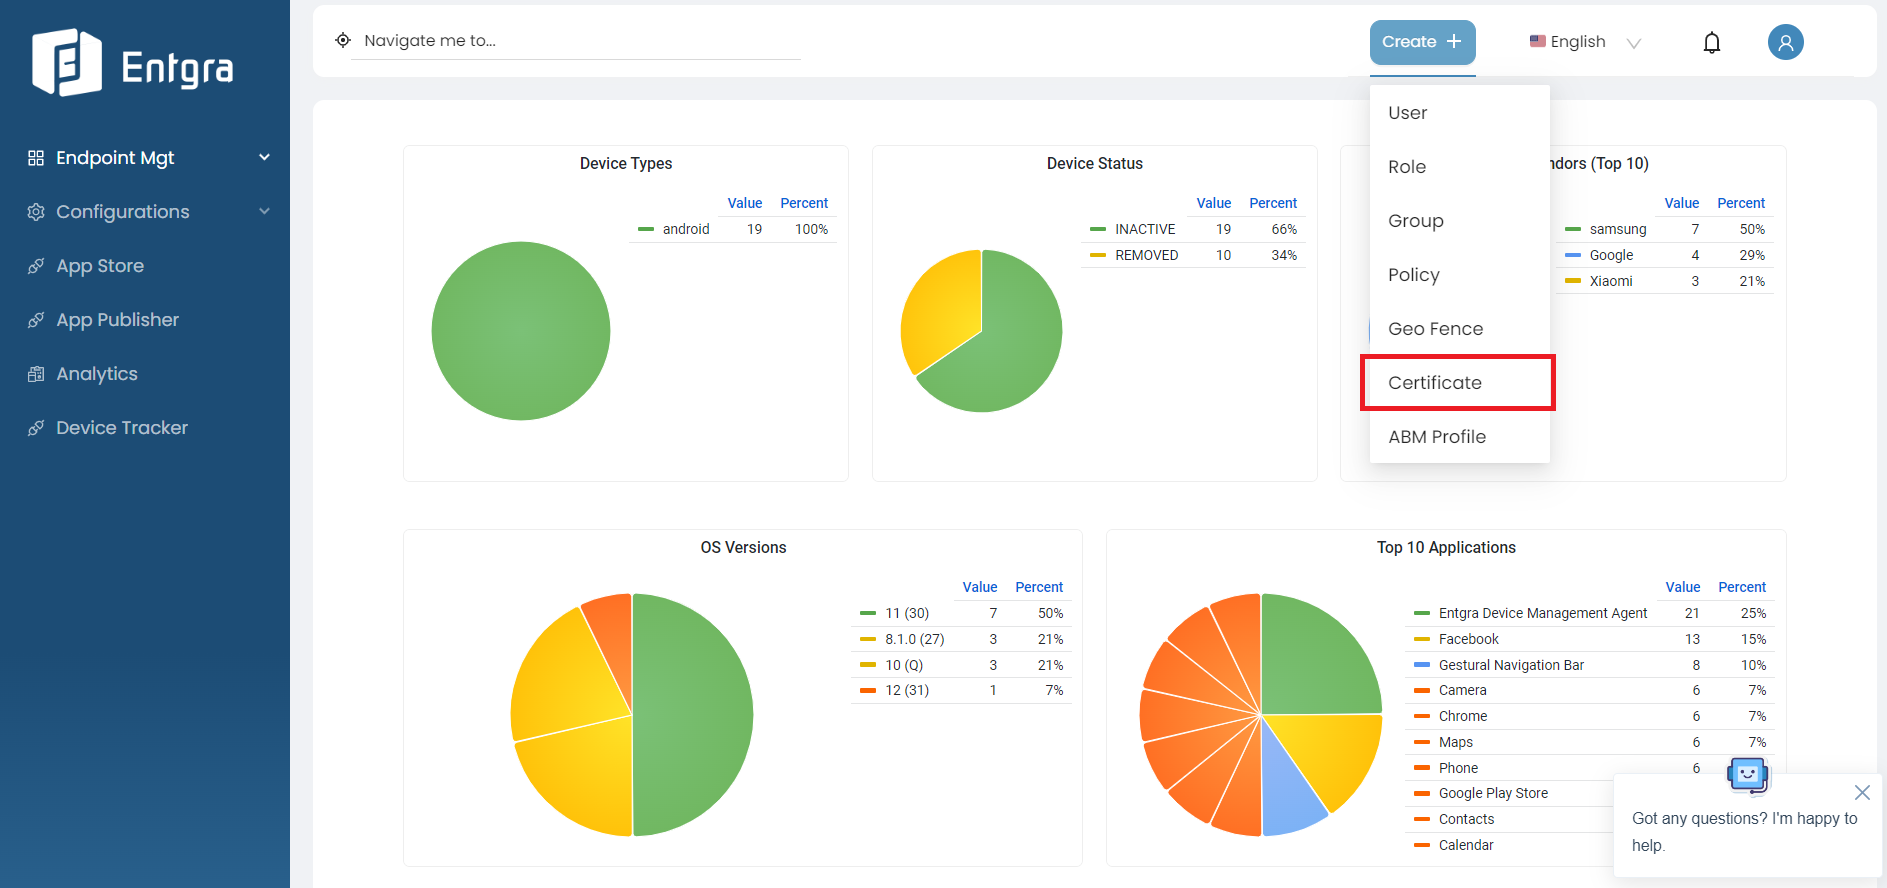
-
Enter the serial number and attach the certificate in the given fields. Click Save.
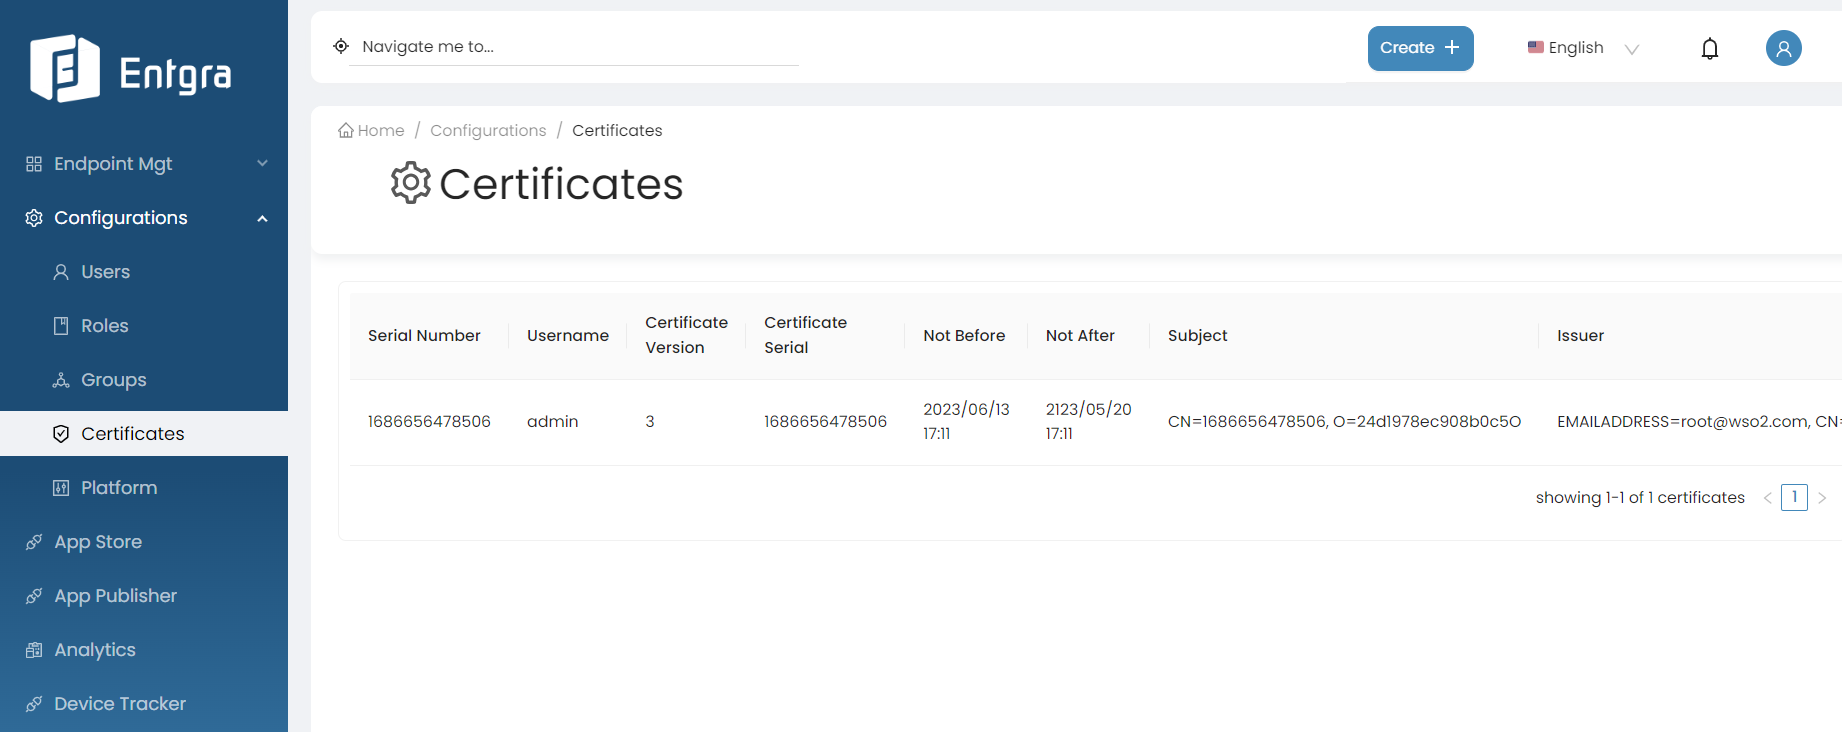
View Certificates
-
Sign in to the Entgra UEM Server console.
-
Go to Certificates under Configurations.
Remove Certificates
- Select the certificate record that you wish to delete and click on the delete icon.
-
A dialog box will be prompted asking you to confirm that you wish to delete the record, where you can click OK, if so.

-
Your certificate record will now be deleted.
Platform Configurations
General Configurations
Follow the instructions below to configure the general platform settings:
-
Sign in to the Entgra UEM Server Endpoint Management Console.
-
Click Platform Configurations under Configurations.
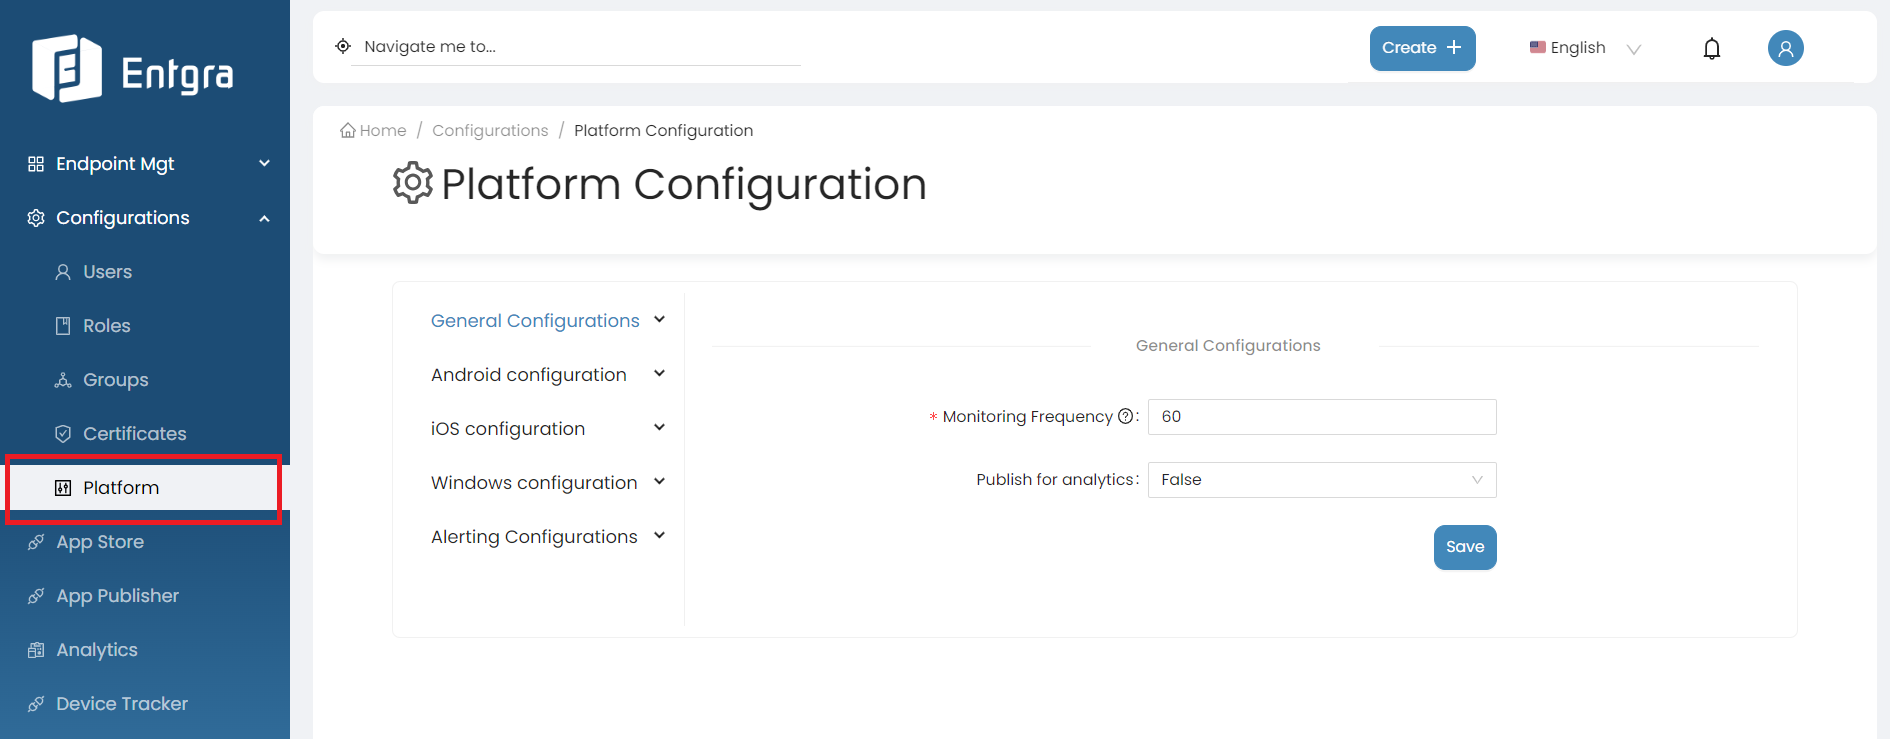
-
Click General Configurations under Platform Configurations.
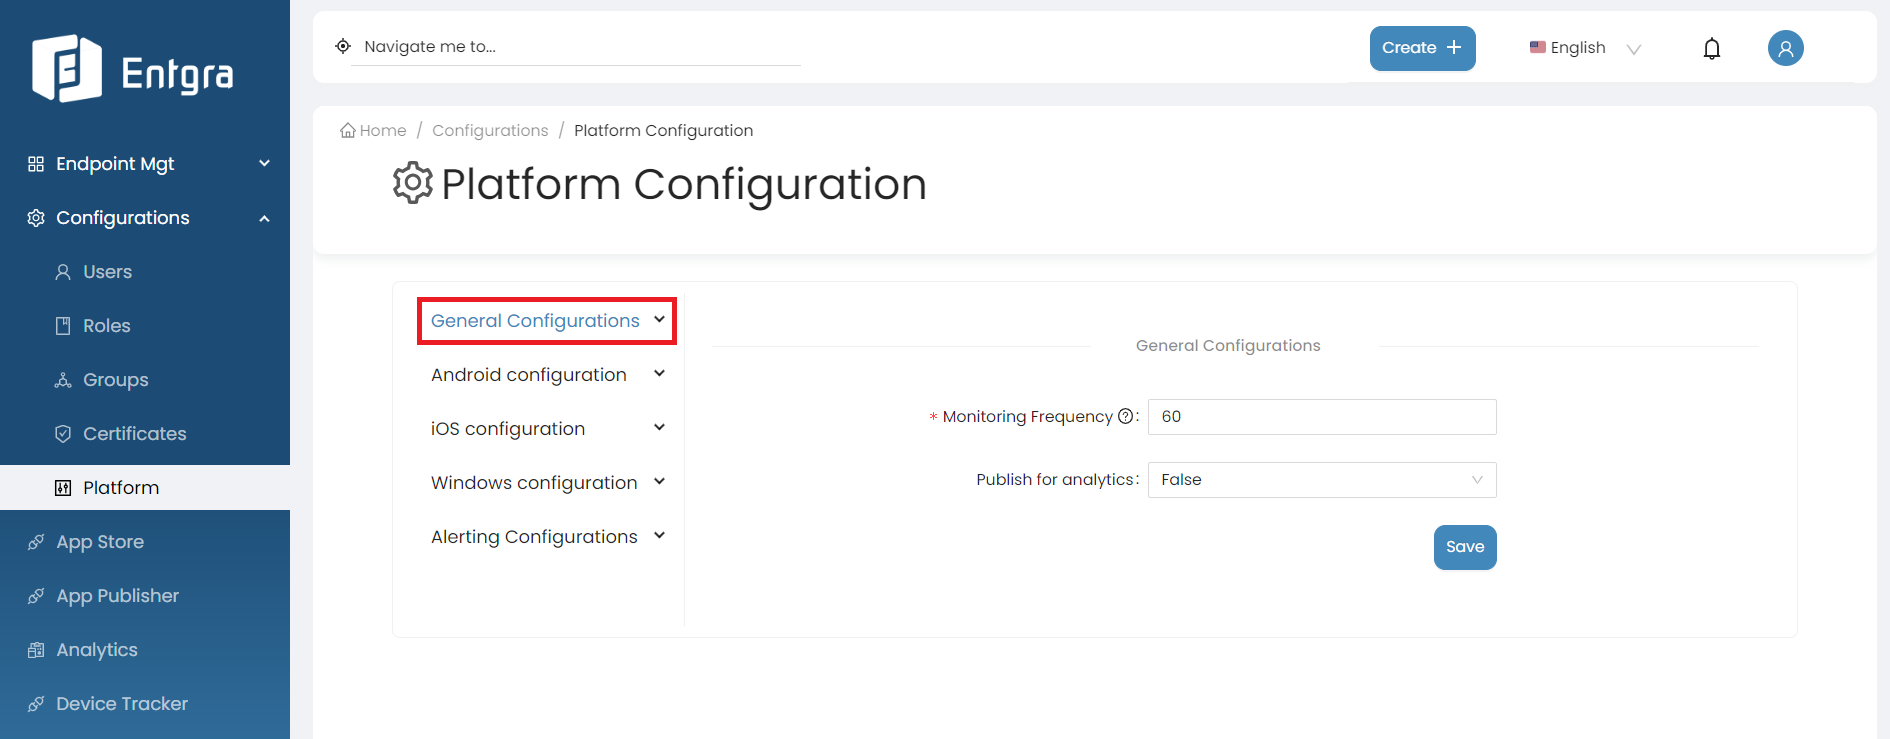
There are 8 main configuration sections for General Configurations:
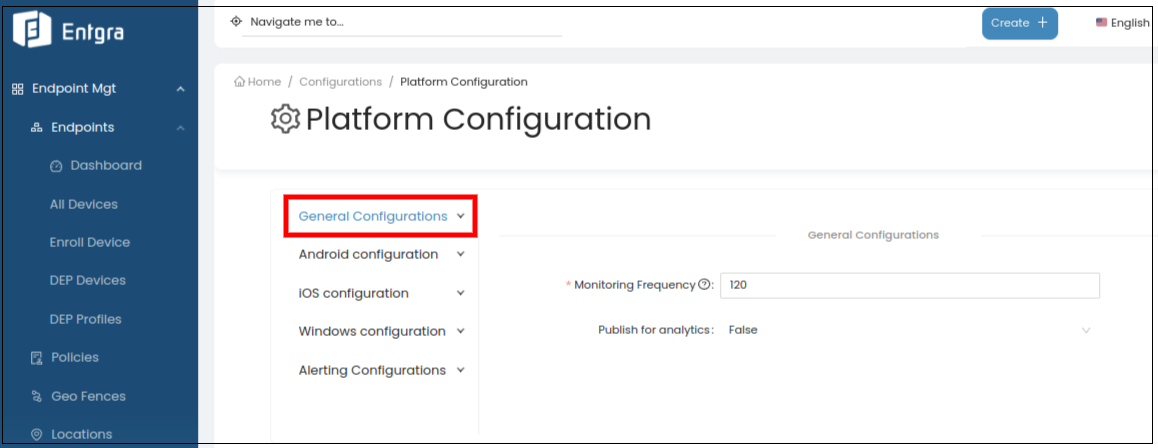
General
The general platform configurations for Entgra UEM Server involves setting up configurations for monitoring how often the devices are enrolled with the server.
By following the steps below, you can modify general configurations;
-
Log in to the Endpoint Management Portal.
-
Go to General Configurations under the Platform Configurations.
-
Select General.
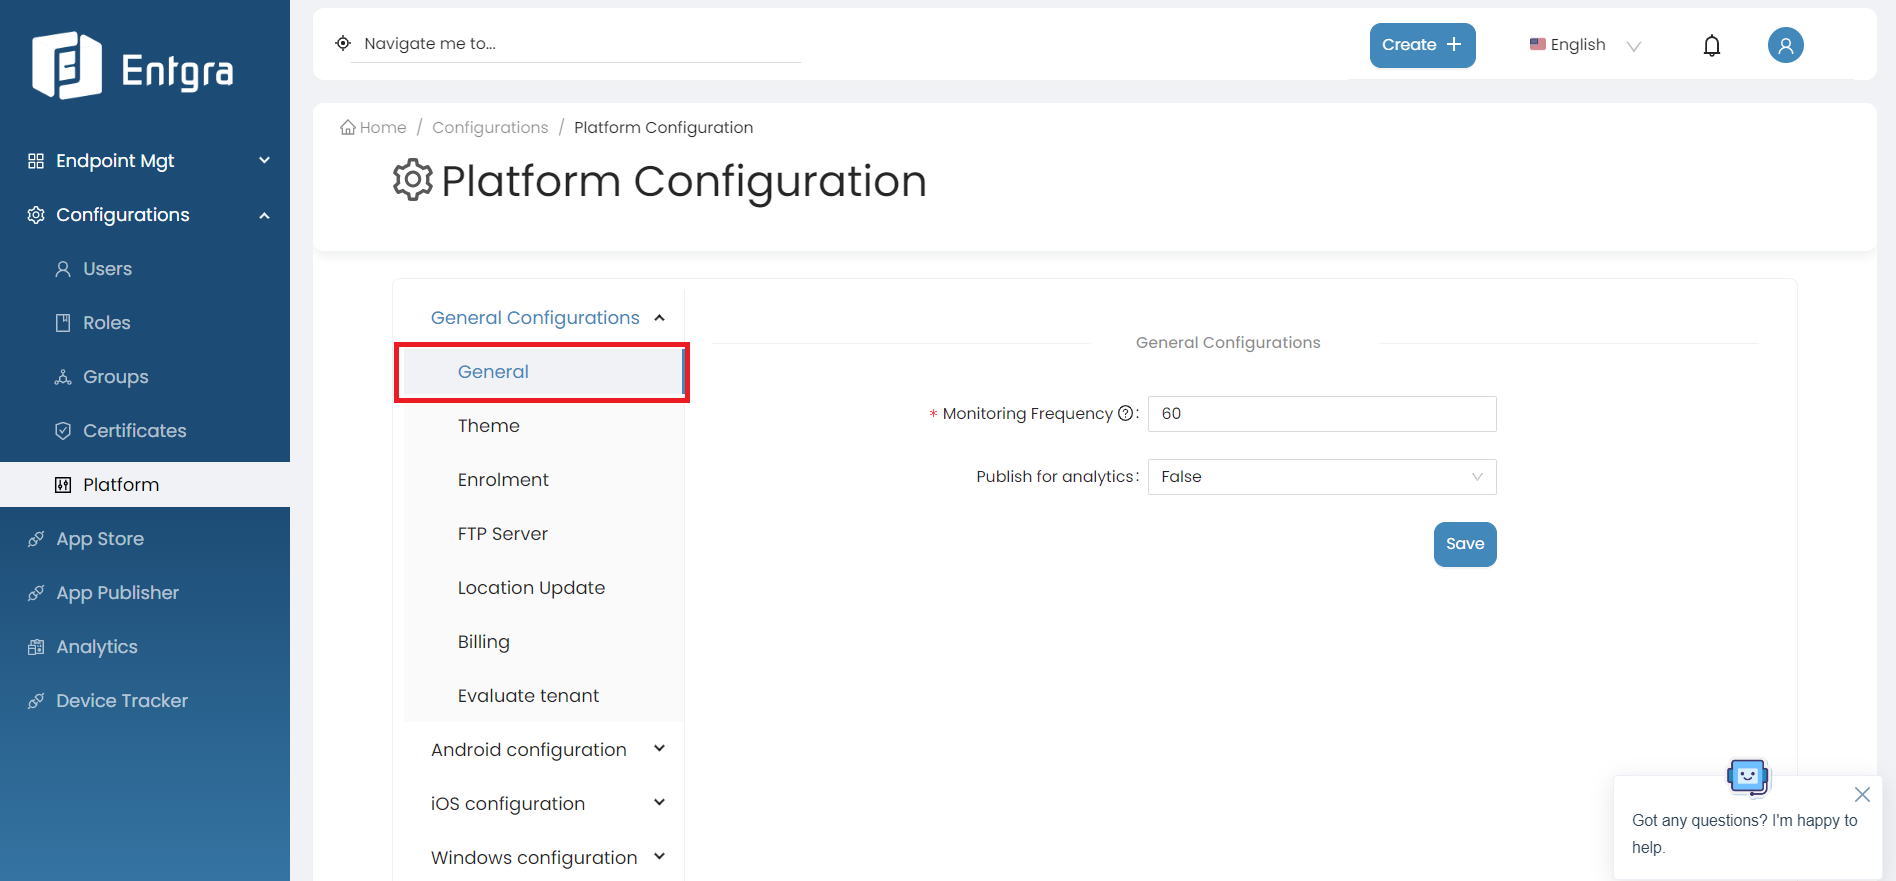
-
Fill in the required fields.
Field Description Monitoring Frequency Define the Monitoring Frequency in seconds, to monitor the enforced policies on the devices. Publish for analytics The available options have been explained as follows: False - Use this option not to publish analytics, True - Use this option to publish analytics -
Click on Save.
Theme
The theme configuration allows customization of the visual appearance of the platform, providing a consistent and personalized user experience. Tenant admins can customize the platform's theme to align with the organization's branding guidelines.
Follow the instructions below to modify theme configurations:
-
Log in to the Endpoint Management Portal.
-
Go to General Configurations under the Platform Configurations.
-
Select Theme.
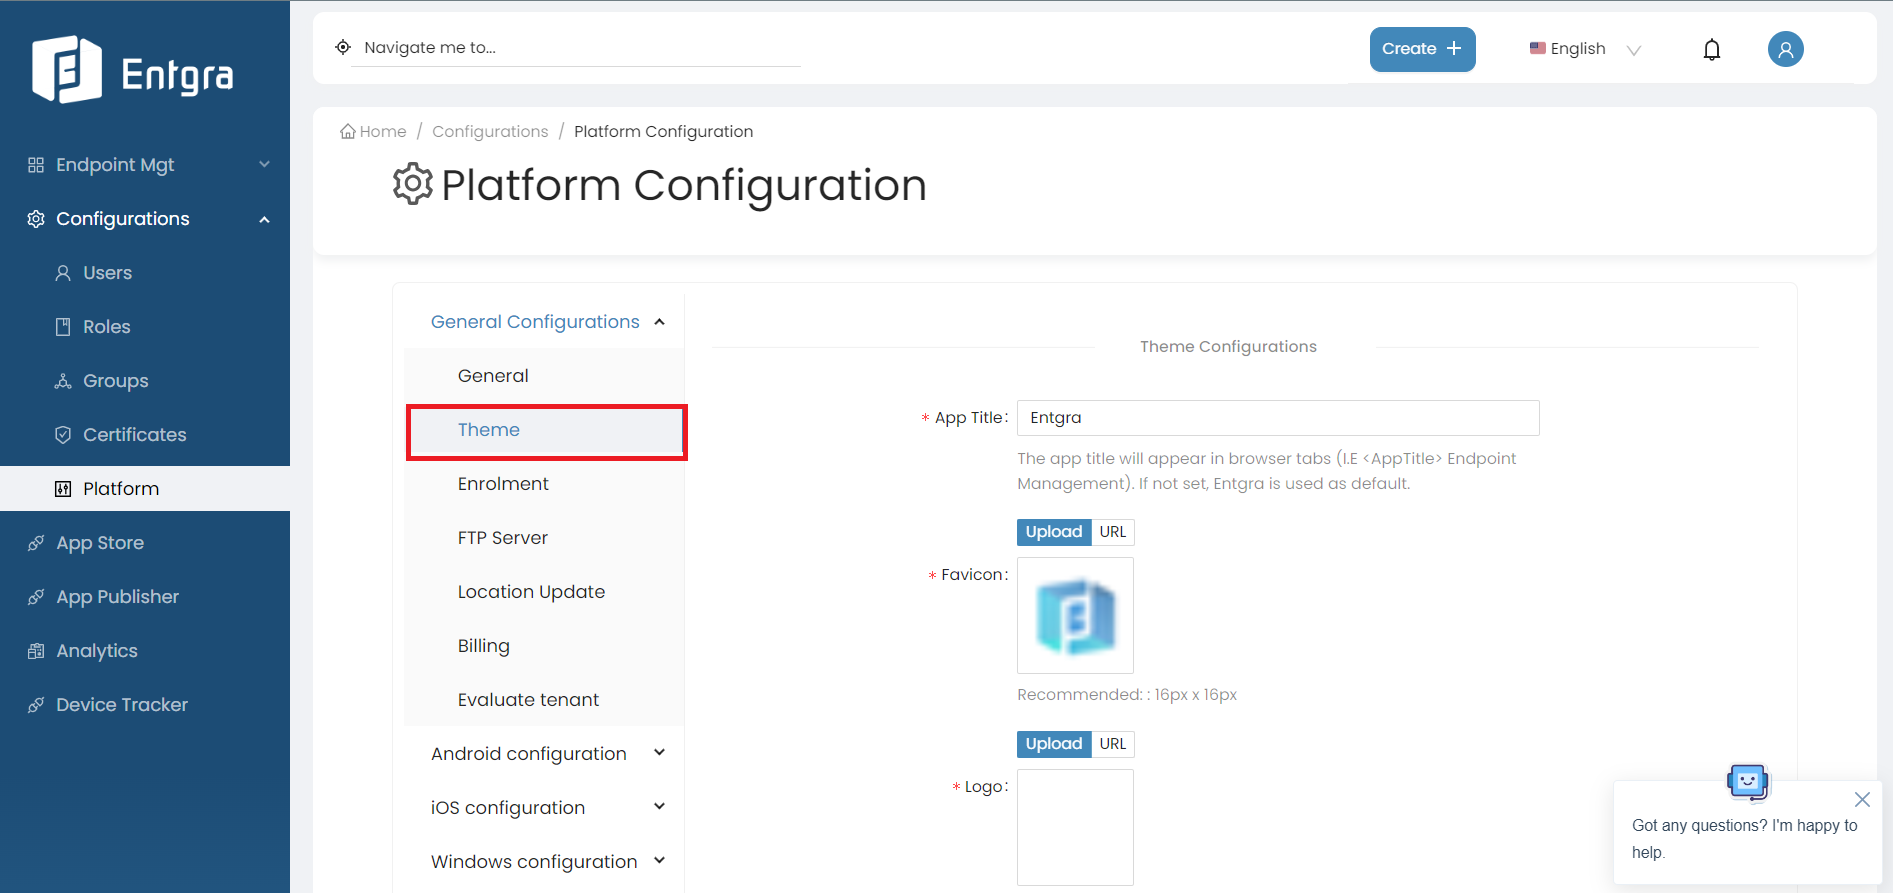
-
Fill in the required fields.
Field Description App Title The app title that appears in browser tabs. (I.E Endpoint Management).If not set, Entgra is used as default. Favicon The favicon will appear in browser tabs. Recommended: 16px x 16px Logo The logo uploaded will be shown on the sidebar. Recommended: min: 320px max: 1920px Logo Icon The logo icon uploaded will be shown when the sidebar is collapsed. If not set, the default Entgra icon is used. Footer Text The footer text uploaded will be shown in the footer of the console. Recommended: max. 100 char. -
Click Save.
Further explore this feature by referring to our comprehensive blog article
Unlocking The Power Of Personalization With Entgra UEM 5.2’S Per-Tenant Theming Feature
Enrolment
This functionality is used for uploading a set of serial numbers of devices and the user/group that they should be assigned to.
If you upload a JSON file with the device serial and its group prior to enrolling the devices, when enrolling, the server checks the incoming device's serial and looks up the matching group in the JSON, and assigns the device to the correct group.
Follow the steps given below to upload an enrollment config file:
-
Log in to the Endpoint Management Portal.
-
Go to General Configurations under the Platform Configurations.
-
Select Enrolment.
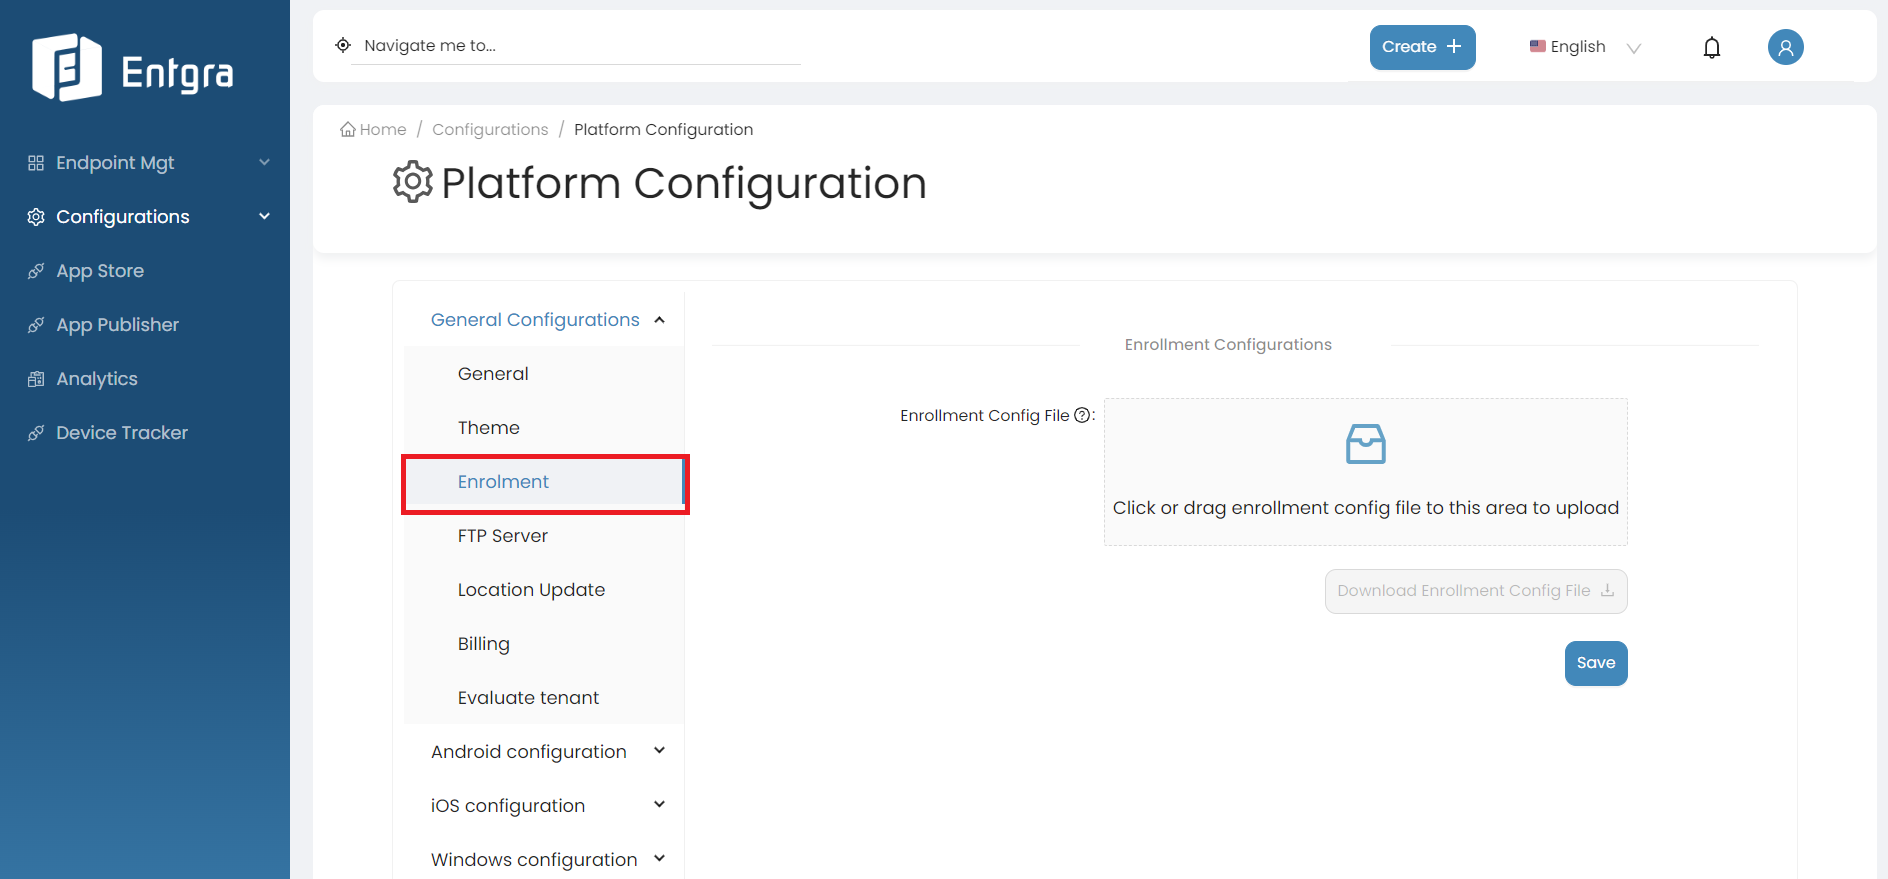
-
Upload the enrollment config file (JSON file).
Supported Foramt Examples
- Enroll devices having the serial numbers only
- Enroll devices having the serial numbers assigned against users
- Enroll devices having the serial numbers to the specified group
- Enroll devices having the serial numbers assigned against users and then add those devices to assigned groups
{"userConfigurations":[{"username":"user1","serialNumbers":["1","2","3","4","5"]},{"username":"user2","serialNumbers":["6","7","8","9"]}],"groupConfigurations":[{"groupName":"group1","serialNumbers":["1","2","3"]},{"groupName":"group2","serialNumbers":["4"]},{"groupName":"group3","serialNumbers":["6","7","8"]},{"groupName":"group4","serialNumbers":["9"]}]}
-
Click on Save.
FTP Server
Under the FTP server section in General Platform settings, you can add a new FTP server.
Follow the steps given below to add a new FTP server:
-
Log in to the Endpoint Management Portal.
-
Go to General Configurations under the Platform Configurations.
-
Select FTP server.
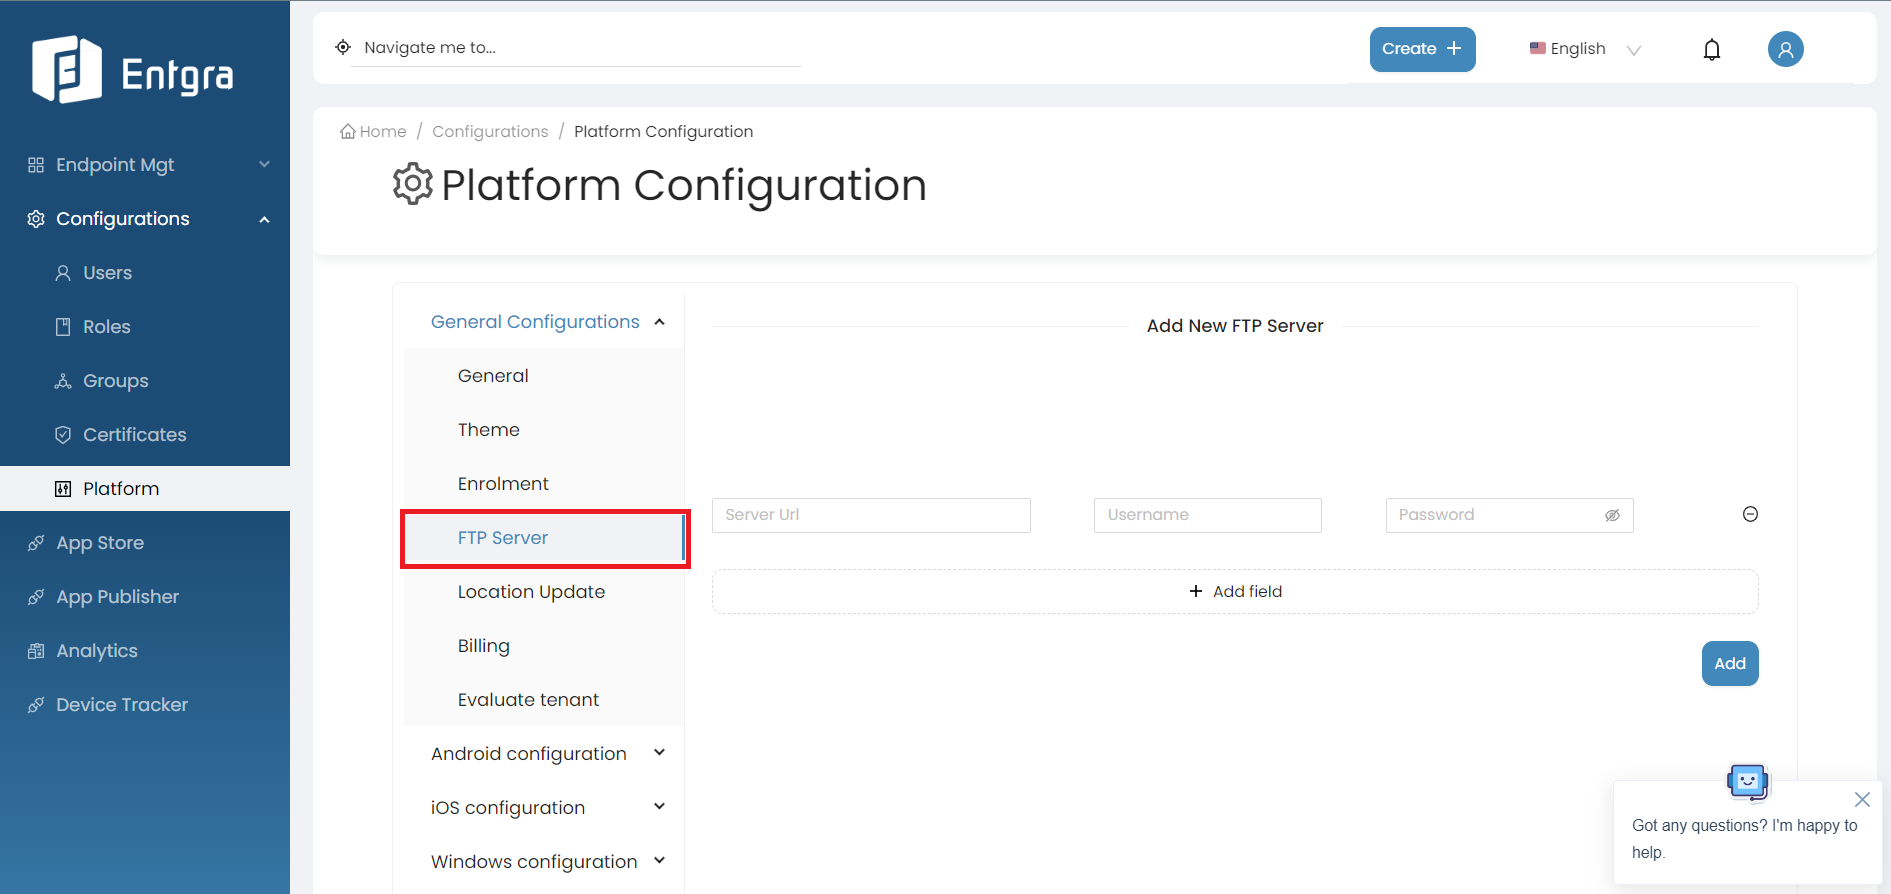
-
Add a new FTP server in there and click Add.
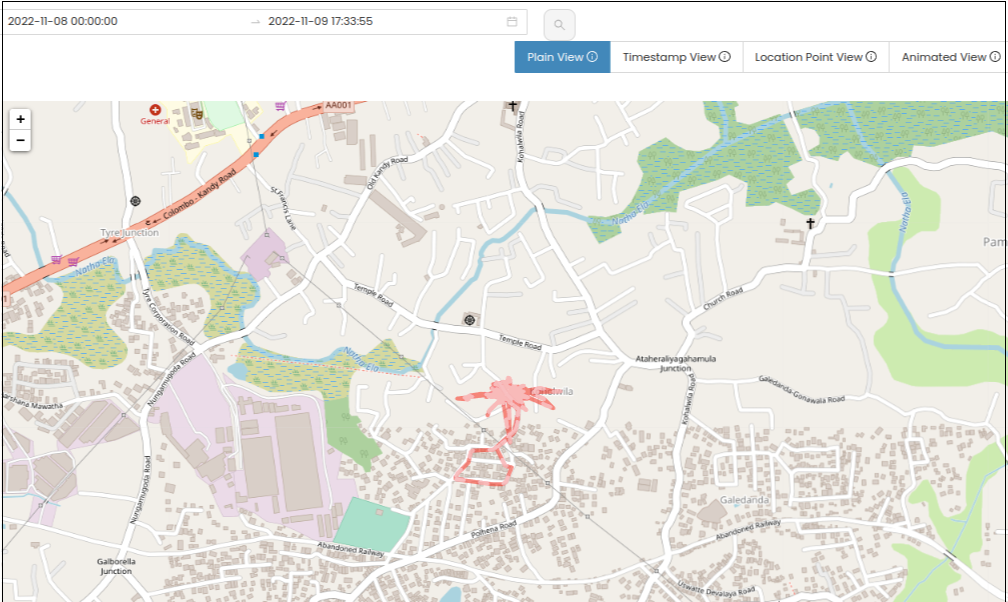
Location Update
The Location Update configuration is for enabling the geofencing feature required for Location-Based Services [LBS] in a multi-tenant environment. The feature is used for tracking the device using continuous location publishing on the Entgra UEM server.
By following the steps below, you can see the location being published continuously:
-
Log in to the Endpoint Management Portal.
-
Go to General Configurations under the Platform Configurations.
-
Select Location Update.
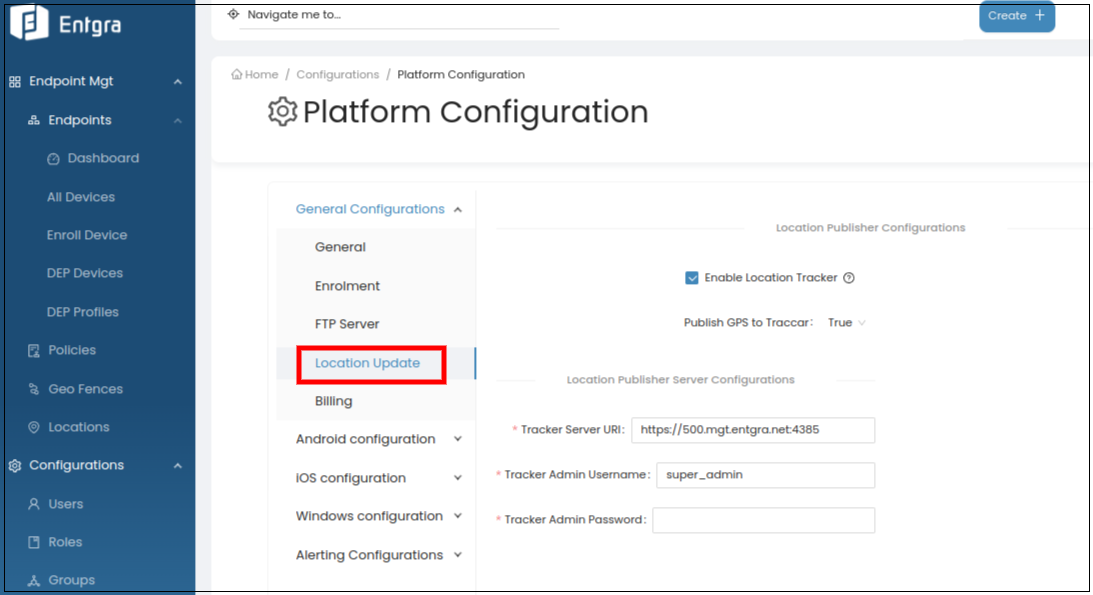
-
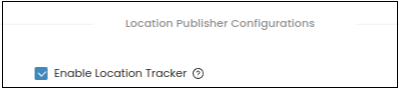
Select Enable Location Tracker check box.
-
Next, enroll a device to be tracked.
-
Move the device to different locations (i.e., carry it around over to different loations).
-
In the Endpoint Management Portal, locate the device.
-
Select the Location History under Device Location.
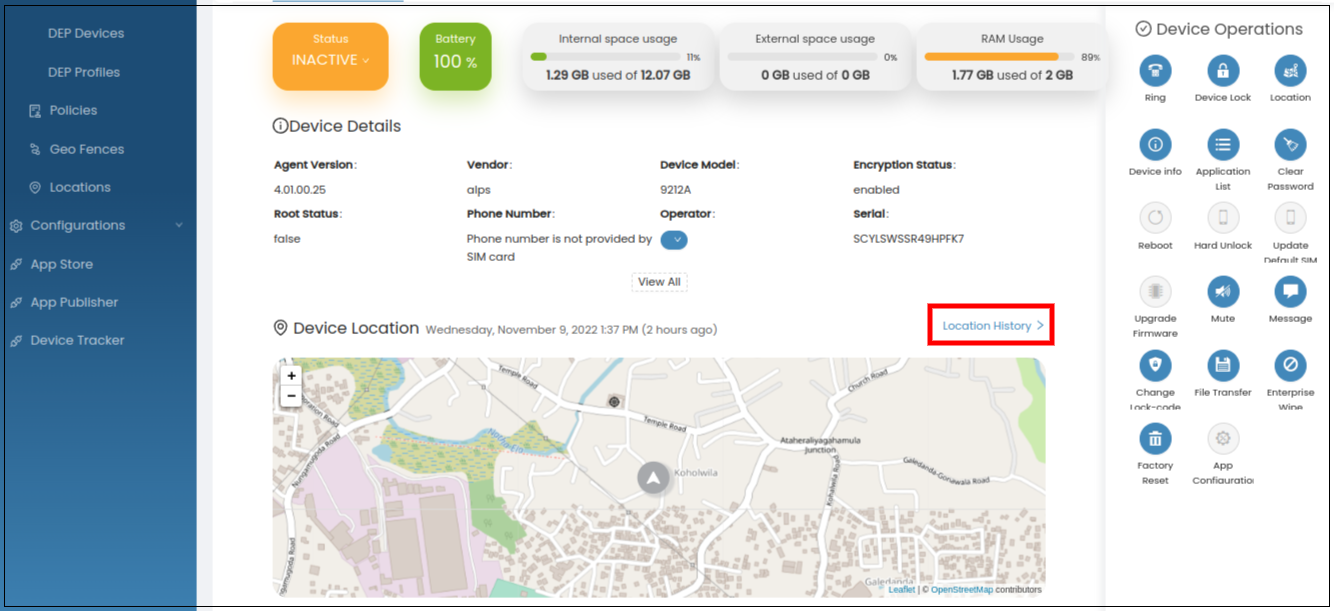
-
On the map view, you can see the locations that the device was moved to. The locations can also be filtered by date and time, as well by different types of views (plain view, timestamp view, location point view, animated view etc.).
There are some important points that need to be addressed to help the device send consistent location tracking data.
-
For location publishing to work consistently, location publishing permission should be configured as Allow all the time.
-
Any power saving/battery optimization configurations should be disabled.
The settings below are on different vendors about where and when the power saving configuration enables and exists:
-
Huawei: App launch (Settings > Apps > App launch)
-
Xiaomi Redmi: Auto Start
-
iPhone: Low power mode
-
Samsung: Power saving mode (Settings > Battery and device care > Battery > Limit apps and home screen)
Note: These settings may change according to the device model and the Android version.
Billing
The billing feature is used to generate the usages of the devices enrolled by each tenant.
Follow the instructions below to access the feature:
-
Log in to the Endpoint Management Portal.
-
Go to General Configurations under the Platform Configurations.
-
Select Billing.
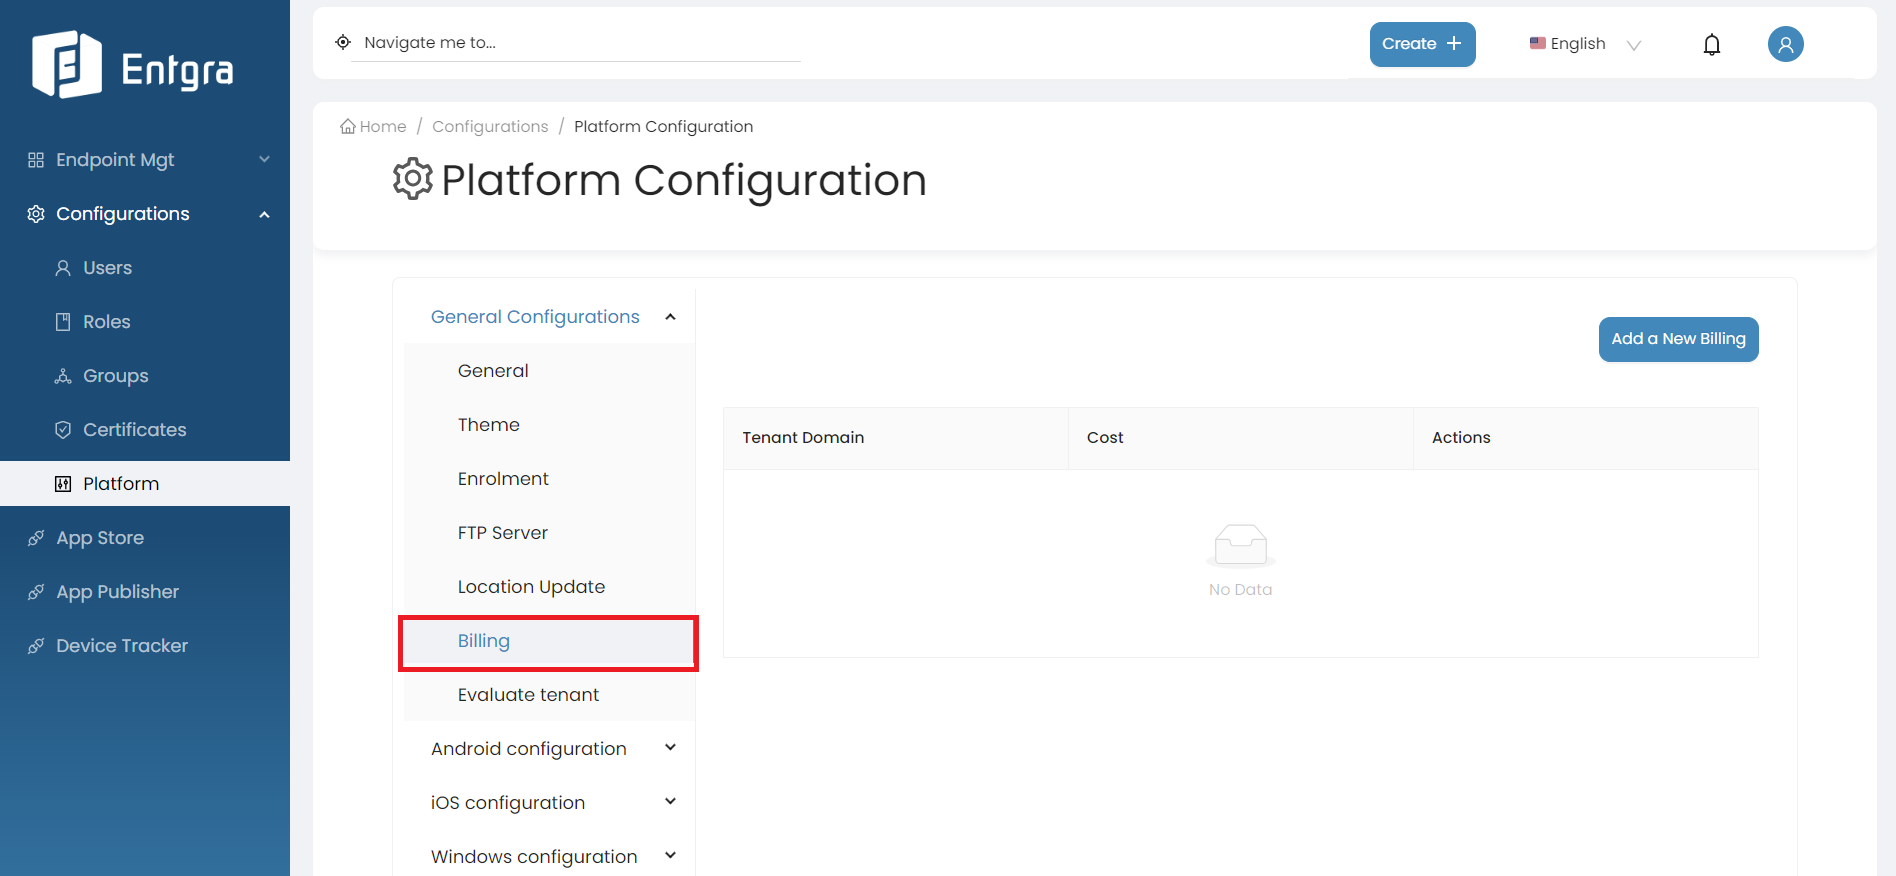
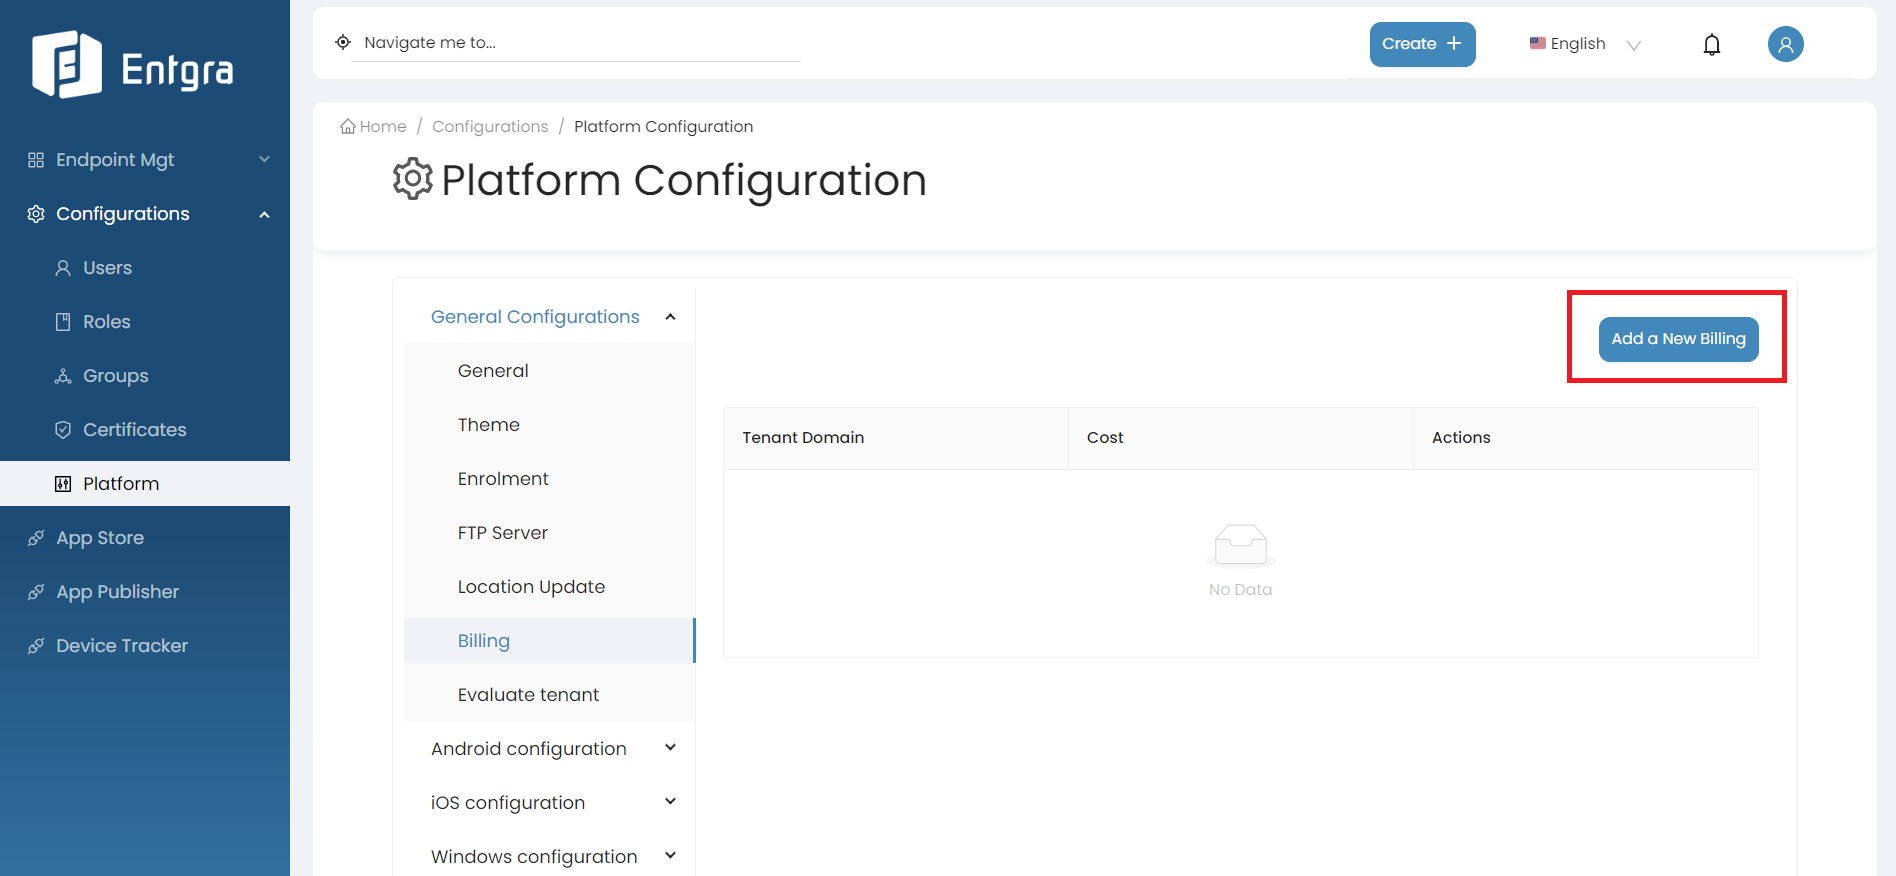
-
The super admin user has access to add the annual cost for a device for each tenant. Click Add a New Billing.
-
Select the tenant domain from the dropdown list.
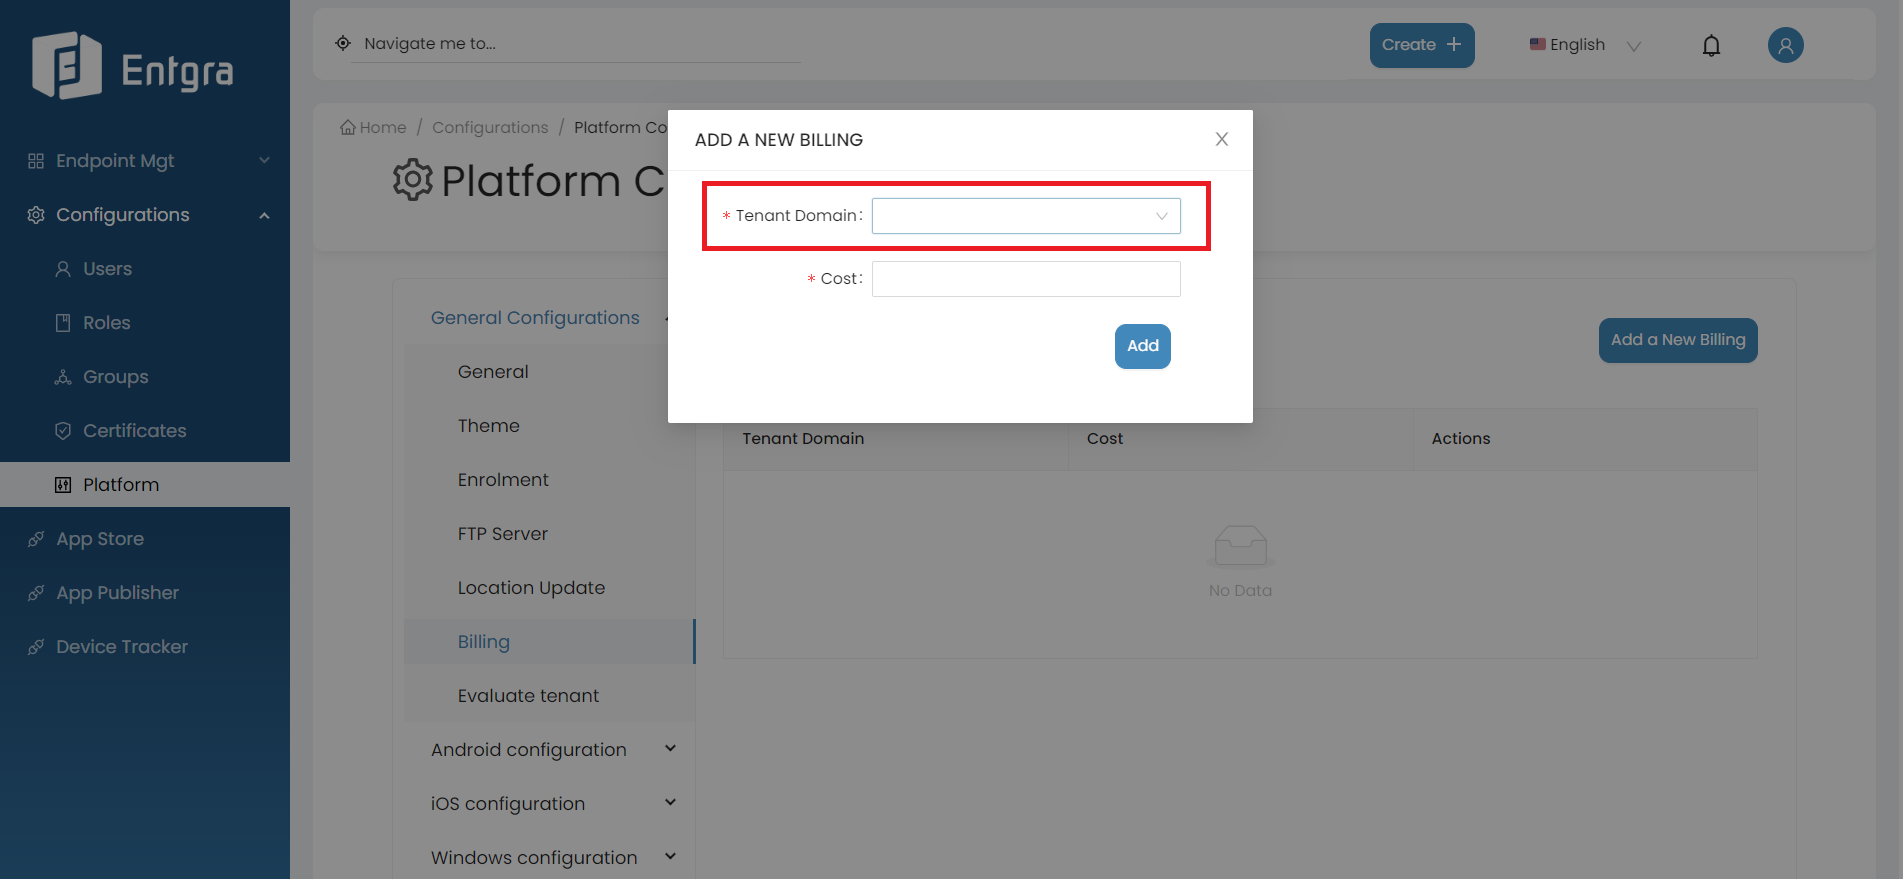
-
Add the annual cost for a device belonging to the tenant.
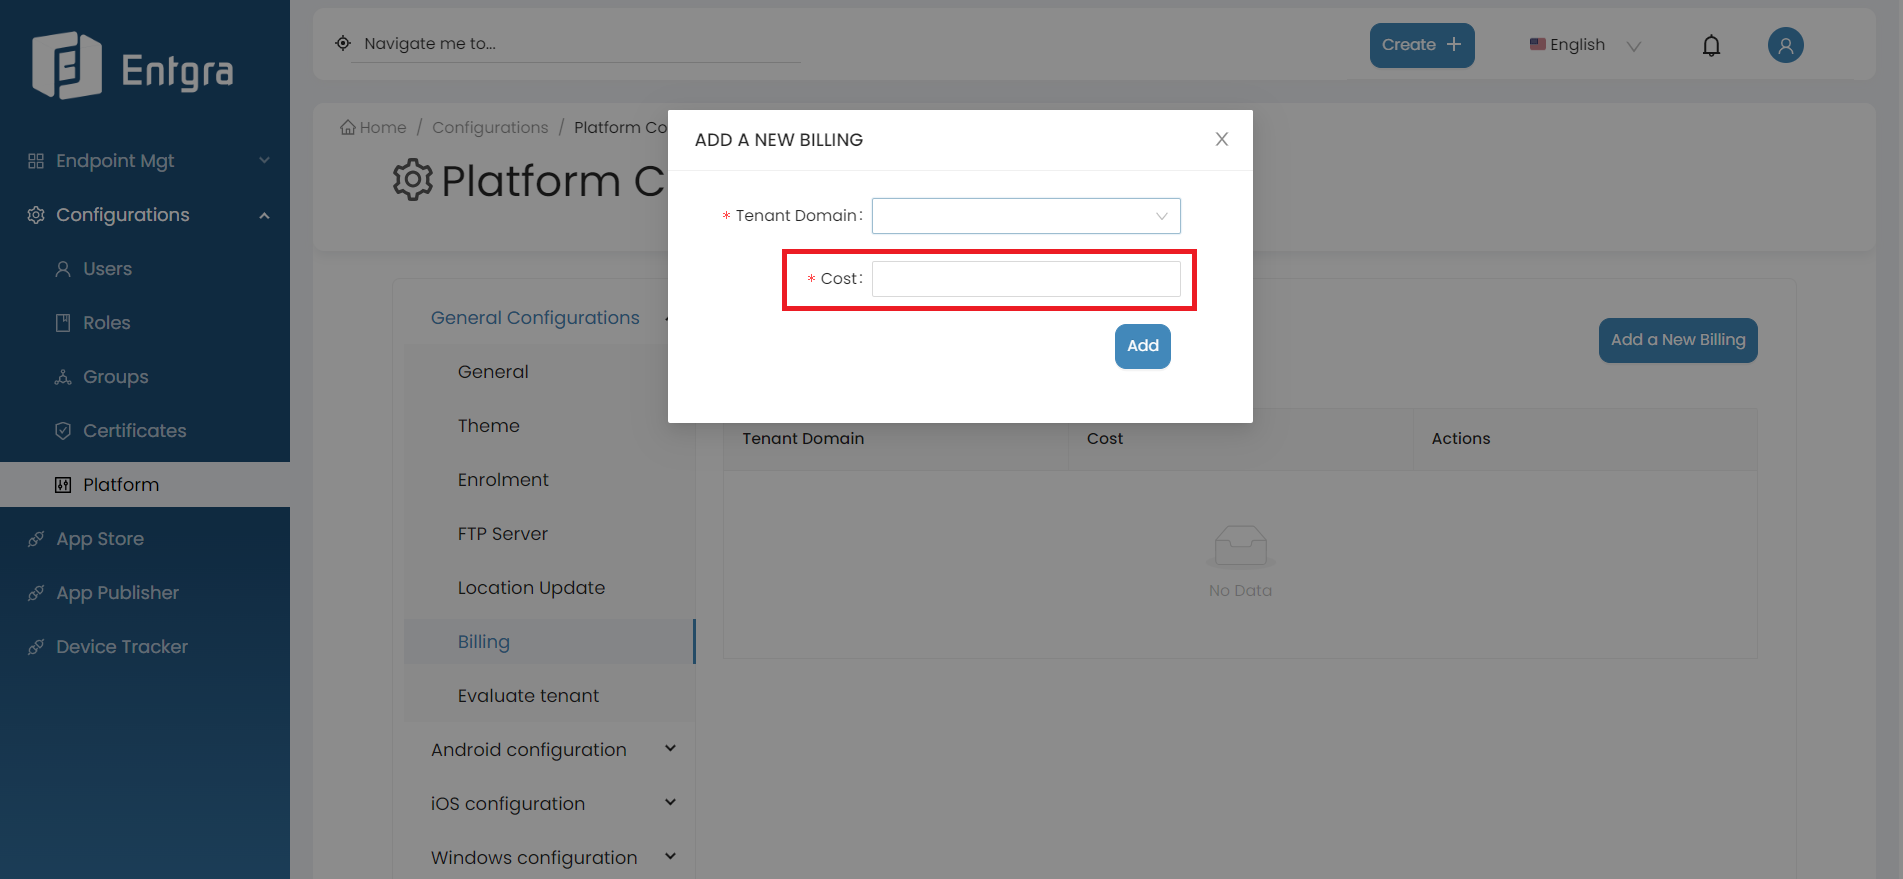
-
Click Add.
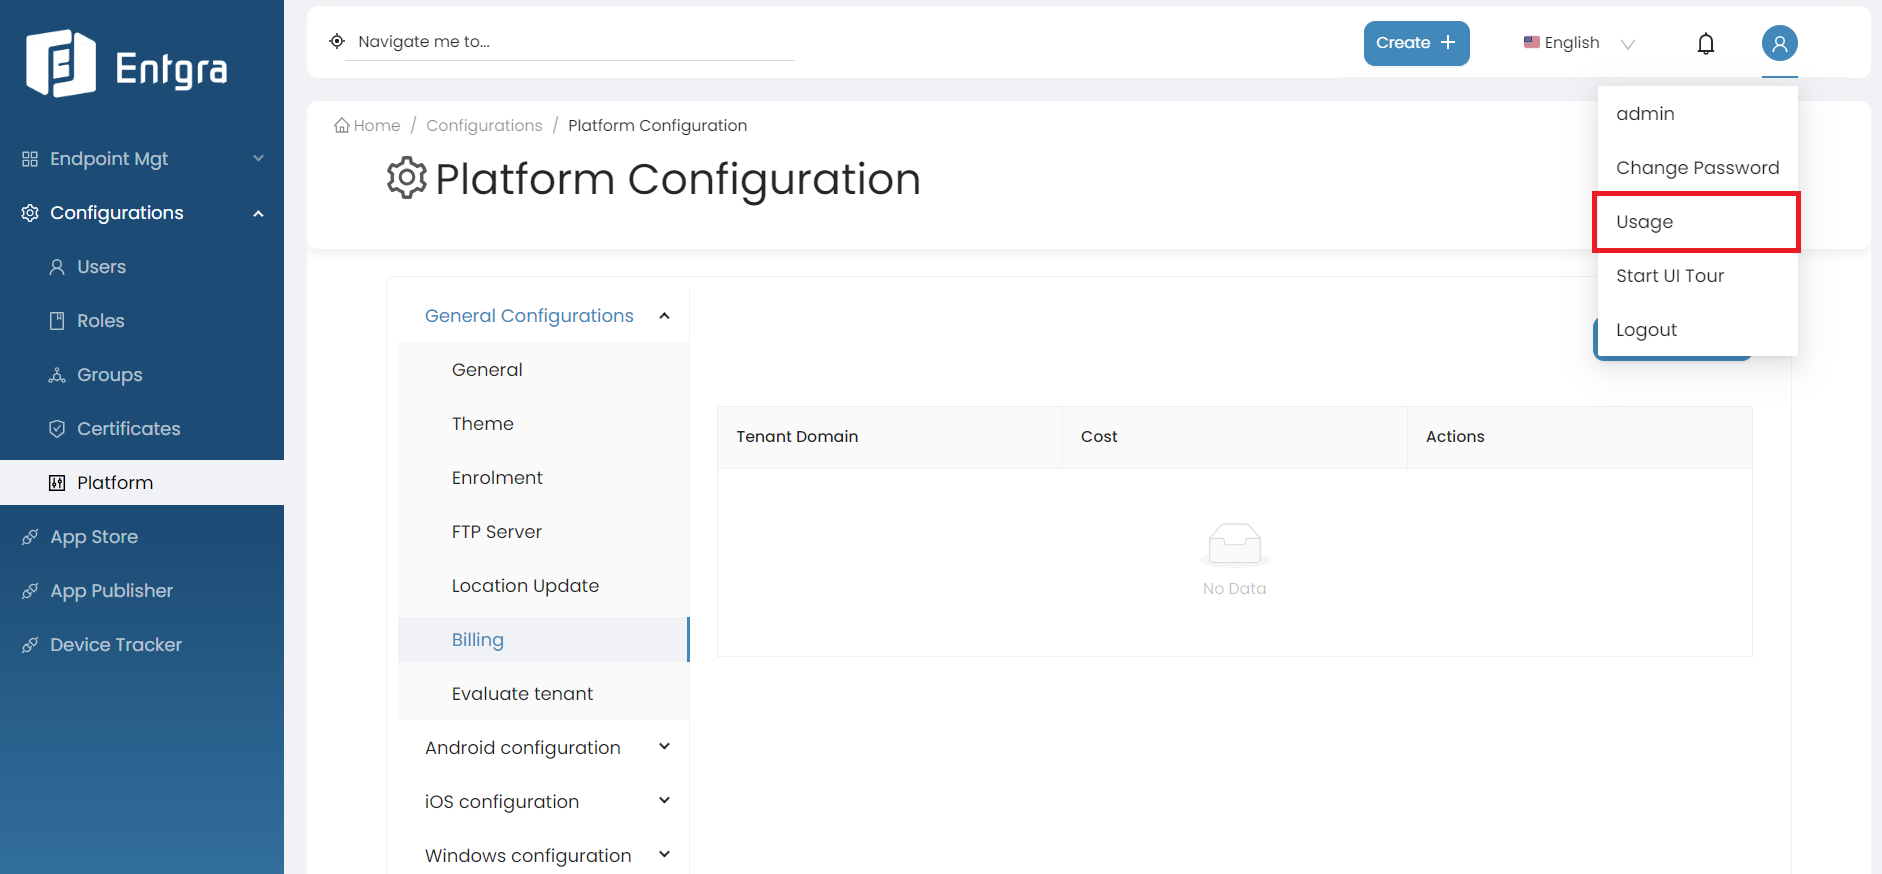
-
Super admin and other admins of the tenant will have the ability to generate usage reports for the devices they have utilized. Go to the Usage section in the main profile dropdown menu.
-
Enter start date and end date.
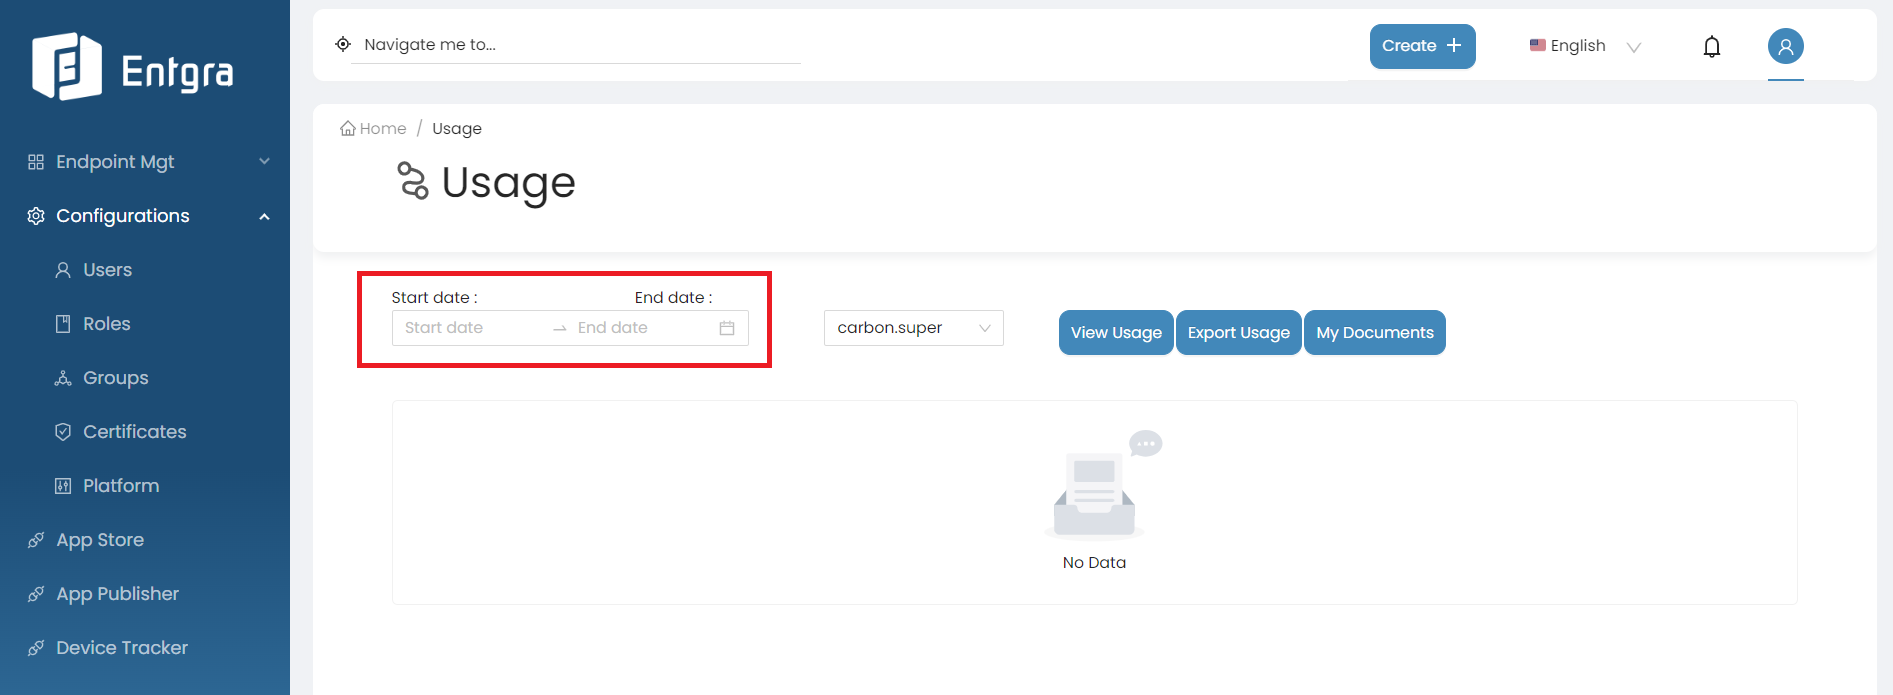
Field Description Start date The start of the usage period. End date The end of the usage period. -
Select the tenant domain from the dropdown list.
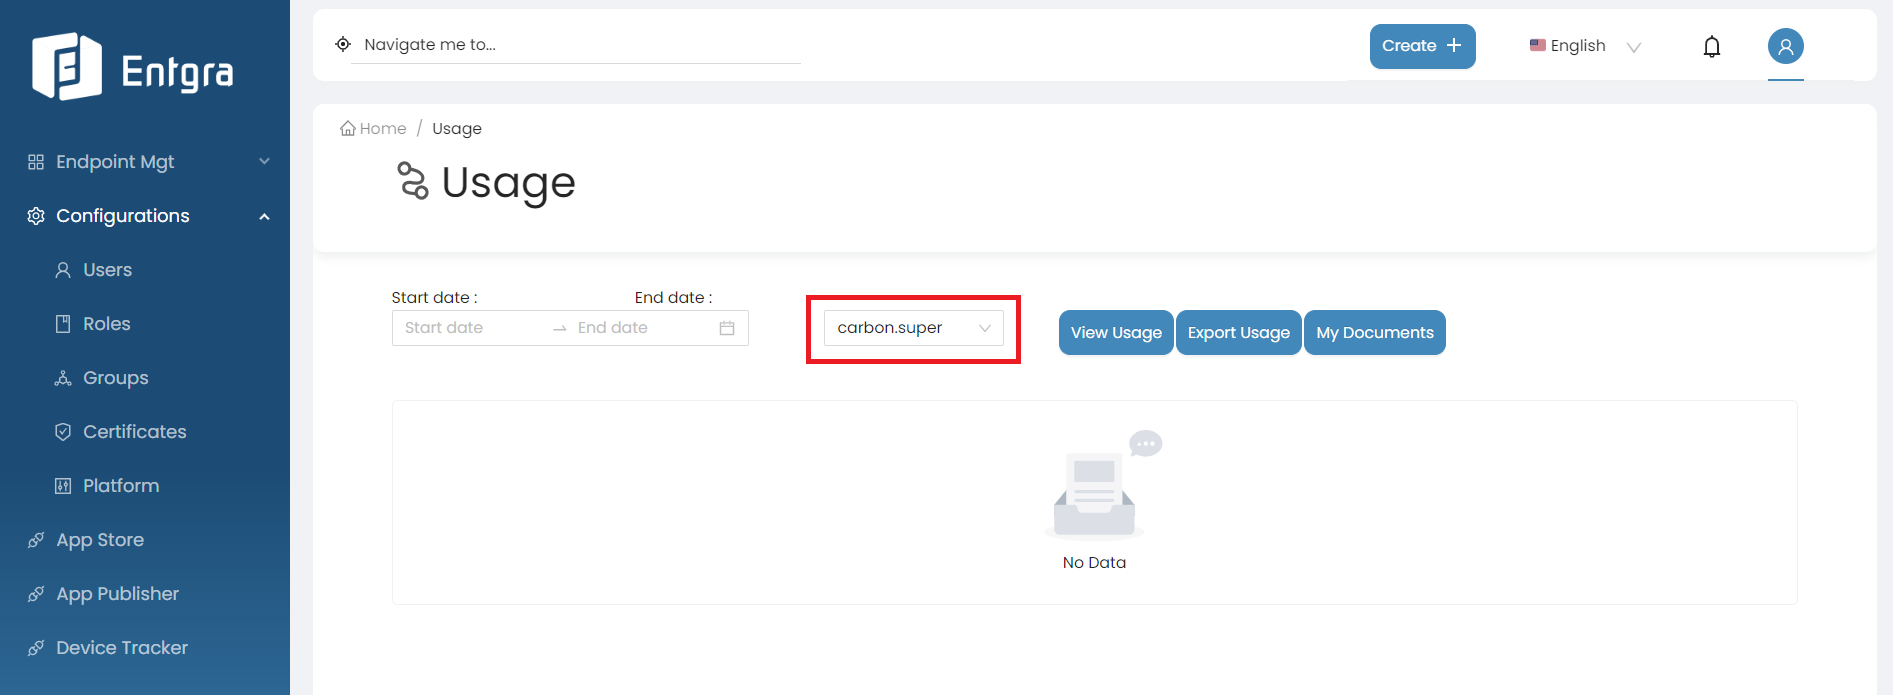
Note
This option is only visible for super tenant admin users and is used to check the usage of other tenants.
-
Click View Usage and then the usages of the tenant devices will be generated for the entered period.
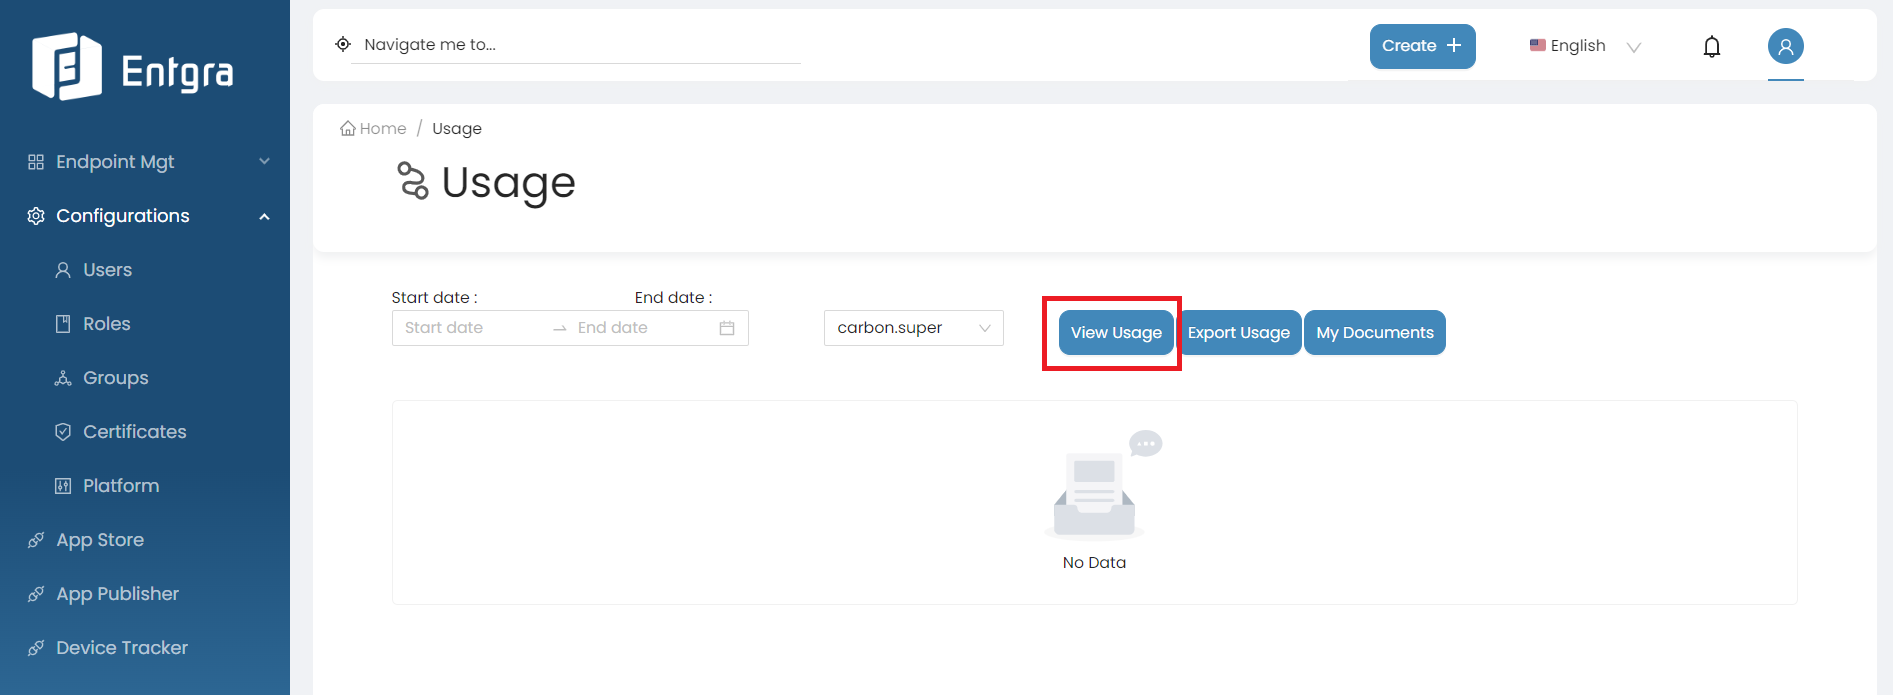
-
Click Export Usage to generate the CSV file containing the usage data.

Evaluate Tenant
Super admins can evaluate available tenants by adding them to a list or by removing tenants and clearing out their respective data.
Follow the instructions below to evaluate tenants for live chat feature:
-
Log in to the Endpoint Management Portal.
-
Go to General Configurations under the Platform Configurations.
-
Select Evaluate Tenant.
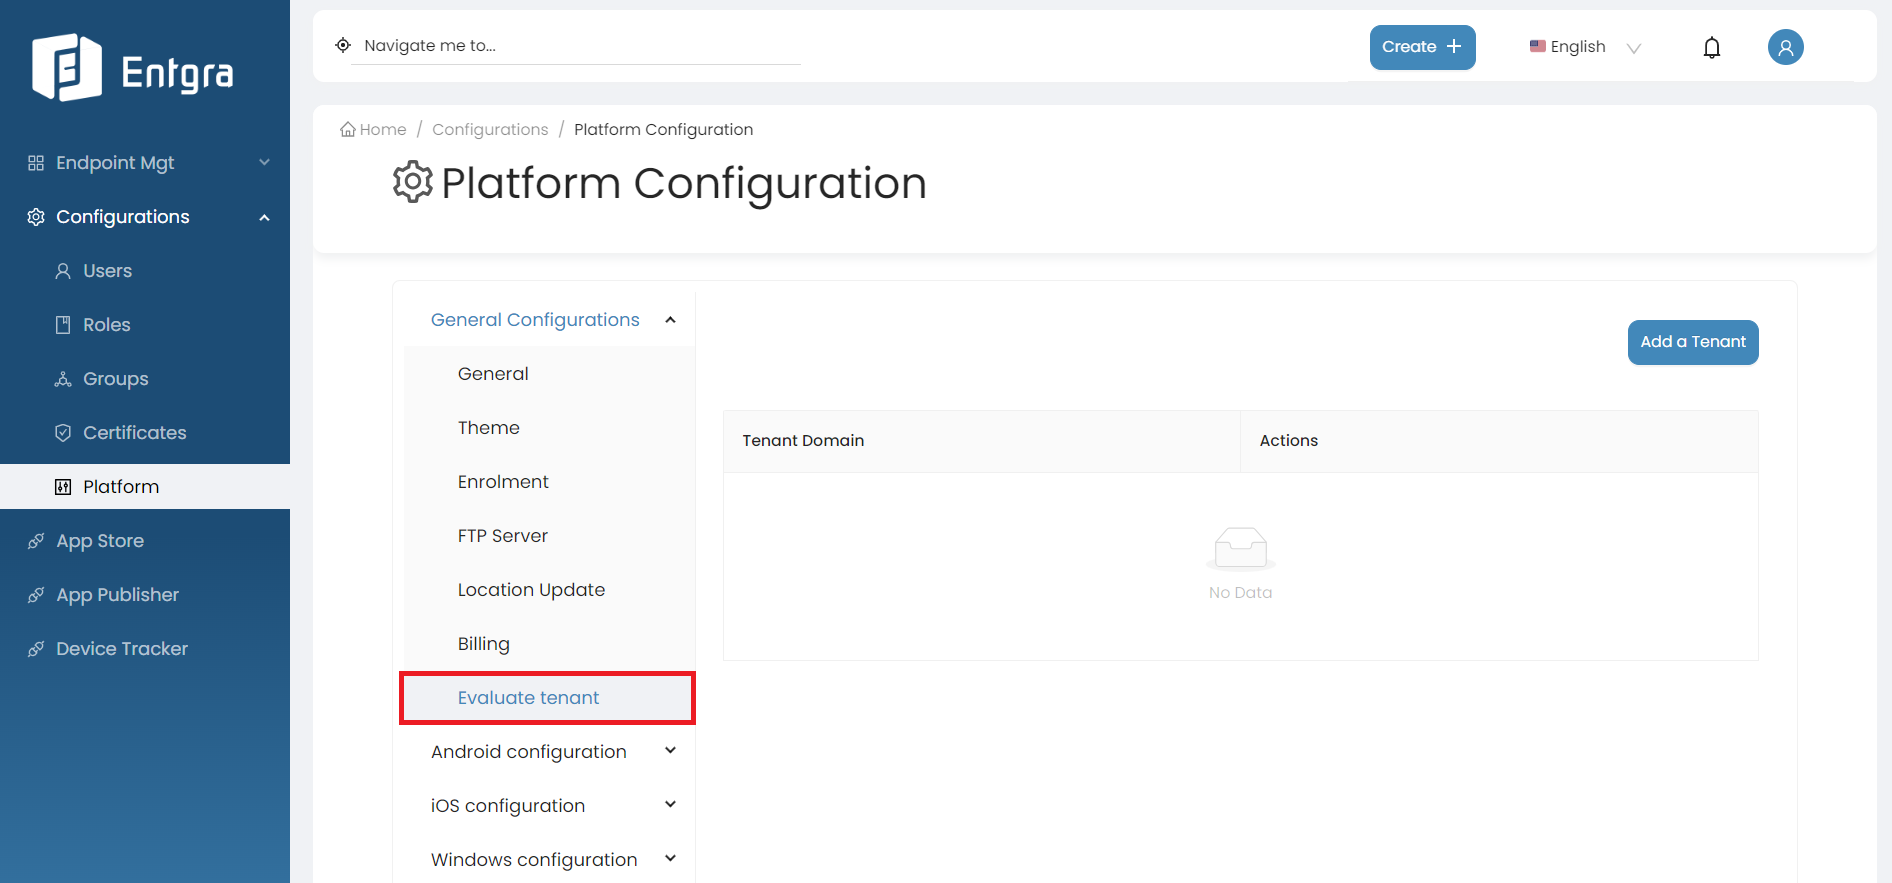
-
Click Add a Tenant.

-
Select a new tenant to be evaluated from the dropdown list.

-
Click on Add.
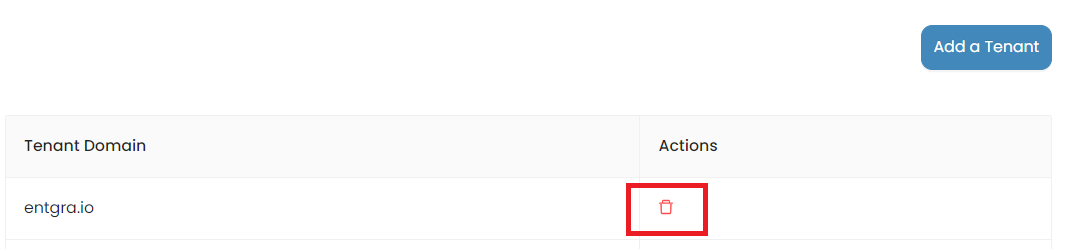
-
Click on the remove icon if you want to delete an existing evaluate tenant.
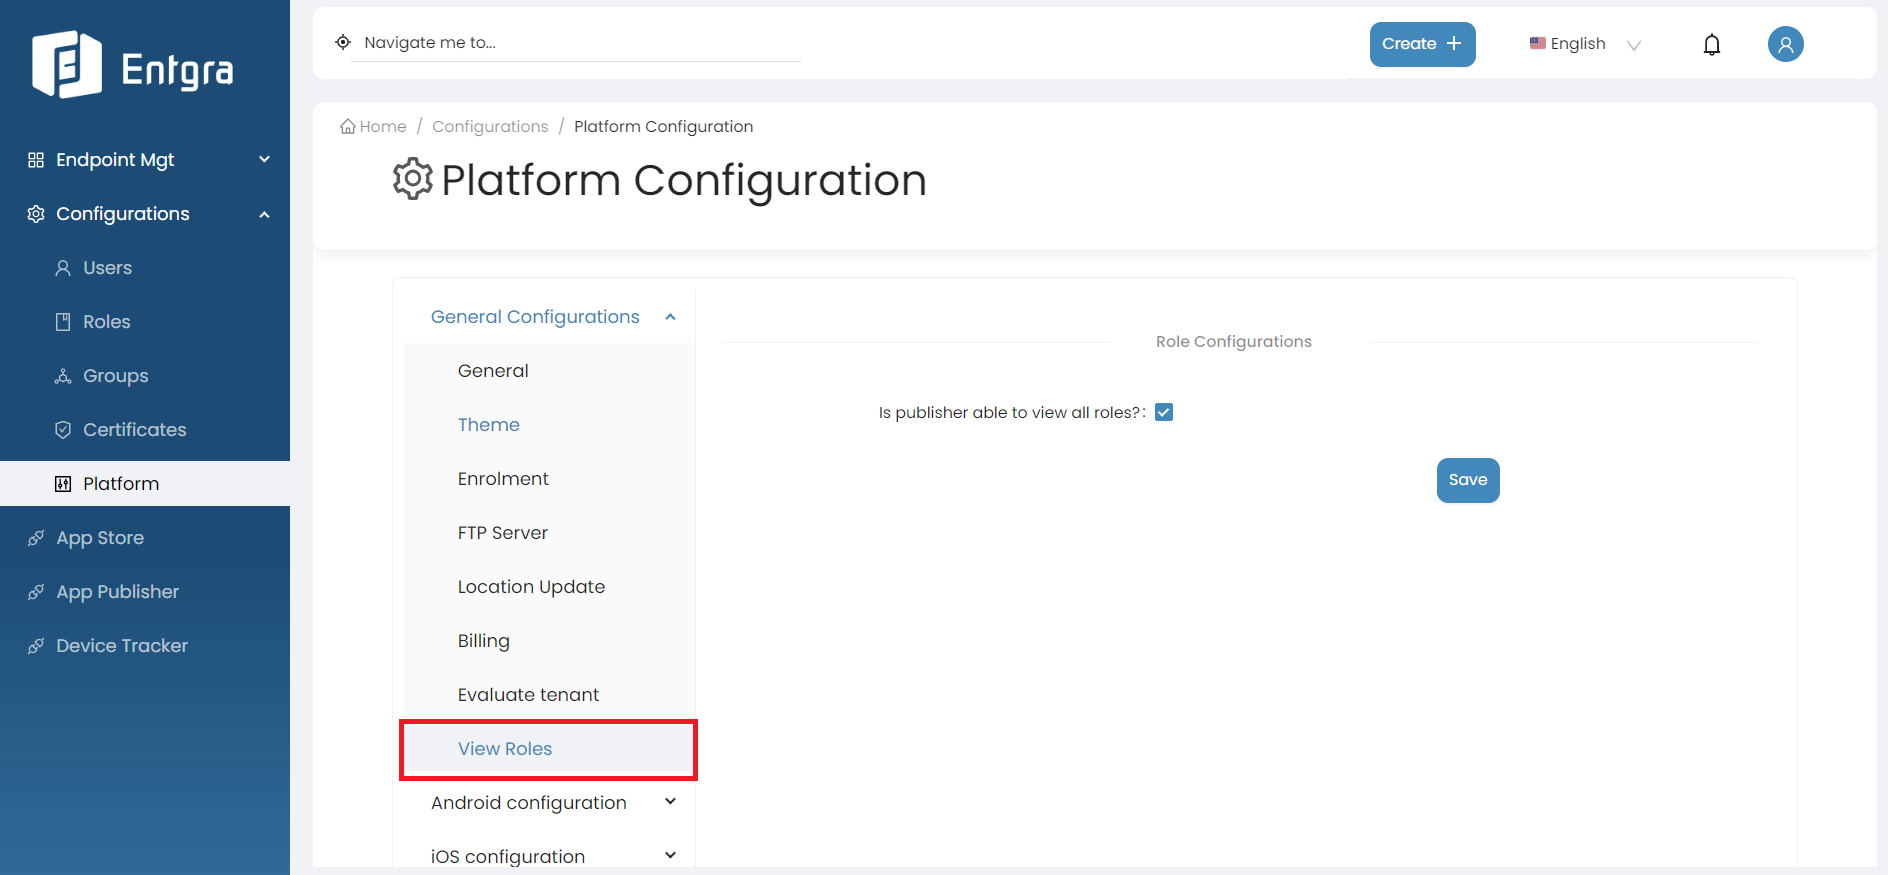
View Roles
This functionality is used to define whether the publisher is able to view all available roles when publishing an app.
Follow the instructions below to modify the View Roles configs:
-
Log in to the Endpoint Management Portal.
-
Go to General Configurations under the Platform Configurations.
-
Select View Role.
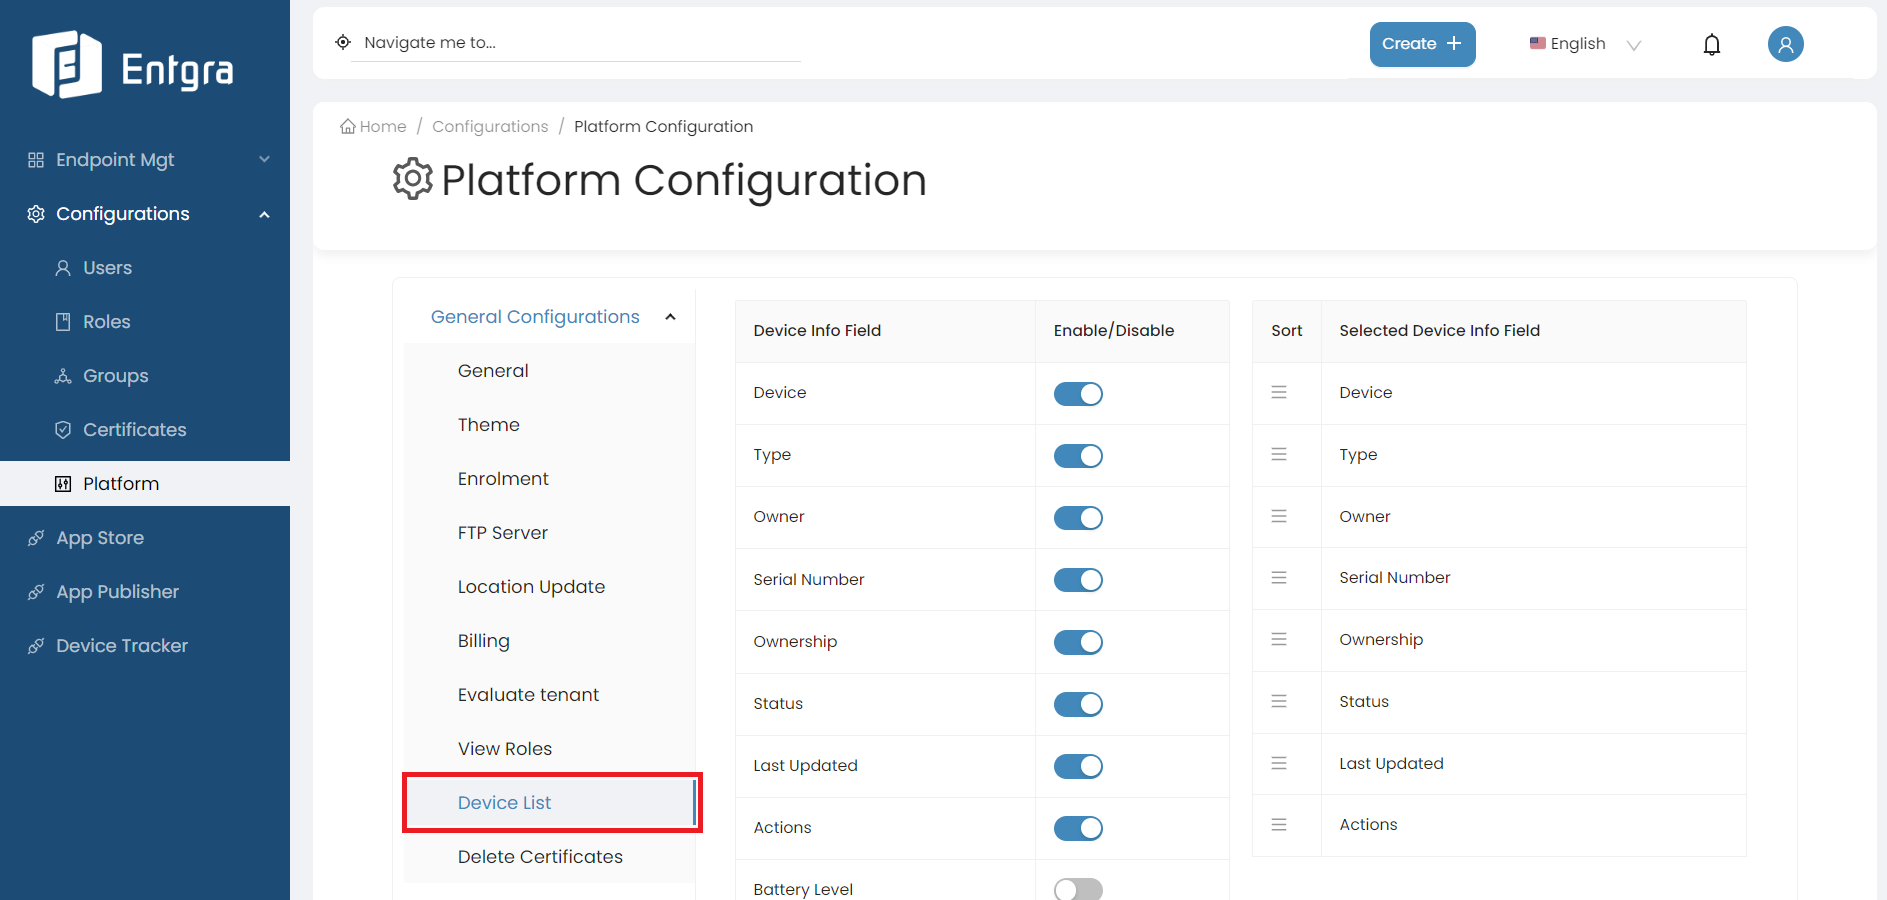
Device List
The Device List feature provides you with the flexibility to customize the appearance and content of your device list. You can enable or disable specific columns and arrange their display order according to your preferences.
Follow the instructions below to modify the device list view:
-
Log in to the Endpoint Management Portal.
-
Go to General Configurations under the Platform Configurations.
-
Select Device List.
-
On the left side table, toggle the switches next to each Device Info Field to either enable or disable them based on your preferences. To adjust the order in which these columns appear, simply click and drag a Selected Device Info Field to your desired position on the right side table.
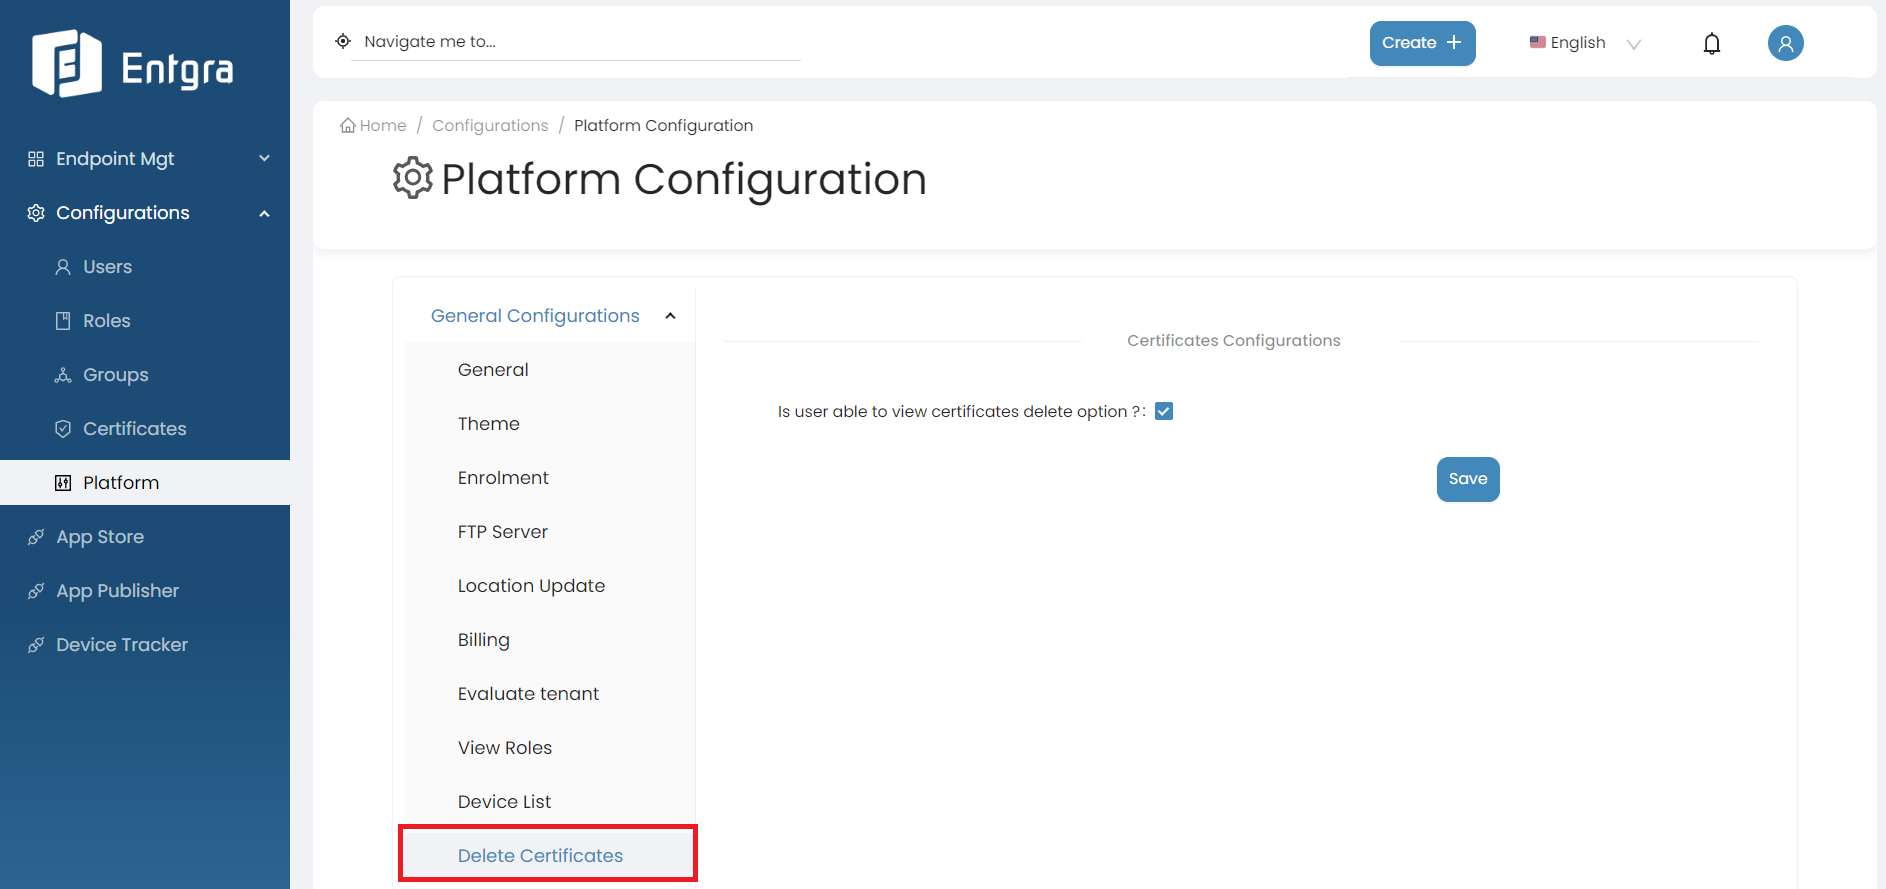
Delete Certificates
This feature allows you to enable the Certificate Delete option in the certificate section.
Follow the instructions below to configure certificate deletion:
-
Log in to the Endpoint Management Portal.
-
Go to General Configurations under the Platform Configurations.
-
Select Delete Certificate.
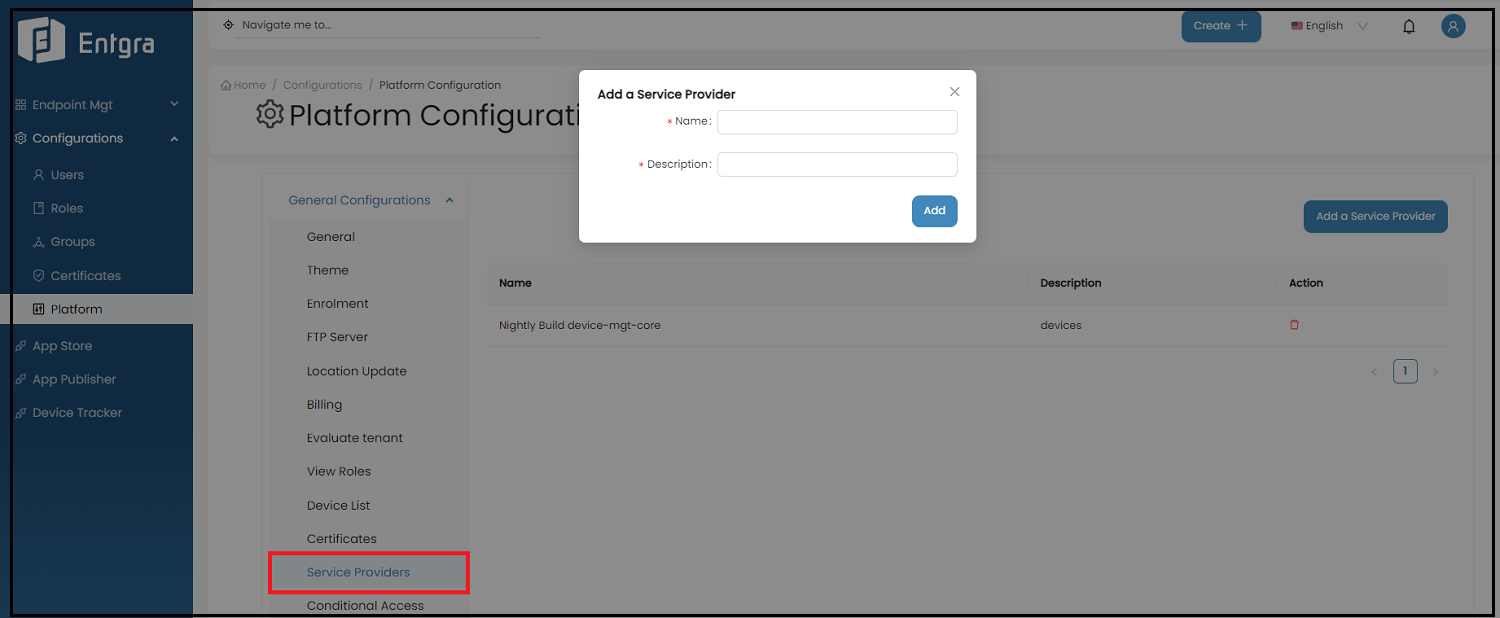
Service Providers
Add Service Provider Configuration
Steps
-
Log in to the Endpoint Management Portal.
-
Go to General Configurations under the Platform Configurations.
-
Select Service Providers.
-
Click Add a Service Provider.
-
Now add the service provider’s name you have configured and a simple description here.
Conditional Email Access (CEA)
Conditional Email Access (CEA) allows organizations to control corporate email access on mobile devices. If users fail to enroll their devices in Entgra UEM, CEA restricts their access to prevent unauthorized devices from accessing corporate emails.
Prerequisites
Before setting up CEA, you have to create a Mobility (MDM and WIP) application within your Azure tenant and acquire Application ID & Client Secret.
Acquire Application ID & Client Secret
Steps
-
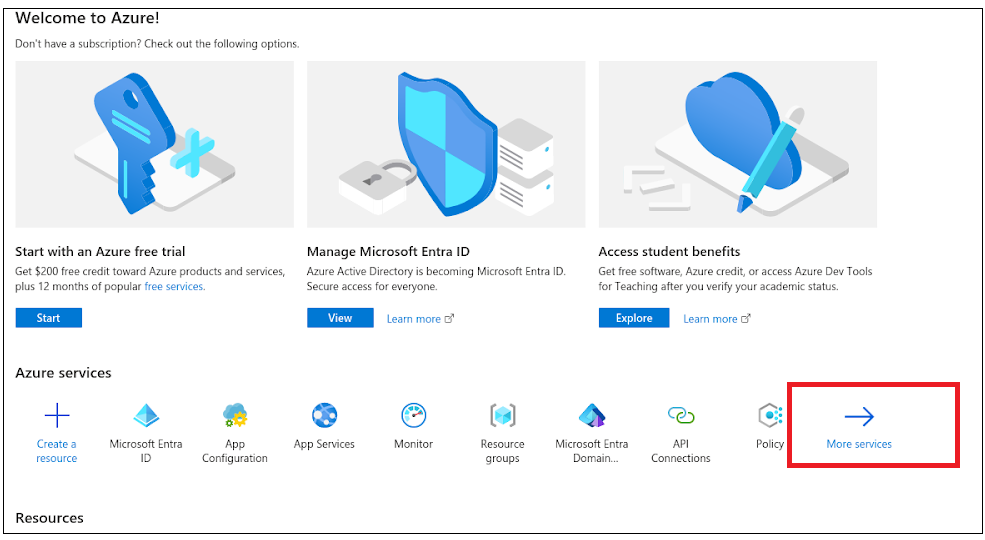
Sign in to Microsoft Azure Portal.
-
Click More Services under Azure Services and then click App Registration under the Identity section.
-
Add a name for the application and select Accounts in this organizational directory only as the supported account type.
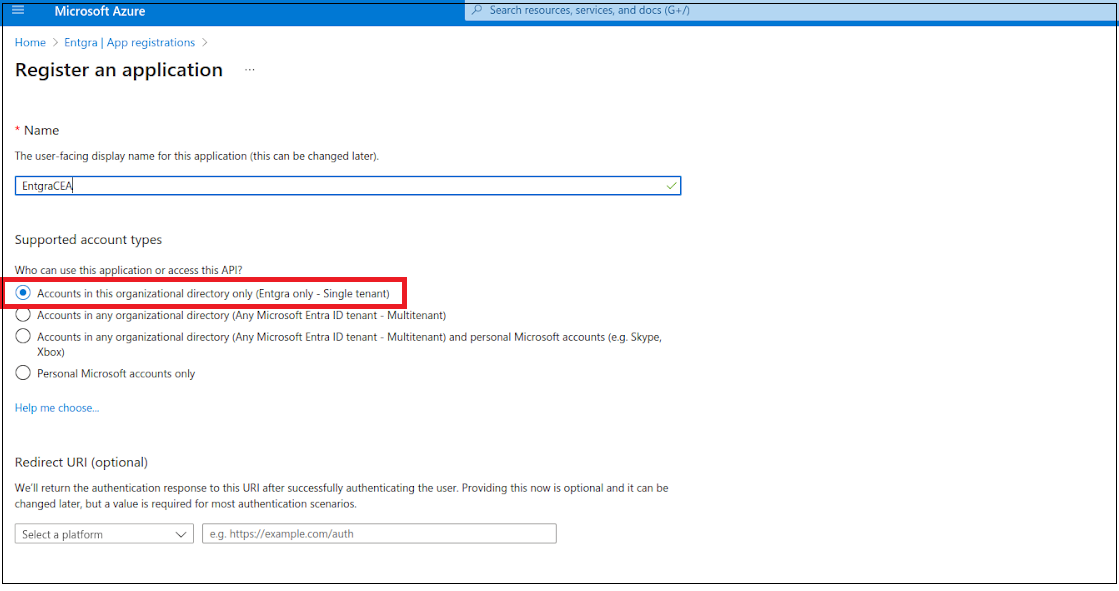
-
Click Register.
-
Make sure to save the application ID. This value is mandatory to configure the Conditional Access Policy in the UEM server.
-
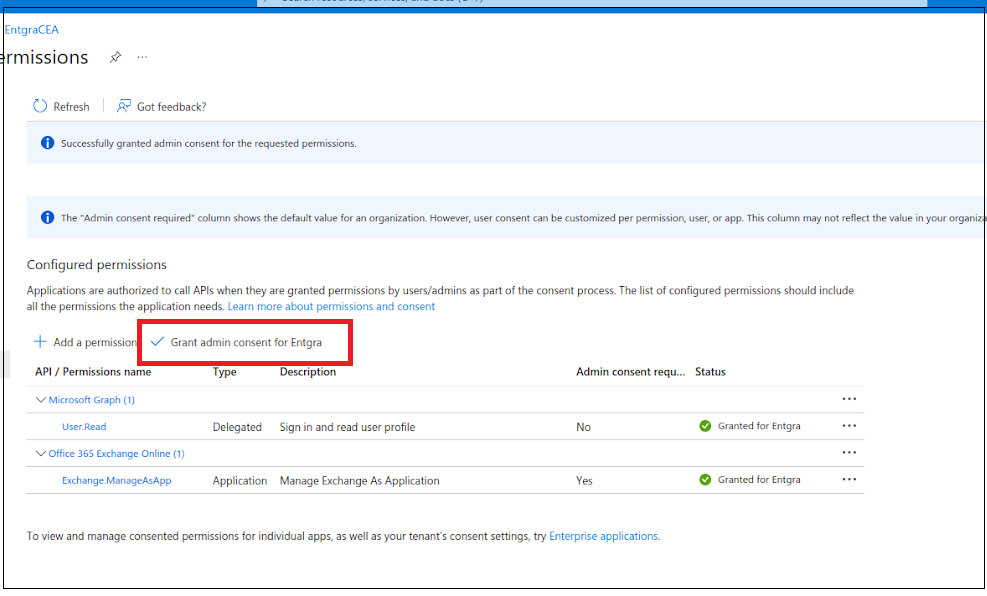
After the registration, go to the API Permissions section. Here you need to assign Exchange Online Management permission to the newly created application.
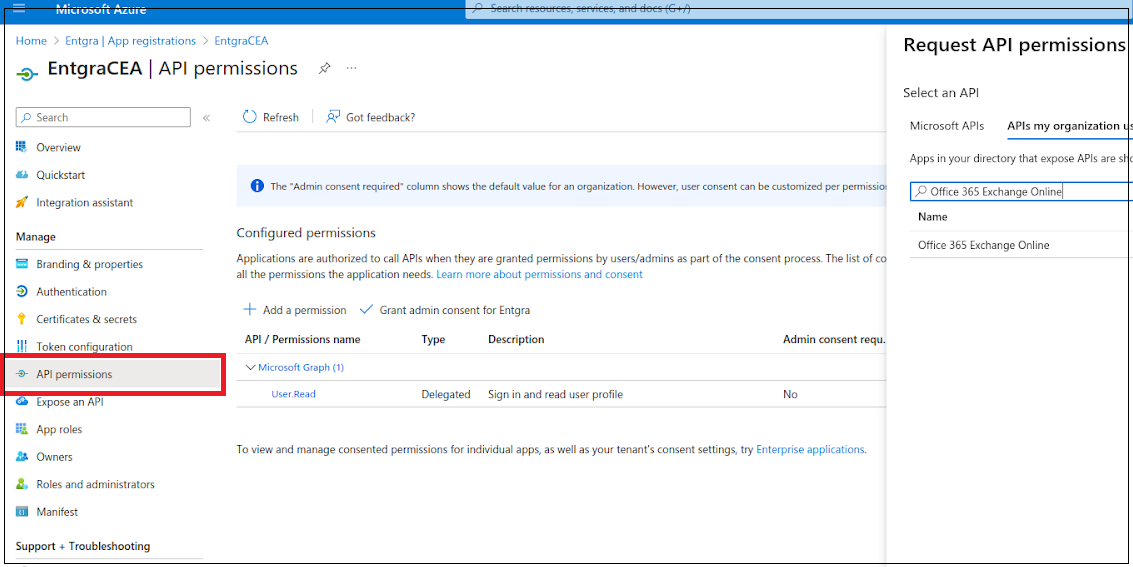
-
Click Add a permission and select the APIs my organization uses tab.
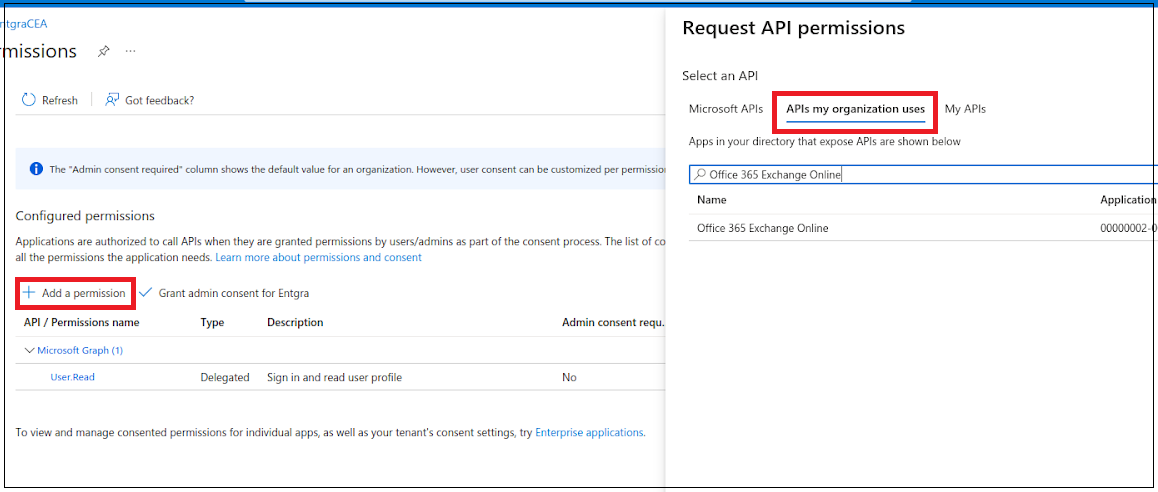
-
Search for Office 365 Exchange Online using the search bar.
-
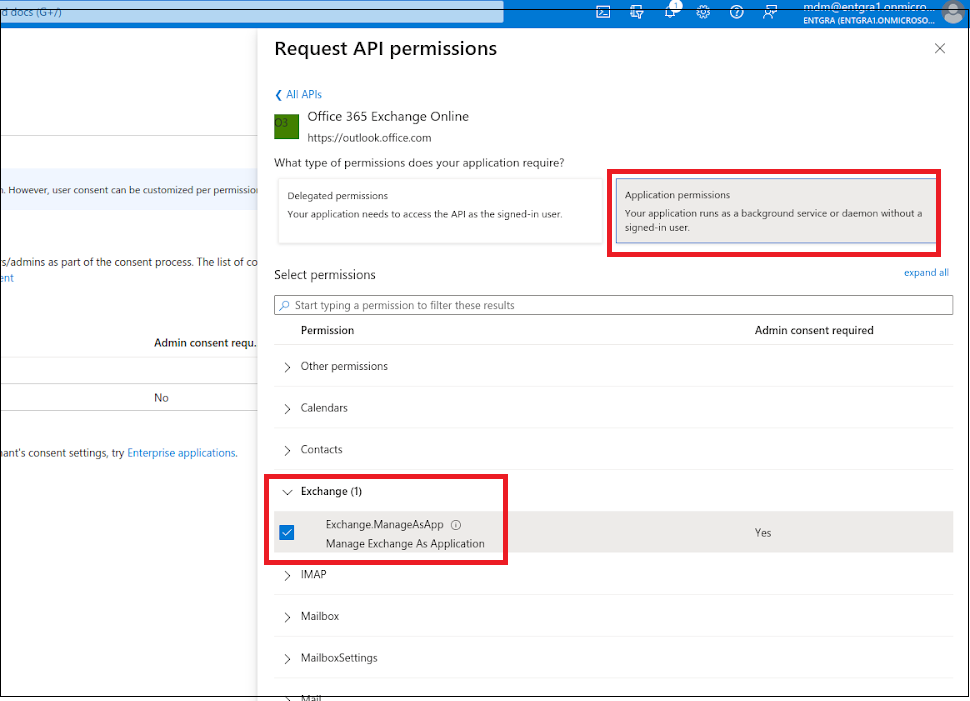
Then select Office 365 Exchange Online from search results. Now you can select the type of required permissions.
-
Click Application permissions and select Exchange.ManageAsApp under Exchange dropdown.
-
Now grant admin consent by clicking Grant admin consent for Entgra.
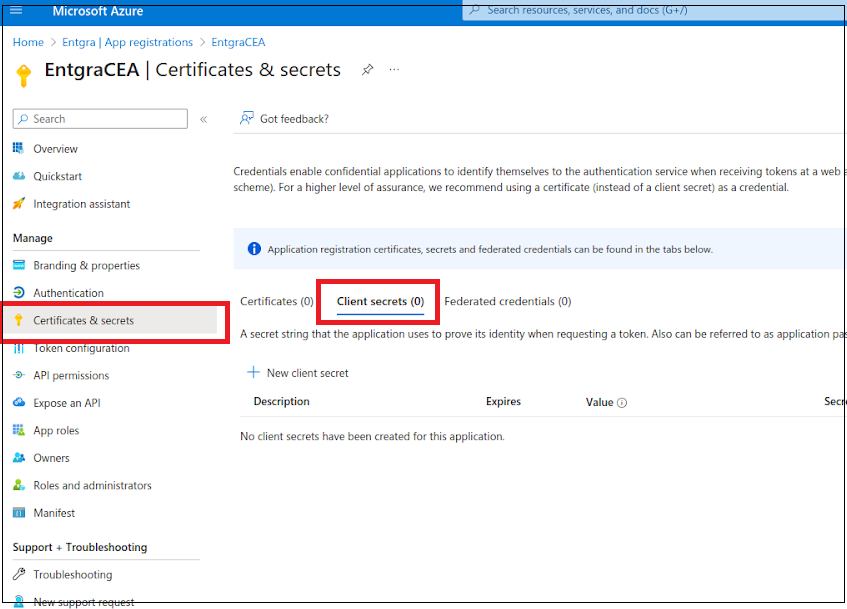
-
Go to the Certificate & secrets section and select the Client Secrets tab.
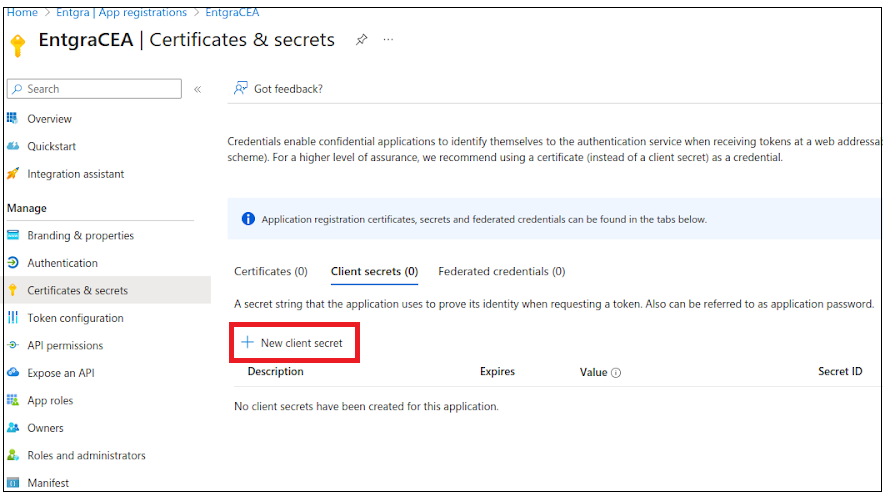
-
Click +New client secret and provide the required details to add a client secret.
-
Make sure to save the secret value/secret ID/application secret. This value is mandatory to configure the Conditional Access Policy in the UEM server.
-
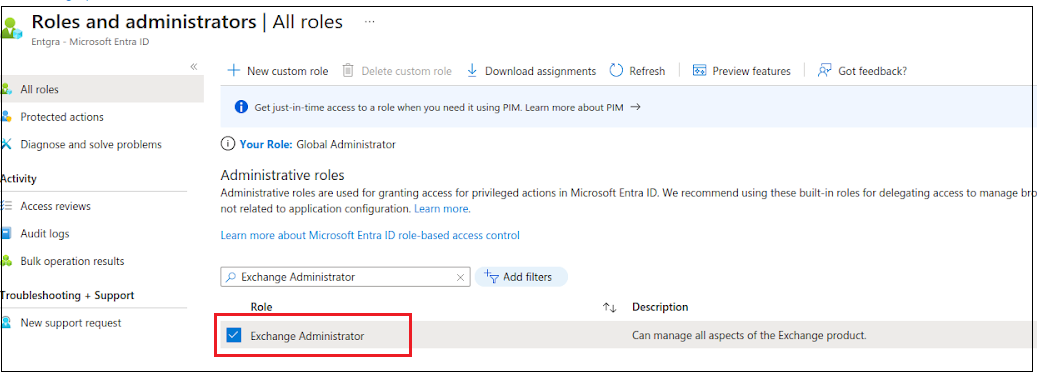
Go back to Microsoft Entra ID section and click Roles and administrators section.
-
Then search for the Exchange Administrator role and select it.
-
Click +Add assignments and then search for the newly created application under All tab.
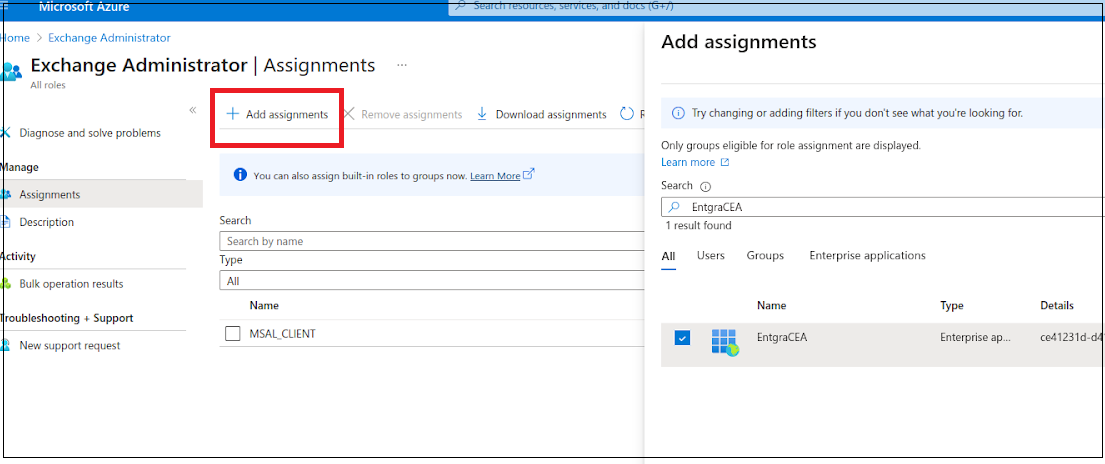
-
Now assign the application to the role.
This is all that is required for gaining the application ID and client secret.
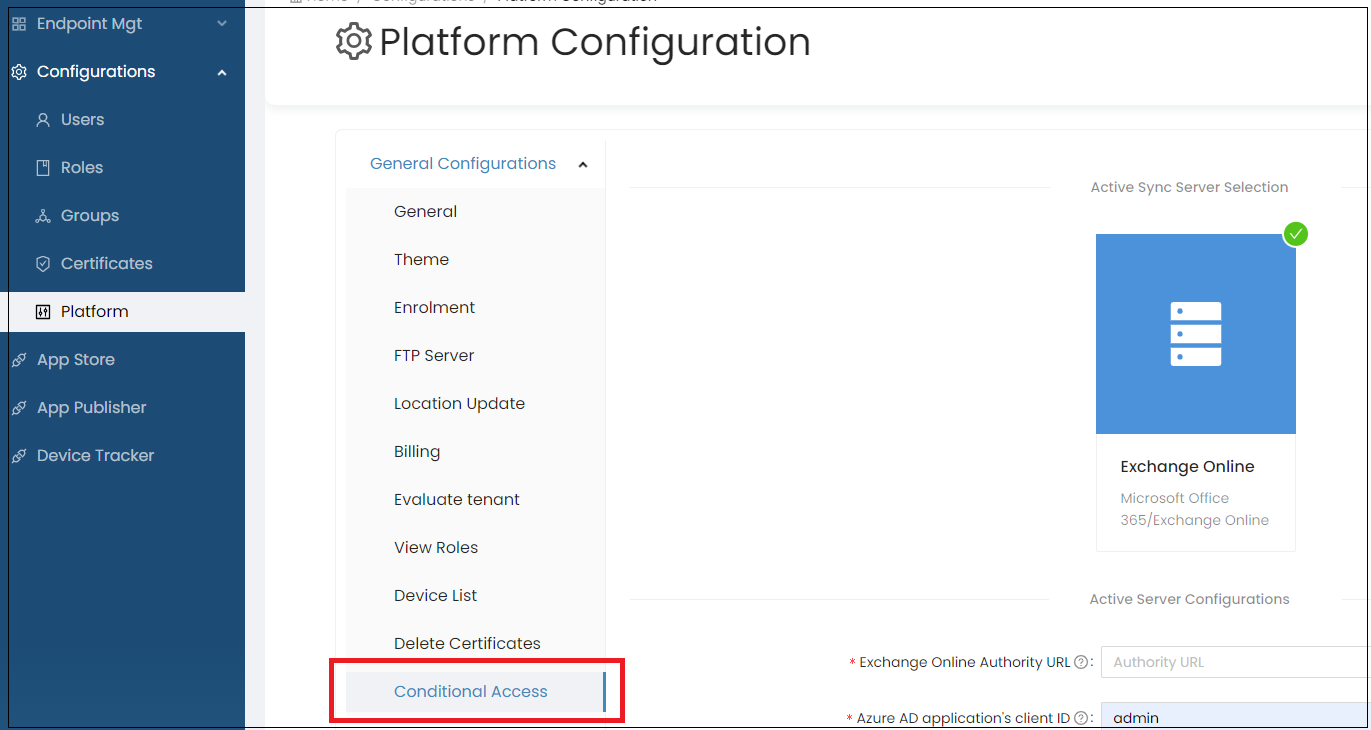
Configure the CEA Policy
Steps
-
Log in to the Endpoint Management Portal.
-
Go to General Configurations under Platform Configurations.
-
Select Conditional Access.
| Field | Description |
|---|---|
| Active Server Configurations | |
| Exchange Online Authority URL | For Exchange Online server authority URL will be https://login.microsoftonline.com/ |
| Make sure to replace the |
|
| Azure AD application's client ID | Application ID we created in the Azure AD portal previously. |
| Azure AD application's client secret | Client secret we created in the Azure AD portal previously. |
| Conditional Access Policy Configurations | |
| Default global access policy | Defines the default access policy for the organization's devices. |
| There are three options for the default global access policy, | |
| i. Block - Block all the devices accessing the corporate mailboxes. | |
| ii. Quarantine - All access to corporate mailboxes on new devices from any user in the organization is quarantined and validated against the conditional access policy before giving access. | |
| iii. Allow - All access to corporate mailboxes on new devices from any user in the organization is allowed and validated against the conditional access policy. | |
| Block email access from Outlook | Block accessing Outlook from email clients from devices such as Android, iOS, and Windows. |
| Block Outlook web access | Block accessing Outlook from web browsers. |
| Block POP/IMAP access to mail server | Block POP and IMAP methods. |
| Grace Period Configurations | |
| Grace period | Defines a grace period for the devices that are not currently managed by the Entgra UEM. |
| Grace allowed policy | Not allowed - Grace period will not be allowed to any unmanaged device. |
| Allow to new devices only - Grace period will be allowed to new unmanaged devices that are connecting with the active sync server after creating the conditional access policy. | |
| Allow to existing devices only - Grace period will be allowed to existing unmanaged devices that are connecting with the active sync server before creating the conditional access policy. | |
| Allow to new & existing devices - Grace period will be allowed to both new and existing unmanaged devices. |
Set Up Android Gmail Client
Sign in to Entgra App Publisher portal and set up the following managed configurations by filling up the form with the configurations given below to connect with the Gmail app.
| Field | Description |
|---|---|
| email address | Add “$emai” in this field. |
| Hostname or Host | Add “outlook.office365.com” |
| Username | Add “$emai” in this field |
| Device Identifier | Add “$EASIdentifier” in this field. |
| SSL Required | true |
| rust all Certificates | false |
| Allow Unmanaged | false |
| Accounts |
Android Configurations
Multiple tenants can use Entgra UEM Server. While maintaining tenant-based isolation, the Android configurations enable the tenants to customize the Android settings based on their own requirements.
Prerequisites
- The server has to be downloaded and started.
- Must have been logged on to the server's Endpoint Management Portal.
- Optionally, Basic Concepts of Android Enrollment will be beneficial as well.
Follow the steps given below to configure the Android platform:
-
Click the menu icon.
-
Click CONFIGURATIONS.
-
Click PLATFORM CONFIGURATIONS.
-
Select Android Configurations.
There are 4 main configuration sections for Android:
-
General configurations
-
Policy configurations
-
COPE/Kiosk configurations
-
Android For Work
General
This section covers details about the preferred communication mechanisms used by Android device for server communication, user agreements and multiple other Android specific general configurations.
Android communication protocol

Type of Communication : Configures the preferred communication mechanisms used by Android device to server communication. There are 2 methods of communication available: Local Polling and FCM.
-
Local Polling
- The device will contact the Entgra UEM server periodically.
- When Local poling is selected, a new field called polling interval is enabled. The agent will contact the server and try to fetch commands, based on the interval provided here (in seconds). Note that lowering this number will mean more network callls and high device battery usage.
Note
Due to Android restrictions, the minimum frequency here is 60 seconds.
-
Firebase Cloud Messaging (FCM)
- FCM will send a notification to the device when there are pending operations available for a specific device.
- If FCM has been selected as the notifier type, a new field called API key will be enabled where the server key of the FCM configuration needs to be provided. FCM is more network and barrery usage friendly and recommended over local polling.
- Also note that we do not send any sensitive data over FCM. FCM is mearly a wake up call to the agent and the agent will poll the server when it recieves such a wakeup to fetch the real commands.
Note
From Android 4.4 (KitKat) onwards, the OS does not allow applications to trigger wake-up commands when the trigger period is set to less than a minute. Therefore, make sure to set the notifier frequency to 60 seconds or more.
End User License Agreement (EULA) - This text will be shown to a user while enrolling via the agent. This can be used to show the end user agreement or any other information that the user must agree, in order to proceed with enrolment.
Android Location Configurations
Enable Continuous Device Location Publishing - If this is ticked, the server will publish data from devices to the analytics component. Note that the analytics must be enabled and configured prior to enabling this configuration
Android Firewall Configuration
Enable UEM Server Firewall Service - If this is enabled, the agent will to look up the entgra firewall application and start the firewall service. Note this requires certain components which are only available to certain customers. Please contact Entgra for more details
Policy
The configurations below serve as prerequisites for enforcing certain policies:
| Field | Description |
|---|---|
| Allowing Application List | Set of comma separated package names. This is typically a set of system applications that are always allowed to run on devices. When a policy calculates the applications to be allowed-listed on a device, the list given here is always considered allowed. The reason for this is that certain OS level applications should not be disabled while allow-listing as those apps are critical to the operation of the device. |
| Force device renaming on enrollment | If this is selected, the agent will prompt the user to provide a name for the device at enrolment. The given name will be the name that appears on the endpoint management portal. If this is not selected, the device name provided by the system will be used. |
COPE/Kiosk
Fill the fields with required values and click Save to apply the changes to the device.

| Field | Details |
|---|---|
| Provisioning Component | Package name of the Entgra Android agent’s device policy manager component. This is always the bellow value, unless the package name is customized io.entgra.iot.agent/org.wso2.iot.agent.services.AgentDeviceAdminReceiver |
| Package checksum | During the enrollment, this checksum is validated by Android to determine if the downoaded apk matches the checksum. Run the following command to get the checkSum value of the agent, cat <AGENT_APK_FILE_PATH> | openssl dgst -binary -sha256 | openssl base64 | tr '+/' '-_' | tr -d '=' |
| Download Location | Android agent download location. (ex: http://192.168.8.20:8080/android.apk) |
| Server Address | The address of the server. This is used as the server address when enrolling the device. (ex:https://gw.entgra.net:443 |
| Enable Encryption | Upon enrolment if this device must be encrypted, select this option. Not applicable to BYOD devices |
| Enable All System Apps | This will indicate whether all system apps should be enabled after the device is enrolled. |
| Ownership Type | Type of the ownership |
Android For Work
Android enterprise configurations
Before you start using the capabilities of Android Enterprise, there is a configuration step that enables Entgra to connect to Google Enterprise. This step will allow Entgra to manage your device uniquely for your enterprise. In more technical terms, Entgra requires a special token to talk to Google APIs (known as ESA) and a unique enterprise ID to identify your organization and its devices and apps uniquely.
The steps below will enable you to configure Android Enterprise:
-
Get an access token from Entgra - This token provided by Entgra is only valid for a period of 1 hour. Therefore, please make sure to mention the time that you are planning to perform these steps. This is a token that gives you access to start the onboarding process which will allow you to register a new enterprise ID and a token from Google known as ESA.
-
If you are using Entgra UEM cloud, create a new ticket in the support system with the following title Requesting a token for Android Enterprise Onboarding. In the description, please mention the time window you are planning to perform the onboarding steps. Example: We are planning to configure at 9AM EST on 24/02/2021.
-
If you are using the on-premises version, please send an email to biz-dev@entgra.io with the following subject Requesting a token for Android enterprise onboarding. In the body, please mention the time window you are planning to perform the onboarding steps. Example: We are planning to configure at 9AM EST on 24/02/2021.
-
-
You will need a Google account which is dedicated to EMM related work. We recommend creating a new Google account (a free account). Please keep this account details securely as this will be having administrative rights over your enterprise account.
-
If you have any other Google accounts you have signed in using your browser, please open a private browser window and sign in to your new Google account.
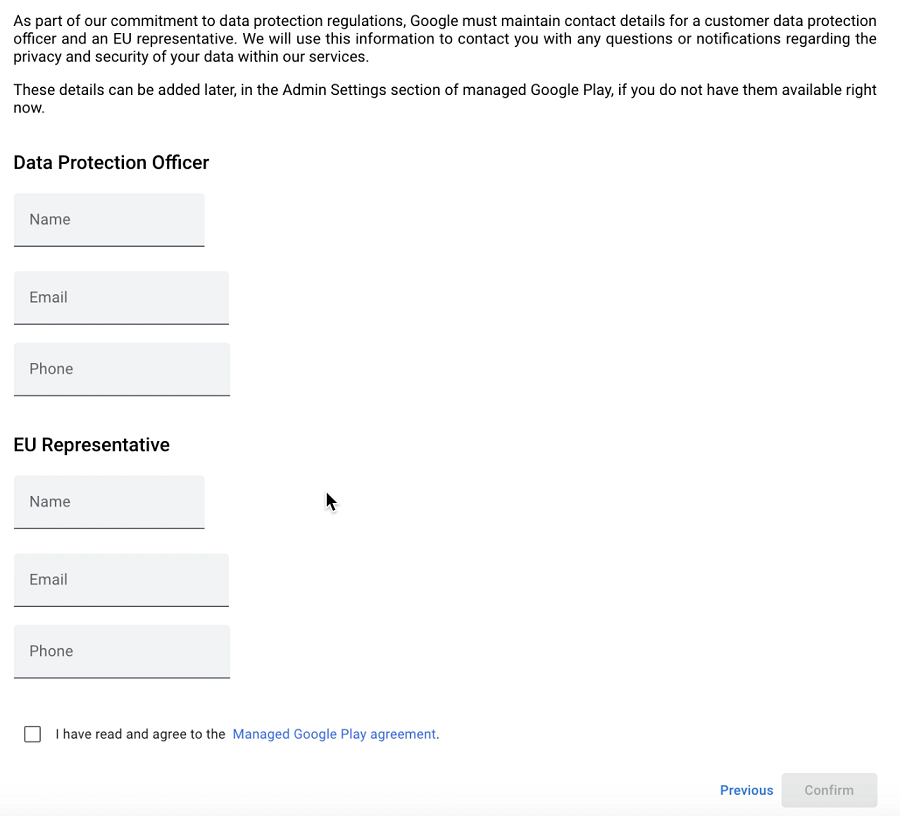
-
Before you begin, please note that during the onboarding process, you will be prompted to provide your organization name and fill the following form. Filling this form is optional based on your countries regulations such as GDPR. Also note that agreeing to the managed Google Play agreement at the bottom of this form is mandatory. Please review this prior to starting the onboarding process.
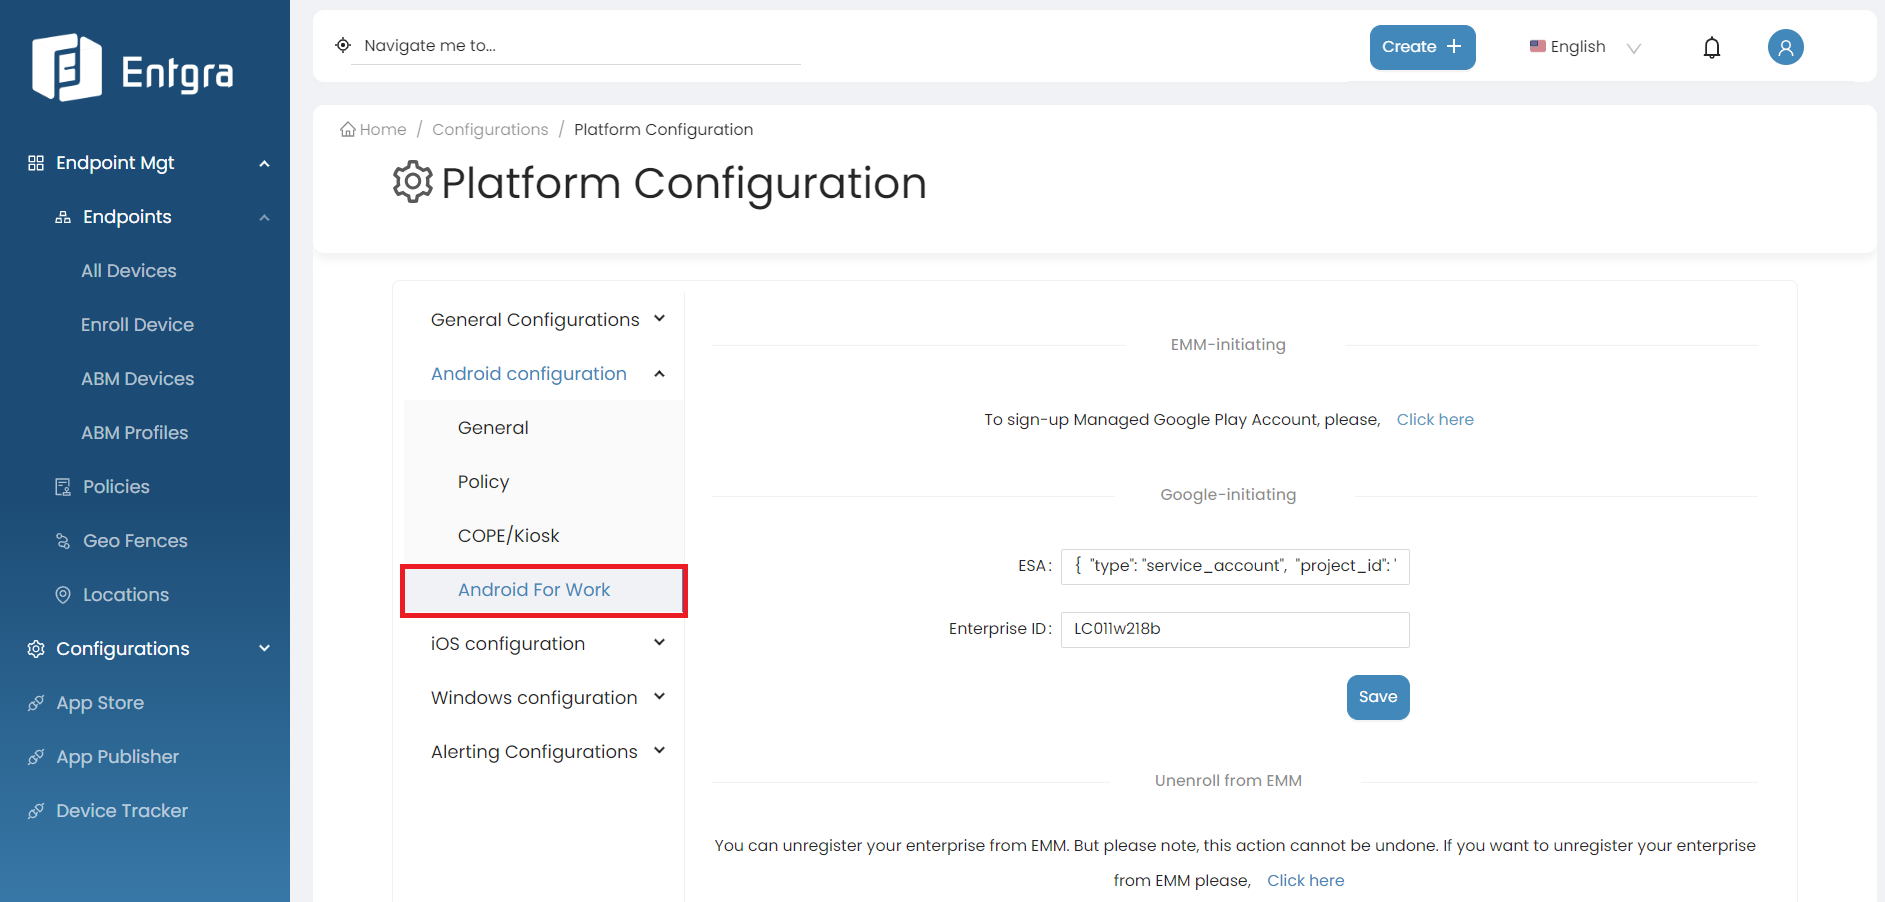
Configuration Steps
This step will allow Entgra to manage your device uniquely to your enterprise. In more technical terms, Entgra requires a special token to talk to Google APIs (known as ESA) and a unique enterprise ID to identify your organization and its devices and apps uniquely.
-
On the Android Platform Configurations, Go to Android For Work section as shown in the bellow image.
-
Under EMM initiating section, click here.
-
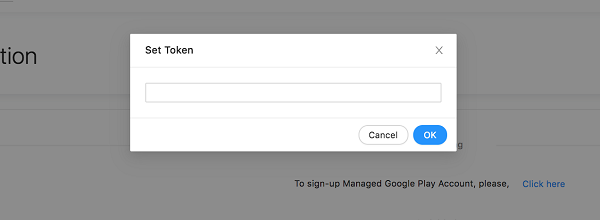
A popup will be displayed as below. Enter the token you received from Entgra and click OK.
-
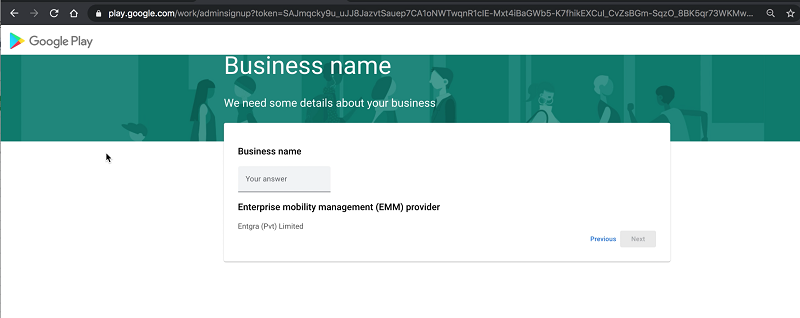
You will be redirected to Google’s Enterprise onboarding page where you are required to provide your organisation name.
-
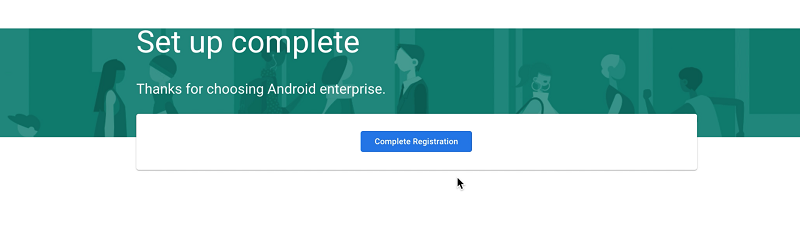
Fill the form and click Confirm. On the next screen that appears, click Complete registration.
-
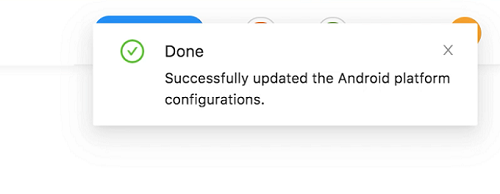
You will be redirected to the platform configuration page. Stay on this page until you see the following notification on the top right corner that shows the end of successful completion of configurations.
-
Enter the ESA and the Enterprise ID received from entgra and click Save.
Now the link between Entgra UEM and your new enterprise is established successfully! We have everything we need to start enrolling and importing applications from Google Play store to the UEM server.
Follow our Android Enterprise Guide for details on the enterprise configurations for Android.
Unenroll Enterprise from EMM
If you want to Unregister your enterprise from the UEM server, click Unenroll. This action cannot be undone.

MS Exchange Online Support for Android
Configure Exchange Mail/O365 Mailbox on Android
Prerequisites
- Go to Platform Configurations and set up enterprise configurations for Android.
Set up email client application
Steps
-
Sign in to the Entgra UEM Server Endpoint Management Console.
-
Go to the App Publisher portal.
-
Click Android Enterprise under the Configurations section.
-
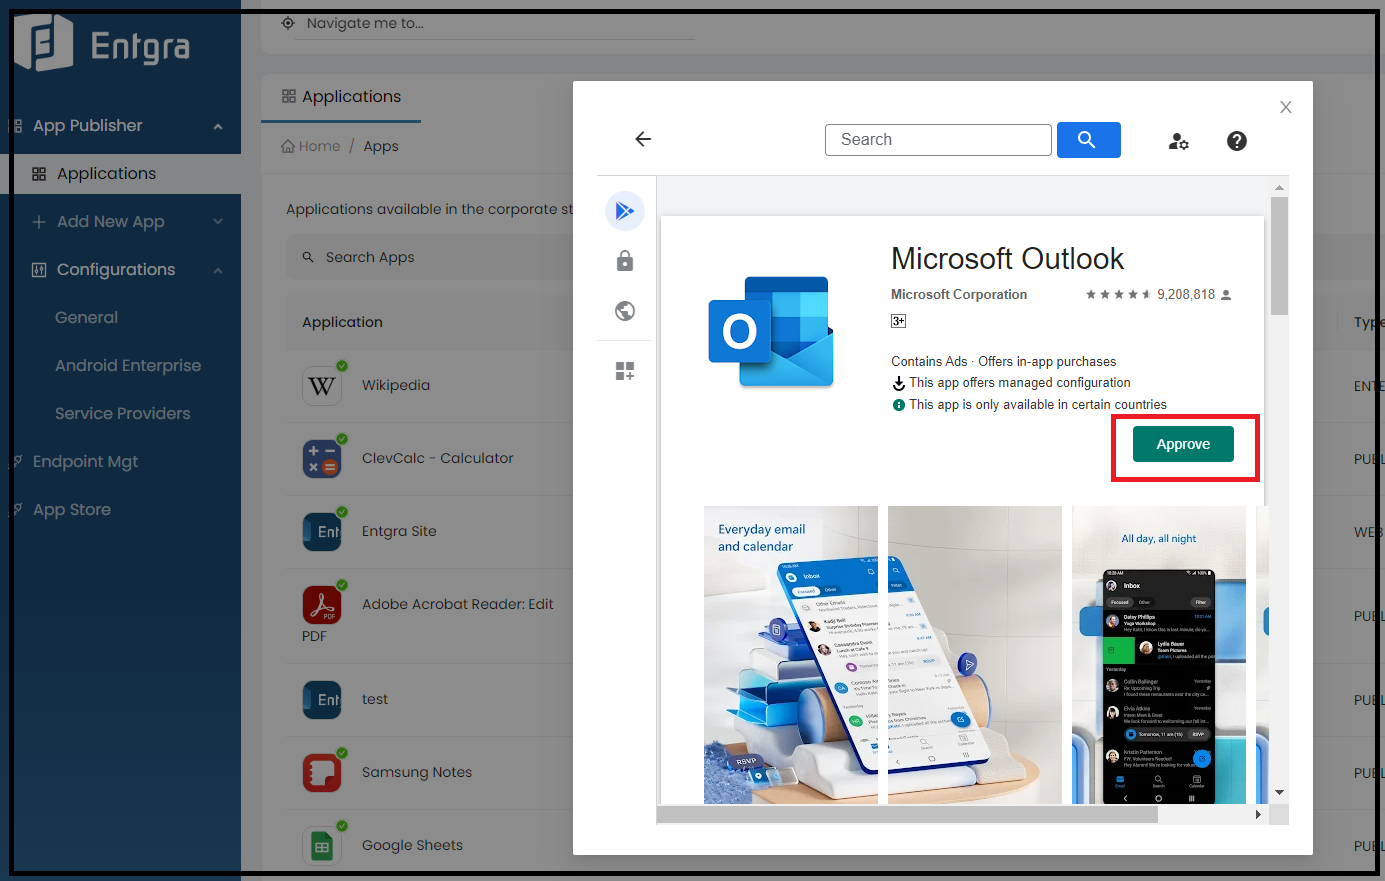
Search for your target email client application. (Here we use the MS Outlook app as the email client.)
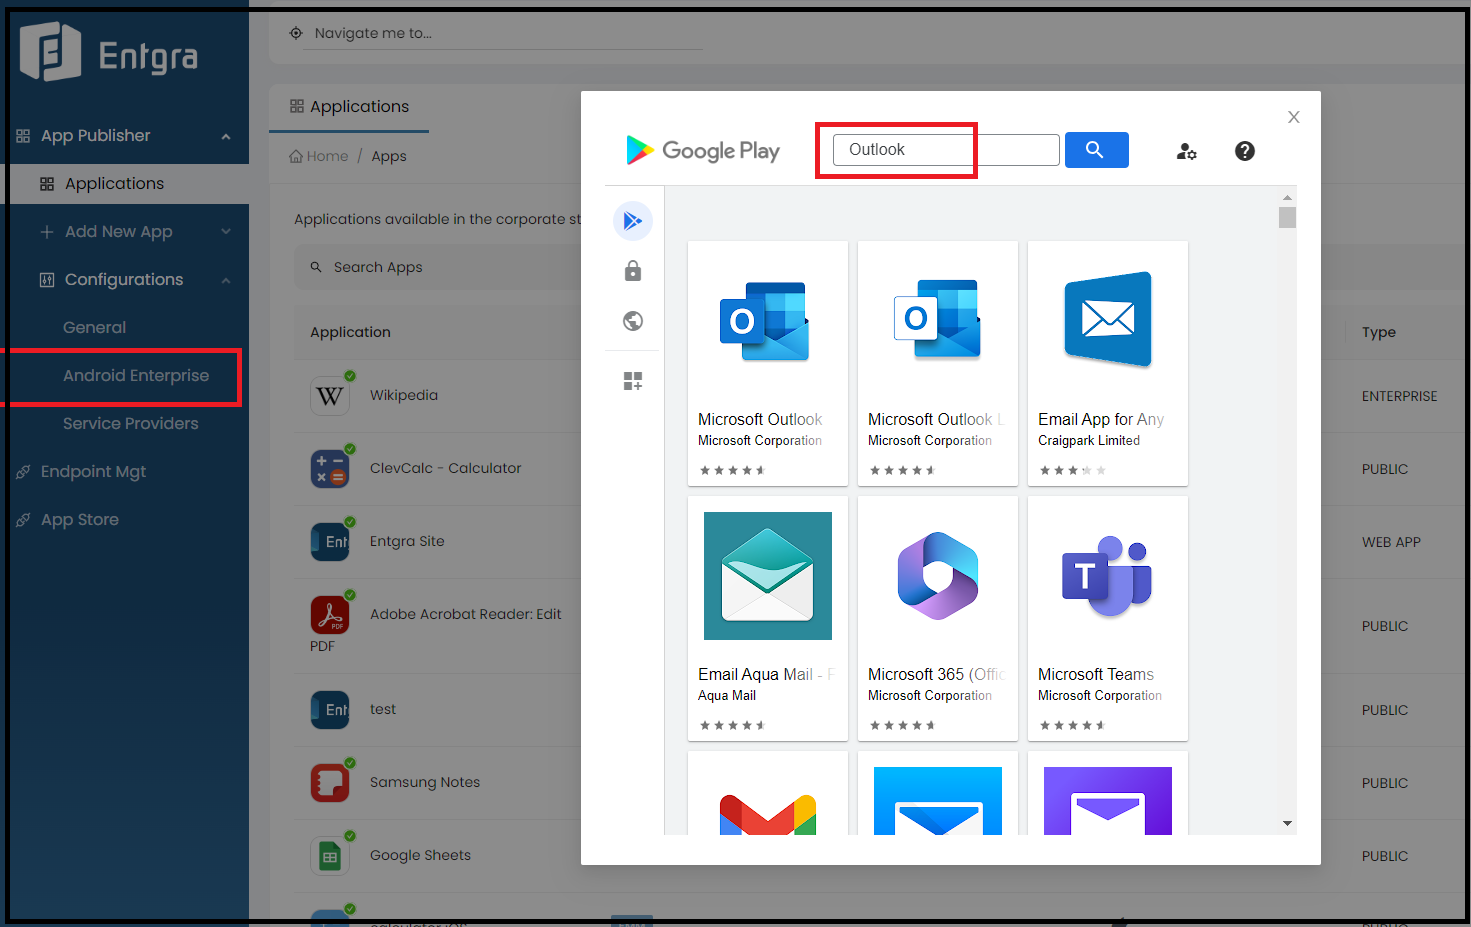
-
Click Approve if the email client app is not approved yet.
-
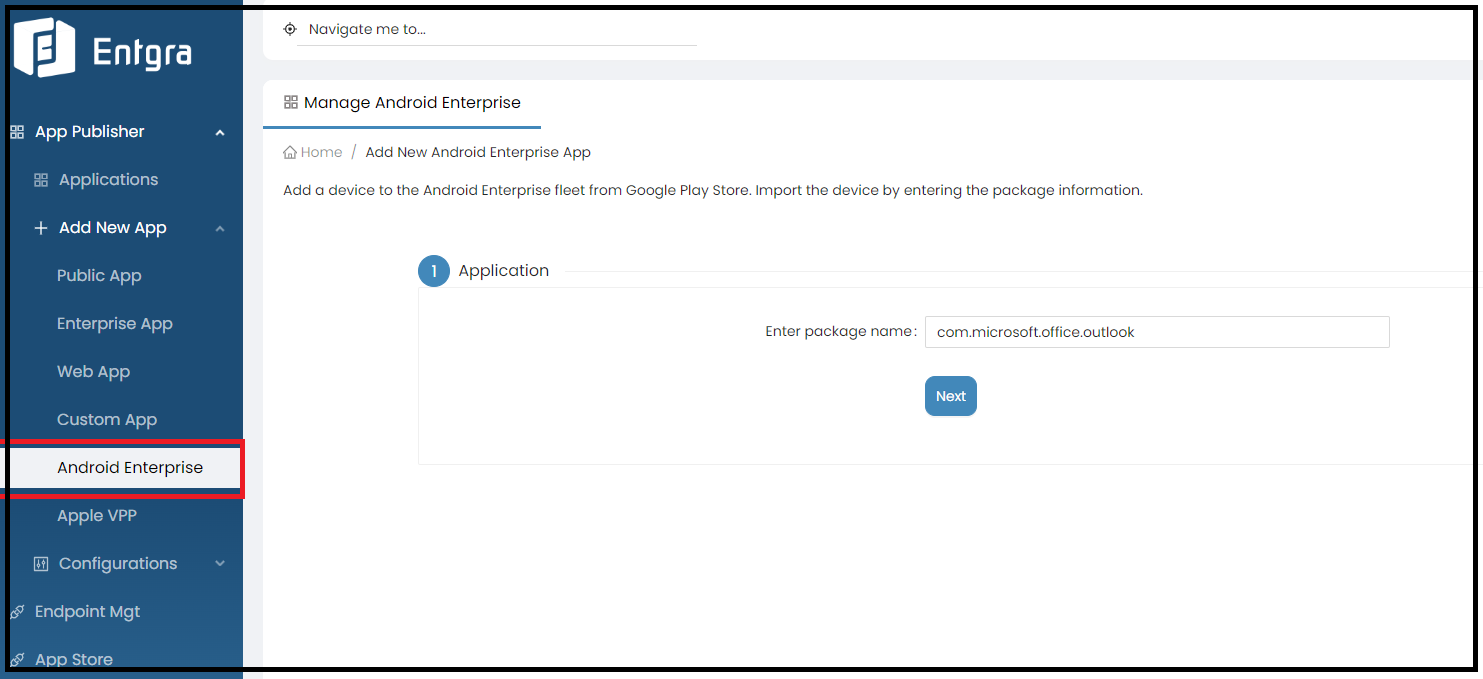
After approving the app, click Android Enterprise under the Add New App section.
-
You can publish the email client app as an enterprise application by entering its package name. Need support to identify the package name?
Add managed configurations to email client app
Note
- Refer to Managed Configurations in the App Publisher for more details.
Steps
-
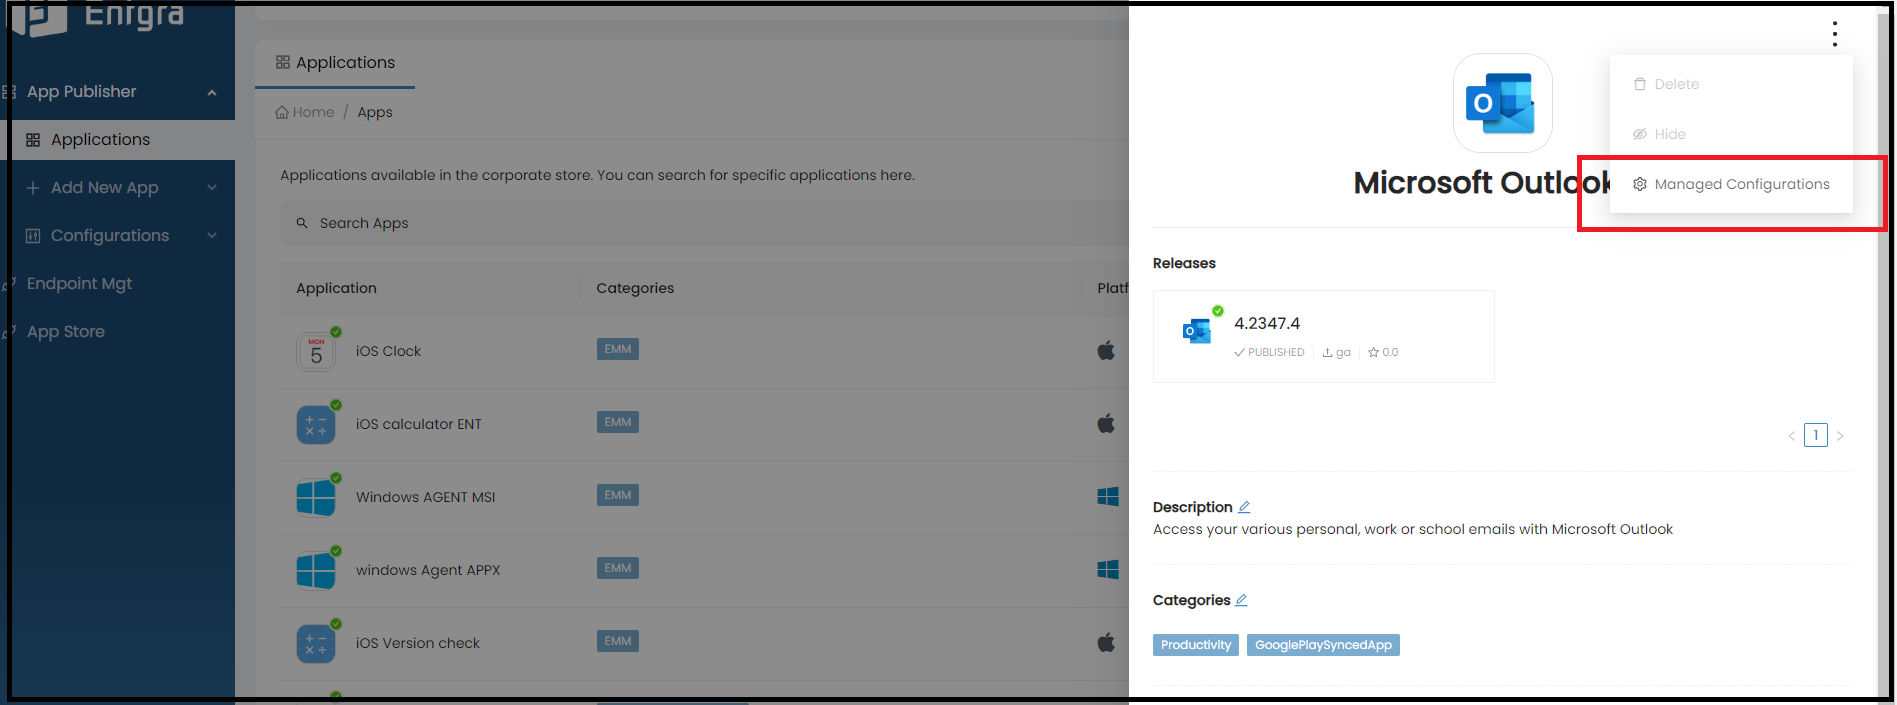
Go to the Applications section and click on the published email client app.
-
Click on the ellipses (overflow menu) and select Managed Configurations from the drop-down menu.
-
Set up the following configurations to connect the email client app with the MS Exchange server.
| Field | Description |
|---|---|
| email address | Add “$emai” in this field. Then this will be replaced with the Endpoint Management console user’s email address during the app installation phase. |
| exchange server URL | Add “outlook.office365.com”. This is because we are using the Exchange online plan. |
| account type | Add “ModernAuth”. This key specifies the account type being configured based on the authentication model. (Note that for the Android Enterprise, this value will always be ModernAuth at the current moment) |
Important
- A comprehensive guide about the available configuration options for MS Outlook can be found here.
Create enrollment application install policy
Turn on the Enrollment Application Installation policy and mark the email client app that you need to install via Android DPC service during the enrollment.
Enroll a device and check check how the Managed Configurations work
Steps
-
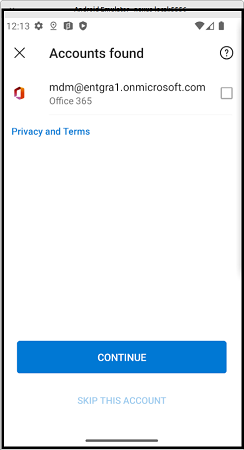
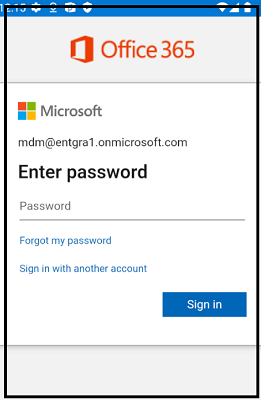
Create a new user in the Endpoint Management Console. ( mdm@entgra1.onmicrosoft.com is the sample email we use for demonstration).
-
Enroll a new device under that user. Refer to the enrollment guide for more details.
-
Once the enrollment is completed, go to the the email client app and try to add a new account. You will see that the email client app is successfully configured with the provided managed configurations.
-
Now log in to your exchange account using the account password.
iOS configuration
This section takes you through the additional server configurations required for setting up an iOS device. Apple server configurations, both for iOS and Mac OS are given here in detail along with the platform configurations, based on the required enrollment method. The configurations necessary for enrolling the device at the Apple ABM (Apple Business Manager), for both iO and Mac OS, are listed in the section that follows.
Multiple tenants can use Entgra UEM while maintaining tenant-based isolation. The iOS configurations enable the tenants to customize the iOS settings based on their own requirements.
Follow the steps given below to configure the Android platform:
-
Sign in to the Entgra UEM Server Endpoint Management console.
-
Click Platform Configurations under Configurations.
-
Click iOS Configurations under Platform Configurations.
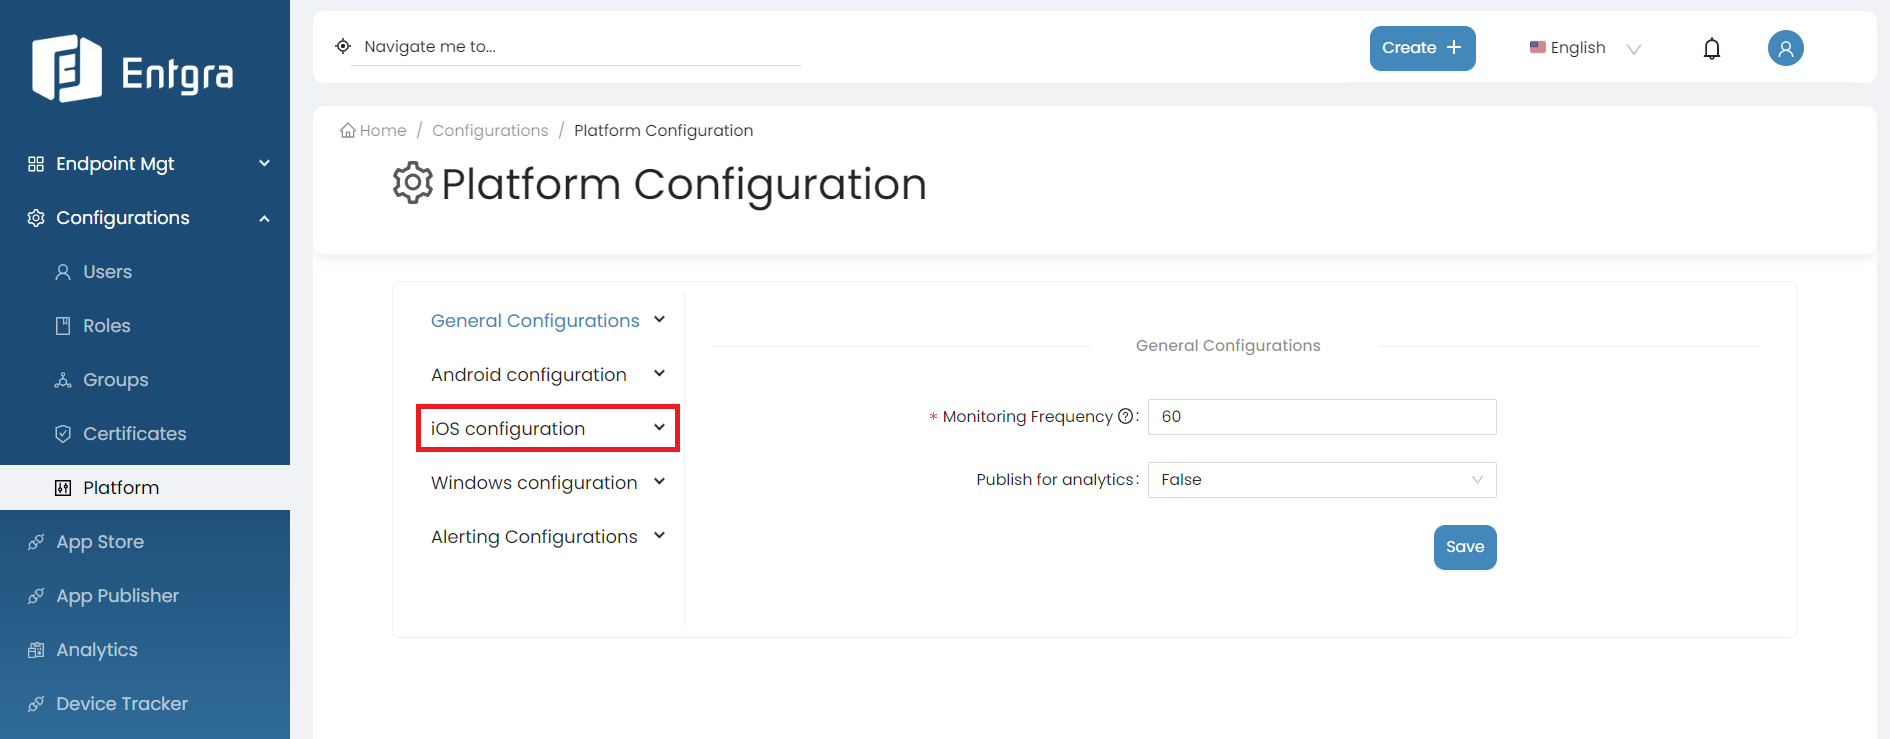
There are 4 main configuration sections for iOS Configurations:
MDM Profile
By following the steps below, you can modify SCEP Certificate, Profile and MDM Configurations;
-
Log in to the Endpoint Management Portal.
-
Go to iOS Configurations under the Platform Configurations.
-
Select MDM Profile.
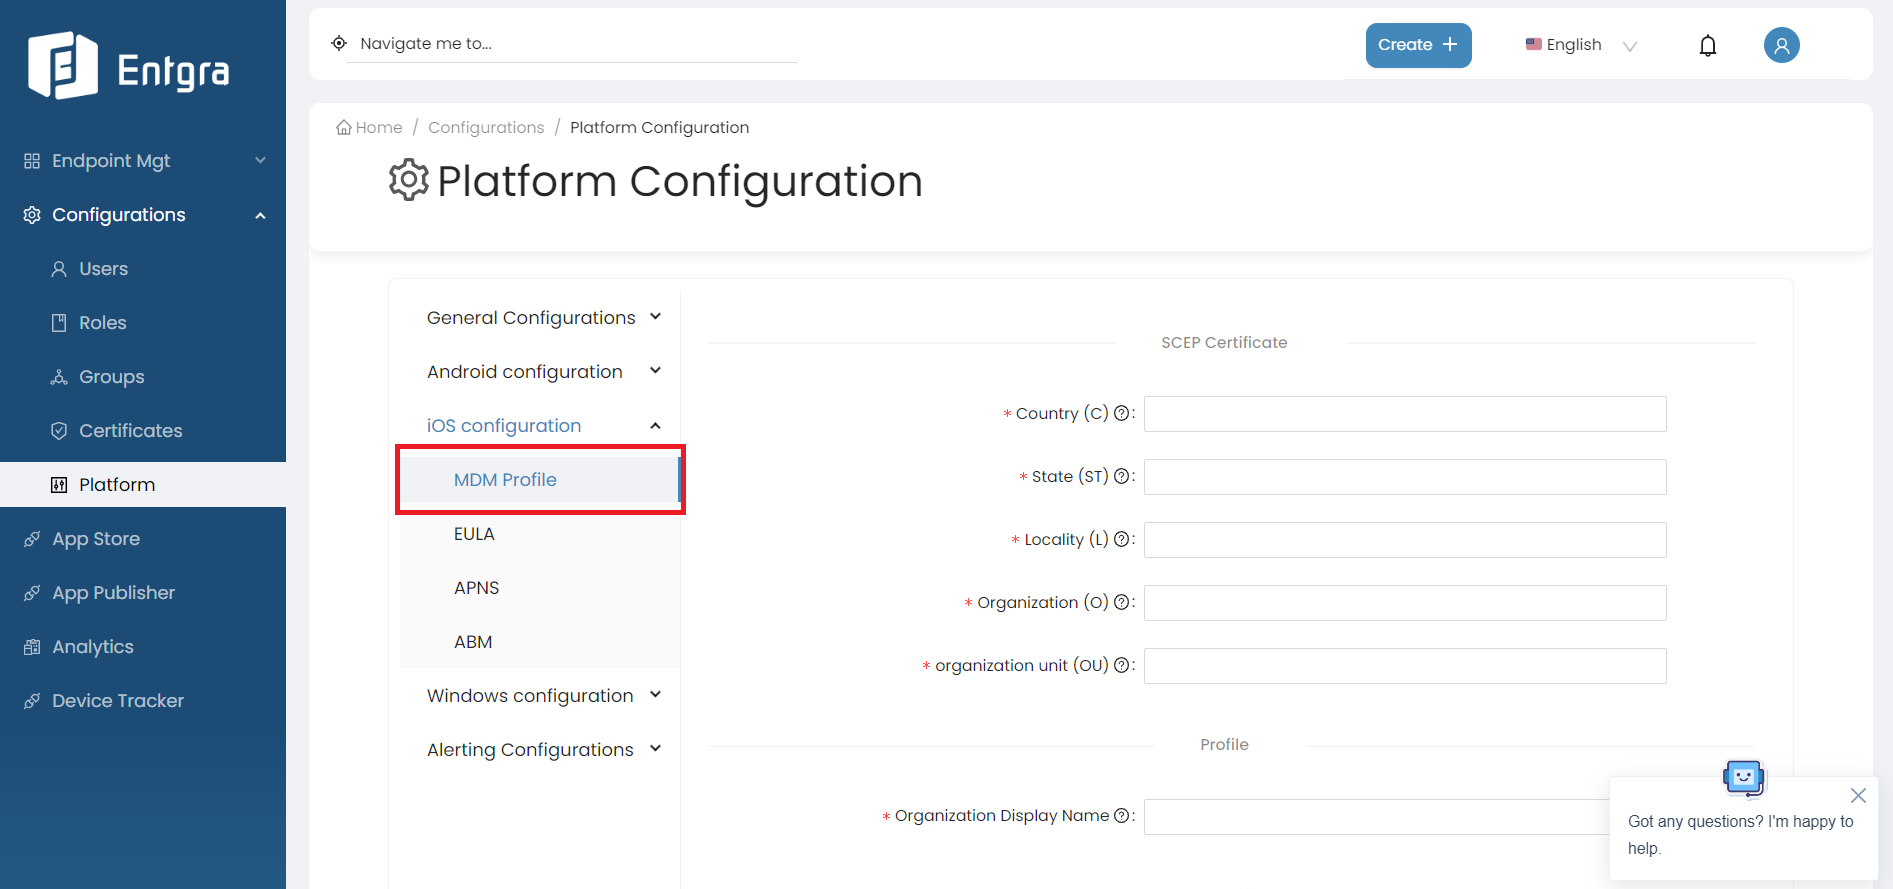
iOS SCEP Certificate Configurations
When an iOS device enrolls with Entgra UEM two iOS Simple Certificate Enrollment Protocol (SCEP) certificates will be created on the fly based on the given SCEP configurations.
| Field | Description |
|---|---|
| Country (C) | The country where the tenant is based. |
| State (ST) | The state where the tenant is based. |
| Locality (L) | The locality where the tenant is based. |
| Organization (O) | The name of the organization where the tenant is based. |
| Organization unit (OU) | The name of the organization unit where the tenant is based. |
iOS Profile Configurations
The details of the organization need to be added.
| Field | Description |
|---|---|
| Organization Display Name | The name of the organization. |
iOS MDM Configurations
The details with respect to the iOS IoTS APNS certificate need to be added.
| Field | Description |
|---|---|
| MDM Certificate | Select the iOS IoTS APNS certificate that was previously created. |
| MDM Certificate Password | The password that was used when converting the IoTS certificate from a .pem file to the .pfx file. |
| MDM certificate topic ID | The USER ID mentioned in the IoTS signing certificate. |
| Mode | The available modes have been explained as follows: Production - Use this option if you are configuring IoTS for a production environment, Developer - Use this option if you are configuring IoTS for a testing environment. |
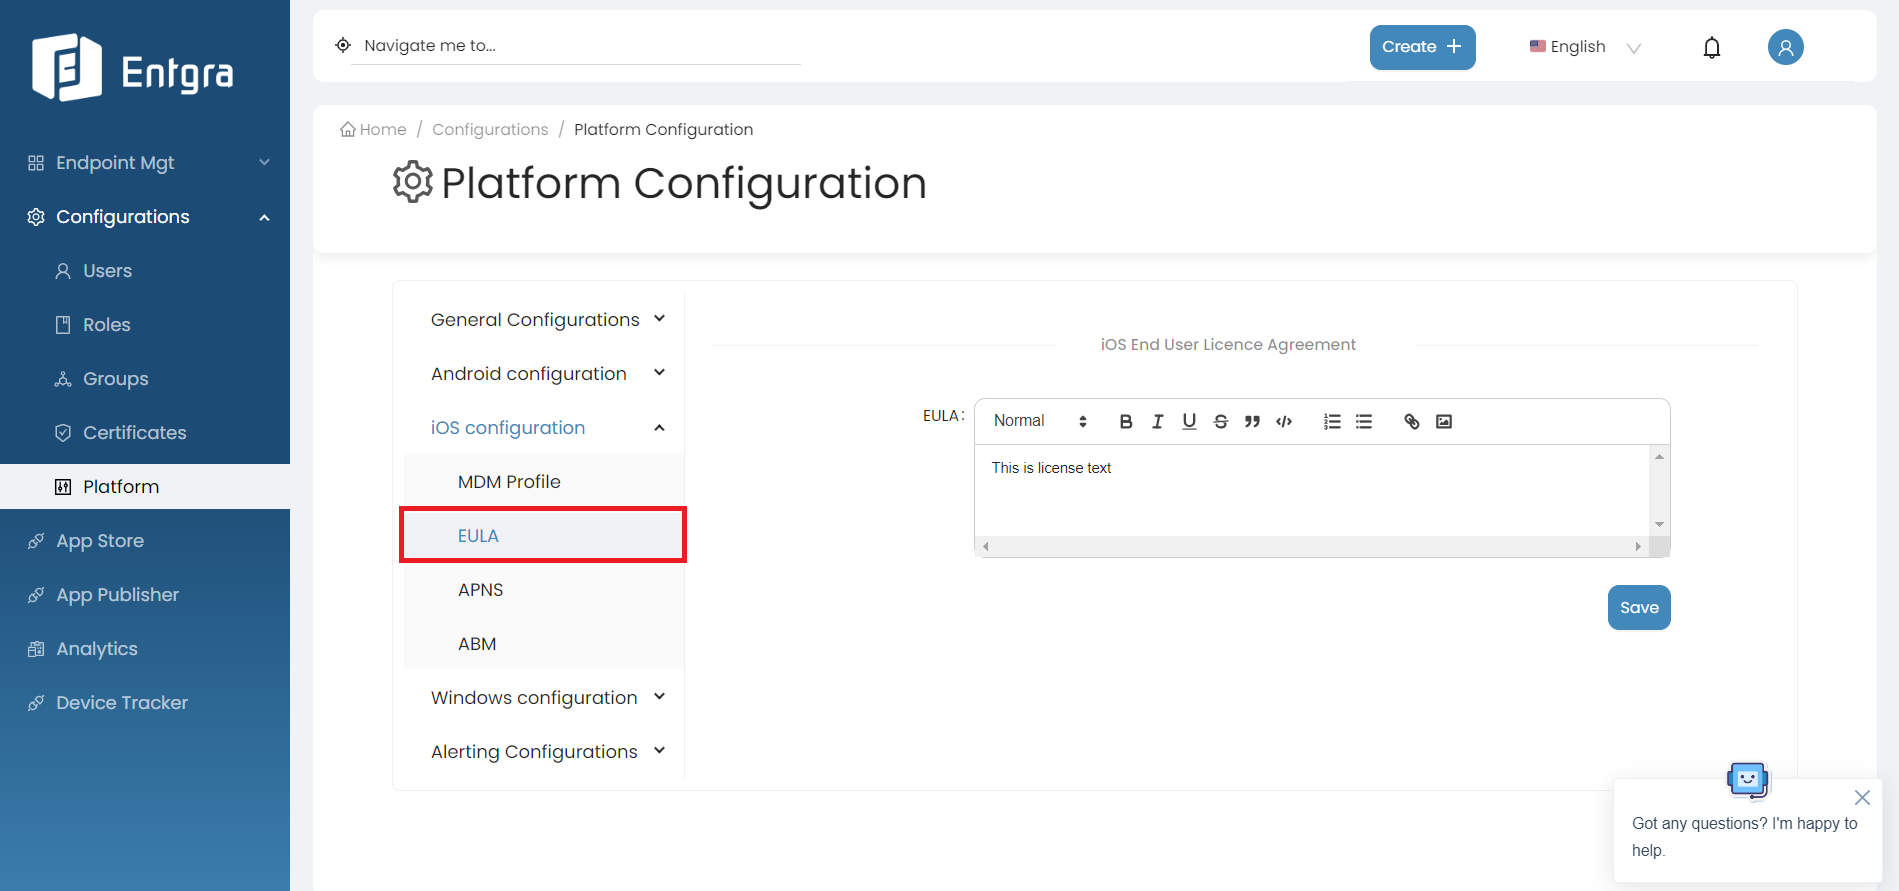
EULA
Provide the End User License Agreement(EULA) that a user must adhere to when enrolling an iOS device with IoTS.
By following the steps below, you can modify the license agreement for end users;
-
Log in to the Endpoint Management Portal.
-
Go to iOS Configurations under the Platform Configurations.
-
Select EULA.
APNS
The details with respect to the Apple Push Notification Service(APNS) need to be added here. By following the steps below, you can configure APNS;
-
Log in to the Endpoint Management Portal.
-
Go to iOS Configurations under the Platform Configurations.
-
Select APNS.
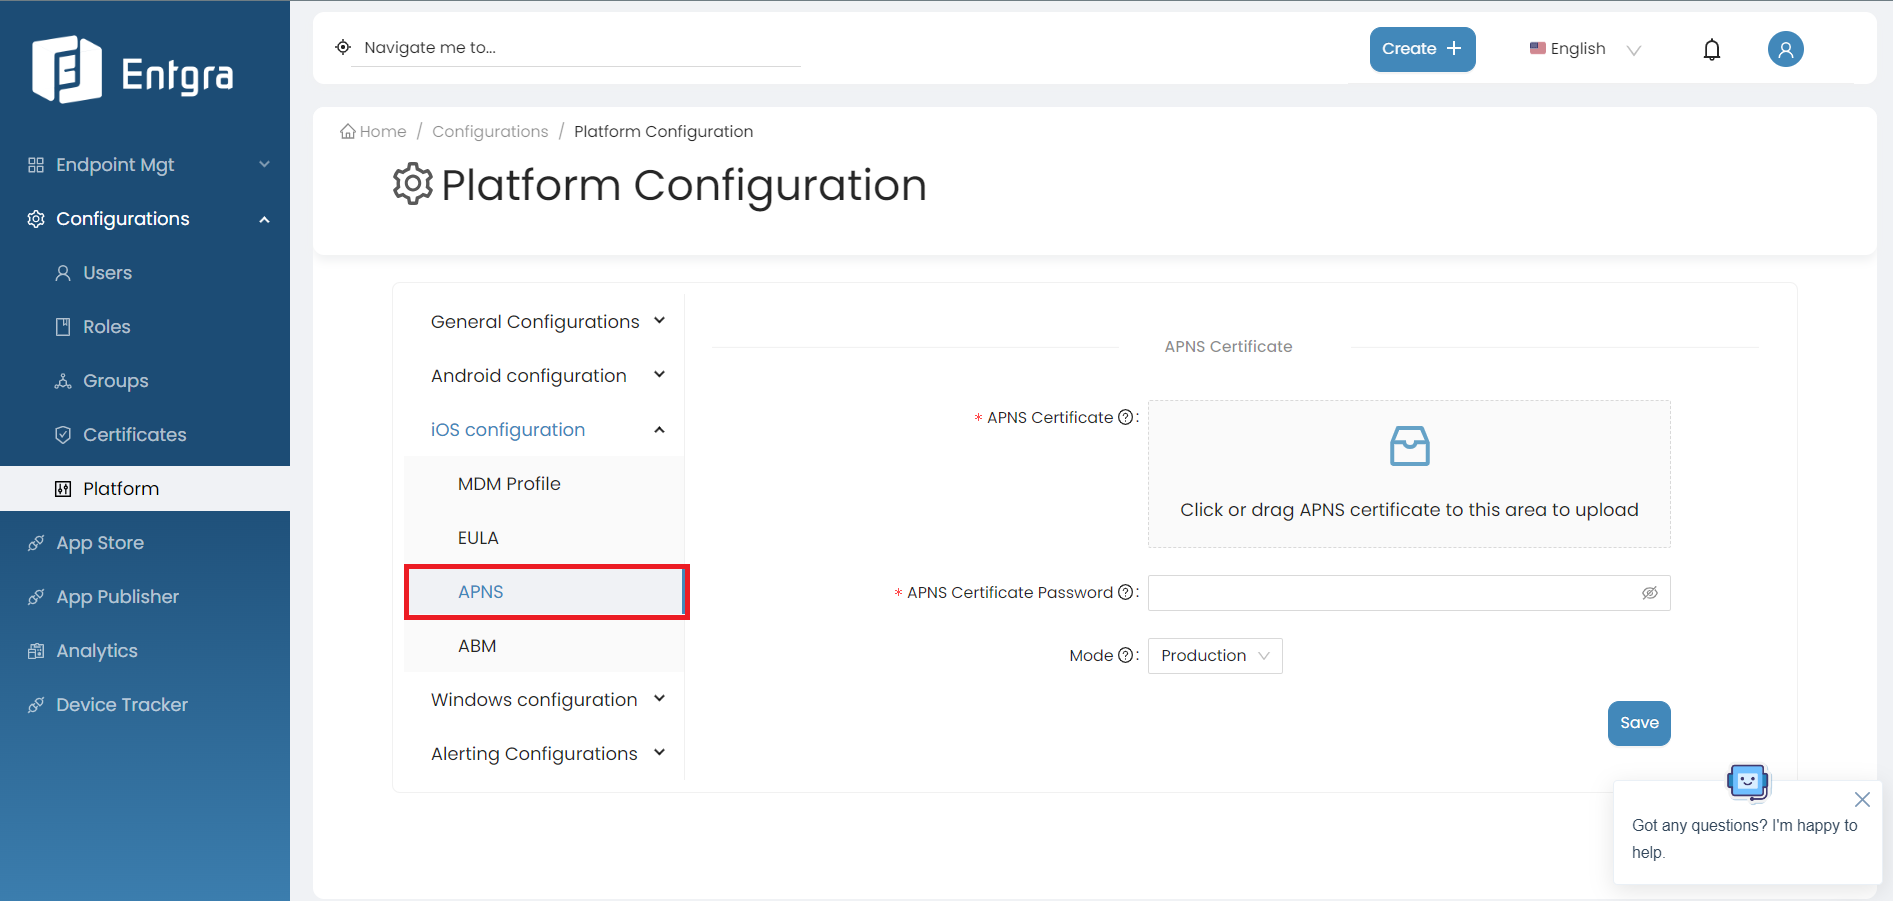
Field Description APNS Certificate Select the APNS certificate that was previously created. APNS Certificate Password Enter the password provided when exporting the iOS APNS certificate. Mode The available modes have been explained as follows: Production - Use this option if you have configured a production APNS certificate, Developer - Use this option if you have configured a development APNS certificate.
ABM
To effectively manage your DEP-enrolled devices within the Entgra UEM console, follow these steps to enable and configure the Apple Business Manager(ABM).
By following the steps below, you can configure ABM;
-
Log in to the Endpoint Management Portal.
-
Go to iOS Configurations under the Platform Configurations.
-
Select ABM.
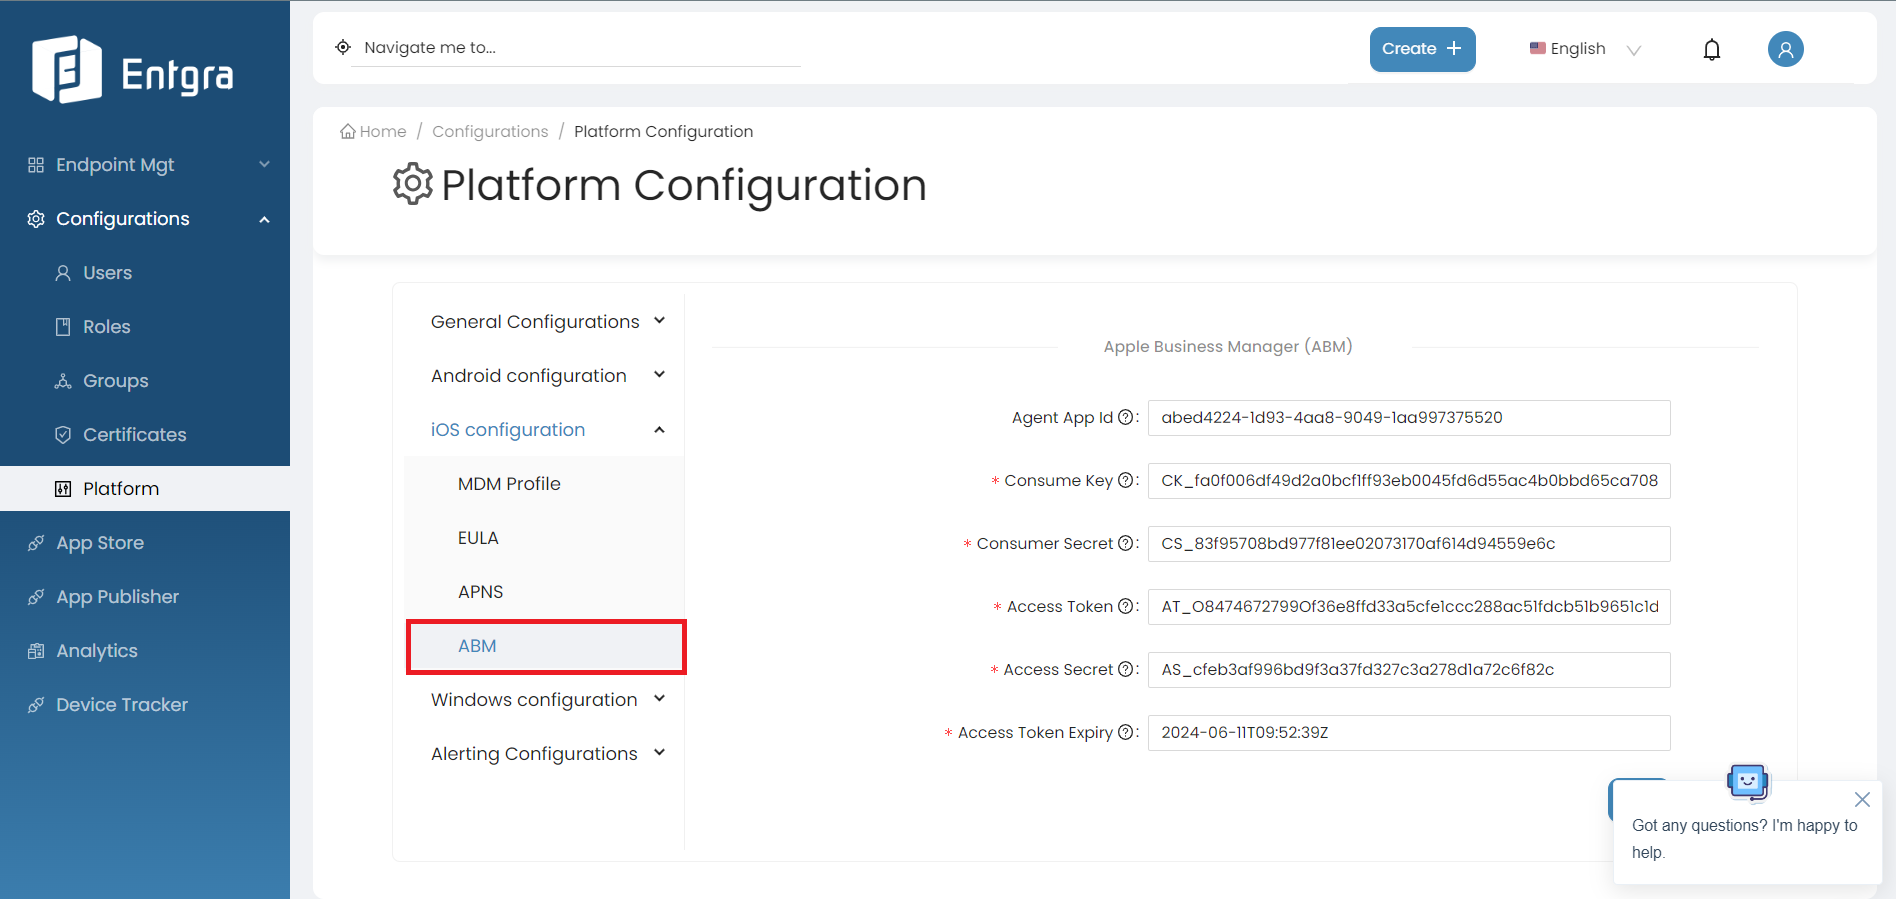
Field Description Agent App Id The App ID of the ABM agent stored in the internal app store. Consume Key Consumer key value of the ABM token. Consumer Secret Consumer secret value of the ABM token. Access Token Access token value of the ABM token. Access Secret Access secret value of the ABM token. Access Token Expiry Access token expiry value of the ABM token.
VPP Token Configurations
Steps
- Sign in to the Apple Business Manager portal and generate the VPP token.
-
After receiving the token, input the token value into the following designated field.
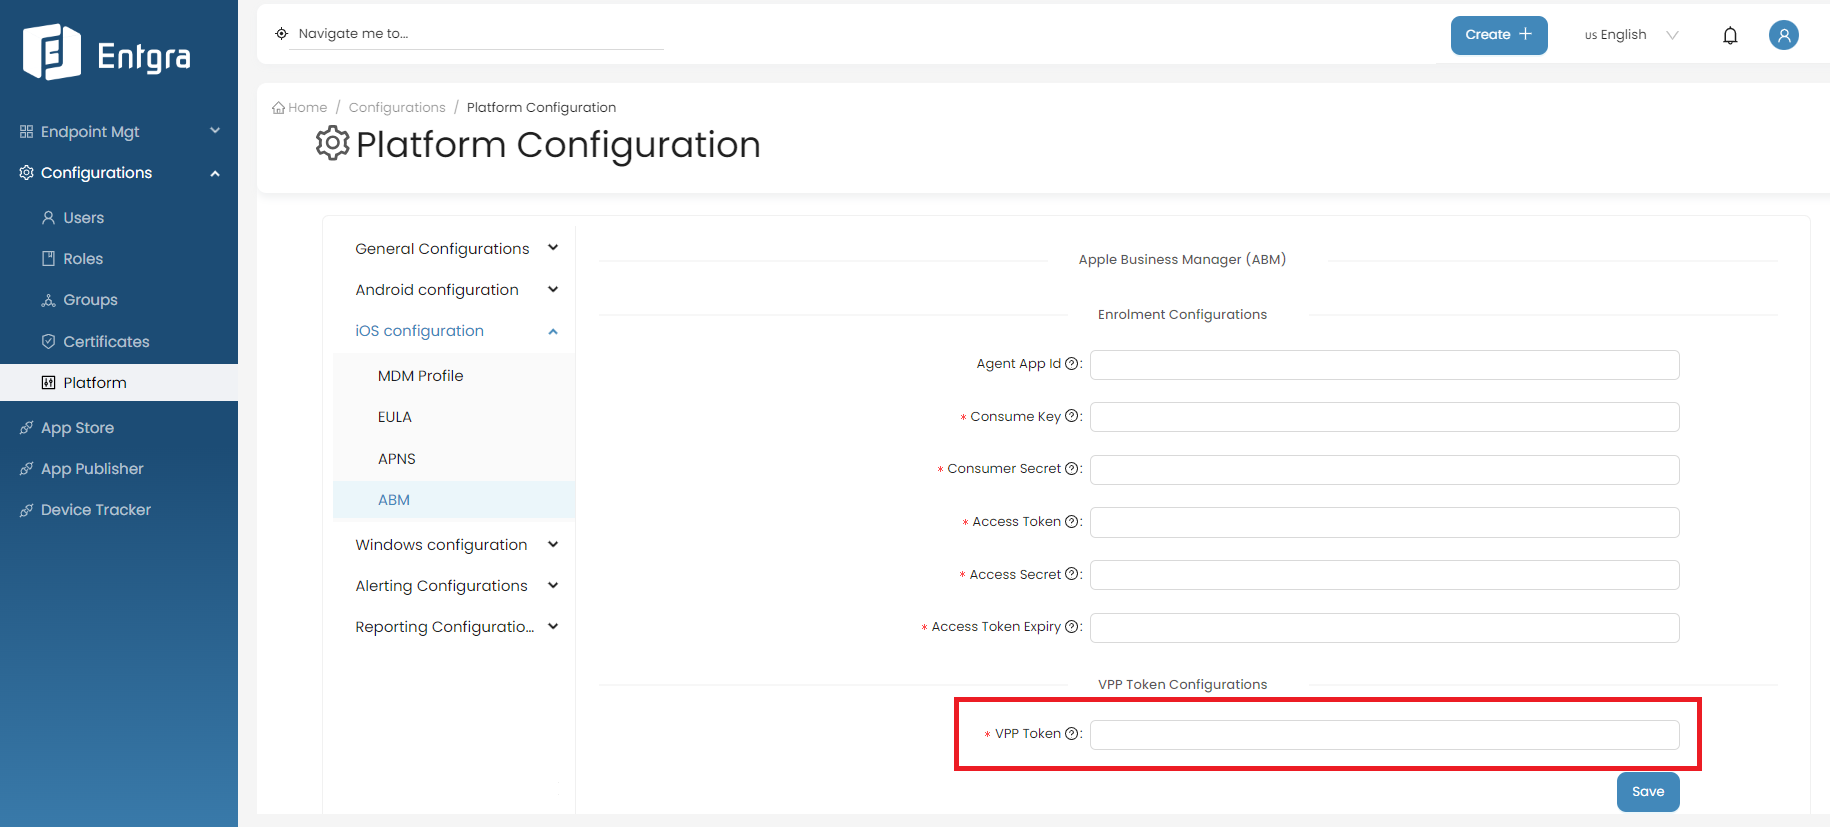
-
Click on Save.
MS Exchange Online Support for iOS
Configure Exchange Mail/O365 Mailbox on iOS
Provision ActiveSync configurations
Turn on the ActiveSync Configurations policy and fill out the following fields to provision ActiveSync Configurations on iOS devices.
| Field | Description |
|---|---|
| Email address | Add “$emai” in this field. Then this will be replaced with the Endpoint Management console user’s email address during the profile installation. |
| Exchange Server Hostname | Add “outlook.office365.com”. This is because we are using the Exchange online plan. |
| Account Username | Add “$emai” in this field also. This string specifies the user name for this Exchange account. |
| Account Password | The password of the account. Use only with encrypted profiles. |
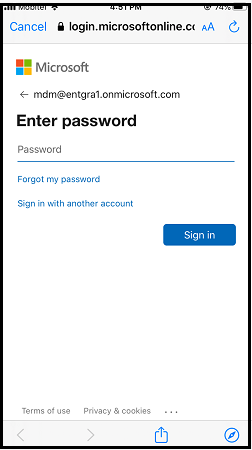
Enroll a device and check check how the ActiveSync Configurations work
Steps
-
Create a new user in the Endpoint Management Console. ( mdm@entgra1.onmicrosoft.com is the sample email we use for demonstration).
-
Enroll a new device under that user. Refer to the enrollment guide for more details.
-
Once the enrollment is completed, go to the the Password & Accounts in Settings and try to add a new account. You can identify that the exchange account is successfully configured with the provided ActiveSync configurations.
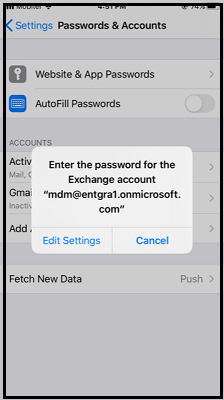
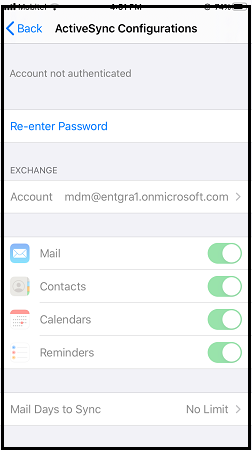
-
Now log in to your exchange account using the account password.
Windows configuration
Multiple tenants can use Entgra UEM while, maintaining tenant based isolation. The Windows configurations enable the tenants to customize the Windows settings based on their own requirements.
Follow the steps given below to configure the Windows platform:
-
Sign in to the Entgra UEM Server Entgra UEM Console.
-
Click Platform Configurations under Configurations.
-
Click Windows Configurations under Platform Configurations.
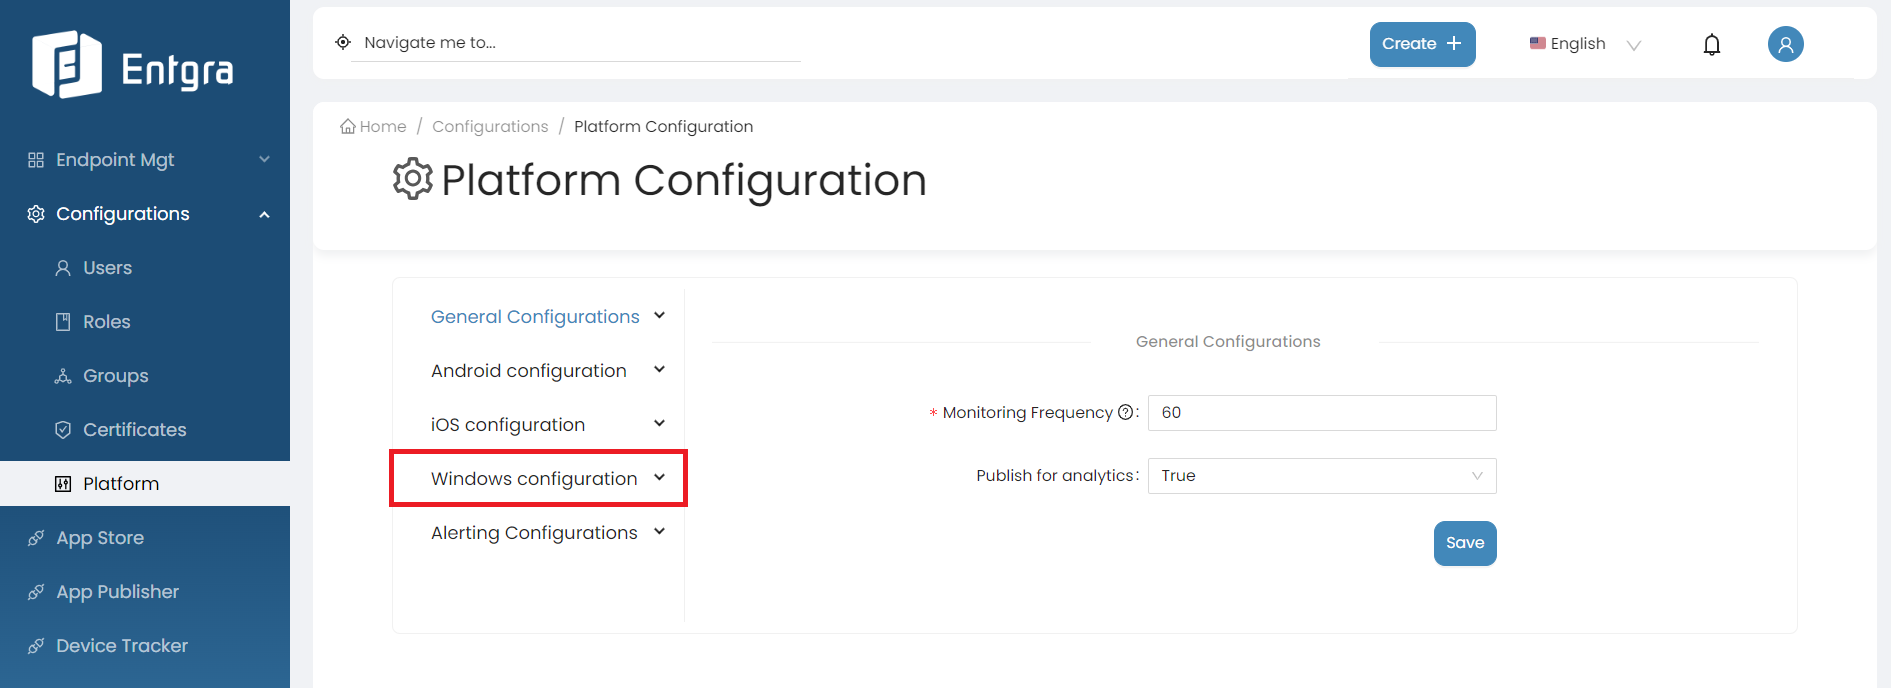
There are 2 main configuration sections for Windows Configurations:
General Configurations
By following the steps below, you can modify the general configurations for Windows;
-
Log in to the Endpoint Management Portal.
-
Go to Windows Configurations under the Platform Configurations.
-
Select General Configurations and enter the requested information.
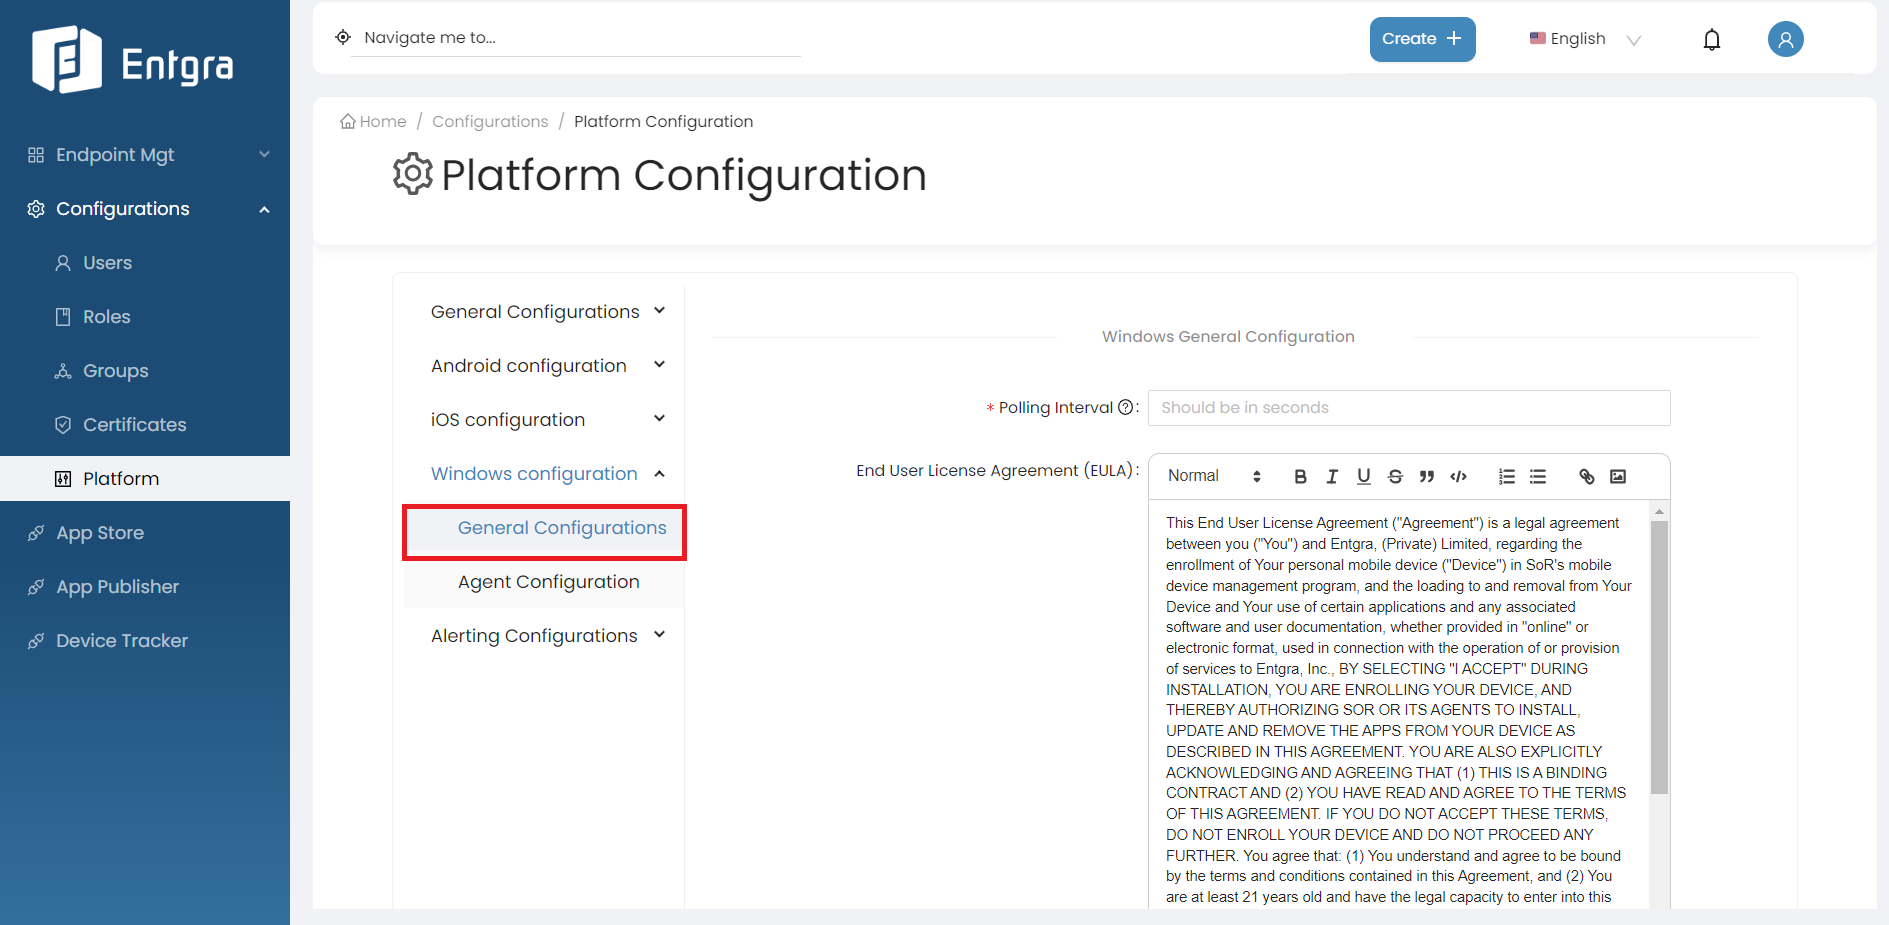
Field Description Polling Interval Specify the time period for the wake-up command to automatically trigger the Entgra UEM client as the notifier frequency. Ensure to specify the notifier frequency in seconds. End User License Agreement (EULA) Provide the license agreement that a user must adhere to, when enrolling an Windows device with Entgra UEM Server. -
Click SAVE.
Agent Configuration
Apart from the General Configurations, there is Windows Agent Configuration as well. By following the steps below, you can modify the general configurations for Windows;
-
Log in to the Endpoint Management Portal.
-
Go to Windows Configurations under the Platform Configurations.
-
Select Agent Configurations and enter the requested information.
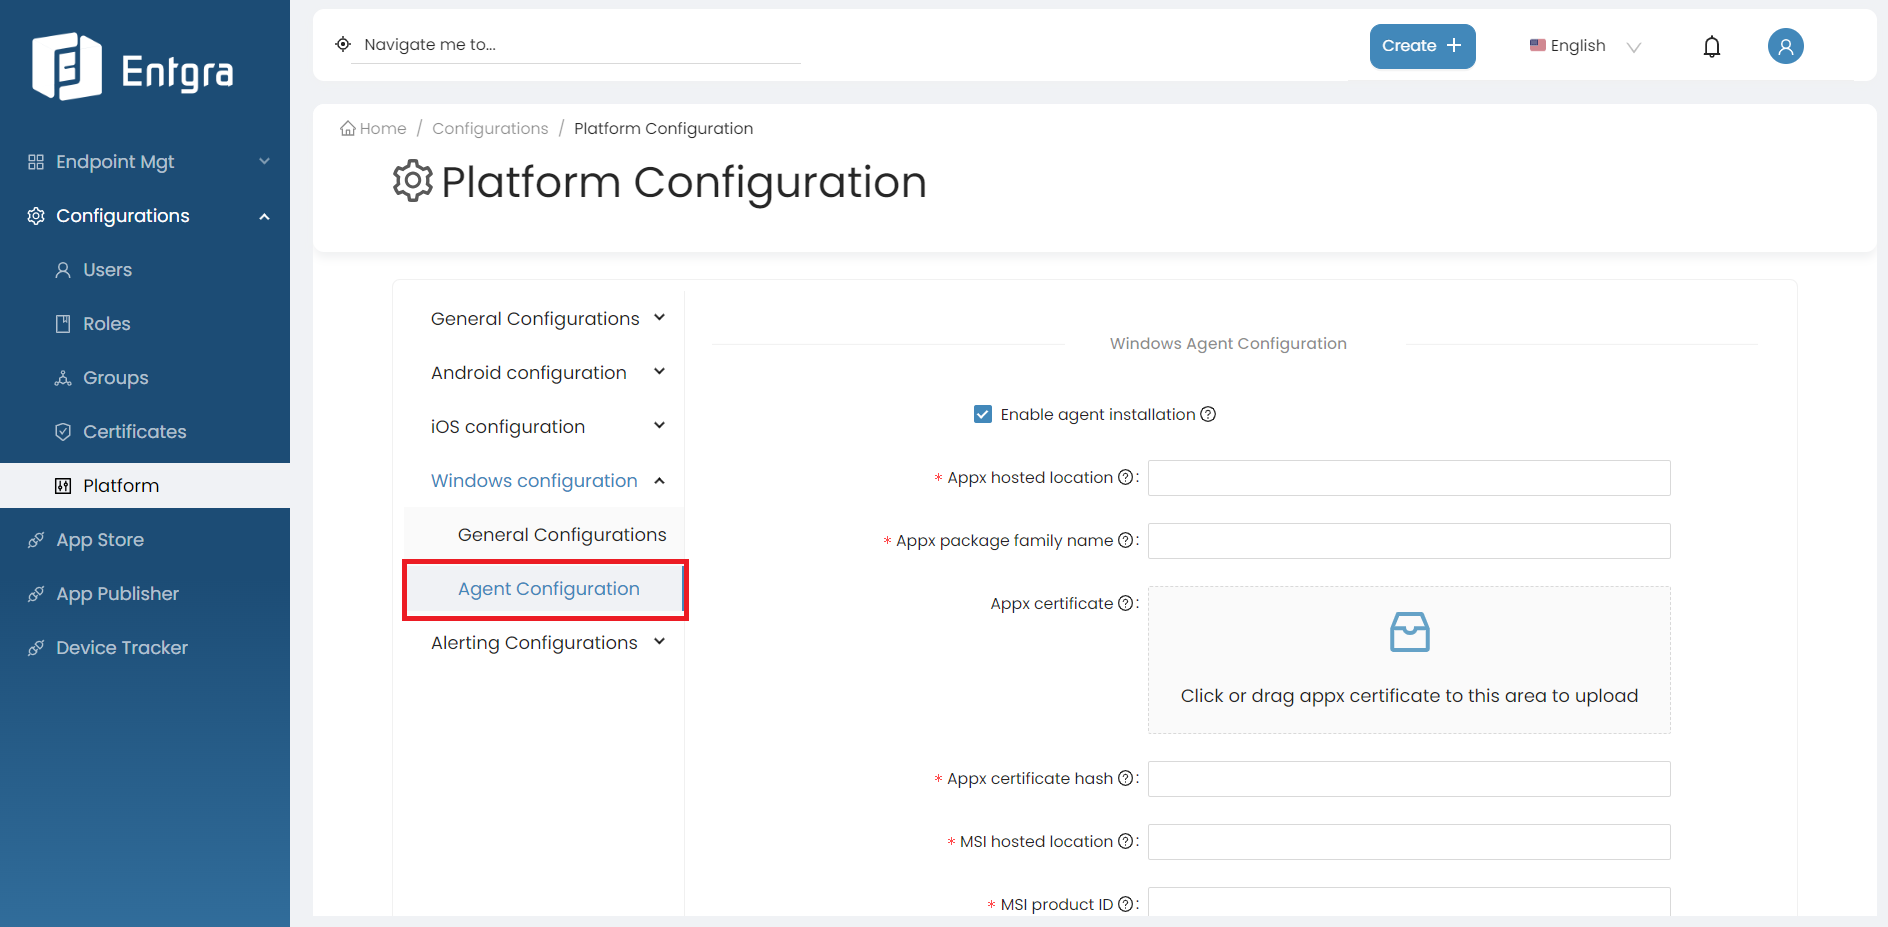
Field Description Appx Hosted Location Location of the appx package of the Windows agent where it hosted. Appx Package Family Name This field should contain the family name of the Windows agent package. Appx Certificate Upload the appx certificate. Appx Certificate Hash Hash number of the appx certificate MSI Hosted Location Location of the MSI package of the Windows agent where it hosted MSI Product ID The product id is a GUID identifying Windows Installer package. It associates with an MSI file and can be used to verify sources. MSI File Hash Hash number of the MSI file that needs to configure the MSI file for agent installation. -
Click SAVE.
Azure AD Integrated Enrollment Configurations
Prerequisites
-
To integrate Azure Active Directory (Azure AD, now referred to as Microsoft Entra ID) with the Entgra UEM server for enrolling Azure AD registered or joined Windows devices, you must initially obtain an Azure Active Directory Premium P1 license or a higher tier.
-
Subsequently, you will need to create a Mobility (MDM and WIP) application within your Azure tenant.
Verify custom domain name
Note:
-
If the primary domain name of the Entgra UEM server is not already verified under Microsoft Entra ID -> Custom domain names in your Azure portal, then you need to verify the primary domain. More details.
-
When verifying a custom subdomain, note that verification of the primary domain is a prerequisite. An error may occur if this verification process is not completed beforehand. More details.
-
For further details regarding server configurations for Windows enrollment on the Entgra UEM server, please refer to the Windows Server Configuration section of the Enrollment Guide.
Steps
-
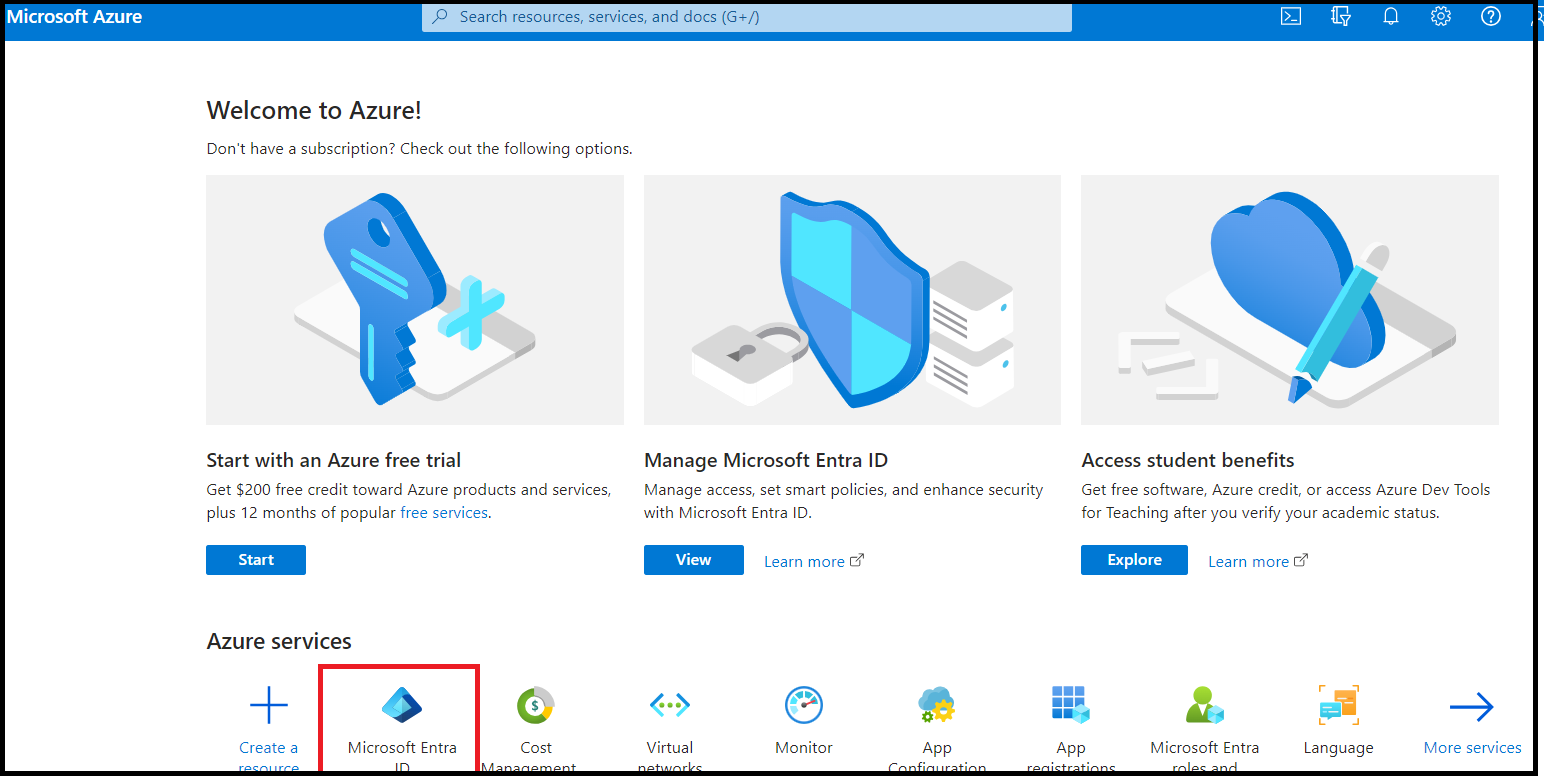
Sign in to Microsoft Azure Portal.
-
Click Microsoft Entra ID under Azure Services.
-
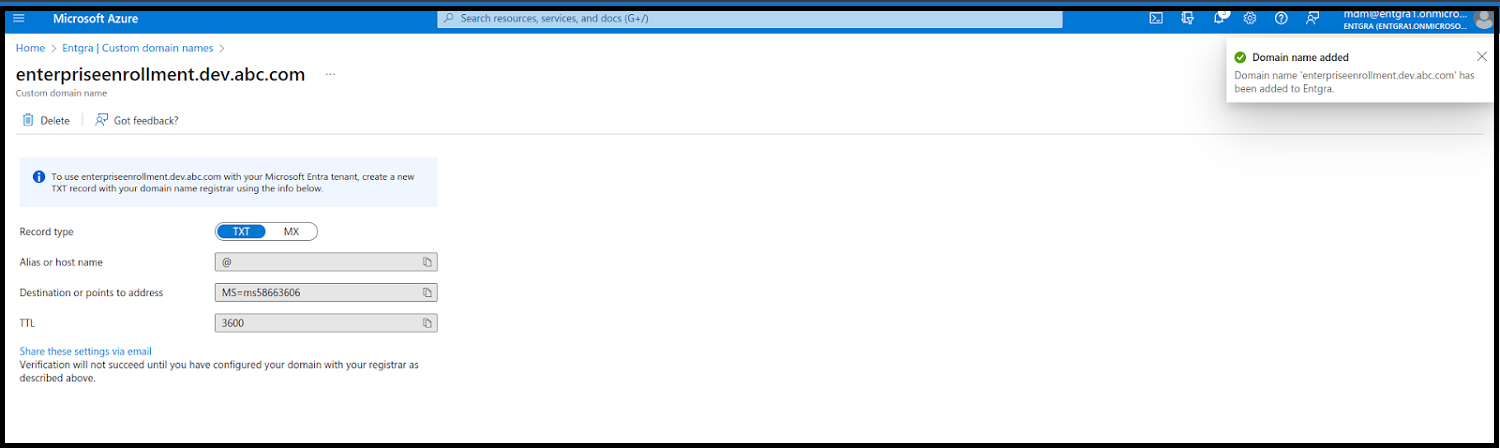
Click Custom domain names and then click on Add custom domain to enter a custom domain name suitable for your domain.

-
After the custom domain name is added you have to verify the domain by adding a new TXT or MX record to your domain registrar. The verification may take some time.
Create an MDM application
Steps
-
Go back to Microsoft Entgra ID and then click Mobility (MDM and WIP). Next, click Add application.

Configure MDM application
After creating the MDM application, you have the option of assigning the MDM user scope to specific groups of users, or all users. It is recommended to create separate user groups and allocate the Azure Active Directory Premium license to each respective group.
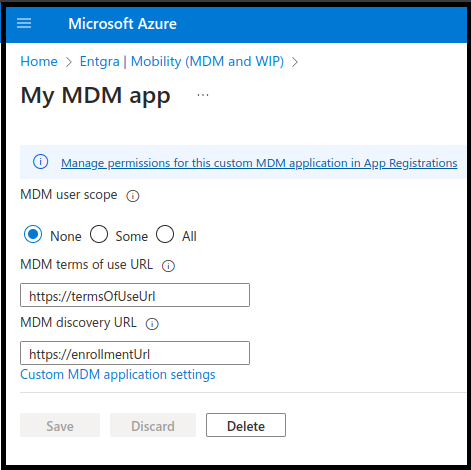
-
Fill out this section as given below:
- MDM user scope - Some or All
- MDM terms of use URL - https://EnterpriseEnrollment.
/enroll-web-agent - MDM discovery URL - https://EnterpriseEnrollment.
/EnrollmentServer/Discovery.svc
-
Click custom MDM application settings and note down the Directory (tenant) ID and Application (client) ID values in the overview page as these will be needed later on.
-
Next, click Expose an API under the Manage section of your MDM application and set the Application ID URI to the custom domain that you verified previously when verifying the custom domain name. Note down this Application ID URI.
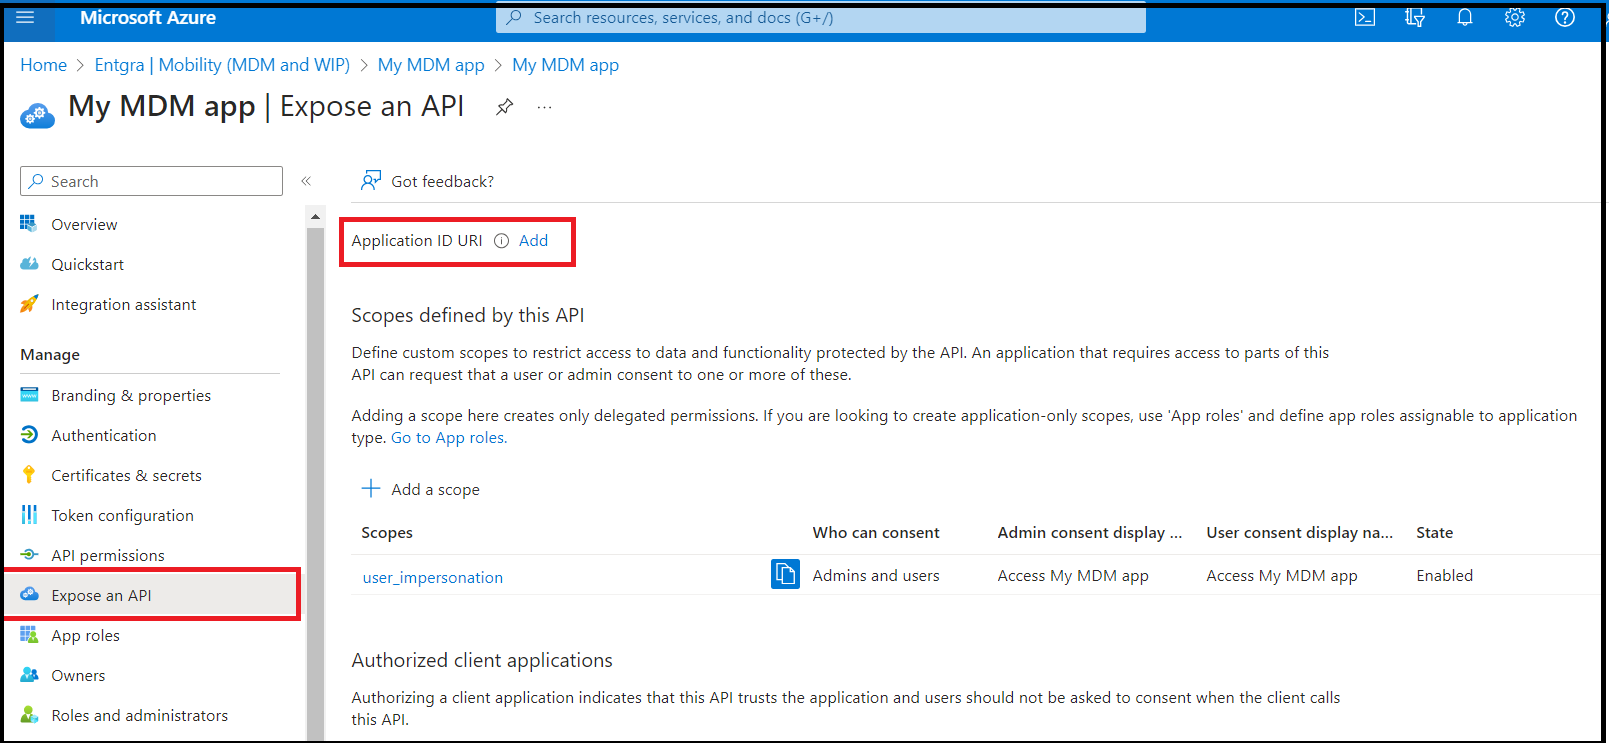
-
Click API Permissions section and grant admin consent to your Azure tenant. This process facilitates the reporting of device compliance to Azure from Entgra UEM server upon successful enrollment and management of a device.
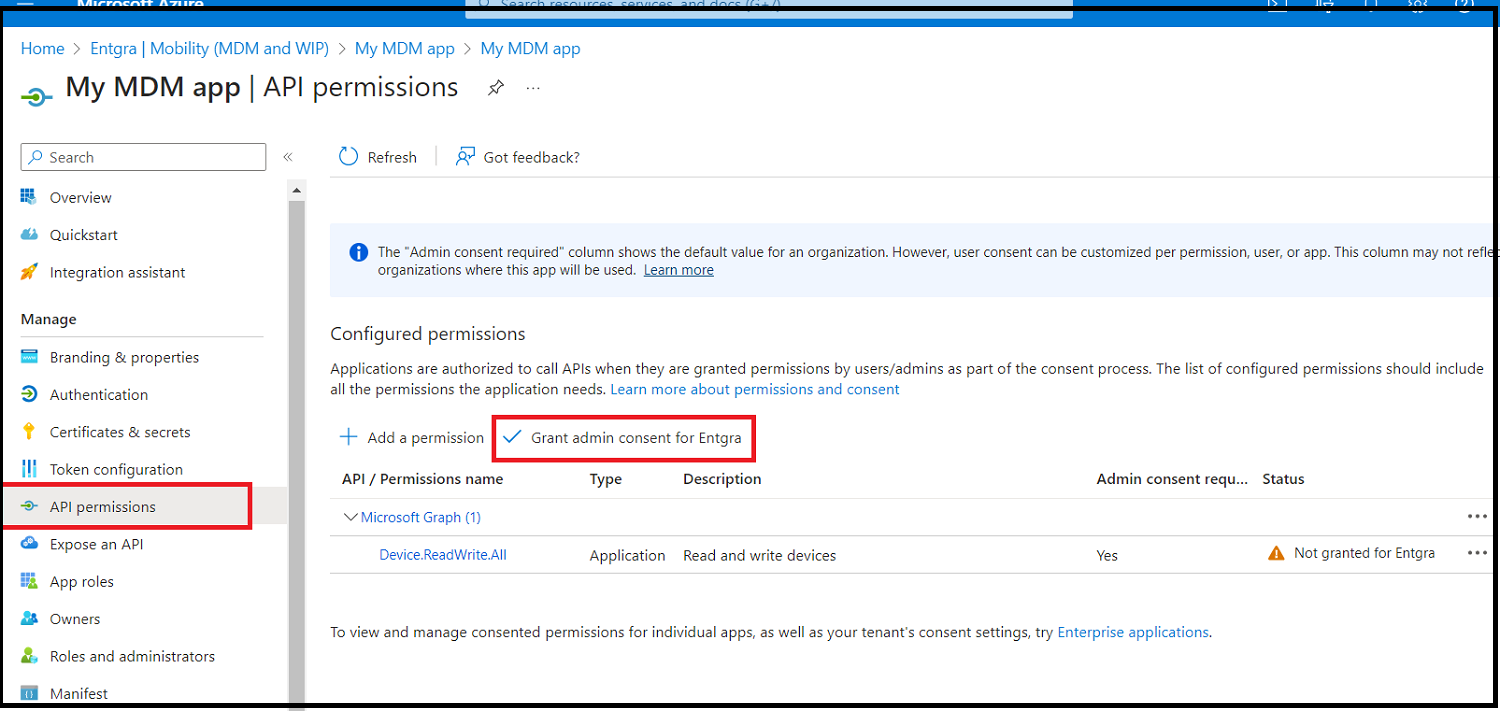
-
Now click Certificates & secrets section and then click New client secret. Add a description and set an expiration for the secret based on your preferences.
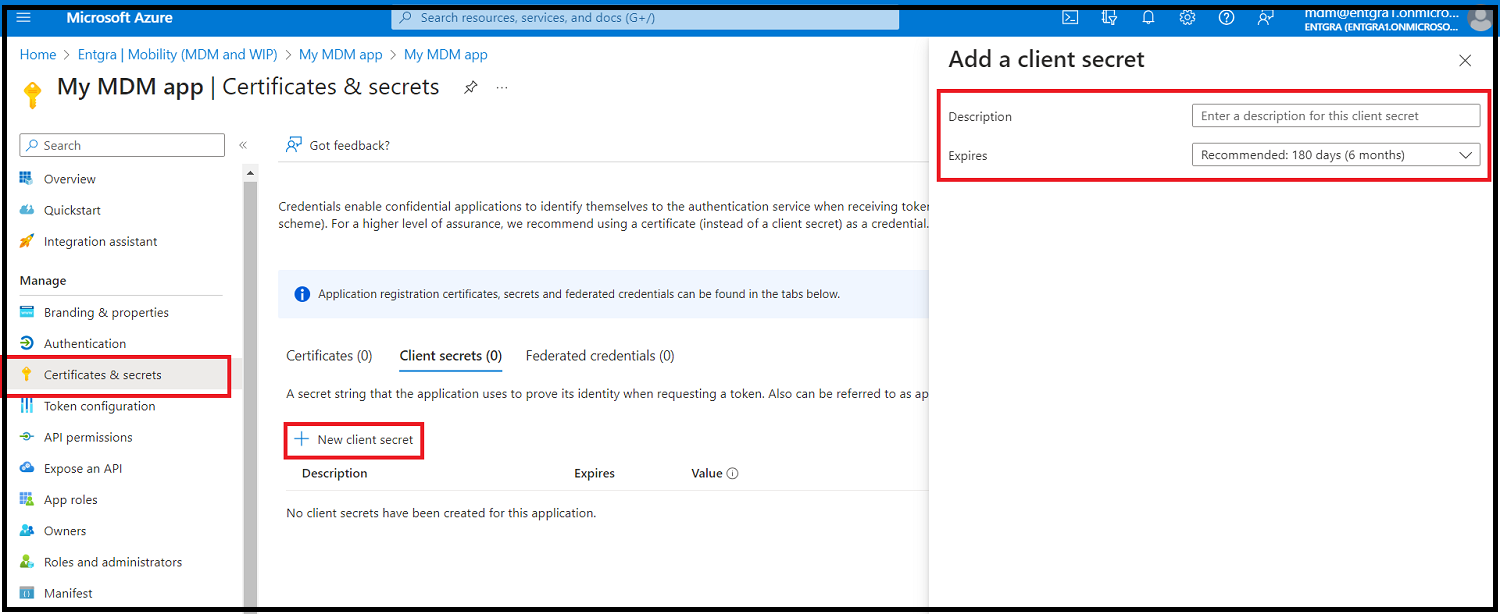
-
Make sure to note down the client secret value (under the Value column) as this will not be able to be retrieved once created.
-
Once all these steps are completed, you should have the following information noted down:
- Directory (tenant) ID
- Application (client) ID
- Application ID URI
- Client secret
- Directory primary domain (This can be found under Microsoft Entra ID > Overview > Basic Information)
Configure the Azure AD Enrollment
Steps
-
Log in to the Endpoint Management Portal.
-
Go to Windows Configurations under Platform Configurations.
-
Select Azure AD Enrollment.
-
Then fill out the form with the values that you noted down in the previous step.
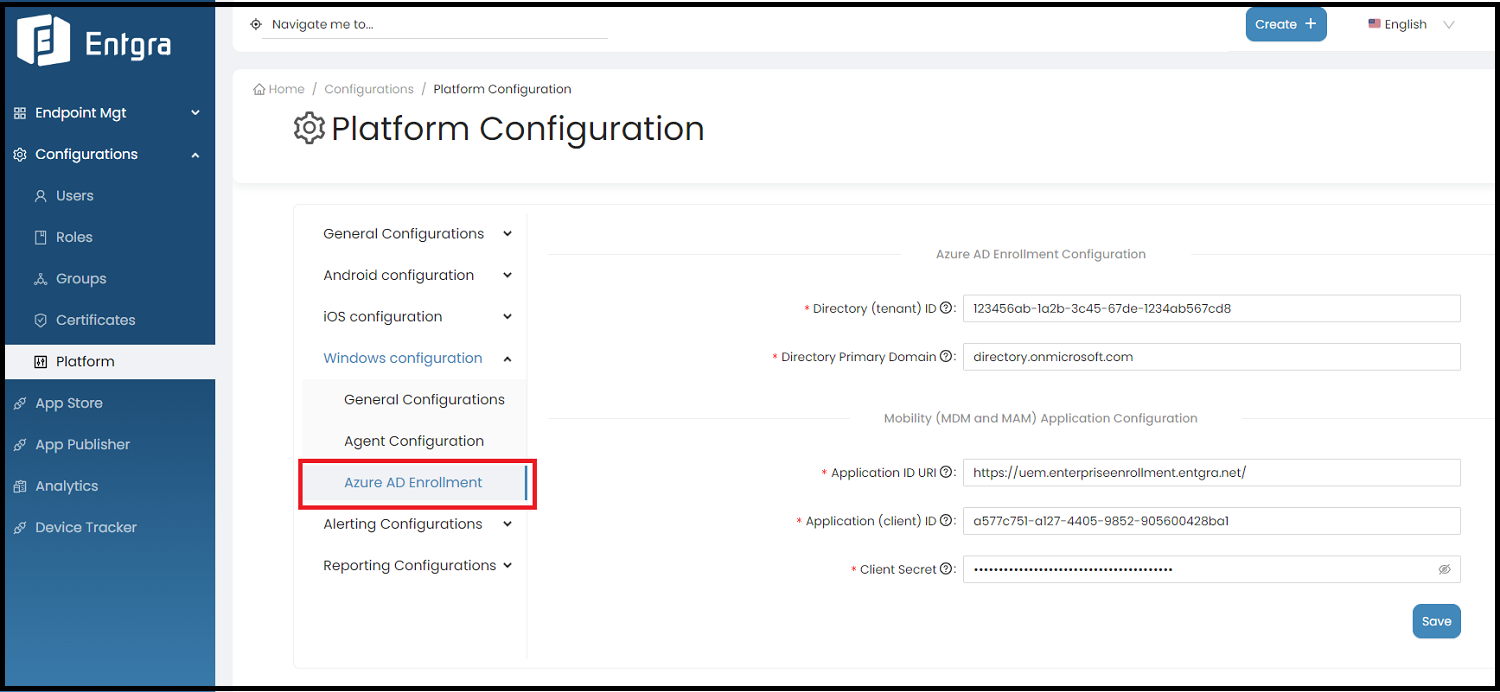
Once these configurations are saved you have successfully integrated Azure AD with the Entgra UEM server for Windows device enrollment. This supports enrolling Azure AD registered devices, Azure AD joined devices and Azure bulk token enrollments using a .ppkg (provisioning package) that can be managed by Entgra UEM server.
Alerting Configurations
Geo Alerts
- Sign in to the Entgra UEM Server Endpoint Management Console.
- Click Configurations.
- Go to Platform Configuration.
-
In Alerting Configurations, select the Geo Alerts.
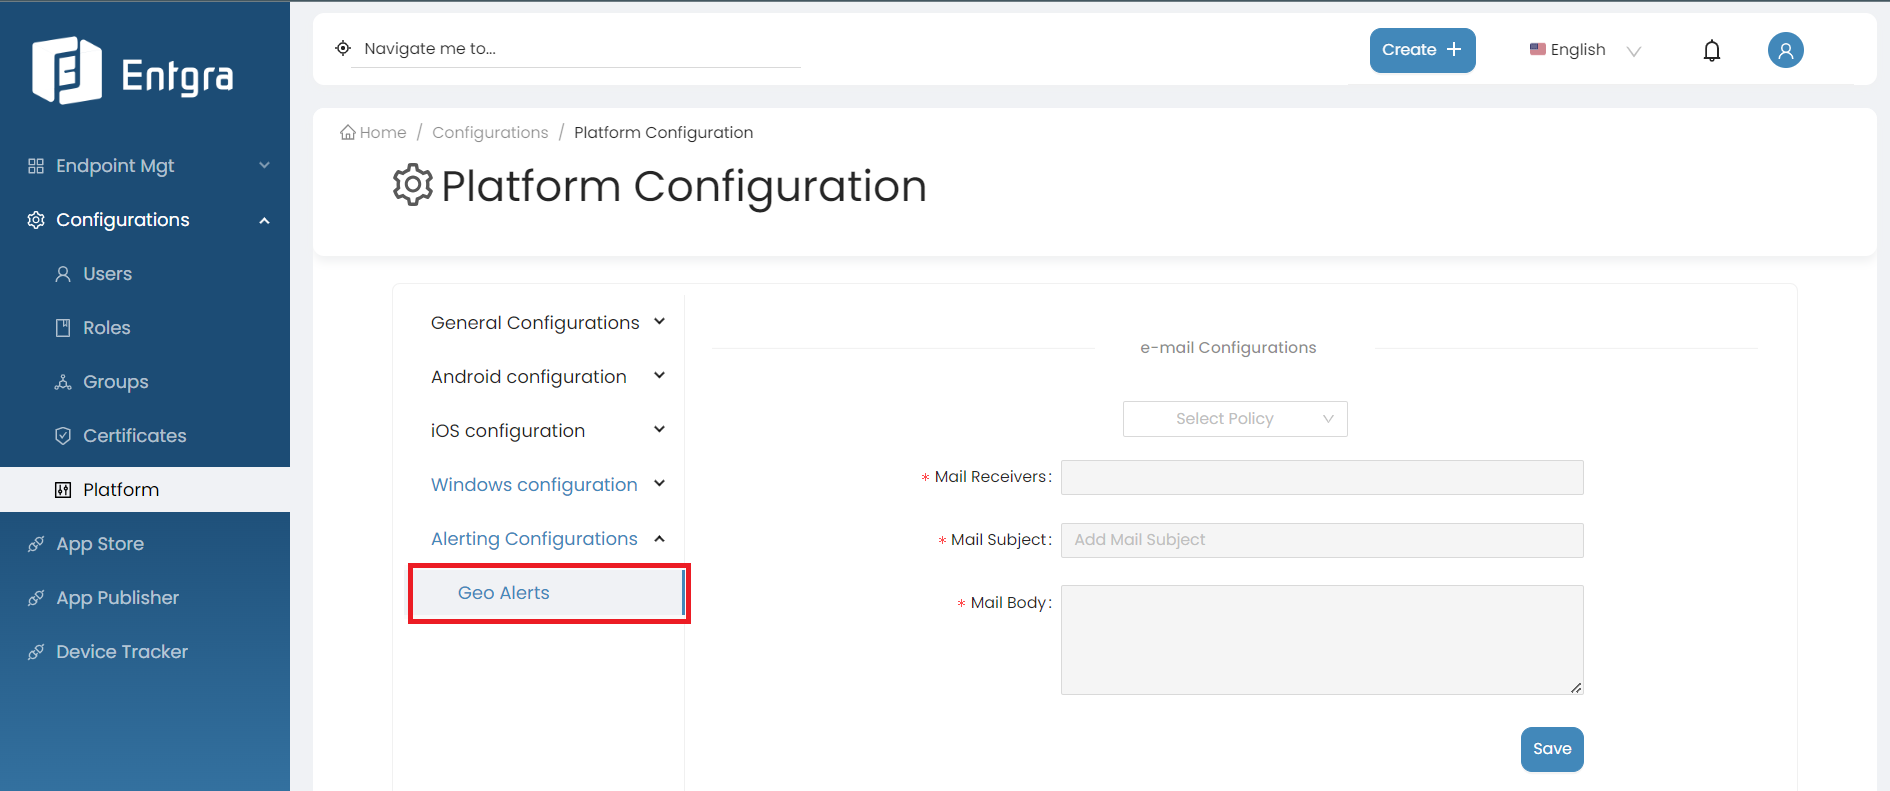
-
Fill in the required fields.
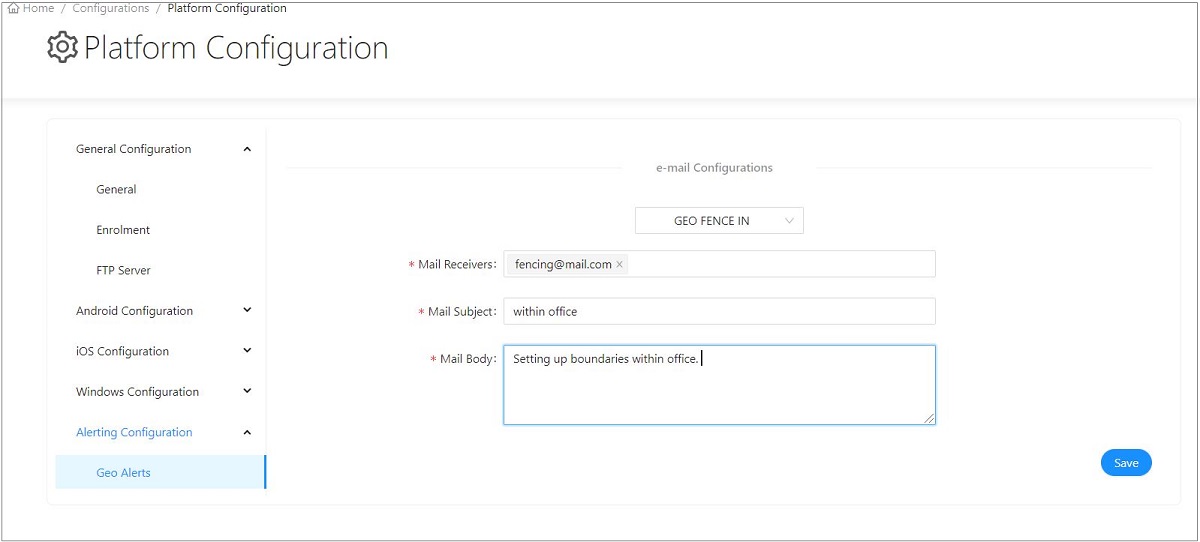
-
Click Save.
Reporting Configurations
Mail Alerts
This feature enables users to configure an email template from the Platform Configurations and receive mail alerts when a SIM change is detected.
By following the steps below, you can modify the mail alert configurations;
Note
Before proceeding, make sure to enable analytics on general platform configurations.
-
Sign in to the Entgra UEM Server console.
-
Click Platform Configurations under Configurations.
-
Click Reporting Configurations under Platform Configurations.
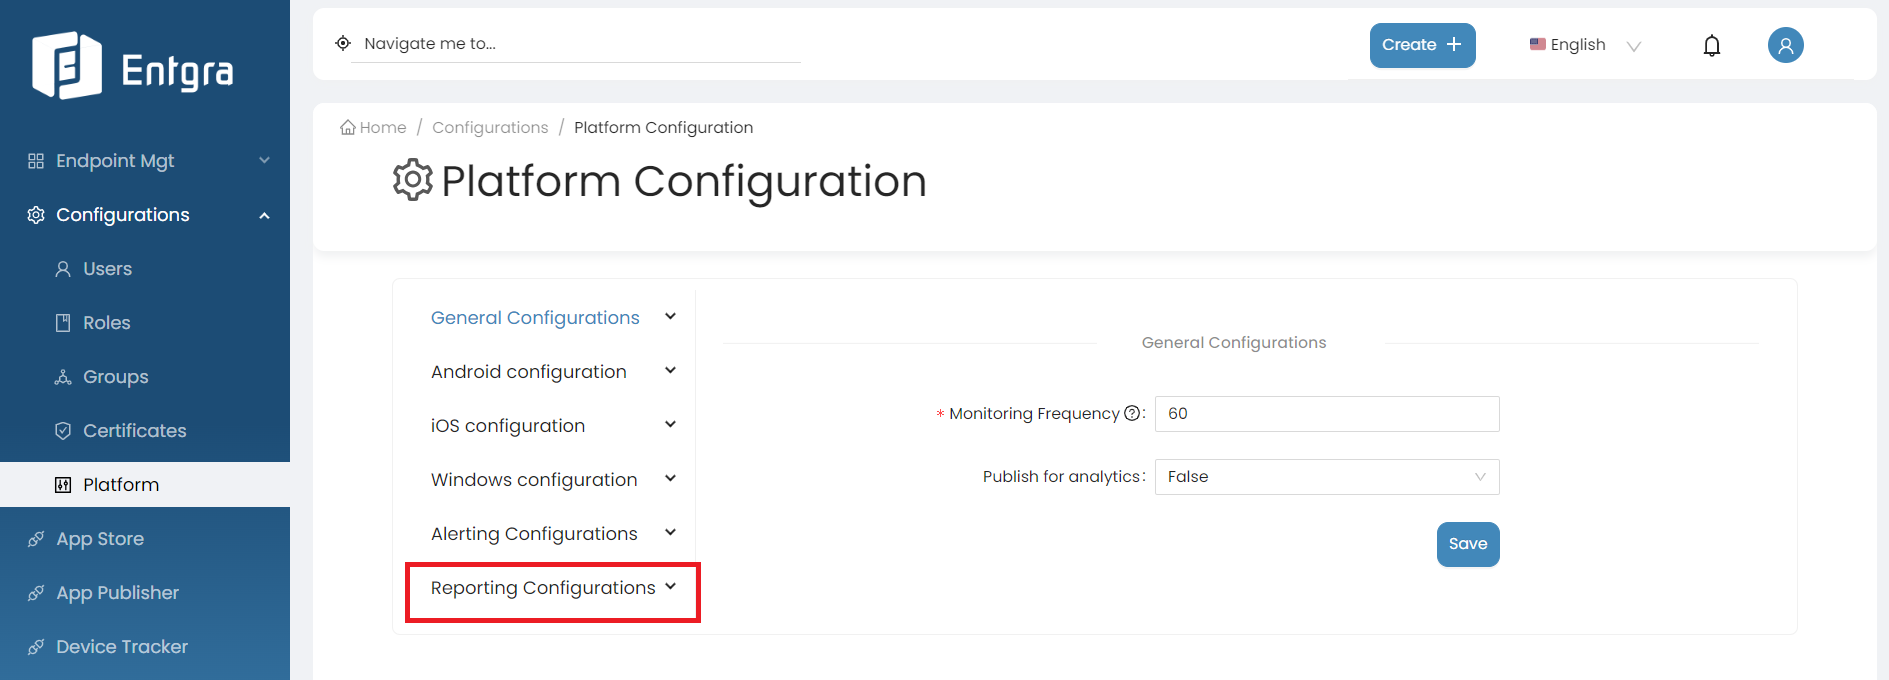
-
Select Mail Alerts.
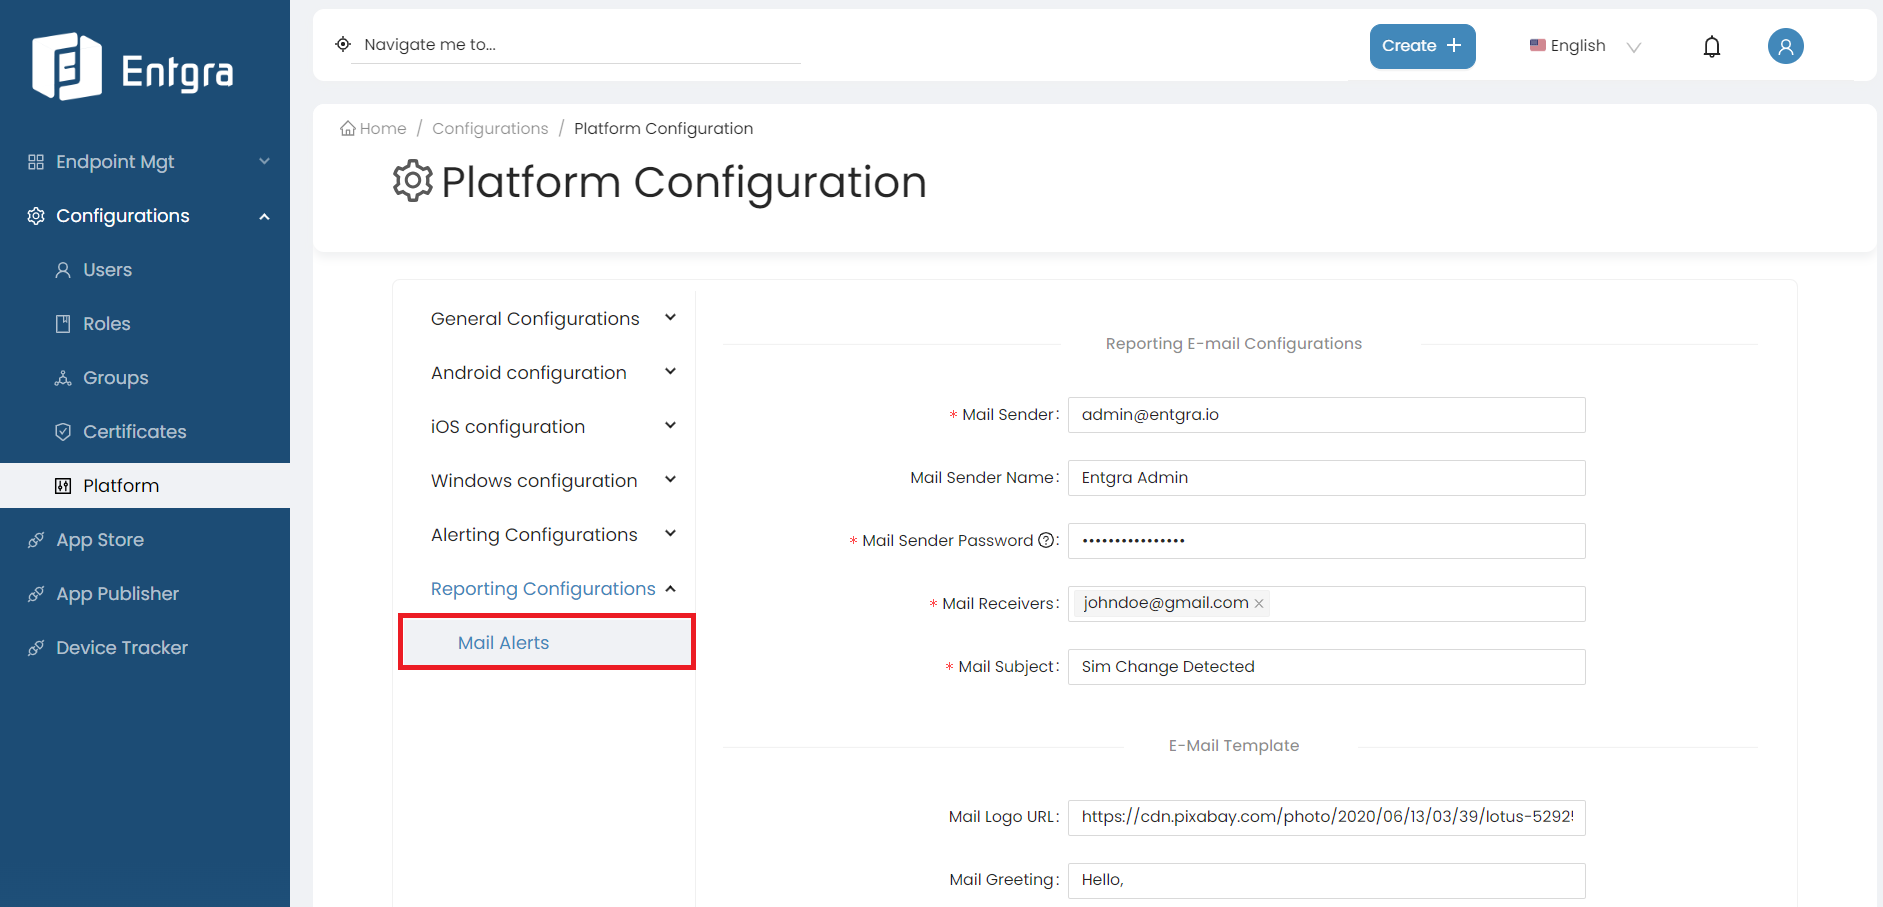
-
Fill in the required fields.
Reporting Email Configurations
Field Description Mail Sender The email address of the account that will be used to send mails. Mail Sender Name A custom name can be given to the mail sender. Otherwise the default name will be “Reporting Mail Alerts”. Mail Sender Password The app password for the given email address. Note: The password for your account should not be an ordinary password but an application password generated for your Google account. Visit Support for more details. Mail Receivers A list containing one or more email addresses to send the mail alert. Mail Subject The subject of the email. Email Template
Field Description Mail Logo URL A logo URL which is publicly accessible to anyone on the internet will be added to the header of the email template. If no value is given by default, the tenant’s allowlist logo URL will be added to the email template. Mail Greeting A mail greeting can be added. If no value is given by default, “Hello!” will be added to the mail template. Mail Body A mail body can be added if needed with multi-line support. If no value is given by default, “We have detected a SIM change. You might want to take a look.” will be added to the mail template. Mail Signature A mail signature can be added if needed with multi-line support. If no value is given by default, “Regards, Entgra” will be added to the mail template. Mail Footer Text An email footer can be added which supports hyperlink support. Email Template Color Theme
Field Description Mail Header Background Color Changes the email template header background color. Default color is a variation of Steel Blue (#4288ba). Mail Footer Background Color Changes the email template footer background color. Default color is a variation of Steel Blue (#4288ba). -
Click Save.