Android Device Management
This section takes you through on how to manage your Android device fleet. Covered within this section are:
- Android Features Summary
- Supported Operations Summary
- Android Device Operations
-
Add Operations to an Android Device
- Android Device Policy Restrictions
- Android Device Remote Control
- Android Device Information
- Android Enterprise Guide
Features
Entgra IoTS 4.0.0 is a Google Enterprise Partner for Android.
The summary list of features available Android devices is as given at the table here.
Supported Operations Summary
Entgra IoT Server facilitates one time operations that can be performed remotely via the Device Management Console. These operations are useful for runtime maintenance of devices.
The type of operations available for Android devices and are applicable for each enrollment type is summed up as per the table given here.
Applicable Policies Summary
The Policies that can be applied on an Android device depends on the way the device is enrolled with the server.
Accordingly, the table below indicates the policies applicable for each type of enrollment.
Restrictions Policies
Restriction Policies are those that can be applied on a device restricting or controlling the use of certain specific device features. There are a large number of restrictions that can be applied on an Android device.
The following table lists the available Restriction Policies for Android devices.
Android Device Operations
Add Operations to an Android Device
Prerequisites
Server has to be downloaded and started.
Must have been logged on to the server's Endpoint Management Portal.
View the device that you have enrolled.
Steps
-
Click on the operation that you need to apply to the device. In this tutorial, let us apply the Ring device operation.
-
A popup message will be displayed on the screen. And click Send to Device to confirm the operation.
Android Device Policies
Add New Policy
Prerequisites
Server has to be downloaded and started.
Must have been logged on to the server's Endpoint Management Portal.
-
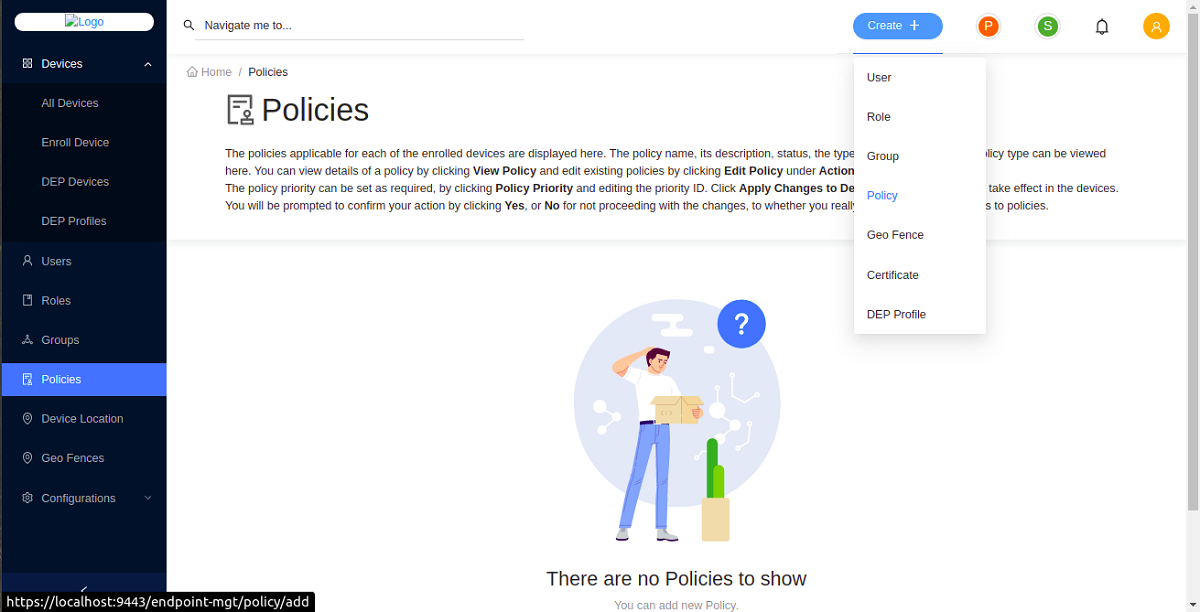
Select Policies in the left navigation.
-
Go to Create + and select Policy.
- Select the platform by clicking ANDROID from the listed device types.
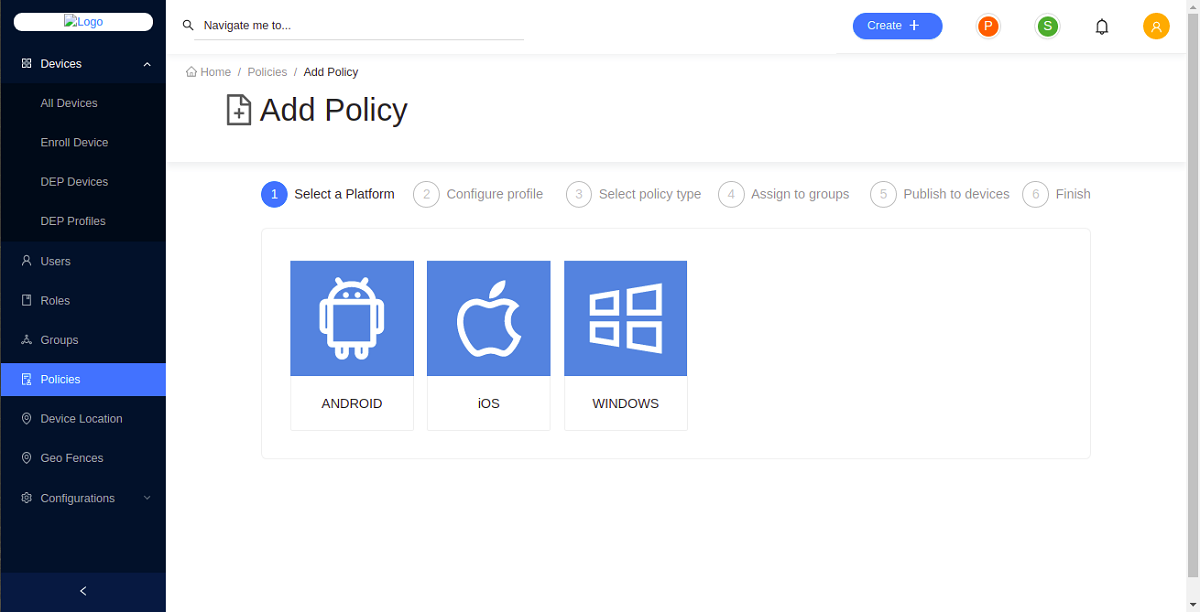
- Create your policy.
In this tutorial, let us create a passcode policy. After defining the required settings, click CONTINUE.
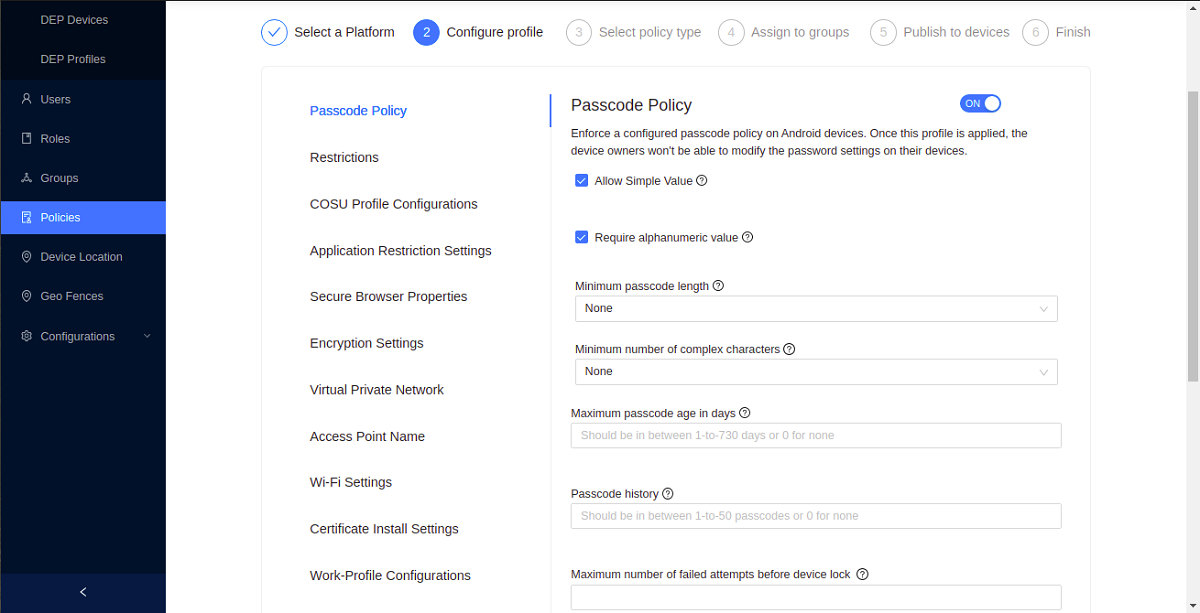
A profile in the context of Entgra IoT Server refers to a collection of policies. For example, in this use case you are only creating one policy that is the passcode policy. If you want to, you can add an restrictions policy too. All these policies will be bundled as a profile and then pushed to the devices.
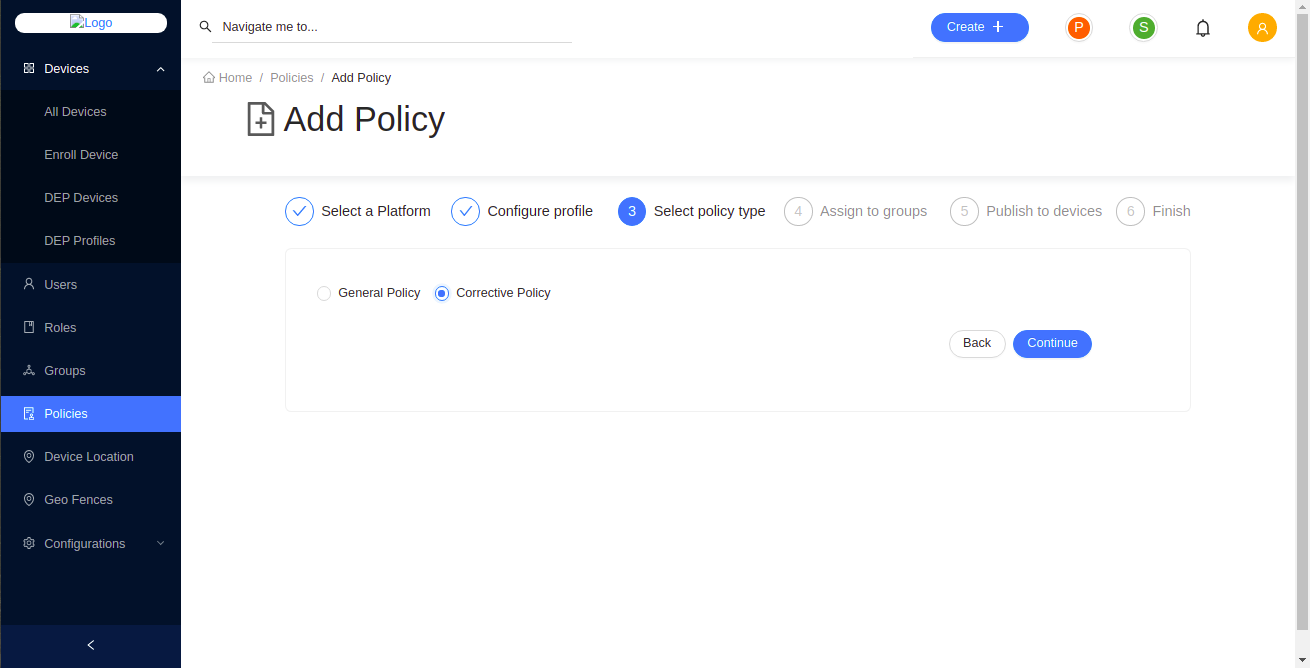
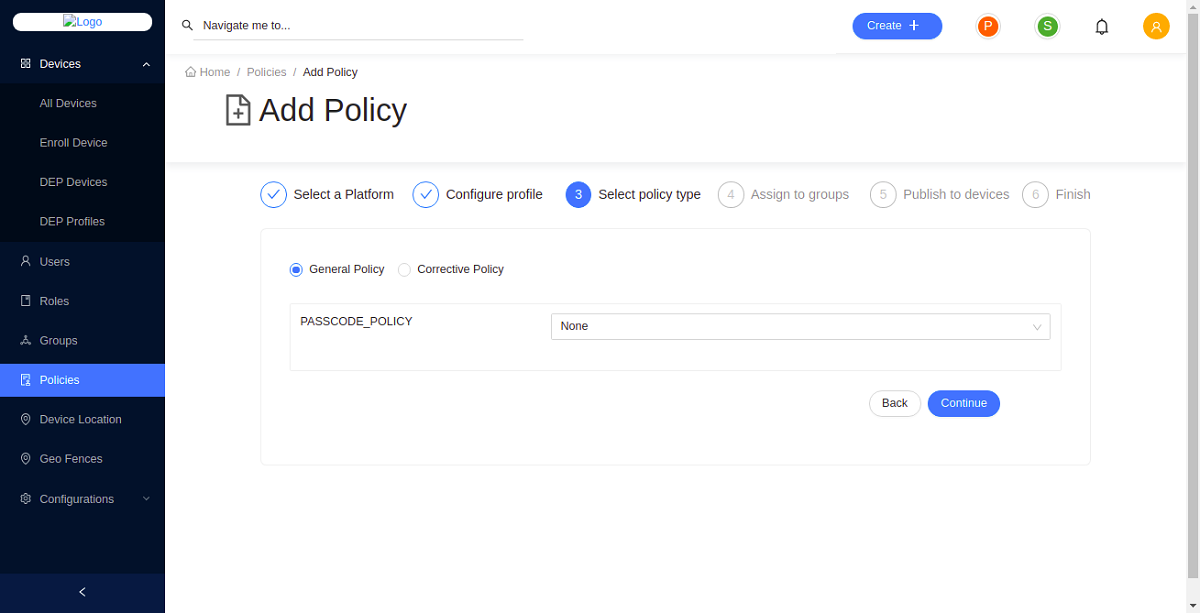
- Select the policy type.
There are two types of policies.
General Policy: General policy is applied to the device by default.
Corrective Policy: Corrective policy is applied to the device when the general policy is violated. When the general policy is not violated the correctiv policy is disabled.
If you wish to apply a corrective policy with a general policy;
-
First apply a corrective policy by selecting the policy type as the corrective policy.
-
Then apply a general policy by selecting the policy type as the general policy.
-
Select the corrective policy to be applied when this general policy is violated.
-
Click Continue.
-
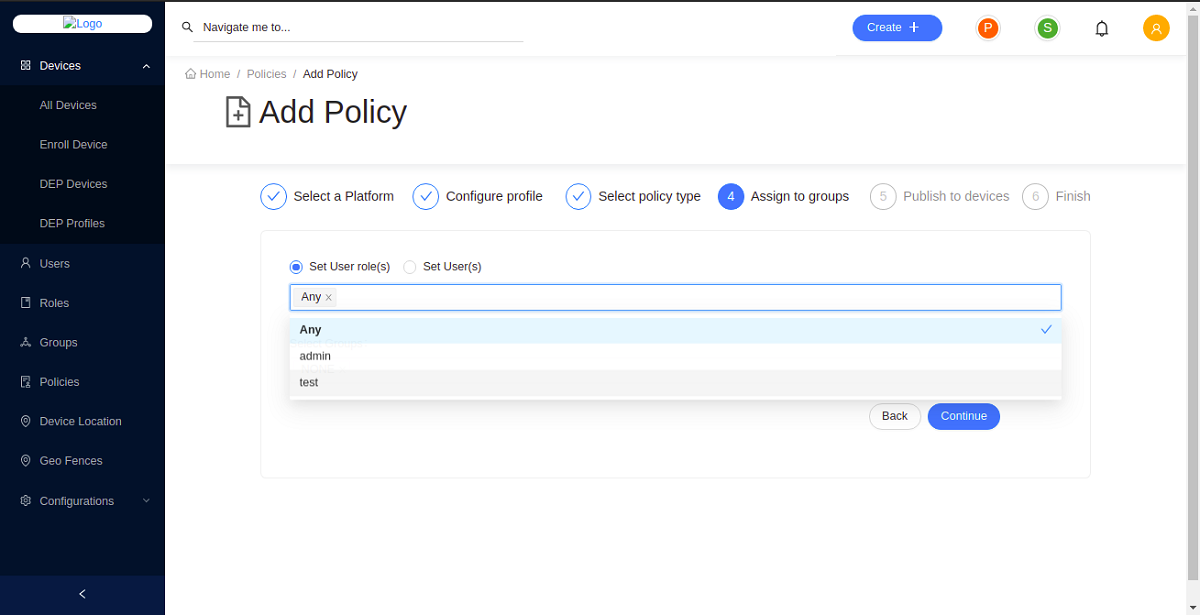
Define the user groups that the passcode policy needs to be assigned to:
Select Set User role(s) or Set user(s) option and then select the users/roles from the item list. For this example, let's select Set User role(s) and then select ANY here.
-
Click Continue.
-
Set a name for your policy and add a description under Publish to devices.
-
Click Save and publish to save and publish the configured profile as an active policy to the database.
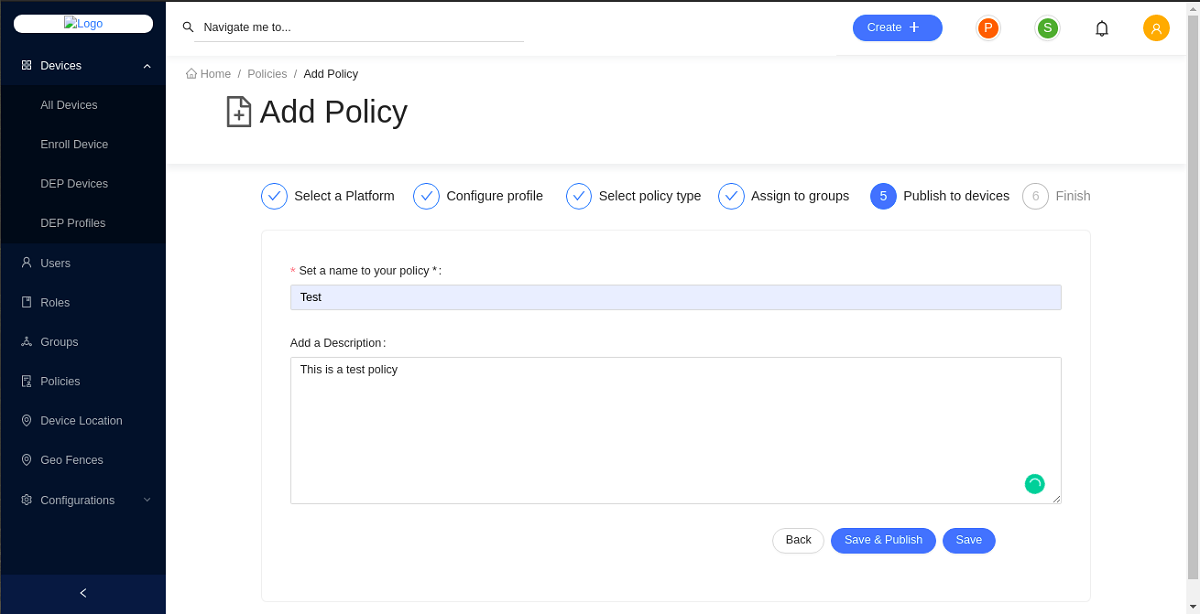
If you save the configured profile, it will be in the Inactive state and will not be applied to any devices. If you save and publish the configured profile of policies, it will be in Active state.
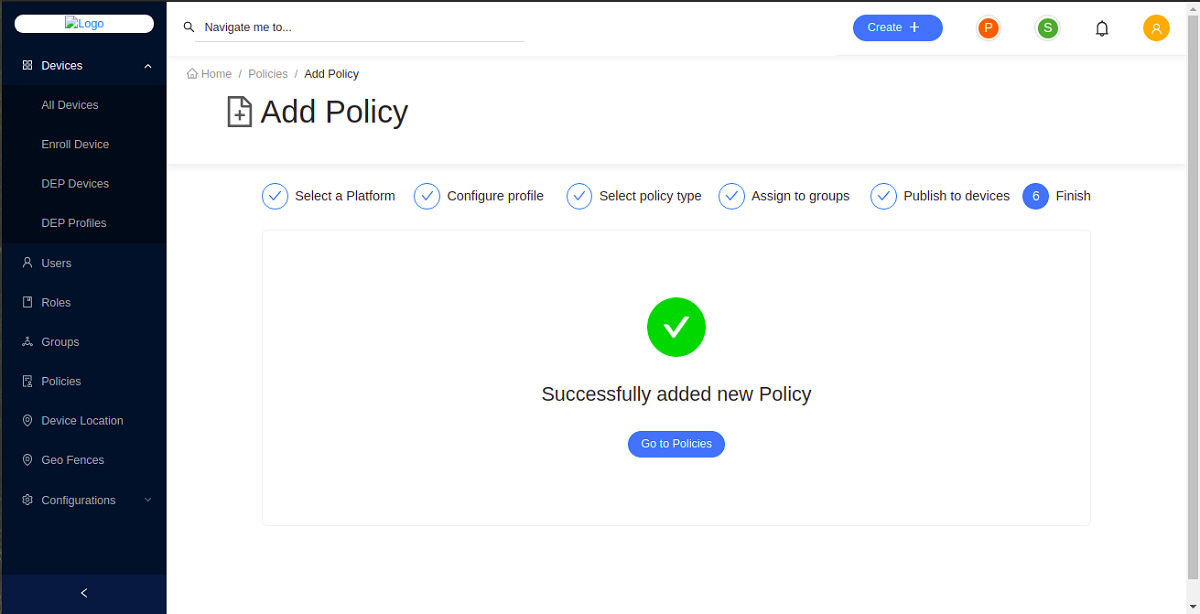
- You have now successfully created a new policy and applied it to devices. Click Go to Policies to view all applicable policies.
View a Policy
- Go to the Endpoint Management portal and click Policies.
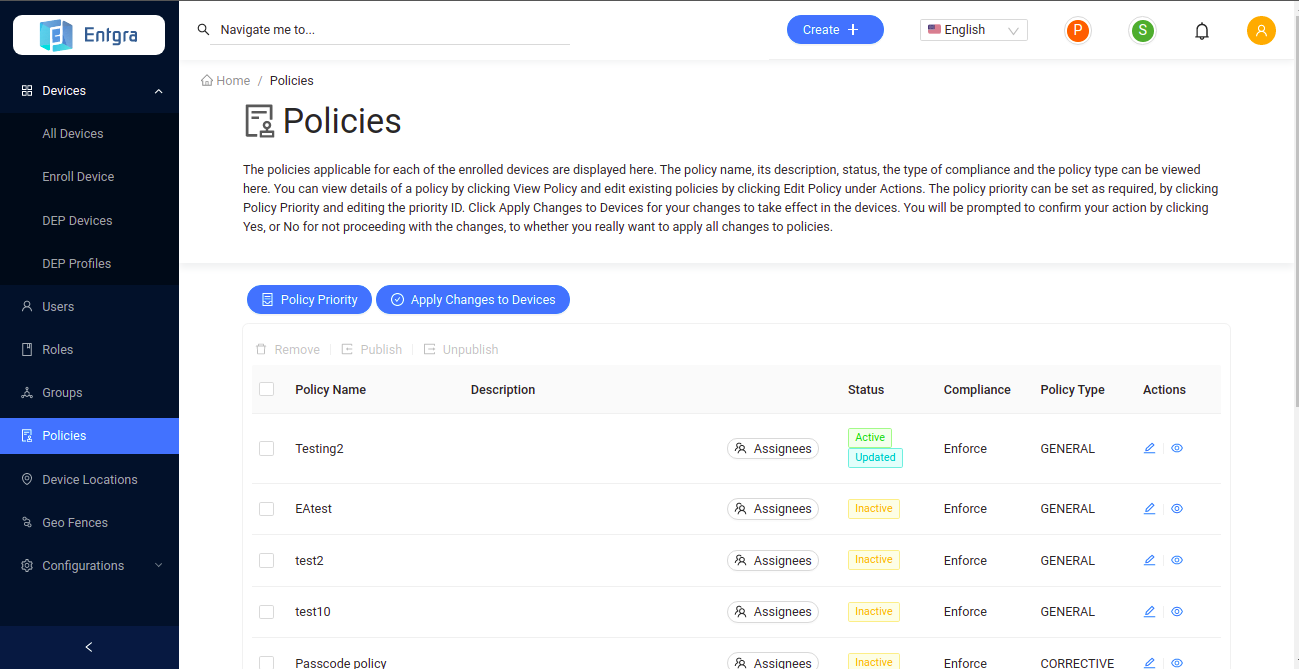
You can view all the published policies for the device.
Publish a Policy
-
Click Policies to get the list of the available policies.
-
Select the policy that you wish to publish which has not been published arleady.
-
Click Publish.
-
Click Yes to confirm publishing the policy.
-
Then click Apply Changes to Devices to apply the policy to the devices.
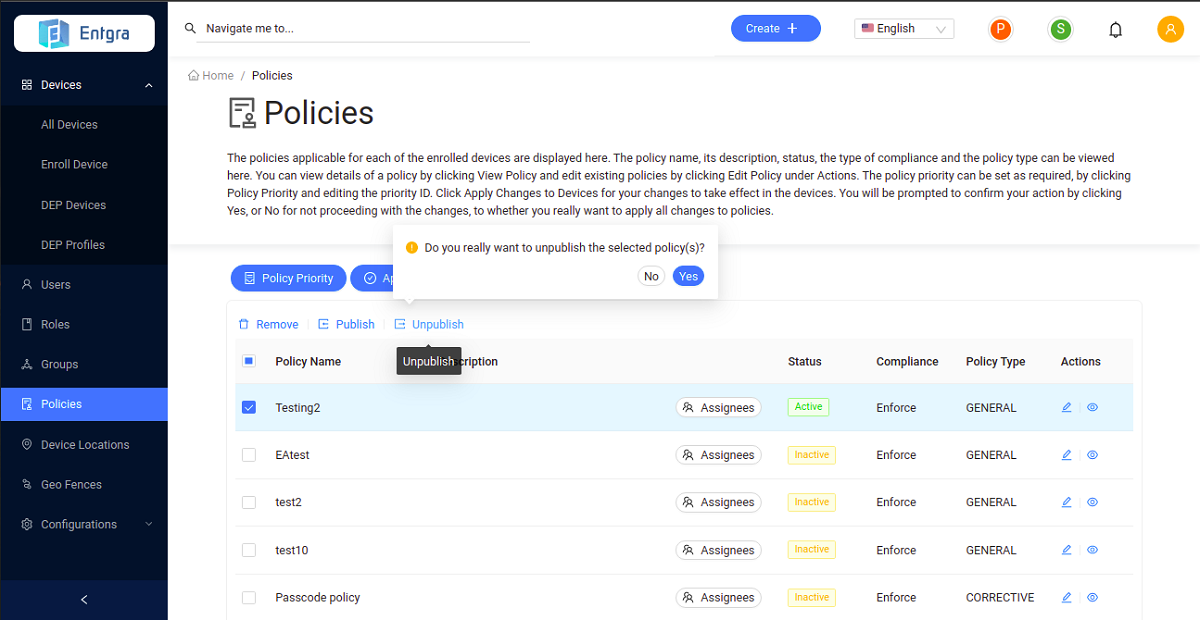
Unpublish a Policy
-
Go to the Endpoint Management portal and click Policies.
-
Select the policies that you wish to unpublish from those that have already been published.
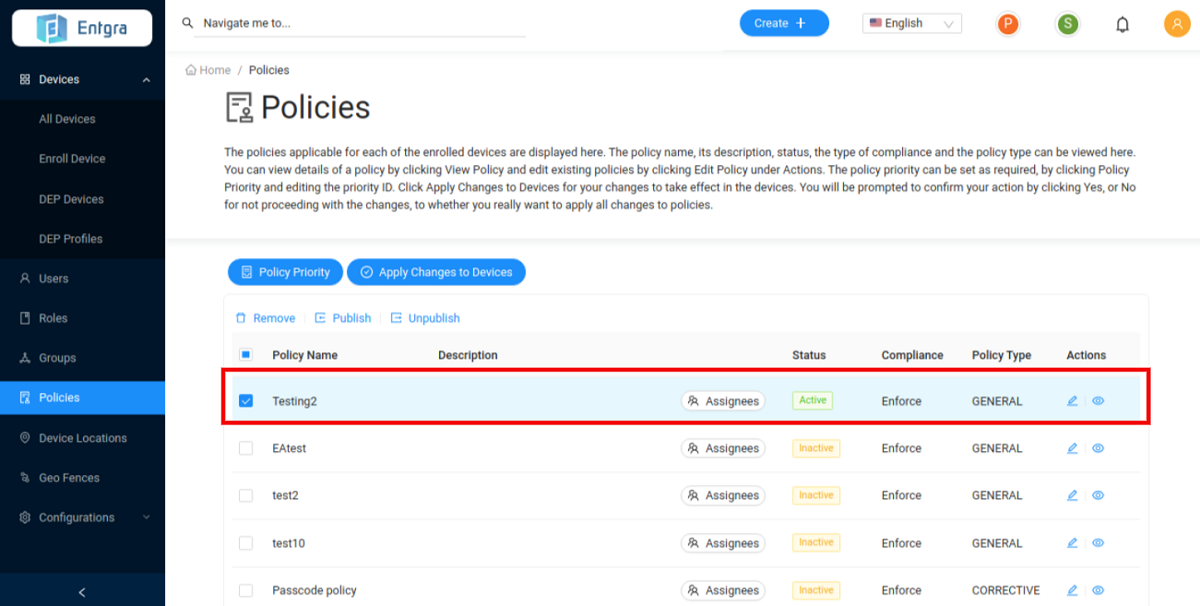
- Click Unpublish.

-
Click Yes to confirm unpublishing the policy.
-
The selected policy has now been unpublished and is in inactive/updated state. Therefore, this policy will not be applied on devices that are newly enrolled with Entgra IoT Server.
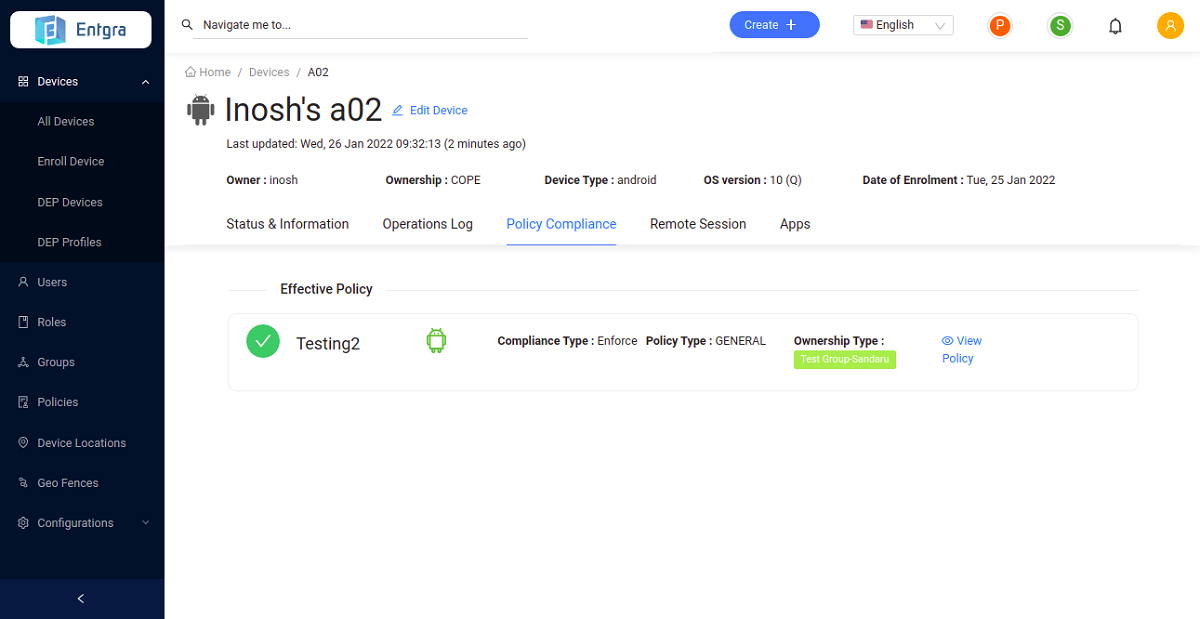
Verify Enforced Policy
Follow the setps below to verify a policy enforced on a device.
-
Click on your device to view the device details.
-
Click Policy Compliance.
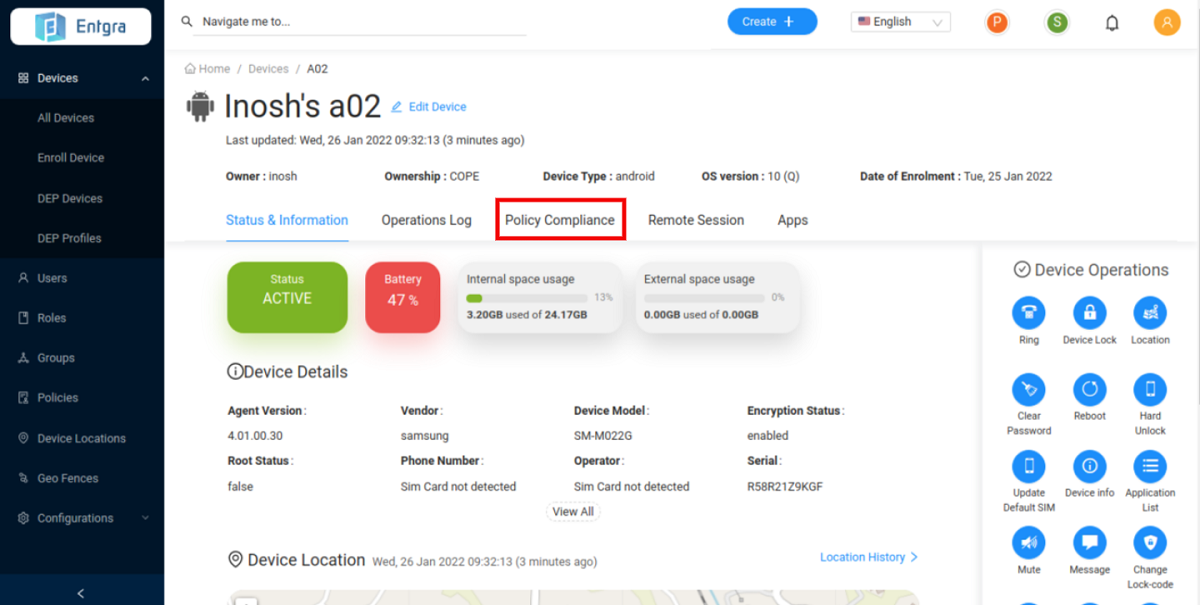
- You can see the policy that is currently applied to your device.
Manage Policy Priority Order
You can change the priority order of applied policies for them to be applied in that order in the devices that are registered with the Entgra IoT Server.
-
Click Policies to get the list of the available policies.
-
Click Policy Priority.
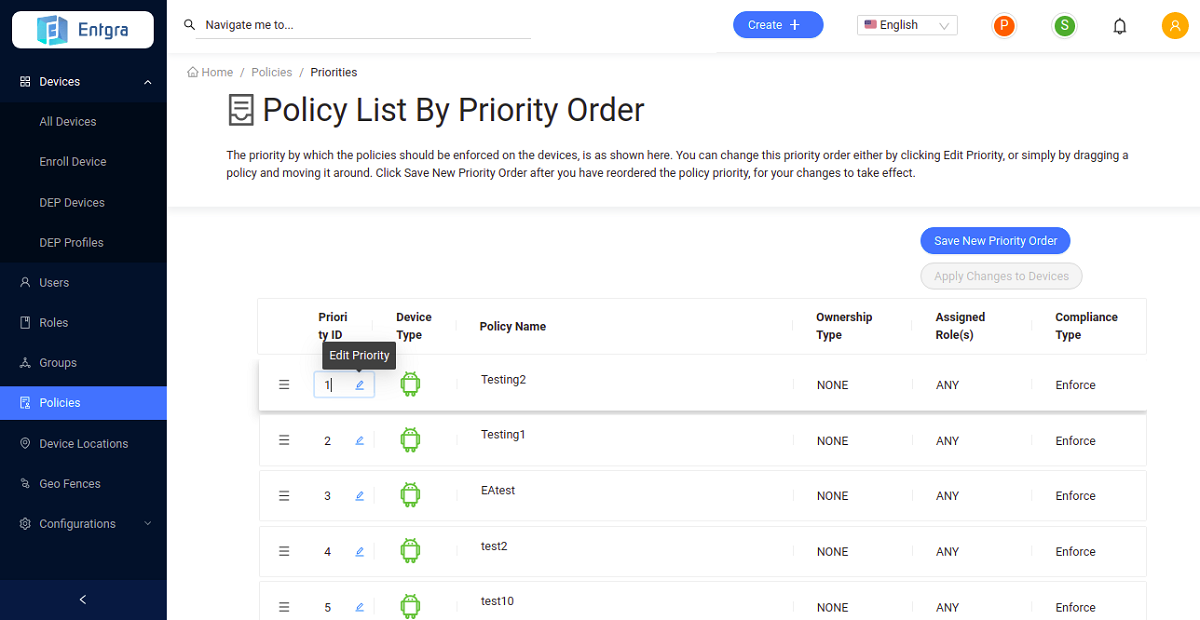
-
Manage Policy Priority - Drag and drop the policies to prioritize the policies accordingly. Manage the policy priority order by defining the order using the edit box.
: As shown in the image below, if you want to apply Testing1 policy first to the devices you have to drag that policy to the top of the list. Then Testing2 policy will be listed as the 2nd policy in the list.
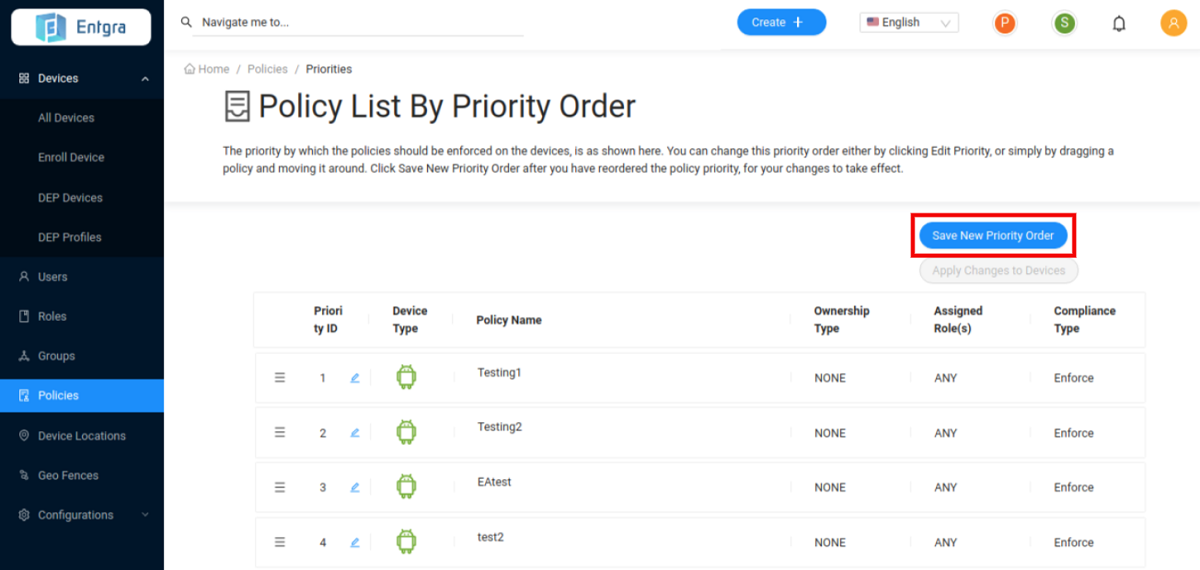
-
Click Save New Priority Order to save the changes.
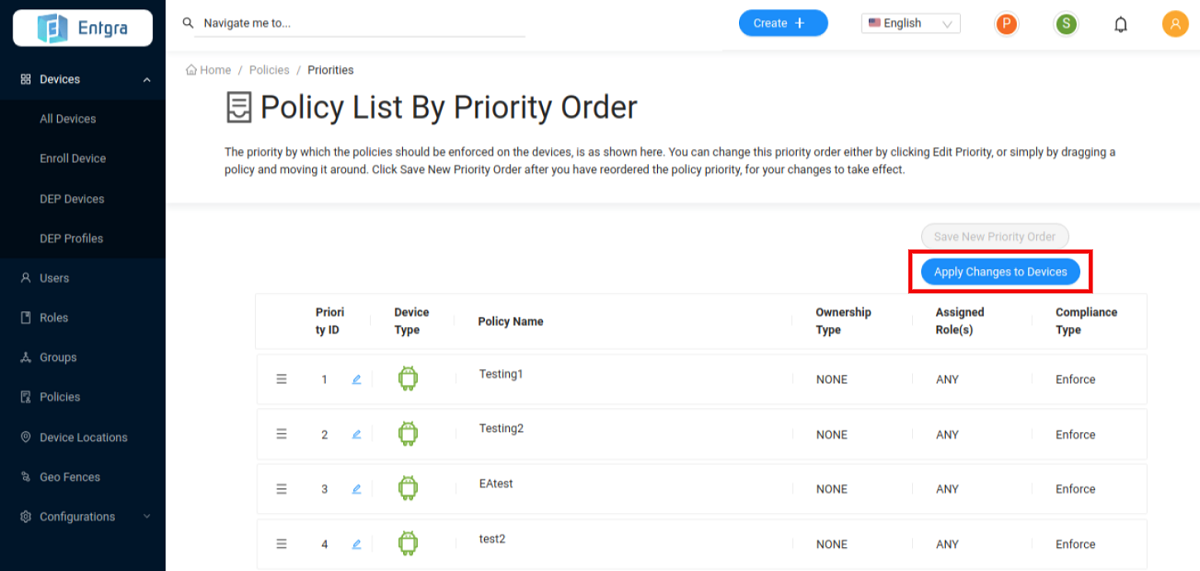
-
Click Apply Changes to Devices to push the changes to the existing devices.
Updating a Policy
-
Click Policies to get the list of the available policies.
-
On the policy you wish to edit, click Edit.
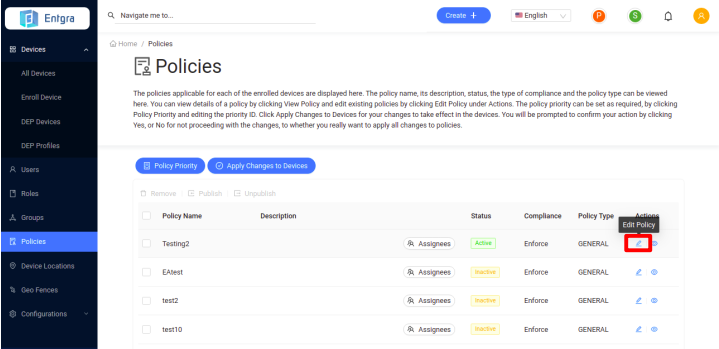
Edit Policy
-
Edit current profile and click CONTINUE.
-
Edit assignment groups and click CONTINUE.
-
Optionally, edit the policy name and description.
-
Click SAVE to save the configured profile or click SAVE AND PUBLISH to save and publish the configured profile as an active policy to the database.
Android Supported Features
Live Feed
Android devices are now enabled with Live Feed for remote troubleshooting of the devices. In case of device syncing issue or app installation failing issue, the admin can remotely access the device by using this feature. The admin is able to remotely access and observe device live data and analysing the root cause for troubleshooting.
Follow the steps below for accessing this feature:
- Click on the enrolled device that you want to troubleshoot.
- Go to Remote Session.
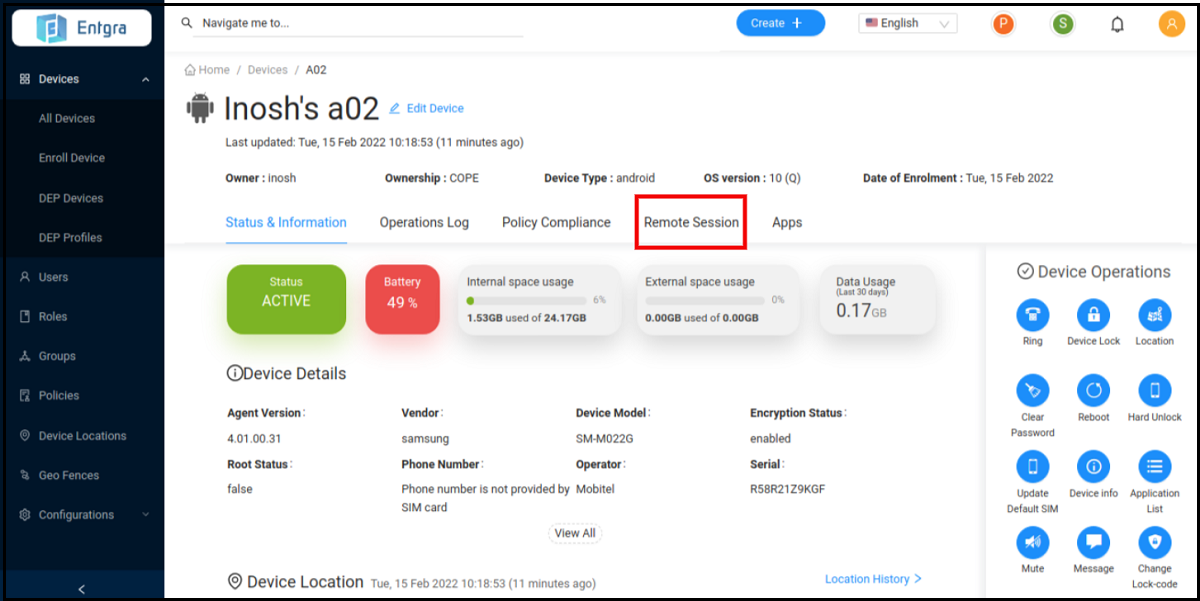
- Click Connect to Device.
- Select Live Feed.
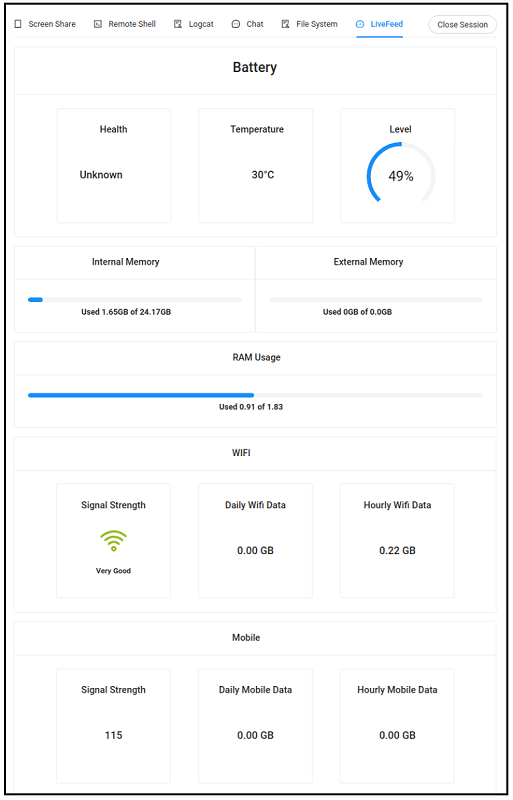
All of the above shown data is derived from the live data of the device. The extracted device details include:
- Battery details – The health of the battery, temperature, and charging percentage.
- Device memory – Internal memory usage and external memory usage of the device are shown separately.
- RAM usage – RAM usage of the device.
- WiFi connectivity – WiFi connectivity strength of the device plus daily and hourly WiFi data consumption.
- Mobile connectivity – Mobile connectivity strength of the device plus daily and hourly mobile data consumption.
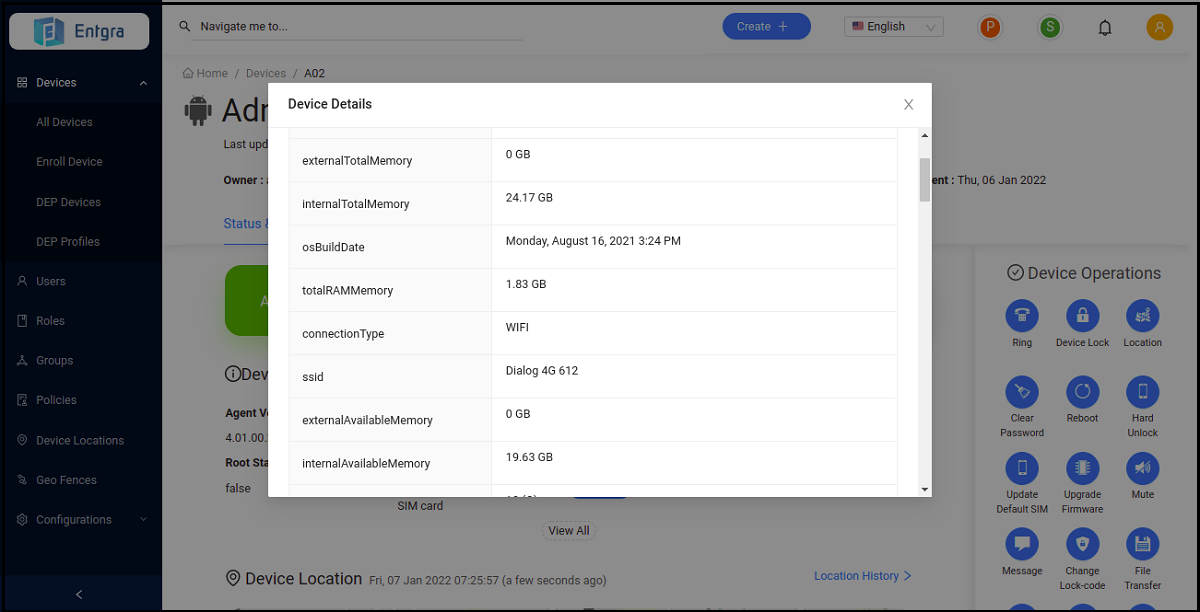
Hardware Properties
This feature, when enabled, captures device hardware properties and displays them off the device details. The displayed hardware properties are,
- DEVICE_TEMPARETURE_BATTERY
- DEVICE_TEMPARETURE_CPU
- DEVICE_TEMPARETURE_GPU
- DEVICE_TEMPARETURE_SKIN
- DEVICE_FAN_SPEED
- DEVICE_CPU_USAGE
You can see the hardware properties of the device by as follows:
- Click the enrolled device to be observed.
- Click View All.
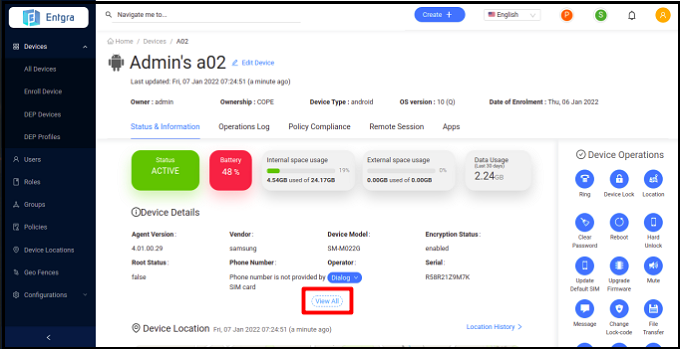
- As shown below, you will see the hardware properties of the device along with other device details.
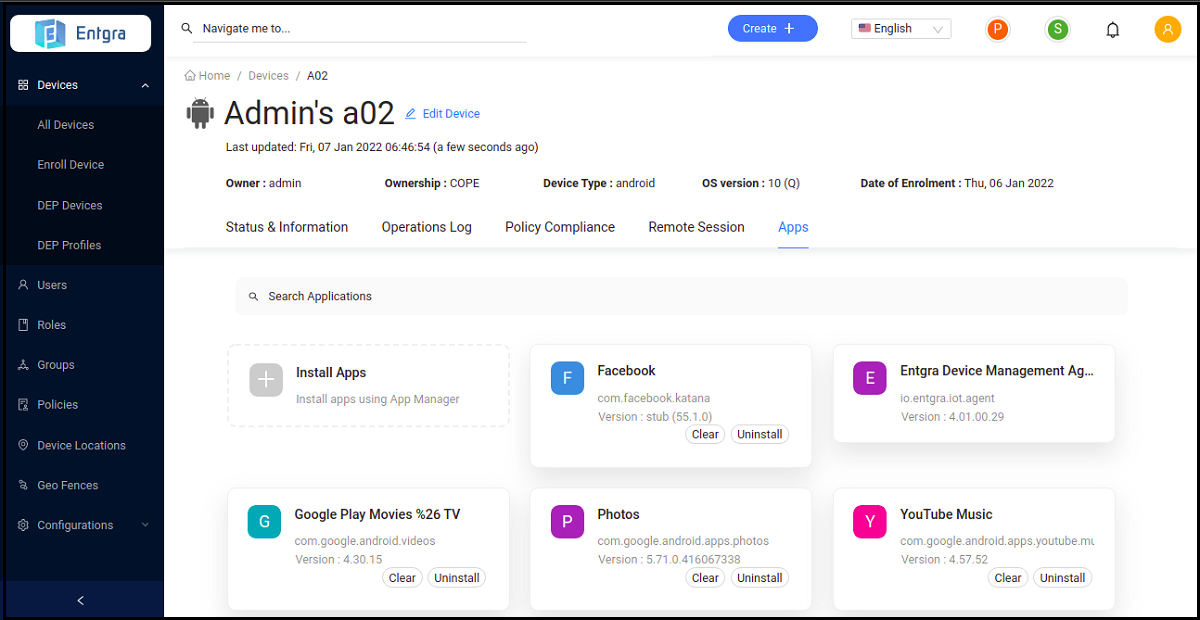
Clear App Data Remotely
This feature is used by the device owner or profile owner to clear application user data remotely of a given package. This is equivalent to the user choosing to clear the app's data from within the device settings UI.
In case of misplacing the device, the administrator can clear the app data of corporate apps that has already been installed in the device by using this feature.
To access this feature:
- Click on the enrolled device whose data data needs to be cleared.
- Click Apps tab.
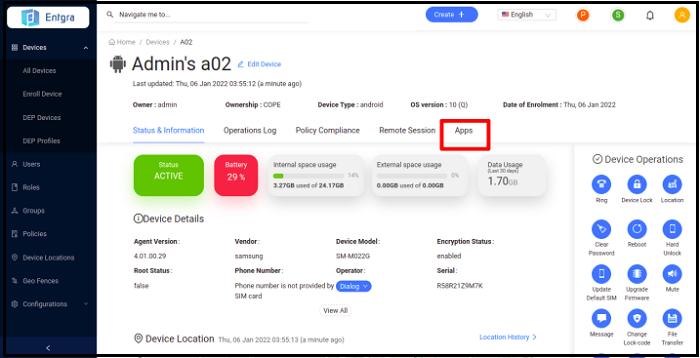
- You can now see the installed apps on the device.
- Click Clear to erase the appa data.
Note: This feature is not applicable for apps of BYOD devices as they are personal devices. It is not advisable to clear all app data of personal applications, as the user may wish to retain some data.
Device Theme Policy
The device theme policy defines the device wallpaper settings and volume settings. It also sets the settings for locking screen wallpaper, system wallpaper and defines the system, media, alarm and calls volume levels. Note that alarm and call volume controllers may not work on some device models due to limitations of the Device vendor.
Data Keys of Policy and its Descriptions
| Data Keys | Descriptions |
|---|---|
| Lock screen wallpaper URL | Give the URL of the image that you wish to configure as the wallpaper of the device lock screen. The image URL should be ending with .png, .jpg or .jpeg. |
| System wallpaper URL | Give the URL of the image that you wish to configure as the system wallpaper of the device. The image URL should be ending with .png, .jpg or .jpeg. |
| Music volume | This defines the media volume level of the device. Set the volume of audio streams for music. |
| System volume | This defines the notifications volume, ringing volume and DMFT volume. |
| Alarm volume | You can define the alarm volume of the device. This may not work on some device modules due to limitations from the device vendor. |
| Voice call volume | Able to define the volume of voice calls from here. This also may not work on some device modules due to limitations from the device vendor. |
Refer to Publish a Policy for instructions on how to publish a new policy on an Android device.
Grafana-based Dashboards
Applications
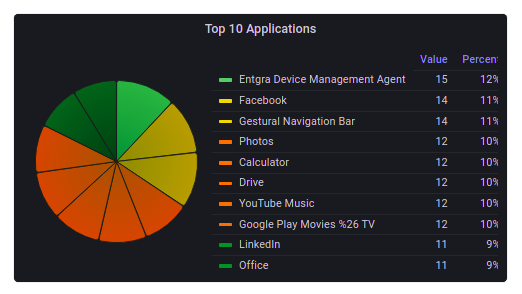
Top 10 Apps in Devices
This pie chart presents the top 10 most installed apps in the device fleet. As such, this can be used to see and identify the most popular trending apps within the fleet.
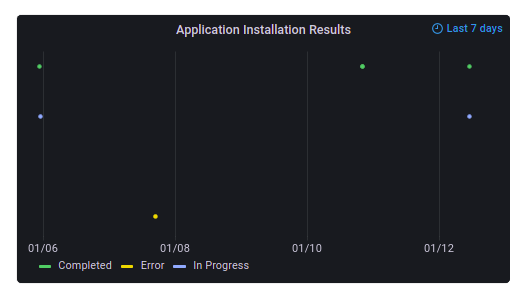
Application Installations Results
This chart shows the status of the application installation process over a period of 7 days.
App Installation Success Rate
This chart shows the number of successful and unsuccessful app installations.

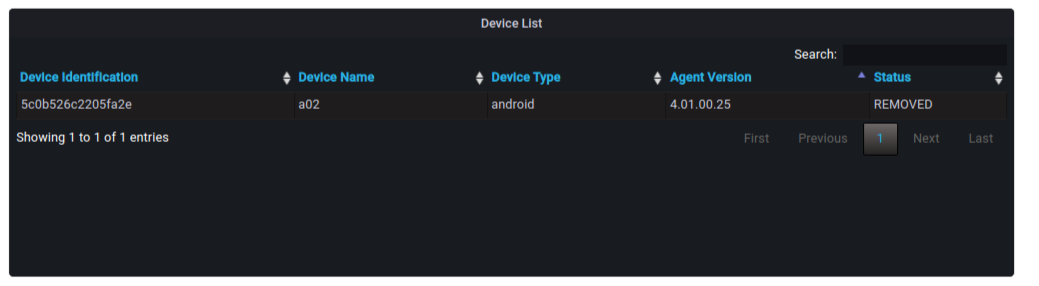
Device Inventory
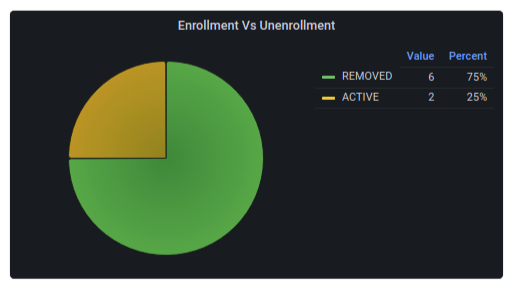
Enrollments vs Unenrollments
This report indicates the number of device enrollments and unenrollments performed.
Device Type
The device type chart displays the onboarded devices under Android, iOS, and Windows.
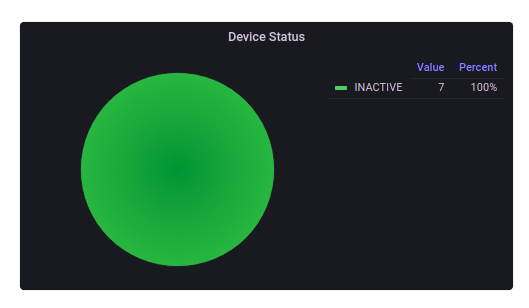
Device Status
The device status chart indicates the number of devices available under the Inactive, Active, and Unreachable statuses.
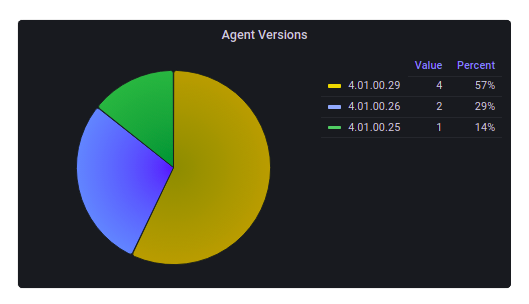
Agent Version
Displays the different agent versions that are installed on the devices.
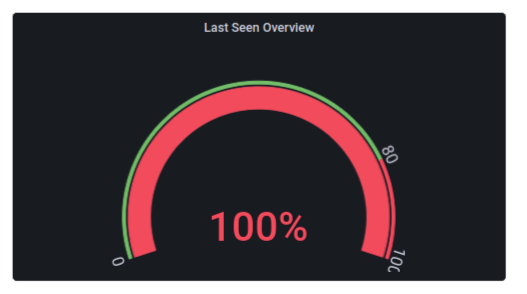
Last Seen Overview
This shows the device count of devices' last seen update over a given period of time.
Device Hardware
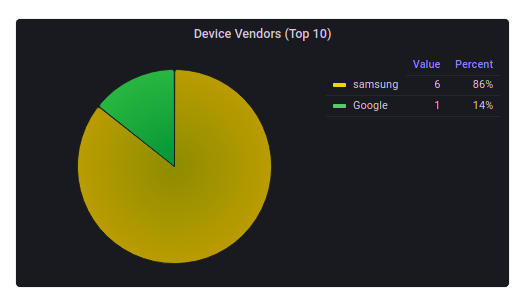
Device Vendors
This pie chart shows the number of devices under different device types.
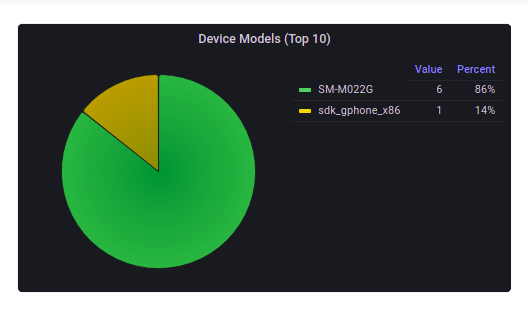
Device Models
This chart is based on the device models of the enrolled devices.
Device Firmware
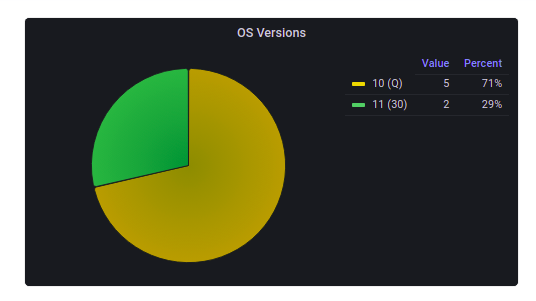
OS Versions
This chart can be used to see the OS versions of the devices and the number of devices under each OS version.
Device Connectivity
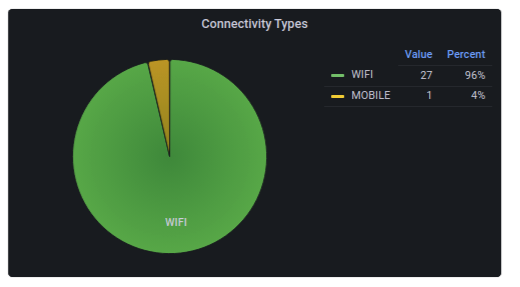
Connectivity Type
This shows the number of WiFi and mobile devices by connectivity. Clicking on each will take you to the corresponding connectivity page.
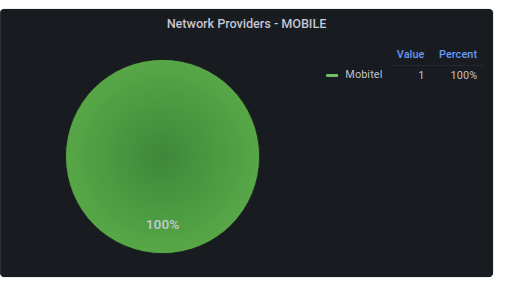
Network Provider
Displays the number of different operators available for either mobile or WiFi devices. By default, MOBILE is displayed. By changing the connection type in the search filter you can see the number of devices for WiFi devices. Clicking on an operator will take you to the relevant connectivity page depending on the selected connection type in the search filter.
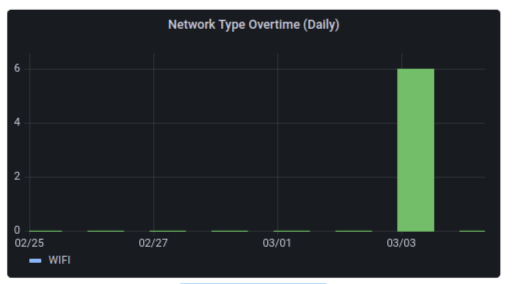
Network Type Daily
Shows the number of mobile and WiFi devices that were available during the last 7 days. Clicking on more details will take you to the chart that will show the number of mobile and WiFi devices that were available over a given frequency of hourly, daily and monthly breakdown.
Daily Signal Strength
This shows the signal strength over time for all the operators based on the connection type selected from the search filters over the last 7 days. Clicking on more details will take you to the list of devices that are either mobile or WiFi depending on the selected connection type. By default, it shows mobile.
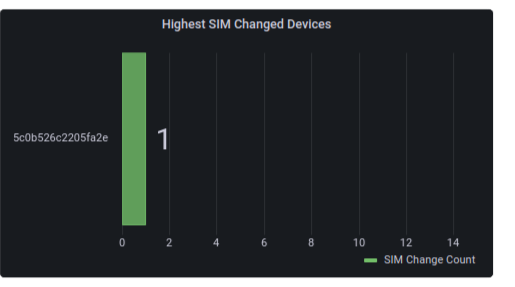
Devices with Changed SIMs
This chart shows the number of devices that had their SIM changed during the last 7 days. Clicking on more details will take you to a list of all the SIM changed devices.
Device Assignment
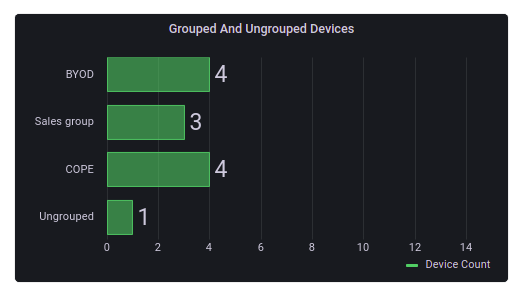
Device Groups
Displays the number of devices assigned to the created device groups.
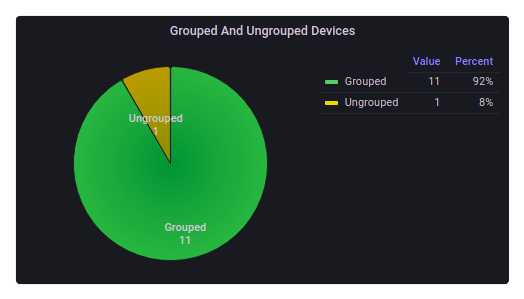
Grouped and Ungrouped Devices
This chart contains the number of grouped and ungrouped devices.
Operations
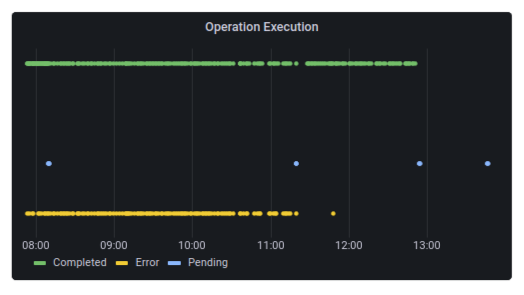
Operation Execution
This chart shows the status of the executed operations.
Success and Failed Operations
This chart indicates the number of successful and failed operations.

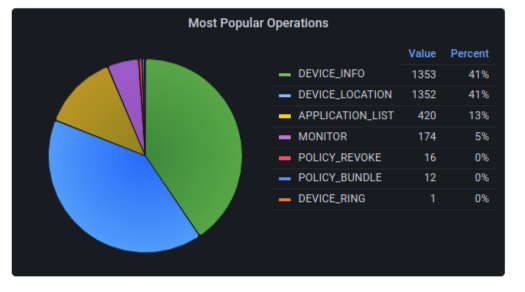
Most Popular Operations
This chart will help to identify the operations that are triggered most on the devices.
Policy
Applied Policies
Using this chart the user can get a device count of the devices which have the published policies applied to them.

Policy Compliancy
This indicates the number of policies that are compliant and non-compliant in the devices.

Android Supported Policies
Passcode Policy
Enforce a configured Passcode Policy on Android devices. Once this profile is applied, the device owners will not be be able to modify password settings on their devices.
Data Keys of Policy and Descriptions
| Data Key | Description |
|---|---|
| Allow simple value | Permits repeating, ascending and descending character sequences. |
| Allow alphanumeric value | The user must enter a password containing at least both numeric and alphabetic (or other symbol) characters. |
| Minimum passcode length | Set the required number of characters for the password. For example, you can require PIN or passwords to have at least six characters. |
| Minimum number of complex characters | Set the required number of letters, numericals digits, and special symbols that passwords must contain. Introduced in Android 3.0. |
| Maximum passcode age in days ( Should be in between 1-to-730 days or 0 for none ) | Designates the full email address for the account. If not present in the payload, the device prompts for this string during profile installation. |
| Passcode history ( Should be in between 1-to-50 passcodes or 0 for none ) | Number of consequent unique passcodes to be used before reuse |
| Maximum number of failed attempts before device lock | The maximum number of incorrect password entries allowed. If you fail to enter the correct password within the allowed number of attempts, the device will be locked. |
| Maximum number of failed attempts before device reset | Specifies how many times a user can enter the wrong password before the device wipes its data. The Device Administration API also allows administrators to remotely reset the device to factory defaults. This secures data in case the device is lost or stolen. |
| Time to auto lock seconds | Time it takes in seconds for the device to lock automatically when idle. |
Passcode policy for work profile
Data Keys of Policy and Descriptions
| Data Key | Description |
|---|---|
| Enabled Work profile passcode | Enable a passcode for work profile |
| Allow simple value | Permits repeating, ascending and descending character sequences. |
| Allow alphanumeric value | The user must enter a password containing at least both numeric and alphabetic (or other symbol) characters. |
| Minimum passcode length | Set the required number of characters for the password. For example, you can require PIN or passwords to have at least six characters. |
| Minimum number of complex characters | Set the required number of letters, numericals digits, and special symbols that passwords must contain. Introduced in Android 3.0. |
| Maximum passcode age in days ( Should be in between 1-to-730 days or 0 for none ) | Designates the full email address for the account. If not present in the payload, the device prompts for this string during profile installation. |
| Passcode history ( Should be in between 1-to-50 passcodes or 0 for none ) | Number of consequent unique passcodes to be used before reuse |
| Maximum number of failed attempts before device lock | The maximum number of incorrect password entries allowed. If you fail to enter the correct password within the allowed number of attempts, the device will be locked. |
| Maximum number of failed attempts before device reset | Specifies how many times a user can enter the wrong password before the device wipes its data. The Device Administration API also allows administrators to remotely reset the device to factory defaults. This secures data in case the device is lost or stolen. |
| Time to auto lock seconds | Time it takes in seconds for the device to lock automatically when idle. |
Encryption Settings
Refer to Add New Policy for instructions on how to add a new policy to an Android device.
This configuration can be used to encrypt data on an Android device, when the device is locked and make it readable when the passcode is entered. Once this configuration profile is installed on a device, corresponding users will not be able to modify these settings on their devices.
Data Keys of Policy and Descriptions
| Data Key | Description |
|---|---|
| Enable storage encryption | Encryption is the process of encoding all user data on an Android device using symmetric encryption keys. Having this checked would enable Storage-encryption in the device. |
Refer to Publish a Policy for instructions on how to publish a new policy in an Android device.
WiFi Settings
Refer to Add New Policy for instructions on how to add a new policy to an Android device.
These configurations can be used to configure WiFi access on an Android device. Once this configuration profile is installed on a device, corresponding users will not be able to modify these settings on their devices.
Data Keys of Policy and Descriptions
| Data Key | Description |
|---|---|
| Service Set Identifier (SSID) | The network's SSID. Can either be a UTF-8 string, which must be enclosed in double quotation marks (e.g., "MyNetwork"), or a string of hex digits, which are not enclosed in quotes (e.g., 01a243f405). |
| Security | Security type of the wireless network to be configured. 802.1x EAP works with Android 4.3 and above devices only. |
| WEP | WEP (Wired Equivalent Privacy) is a security algorithm for IEEE 802.11 wireless networks. |
| WPA/WPA 2 PSK | WiFi Protected Access (WPA), WiFi Protected Access II (WPA2) are the security protocols and security certification programs developed by the WiFi Alliance to secure wireless computer networks. |
| 802.1x EAP | |
| EAP Method | EAP is an authentication framework for providing the transport and usage of material and parameters generated by EAP methods . - PEAP : PEAP (Protected Extensible Authentication Protocol) is a version of EAP, the authentication protocol used in wireless networks and Point-to-Point connections. - TLS : EAP uses TLS public key certificate authentication mechanism within EAP to provide mutual authentication of client to server and server to client. - TTLS : The Tunneled TLS EAP method (EAP-TTLS) is very similar to EAP-PEAP in the way that it works and the features that it provides. The difference is that instead of encapsulating EAP messages within TLS, the TLS payload of EAP-TTLS messages consists of a sequence of attributes. - PWD : EAP-PWD is highly secure (the password is never transmitted, even in encrypted form), and does not require PKI certificates, and also requires only 3 authentication round-trips. - SIM : - AKA* : The AKA is defined in RFC 5448, and is used for non-3GPP access to a 3GPP core network. For example, via EVDO, WiFi, or WiMax. |
| Phase 2 Authentication | PAP : Password Authentication Protocol (PAP) is a password-based authentication protocol used by Point to Point Protocol (PPP) to validate users. - MCHAP : - MCHAPV2 : - GTC : Generic Token Card (GTC) carries a text challenge from the authentication server, and a reply generated by a security token. |
| Identity | Identity of the wireless network to be configured. |
| Anonymous Identity | Identity of the wireless network to be configured. |
| CA Certificate | CA Certificate for the wireless network. |
| Password | Password for the wireless network. |
| Enable force connect to WiFi | If this checkbox is ticked, the user will only be able to connect to the authorised WiFi networks with the SSIDs given above |
Refer to Publish Policy for instructions on how to publish a new policy in an Android device.
Android Policy Restrictions
The Restrictions Policy for Android devices enables restricting specific settings on the device. Once the profile with these configurations is installed on the device, the user is unable to modify those settings on his/her device.
Data Keys of Policy and Descriptions
| Data Key | Description |
|---|---|
| Allow use of camera | Selecting this feature enables the device to use camera. |
| Disable/Block Configuring VPN | This restriction blocks configuring VPN settings. To test this under Work Profile enrollment, download a free VPN app, for example “turbo VPN” from play store and try to create a VPN connection. The application will show an error. |
| Disable/Block Cross Profile Copy-Paste | This feature disables text copy-pasting between Enterprise profile and the regular profile. To test how this works, you can go to an app where you can type text. For example, in the Google Playstore’s search box. Type some text and copy it. Next, try pasting the copied text into another app on the phone which is not a part of the Enterprise profile container. The text will not be available. Remove the policy and retry. |
| Disable/Block Debugging | This feature blocks the ability to debug any application through the Android studio. |
| Disable Installing Apps | Disables installing apps from the Google Play Store. |
| Disable Installing from Unknown Sources | Install a browser such as chrome in the work profile and try to install an apk file from untrusted source such as (https://github.com/selendroid/selendroid/raw/master/selendroid-standalone/src/test/resources/selendroid-test-app.apk). This will be prevented by the OS. |
| Disable Modifying Accounts | Go to Settings -> Cloud and accounts -> accounts Under work, Add account will be disabled. Also if you go inside the existing Google account of the enterprise profile and click on the 3 dot menu on the top right corner, and the remove button will be disabled. |
| Disable Outgoing Beams | This is related to NFC beams. Install an NFC app that sends some information to another. for example NFC contacts application into the work profile and try to send NFC beam to another NFC enabled device. |
| Disable Location Sharing | This restriction disables turning on location sharing. Under settings -> location -> the work profile and regular profiles location control is available. |
| Disable Uninstalling Apps | This restriction disables turning on location sharing. Under settings -> location -> the work profile and regular profiles location control is available. |
| Disallow parent profile app linking | Allows apps in the parent profile to access or handle web links from the managed profile. |
| Disallow set wallpaper | Selecting this disables the abilty of the user to change the wallpaper. |
| Disallow set user icon | Selecting this, disables the user to change the user icon. |
| Disallow remove managed profile | If you try to remove the managed profile, it will not be enabled if this feature is selected. |
| Disallow bluetooth | Bluetooth function will be disallowed on the device. |
| Disallow bluetooth sharing | Sharing data using bluetooth will be disabled by this feature. Following set of restrictions require the device to be in device owner mode. Follow the documentation to get the device into device owner mode. |
| Ensure verifying apps | In settings, go to Google -> Work -> Security -> Verify apps -> Scan device for security threats is not configurable. |
| Enable auto timing | Search for automatic date and time in settings of the device and enabling/disabling this setting is controlled by this setting. |
| Disable screen capture | This will disable the ability to take screenshots by pressing the power key together with volume down. |
| Disable SMS | The user will not be allowed to send or receive SMS. |
| Disable Volume Adjust | This will disable the ability changing device volume. so the volume keys must not have an effect. |
| Disable Cell Broadcast | Disables cell broadcasting messages (message -> Settings -> Cell Broadcast). |
| Disable Configuring Bluetooth | This restriction will disable the Bluetooth settings in settings of the device. |
| Disable Configuring Mobile Networks | Under settings -> mobile networks -> mobile configurations menu disabling is achieved with this configuration. |
| Disable Configuring Tethering | This will disable the ability to configure mobile hotspots and tethering which is found in settings. |
| Disable Configuring WiFi | Disable the ability to configure wifi settings in device settings. |
| Disable Safe Boot | Disables the ability to safe boot a device to remove any apps installed. https://support.t-mobile.com/docs/DOC-34283 |
| Disable Outgoing Calls | The user is not allowed to make outgoing phone calls. Emergency calls are still permitted. |
| Disable Mounting Physical Media | The user is not allowed to mount physical external media. If you connect a pendrive to the device via the OTG cable, the device will not allow mounting the pendrive. |
| Disable Factory Reset | Disables the ability to factory reset the device. If you go to settings on the device, the factory reset will be disabled. |
| Disable Remove User / Disable Add User | Multiple user profile control. The users are not allowed to remove or add. This may not be available in some Android devices. |
| Disable Network Reset | This restriction will disable network resetting. To check, type “reset network settings” in the settings search bar and the reset settings will be disabled. |
| Disable USB File Transfer | This restriction disables file transfer via USB. |
| Disallow data roaming | This feature disables the ability to use data while roaming. |
| Enable device backup service | By selecting this you can enable the device backup service. |
| Disallow disable mobile data | By selecting this feature the user will not be able to disable mobile data on the device. |
| Disallow airplane mode | User is disallowed from enabling or disabling location. To test this restriction on the device, go to the location in the settings. There the use location turn on button will be disabled and the location accuracy part will be disabled. This restriction is applicable when the agent is the device owner and Android version 9.0 (Pie) or higher. |
| Disable Unmute Microphone | This restriction will disable the microphone. Check the device microphone by using a recording app. This restriction is applicable when the agent is the device owner and Android 6.0 Marshmallow onwards only. |
| Disallow config location | This restriction disables the user from configuring the location. |
| Disallow changing default SIM card | This restriction disables the user from changing the default SIM card. |
| Force uninstall applications is not allowed | When enabled, you cannot force uninstalling of the apps in the allowed-apps list, under the Global Configurations for All Apps -> App Availability to a User -> Only Allow listed Apps. |
Disable Creating Window
Apps running are not allowed to create following types of windows.
LayoutParams#TYPE_TOAST LayoutParams#TYPE_PHONE LayoutParams#TYPE_PRIORITY_PHONE LayoutParams#TYPE_SYSTEM_ALERT LayoutParams#TYPE_SYSTEM_ERROR LayoutParams#TYPE_SYSTEM_OVERLAY LayoutParams#TYPE_APPLICATION_OVERLAY
To test, have an application that creates a toast and for example in the VPN app, when the VPN is created a toast may be shown and this must be Disableed with this setting.
Disable/Block Configuring Credentials
This configuration blocks the user from being able to configure credentials in the security certificates. In order to test this under Work Profile enrollment, enforce this policy on the device. Then go to device settings.
- Search for certificates, and click View Security Certificates.
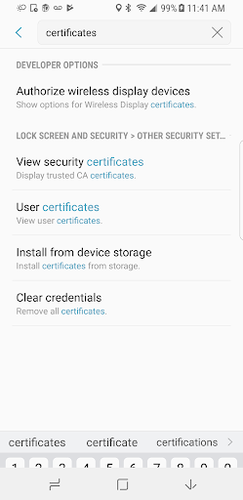
2. If you tap on certificates under personal, a pop-up will appear allowing you to turn off a certificate.
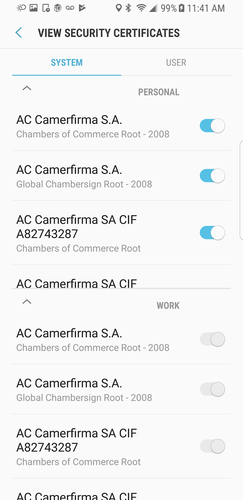
3. Since the policy is applied under Work Profile enrollment, the turn-off button is disabled/not visible.
Disable/Block Configuring App Control
Specifies if a user is blocked from modifying applications in Settings or launchers. The following actions will not be allowed for the user when this restriction is enforced:
-
Uninstalling Apps
-
Disabling Apps
-
Clearing App caches
-
Clearing App Data
-
Force Stopping Apps
-
Clearing App Defaults
After applying the policy, try to remove an installed app, for example the VPN client from the device, and it will not work.
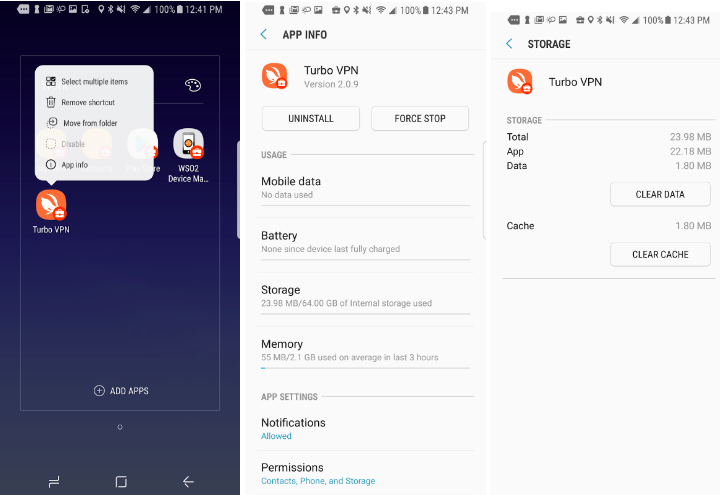
In the first image, uninstall is disabled, and the second image is from Settings -> Apps -> Installed App. Click Uninstall or Force Stop, or under application’s storage, click Clear Data or Clear Cache. The policy will prevent you from doing so.
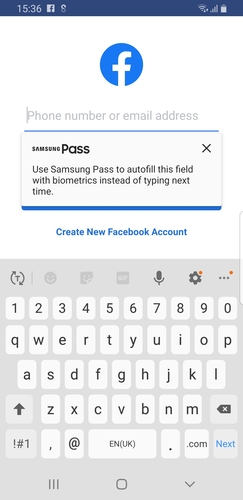
Disable Autofill
This restriction will disable autofill services.To check, install a application that needs to enter user credintials to log in. when entering the credintials, device autofill service will ask to save credincials to autofill service (samsung devices uses samsung pass as default).After when this restiriction active,this auto fill service will be disabled.
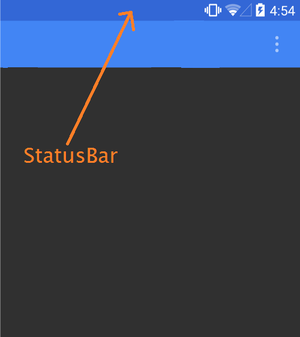
Disable status bar
This restriction will disable the device status bar.
Access Point Name
Refer to Add New Policy for instructions on how to add a new policy to an Android device.
This configurations can be used to configure APN (Access Point Name) on an Android device. This policy will support with the Android 9.0 onwards. This will not work with the below versions. And also Agent must be the device owner to activate this policy.
Data Keys of Policy and Descriptions
| Data Key | Description |
|---|---|
| Name | Access point name. |
| Entry Name | String:The name to set for the APN This value may be null. Eg:Entgra |
| Proxy Address | String: the proxy address to set for the APN This value may be null.Eg: [192.168.8.1] |
| Proxy Port | int: the proxy port to set for the APN Eg:[ Target port 0-65535 ] |
| Username | String: the APN username to set for the APN This value may be null. |
| Password | String: the APN password to set for the APN This value may be null. |
| Server | String: the server set for the APN This value may be null. |
| MMSC | Uri: the MMSC Uri to set for the APN This value may be null. Eg:[ 192.168.8.1 ] |
| MMS Proxy Address | String: the MMS proxy address to set for the APN This value may be null.Eg:[ 192.168.8.1 ] |
| MMS Proxy Port | int: the MMS proxy port to set for the APN.Eg:[ Target port 0-65535 ] |
| MCC | int: the Mobile Country Code to set for the APN. Eg:413 |
| MNC | int: the Mobile Network Code to set for the APN. Eg:02 |
| Authentication Type | int: the authentication type to set for the APN Value. |
| APN Type | The APN type. |
| APN Protocol | APN protocol to be followed. |
| APN Roaming Protocol | APN protocol set for roaming. |
| Bearer | APN bearer. |
| APN Enable/Disable | Feature to enable and disable APN. |
| Mobile Virtual Network Operator Type | Virtual network operator for APN. |
| NONE | int: default Authentication Type for the APN. Constant Value: 0 (0x00000000) |
| PAP | int: Password Authentication Protocol for the APN. Constant Value: 1 (0x00000001) |
| CHAP | int: Authentication type for PAP or CHAP for the APN. Constant Value: 3 (0x00000003) |
| PAP_OR_CHAP | int: Challenge Handshake Authentication Protocol for the APN. Constant Value: 2 (0x00000002) |
| APN Type | int: Apn types are usage categories for an APN entry. One APN entry may support multiple APN types. |
| DEFAULT | int: APN type for default data traffic. Constant Value: 17 (0x00000011) |
| CBS | int: Carrier Branded Services for the APN. Constant Value: 128 (0x00000080) |
| DUN | int: Dial Up Networking bridge for the APN. Constant Value: 8 (0x00000008) |
| IMS | int: IP Multimedia Subsystem for the APN. Constant Value:64 (0x00000040) |
| MMS | int: Multimedia Messaging Service for the APN. Constant Value: 2 (0x00000002) |
| SUPL | int: APN type for SUPL assisted GPS. Constant Value: 4 (0x00000004) |
| IA | int: APN type for IA Initial Attach APN. Constant Value: 256 (0x00000100) |
| HIPRI | int: APN type for HiPri traffic. Constant Value: 16 (0x00000010) |
| FOTA | int: APN type for accessing the carrier's FOTA portal, used for over the air updates. Constant Value: 32 (0x00000020) |
| EMERGENCY | int: used for access to carrier services in an emergency call situation. Constant Value: 512 (0x00000200) |
| APN Protocol | int: Sets the protocol to use to connect to this APN |
| IPV4V6 | int: Virtual PDP type introduced to handle dual IP stack UE capability. Constant Value: 2 (0x00000002) |
| IP | int: Internet protocol. Constant Value: 0 (0x00000000) |
| IPV6 | int: Internet protocol, version 6. Constant Value: 1 (0x00000001) |
| PPP | int: Point to point protocol. Constant Value: 3 (0x00000003) |
| APN Roaming Protocol | int: Sets the protocol to use to connect to this APN when the device is roaming |
| IPV4V6 | int: Virtual PDP type introduced to handle dual IP stack UE capability. Constant Value: 2 (0x00000002) |
| IP | int: Internet protocol. Constant Value: 0 (0x00000000) |
| IPV6 | int: Internet protocol, version 6. Constant Value: 1 (0x00000001) |
| PPP | int: Point to point protocol. Constant Value: 3 (0x00000003) |
| APN Bearer | int: Sets Radio Technology (Network Type) info for this APN. |
| UNSPECIFIED | int: APN type for default data traffic. |
| LTE | int: Long Term Evolution is a standard in the communication of Mobile Phones used for data transfer. |
| HSPAP | int: Dial Up Networking bridge for the APN. Constant Value: 8 (0x00000008) |
| HSPA | int:High Speed Packet Access |
| HSUPA | int: High Speed Uplink Packet Access |
| HSDPA | int: High Speed Download/Upload Packet Access |
| UMTS | int: Universal Mobile Telecommunications System |
| EDGE | int: Enhanced Data for GSM Evolution |
| GPRS | int: General Packet Radio Service. Constant Value: 32 (0x00000020) |
| eHRPD | int: Evolved High-Rate Packet Data |
| EVDO_0 | int: Initial design of Evolution Data Optimized |
| EVDO_A | int: Several additions to the EVDO_0 |
| EVDO_B | int: Multi-carrier evolution of the EVDO_A specification |
| 1xRTT | int: Single carrier (1x) radio transmission technology |
| GSM | int: Global System for Mobile Communications |
| IWLAN | int: Industrial Wireless Local Area Network |
| APN Enable/Disable | boolean: the current status to set for this APN. |
| Mobile Virtual Network Operator Type | int: Sets the Mobile Virtual Network Operator match type for this APN. |
| SPN | int: MVNO type for service provider name. Constant Value: 0 (0x00000000) |
| GID | int: MVNO type for group identifier level 1. Constant Value: 2 (0x00000002) |
| ICCID | int: MVNO type for Integrated Circuit Card ID. Constant Value: 3 (0x00000003) |
| IMSI | int:MVNO type for International Mobile Subscriber Identity. Constant Value: 1 (0x00000001) |
Global Proxy Settings
Refer to Add New Policy for instructions on how to add a new policy to an Android device.
This configuration can be used to set a network-independent global HTTP proxy on an Android device. Once the configuration profile is installed on a device, all the network traffic will be routed through the proxy server.
Note:
- This profile requires the agent application to be the device owner.
- The proxy is only a recommendation. Certain apps may ignore the proxy settings.
Data Keys of Policy and Descriptions
| Data Key | Description |
|---|---|
| Proxy Configuration Type | The type of configuration. |
| Proxy Host | Host name/IP address of the proxy server. Eg:[ 192.168.8.1 ] |
| Proxy Port | Target port for the proxy server. Eg:[ Target port 0-65535 ] |
| Proxy Exclusion List | Add hostnames to this separated by commas to prevent them from routing through the proxy server. The hostname entries can be wildcards such as .example.com Eg:[ localhost, .example .com ] |
| Auto | |
| Proxy PAC File URL | URL for the proxy auto config PAC script Eg: [ http://exampleproxy.com/proxy.pac ] |
Refer to Publish a Policy for instructions on how to publish a new policy in an Android device.
Virtual Private Network
Refer to Add New Policy for instructions on how to add a new policy to an Android device.
Data Keys of Policy and Descriptions
| Data Key | Description |
|---|---|
| VPN Settings | VPNs allow devices that are not physically on a network to securely access the network. Configure the OpenVPN settings on Android devices. In order to enable this, the device needs to have the OpenVPN for Android application installed. |
| OpenVPN Server Config | |
| Always On VPN Settings | Android can start a VPN service when the device boots and keep it running while the device is on. This feature is called always-on VPN and is available in Android 7.0 (API Level 24) or higher. Configure an always-on VPN connection through a specific VPN client application. |
| VPN Client Application Package Name | Package name of the VPN client application to be configured. |
Note: The configurations above are valid only when the agent is the work-profile owner or the device owner.
Refer to Publish a Policy for instructions on how to publish a new policy in an Android device.
Certificate Install Settings
Refer to Add New Policy for instructions on how to add a new policy to an Android device.
These configurations can be used to install certificate on an Android device.
Data Keys of Policy and Descriptions
| Data Key | Description |
|---|---|
| Certificate name | The file name of the enclosed certificate. |
| Certificate file | The base64 representation of the payload with a line length of 52. |
| Certificate type | Certificate should be a DER-encoded X.509 SSL certificate in format of .crt or .cer |
Refer to Publish a Policy for instructions on how to publish a new policy in an Android device.
Device Profile Policy
Refer to Add New Policy for instructions on how to add a new policy to an Android device.
The configurations below can be applied to the devices the agent running on Android Enterprise.
Data Keys of Policy and Descriptions
| Data Key | Description |
|---|---|
| Profile Name | Name of the Enterprise profile created by IoT Server Agent. |
| Enable System Apps | System applications that need to be enabled in the Enterprise profile. Should be exact package names seperated by commas. Ex: com.google.android.apps .maps, com.google.android.calculator. |
| Hide System Apps | System applications that need to be hidden in the Enterprise profile. Should be exact package names seperated by commas. Ex: com.google.android.apps .maps, com.google.android.calculator. |
| Unhide System Apps | System applications that need to be unhidden in the Enterprise profile. Should be exact package names seperated by commas. Ex: com.google.android.apps .maps, com.google.android.calculator. |
| Enable Google Play Store Apps | The applications that needs to be downloaded and installed from Google play store to the Enterprise profile. Should be exact package names seperated by commas. Ex: com.google.android.apps .maps, com.google.android.calculator. |
Refer to Publish a Policy for instructions on how to publish a new policy in an Android device.
Dedicated Device Settings
Refer to Add New Policy for instructions on how to add a new policy to an Android device.
This policy can be used to configure the profile of dedicated devices.
Data Keys of Policy and its Descriptions
| Data Key | Description |
|---|---|
| Restrict Device Operation Time | Device will be operable only during the below time period. |
| Start Time | Start time for the device. |
| End Time | Lock down time for the device. |
| Device Global Configuration | Theme can be configured with the following options. |
| Launcher background image | This is the image that will be displayed in kiosk background. [Should be a valid URL of jpg or jpeg or png] |
| Company logo to display | Company logo to display in the kiosk app drower. [Should be a valid URL ending with .jpg, .png, .jpeg] |
| Company name | Name of the company that have to appear on the agent. |
| Is single application mode | This configuration allows user to enroll single application on Kiosk mode task.If user select more apps it will get the top most application.Selected initial app in Enrollment Application Install policy config will be selected for single application mode. Atleast one application should be selected. If more than one application is beeing selected, then first selected application in the list will be installed as the single application mode. |
| Device Global Configuration | Theme can be configured with the following options. |
| Is idle media enabled | This Configuration allows user to display idle timeout video on the device. |
| Media to display while idle | Url of the media to display while the device is idle.[ Should be a valid URL ending with .jpg, .png, .jpeg, .mp4, .3gp, .wmv, .mkv ] |
| Keep display awake | Selecting this feature will keep the display on without a timeout. |
| Is multi-user device | If Is multi-user device enabled, multi-user configuration can be done for one device. Which enables to register already installed applications for registered users. After the policy is applied these applications can only be executed by logging in as the registered user. Other than this common applications which are common to all the users also can be specified by this policy. |
| Is login needed for user switch | If this is enabled, the user should have valid user name and password to login to the device. |
| Allowed COSU (kiosk) Applications | Specify an applications list to be displayed on the kiosk launcher. |
| Device Global Configuration > Enable Device Info | When enabled, an info button will be available on kiosk mode to display the device information data of the device. |
Other Data Keys of Policy and Descriptions for Dedicated Device Settings
Is application built for Kiosk Is single mode app built for Kiosk. Enable if lock task method is called in the application.
Idle graphic begin after(seconds)
Idle graphic begin after the defined seconds[ Idle timeout should be defined in seconds ]
Primary User Apps
Primary User is the user to which the device is enrolled. The applications that are specified in here will be available by default. These applications can be used by any user. Provide comma separated package name or web clip details for applications. eg: com.google.android.apps.maps, {"identity":"http:entgra.io/","title":"entgra-webclip"}
Device display orientation
Data Keys of Policy and Descriptions
| Data Key | Description |
|---|---|
| Device display orientation | The display orientation of device can be set in a fixed mode. * Auto, * Potrait, * Landscape |
Refer to Publish a Policy for instructions on how to publish a new policy in an Android device.
Application Restriction Settings
Refer to Add New Policy for instructions on how to add a new policy to an Android device.
This configuration can be used to create a deny-list or an allow-list of applications.
Application deny-listing, is a network administration practice used to prevent the execution of undesirable programs. Such programs include not only those known to contain security threats or vulnerabilities but also those that are deemed inappropriate within a given organization.
Application allow-listing is the practice of specifying an index of approved software applications or executable files that are permitted to be present and active on a computer system. The goal of allow-listing is to protect computers and networks from potentially harmful applications.
Data Keys of Policy and Descriptions
| Data Key | Description |
|---|---|
| Select type | Select the type of restriction to proceed. |
| Restricted Application List | Application Name/Description. Eg: [ Gmail ] |
| Package Name | Eg: [ com.google.android.gm ] |
Refer to Publish a Policy for instructions on how to publish a new policy in an Android device.
Runtime Permission Policy (Dedicated Device / Work Profile)
Refer to Add New Policy for instructions on how to add a new policy to an Android device.
This configuration can be used to set a runtime permission policy to an Android Device.
Already granted or denied permissions are not affected by this policy. Permissions can be granted or revoked only for applications built with a Target SDK Version of Android Marshmallow or later.
Data Keys of Policy and Descriptions
| Data Key | Description |
|---|---|
| Set default runtime permission | When an app requests a runtime permission, this enforces whether the user needs to prompted or the permission (PROMPT USER) either automatically granted (AUTO GRANT) or denied (AUTO DENY). |
| Set default runtime permission |
Set app-specific runtime permissions
Refer to_Add New Policy_ for instructions on how to add a new policy to an Android device.
Data Keys of Policy and Descriptions
| Data Key | Description |
|---|---|
| Application | Eg: [ Android Pay ] |
| Package Name | Eg: [ com.google.android.pay ] |
| Permission Name | Eg: [ android.permission.NFC ] ] |
| Permission Name | * PROMPT USER, * AUTO GRANT, * AUTO DENY |
Refer to Publish a Policy for instructions on how to publish a new policy in an Android device.
System Update Policy (Dedicated Devices)
Refer to_Add New Policy_ for instructions on how to add a new policy to an Android device.
This configuration can be used to set a passcode policy to an Android Device. Once this configuration profile is installed on a device, corresponding users will not be able to modify these settings on their devices.
| Data Keys | Descriptions |
|---|---|
| System Update | Type of the System Update to be set by the Device Owner: Automatic, Postpone, Window. |
| Start Time | Window start time for system update. (Only valid when Windows option is selected.) |
| End Time | Window end time for system update. (Only valid when Windows option is selected.) |
Refer to Publish a Policy for instructions on how to publish a new policy in an Android device.
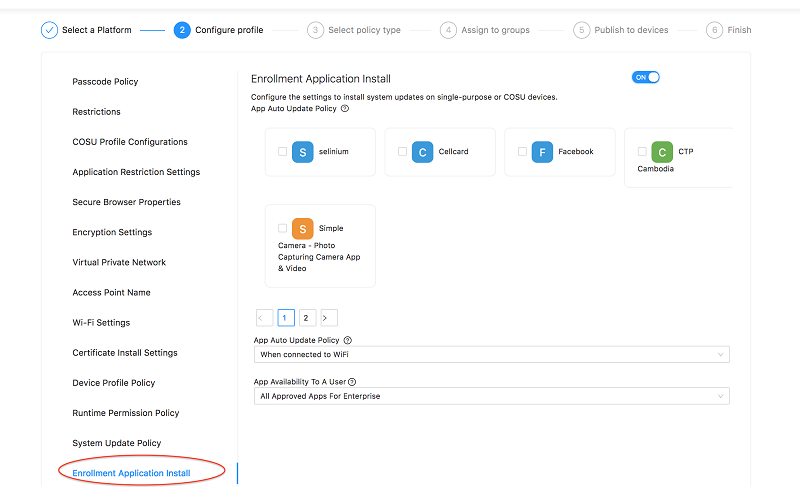
Enrollment Application Install
Refer to Add New Policy for instructions on how to add a new policy to an Android device.
Enforce applications to be installed during Android device enrollment.
| Data Keys | Descriptions |
|---|---|
| Auto Install | When auto install is checked, then the applications that are selected will be installed autmatically. |
Work profile global user configurations
App Auto Update Policy
- When connected to WiFi
- Auto Update any time
- Ask user to Update
- Disable Auto Update
App availability to a user
- All Approved Apps for Enterprise
- All Apps from Playstores
- Only White-listed Apps
App Install Policy (Work profile only)
App Initial Install Mode
The auto install mode for the first time
-
Auto install once only when enrolling
-
Do not install automatically
-
Auto install even if uninstalled manually
Priority level when installing the app
Priority level when installing the app among many other apps
- Lowest - Highest
Device charging state when installing apps
Device charging state when installing apps
-
Device must be charging
-
Device does not need to be charging
Device processor state when installing
-
Device does not need to be idling
-
Device does not need to be idling
Device network state when installing
Device processor state when installing
-
Device can be in any network
-
Device must be in an unmetered network
Refer to Publish a Policy for instructions on how to publish a new policy in an Android device.
Display Message Configuration
Refer to Add New Policy for instructions on how to add a new policy to an Android device.
This policy can be used to show the messages on the devices.To display the Lock screen message the device should have the device owner but the device owner does not need to display the long support message and the short support message.
Data Keys of Policy and Descriptions
| Data Keys | Description |
|---|---|
| Lock Screen Message | Lock screen message works only for the device owner. Once this message is applied, the device will display the device lock screen and the user cannot change it from the setting. |
| Setting App Support Message | Once this message is applied to devices, the message will be displayed to the user in the device administrator's settings screen. |
| Disabled Setting Support Message | Once this message is applied to devices the message will be displayed to the user in settings screens where functionality has been disabled by the admin.The message maximum length is 200 characters. |
| Setting App Support Message | Once this message is applied to devices, the message will be displayed to the user in the device administrator's settings screen. |
Refer to Publish a Policy for instructions on how to publish a new policy in an Android device.
App Usage Configuration
Refer to Add New Policy for instructions on how to add a new policy to an Android device.
This policy allow to define restrictions of the network usage and the data usage limits on individual apps. This policy is only applicable for COPE devices and Entgra Firewall must be installed for the restrictions to enforce.
Data Keys of Policy and Descriptions
| Data Keys | Description |
|---|---|
| Block application net usage | Using this policy, it is possible to completely block a set of applications from using internet or allow only a given set of applications to use internet and block everything else. |
Select the data restriction type
Data Keys of Policy and Descriptions
| Data Keys | Description |
|---|---|
| Allow apps to use network | The list of apps mentioned here are the only applications allowed to use internet. The rest of the apps on the device cannot use internet. |
| Disallow apps to use network | The list of apps mentioned here are blocked from using internet. Rest of the apps on the device can use internet. |
Add Applications
Data Keys of Policy and Descriptions
| Data Keys | Description |
|---|---|
| Application Name | A name to idetify the application. This can the name of the application on google playstore or any other name. |
| Package Name | Package name of the application. |
Network Usage Configuration
This policy allows to define the exact data usage limit for a given set of applications.
Data Keys of Policy and Descriptions
| Data Key | Description |
|---|---|
| Package Name | Package Name |
| Allowed Data | Amount of data alllow to be used by the app. |
| Unit | Package Name |
| Period | This is the period in which the allowed data is applied. After this period exceeds, the data usage counter for that app resets. Example: in the Allowed data is 1GB and the pediod is per day. This mean the application is allowed to use 1GB of data within a day. |
| Billing Date | If per billing date is selected in the above, this feild allows to define the billing date. This is a day of the month and alllows input of number 1-28. Example: if this field is set to 5, the billing cyce renews on every 5th day of every month.7 |
| Set App Specific Time | This can be used to set the time period for which a given amount of data can be used for each application. |
Refer to Publish a Policy for instructions on how to publish a new policy in an Android device.
Secure Browser Properties
This is used to restrict properties of the web browser when using web views.
| Data Key | Description |
|---|---|
| Primary URL | Primary URL of the web view |
| Enable top control bar | Enables top control bar that displays all the controllers such as address bar, home button and forwards controllers. |
| Enable Browser Address Bar | Enables address bar of the browser. |
| Is allowed to go back on a page | Enables to go back on a page. |
| Is allowed to go forward on a page | Enables to go forward on a page. |
| Enables the home button on the browser. | |
| Is page reload enabled | Enables page reload. |
| Only allowed to visit the primary url | Disables visiting URLs other than the primary url. |
| Is javascript enabled | Enables loading of javascript from the browser. |
| Is copying text from browser enabled | Enables copying texts in the browser. |
| Is downloading files enabled | Enables downloading files from the browser. |
| Is Kiosk limited to one web app | Sets whether the device can access single or multiple web views. |
| Is form auto-fill enabled | Enables autofill for forms in the browser. |
| Is content access enabled | Enables content URL access within WebView. Content URL access allows WebView to load content from a content provider installed in the system. |
| Is file access enabled | Sets whether JavaScript running in the context of a file scheme URL should be allowed to access content from other file scheme URLs. |
| Is allowed universal access from file URLs | Sets whether JavaScript running in the context of a file scheme URL should be allowed to access content from any origin. |
| Is application cache enabled | Enables web view's application cache. |
| Application cache file path | Sets the path to the Application Caches files. In order for the Application Caches API to be enabled, this method must be called with a path to which the application can write. |
| Application cache mode | Overrides the way the cache is used. The way the cache is used is based on the navigation type. For a normal page load, the cache is checked and content is re-validated as needed. When navigating back, content is not re-validated, instead the content is just retrieved from the cache. This method allows the client to override this behavior by specifying one of LOAD_DEFAULT, LOAD_CACHE_ELSE_NETWORK, LOAD_NO_CACHE or LOAD_CACHE_ONLY. |
| Should load images | Sets whether the browser should load image resources (through network and cached). Note that this method controls loading of all images, including those embedded using the data URI scheme. |
| Block image loads via network | Sets whether the browser should not load image resources from the network (resources accessed via http and https URI schemes). |
| Block all resource loads from network | title="Sets whether the browser should not load any resources from the network." |
| Support zooming | Sets whether the browser should support zooming using its on-screen zoom controls and gestures. |
| Show on-screen zoom controllers | Sets whether the browser should support zooming using its on-screen zoom controls and gestures. |
| Text zoom percentage | Sets whether the browser should support zooming using its on-screen zoom controls and gestures. |
| Default font size | Sets whether the browser should support zooming using its on-screen zoom controls and gestures. |
| Default text encoding name | Sets the default text encoding name to use when decoding html pages (Should be a valid text encoding). |
| Is database storage API enabled | Sets whether the database storage API is enabled. |
| Is DOM storage API enabled | Sets whether the DOM storage API is enabled. |
| Is Geolocation enabled | Sets whether Geolocation API is enabled. |
| Can JavaScript open windows | Sets whether JavaScript can open windows automatically or not. This applies to the JavaScript function window.open(). |
| Does media playback require user consent | Sets whether the browser requires a user gesture to play media. If false, the browser can play media without user consent. |
| Is safe browsing enabled | Sets whether safe browsing is enabled. Safe browsing allows browser to protect against malware and phishing attacks by verifying the links. |
| Use wide view port | Sets whether the browser should enable support for the viewport HTML meta tag or use a wide viewport. When the value of the setting is false, the layout width is always set to the width of the browser control in device-independent (CSS) pixels. When the value is true and the page contains the viewport meta tag, the value of the width specified in the tag is used. If the page does not contain the tag or does not provide a width, then a wide viewport will be used. |
| Browser user agent string | Sets the WebView's user-agent string. (Should be a valid user agent string). |
| Allow list URLs | Only the URLs listed here will be allowed to be accessed by the browser. Set comma seperated URLs and only http(s) URLs are allowed. |
| Match domains only in allow list | If this feature is enforced only the URLs that matches the above allow list will be allowed to be accessed. if not any domain in the list will be allowed to be accessed. |
| Allow subdomain redirects | This is used to grant permission to subdomains of the allow-listed domains. |
Mixed content mode
Configures the browser's behavior when a secure origin attempts to load a resource from an insecure origin.

Refer to Publish a Policy for instructions on how to publish a new policy in an Android device.
Enterprise Factory Reset Protection
Refer to Add New Policy for instructions on how to add a new policy to an Android device.
Using Enterprise Factory Reset Protection, organizations can specify which Google Accounts can provision a device that has been factory reset. Consumer factory reset protection is designed to deter device theft.
Before allowing anyone to provision the device after unauthorized factory reset, the setup wizard requires the user to authenticate against any Google Accounts that were previously on the personal profile of the device.
This policy works only for Android 5.1 (Lolipop) or later versions and for devices provisioned as Device Owner.
Data Keys of Policy and its Descriptions
Add Emails and Account IDs (Steps to obtain the Account ID)
To apply this policy to the device, email addresses and its account IDs should be given. Once the policy is applied on the device and after a hard reset, the device can be accessed only after providing any of the email address which was given in the policy.
How to get the get account ID to be used in the Policy?
- Sign in with the Gmail address
- Go to the Google GET People API https://developers.google.com/people/api/rest/v1/people/get
- Provide people/me for the resourceName
- Provide metadata for the personFields
- Click Execute
- Allow authorization access for the API
- Use the account ID returned in the response
User Peripherals
Refer to Add New Policy for instructions on how to add a new policy to an Android device.
Configure these settings to manage the applications in the show message.
Data Keys of Policy and Descriptions
| Data Key | Description |
|---|---|
| Bluetooth Peripherals | The lists of apps the user allows or disallows will be in the allow list and/or the block list. Only the apps set by the user will be allowed. |
Refer to Publish a Policy for instructions on how to publish a new policy in an Android device.
Speed Limit Policy
Refer to Add New Policy for instructions on how to add a new policy to an Android device.
When activated, this policy ensures that related corrective policies are applied if and when the set speed limit is exceeded on moving devices.
Using this policy, an administrator can define a speed limit on the device, which if exceeded, will result in subsequent corrective policies, such as disabling certain specific apps on the device, being applied.
Data Keys of Policy and Descriptions
| Data Key | Description |
|---|---|
| Set speed limit | If and when the set speed limit is exceeded on moving devices, you can set other corrective policies to be applied, such as disabling some apps on the device. |
Data Keys of Policy and its Descriptions
Android Device Remote Control
The remote control feature allows administrators to troubleshoot devices that are enrolled with Entgra IoT Server using the endpoint management console. You can create a remote session, send adb shell commands, view the device logs, chat with the end user, transfer the files with FTP server, and remotely view and interact with the screen of an Android device.
Let's take a look at how you can start using it.
BEFORE YOU BEGIN!
- Make sure to enroll an Android device. For more information, see Android Device.
- Make sure that your Android device supports the Android Lollipop (API level 21) version or above to use the screen feature.
- The enrolled device needs to be connected to the network at all times.
Create a Remote Session
Follow the steps given below to create a remote session between the device and Entgra IoT Server:
-
Start Entgra IoT Server.
-
Access the endpoint management console:
https://<IOTS_HTTPS_HOST>:9443/endpoint-mgtFor example:https://localhost:9443/endpoint-mgt - Sign in as an administrator. By default, the username is
adminand the password isadmin. -
Under DEVICES, click All devices.
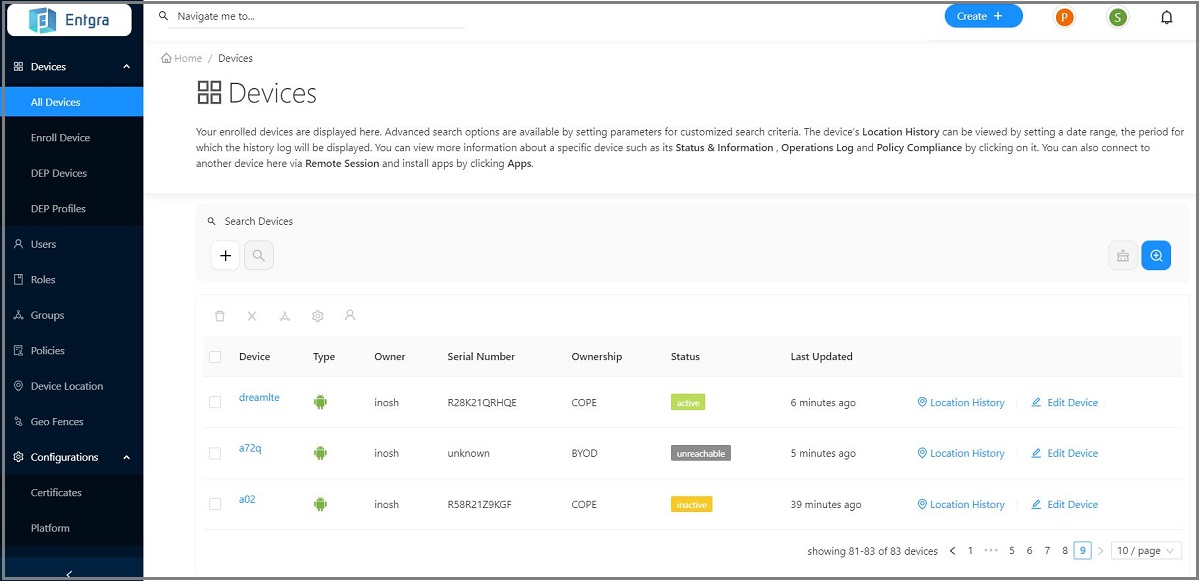
A page appears that lists all the devices that are enrolled with Entgra IoT Server because you have administrator privileges. If you do not have administrator privileges, you only the see the devices that you enrolled.
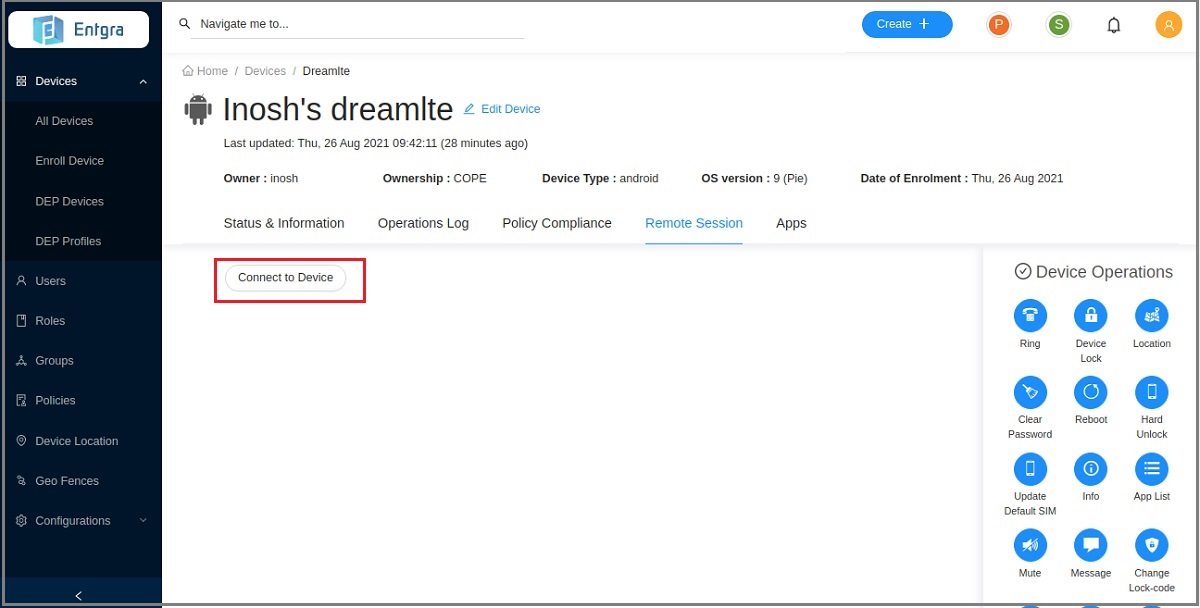
- Click on the device you want to troubleshoot. You will be taken to a page with device details.
- Click on the Remote Session tab.
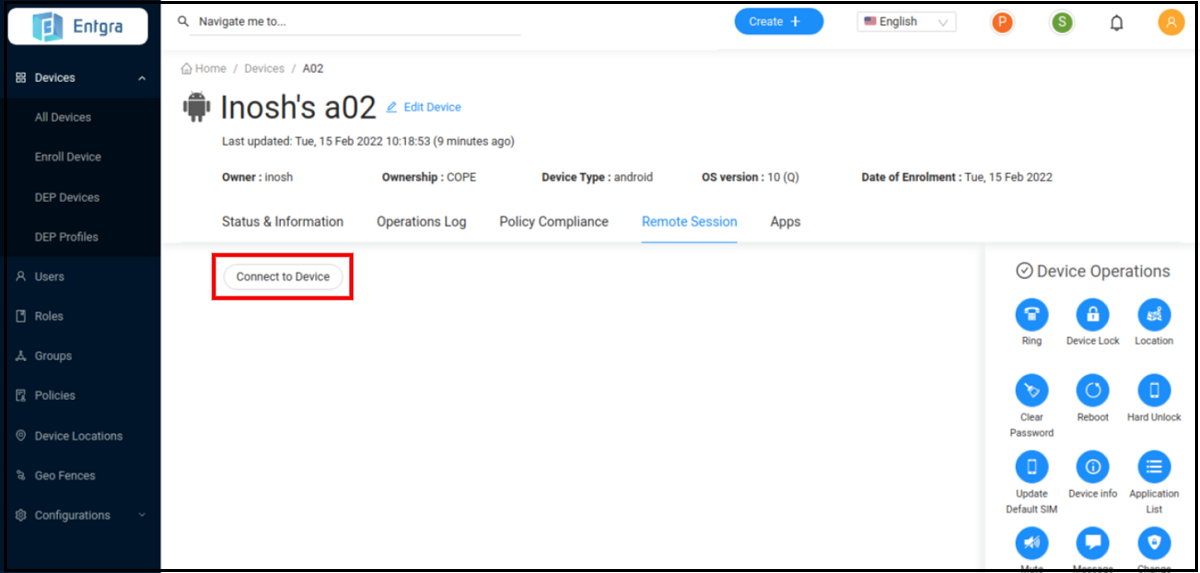
-
Click Connect to Device to start a remote session with the device.
-
When the server connects to the device, you will see the following screen with Start screen share and Close Session options:
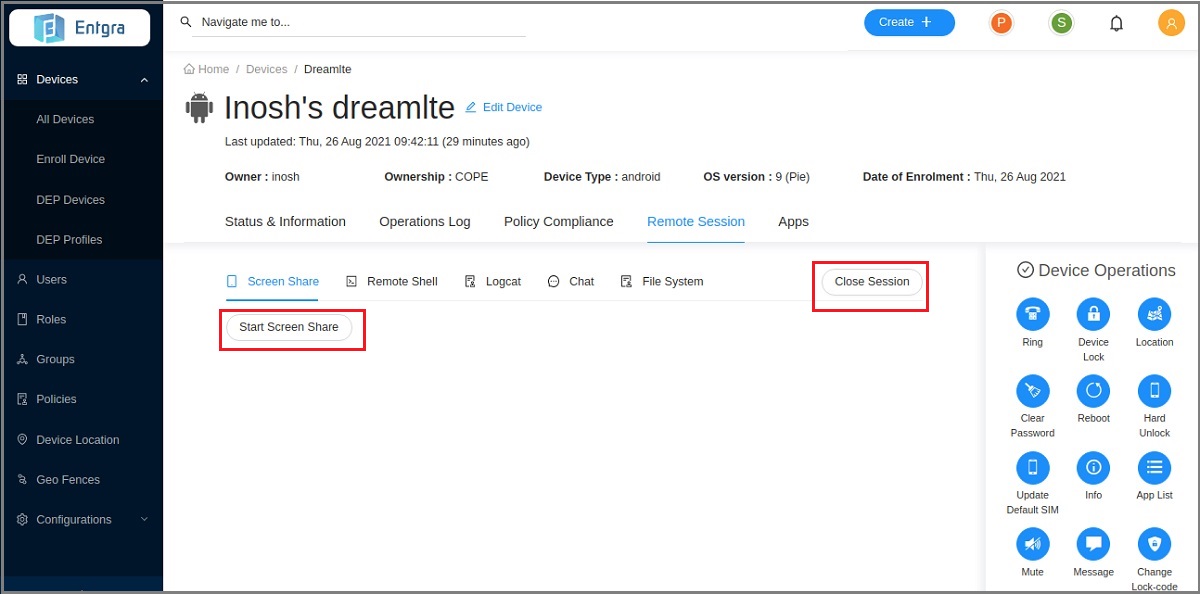
You can now continue to troubleshoot the device as described in the next sections. To stop the remote sharing session, click Close Session.
Send adb Shell Commands
Android Debug Bridge (adb) is a command line tool that lets you communicate with an emulator or connected Android device. Follow the steps given below to troubleshoot the device using adb shell commands:
- If you haven't already set up a remote session, set it up now.
- Click Remote Shell.
-
Write the shell command (see adb shell commands for the available commands) and press Enter.
For example, if you want to get the CPU and memory usage of the device, use thetopadb command.
Sample output: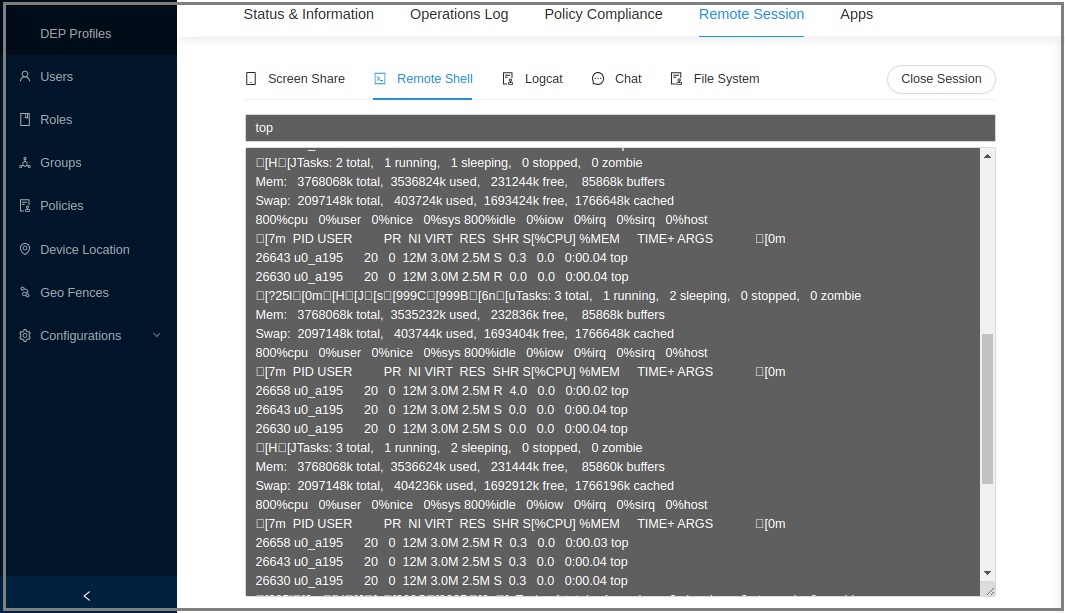
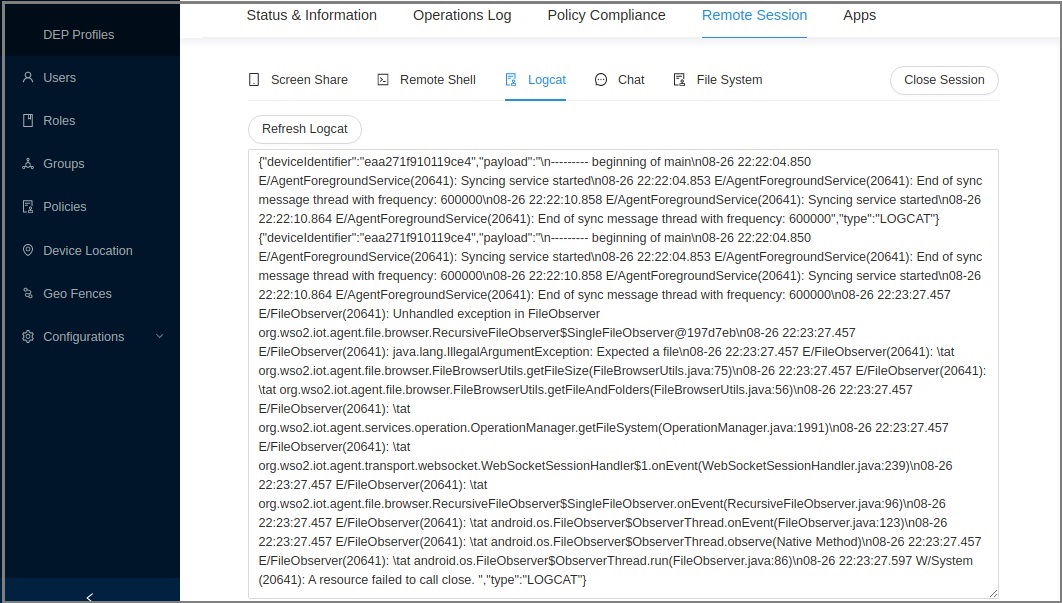
View Device Logs
Logcat is a tool that displays messages from the device log in real time and keeps a history so you can view the old messages. Follow the steps given below to view the device logs.
- If you haven't already set up a remote session, set it up now.
- Click Logcat.
You can now see the log for the device.
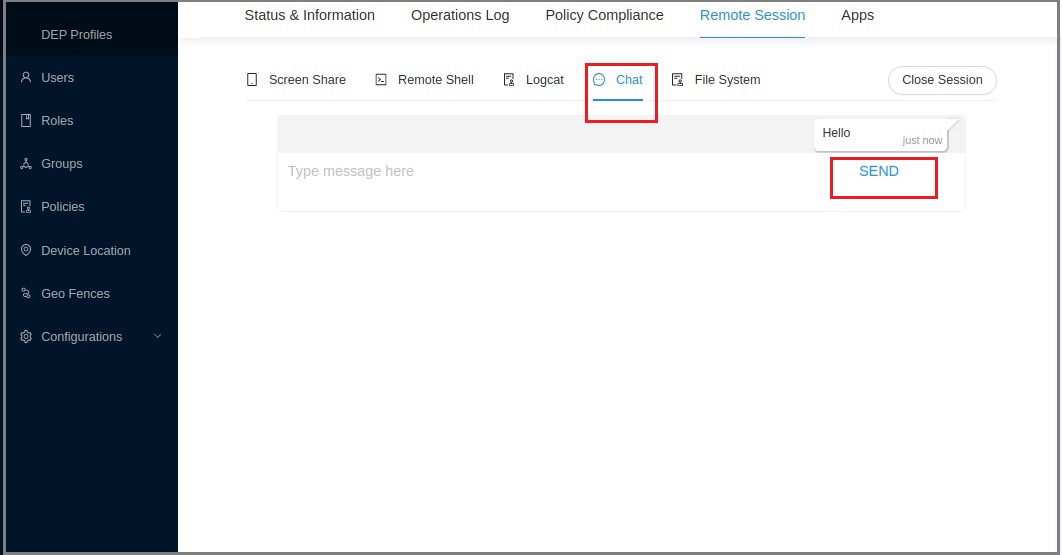
Chat with the User
Chat is a tool that can be used to communicate/connect with the device owner. The device owner can also communicate through the Entgra Device Management Agent.
- If you haven not already set up a remote session, set it up now.
- Click Chat.
-
Type the message that you want to send and press Send.
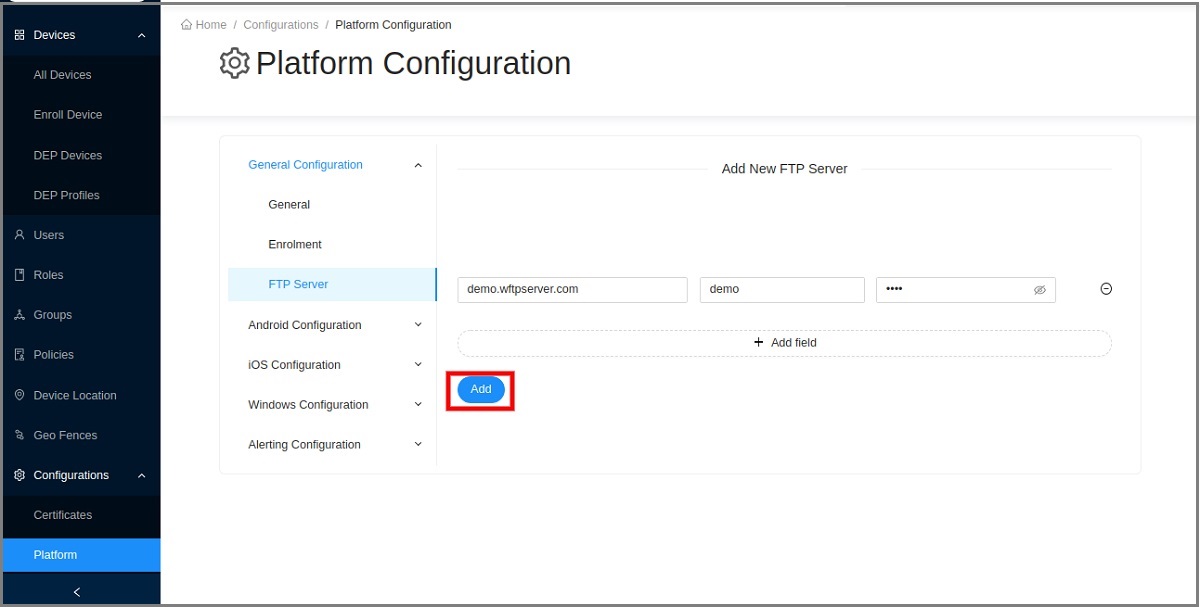
Transfer Files with FTP Server
File System is a file transferring tool to transfer the files from the local device to the FTP server and vice-versa. under the FTP server section in General Platform settings, you can add a new FTP server. In addition, the user has the ability to rename and delete files.
How to Transfer Files
- Click Platform Configurations under Configurations.
- Go to the General Configuration and select FTP server.
-
Add a new FTP server in there and click Add.
-
Set up a remote session.
- Click File System.
-
In the Local Files section, you can see all the files of your device. Select the added FTP server in the Server Files section. There, youwill see the files that are available on the server.
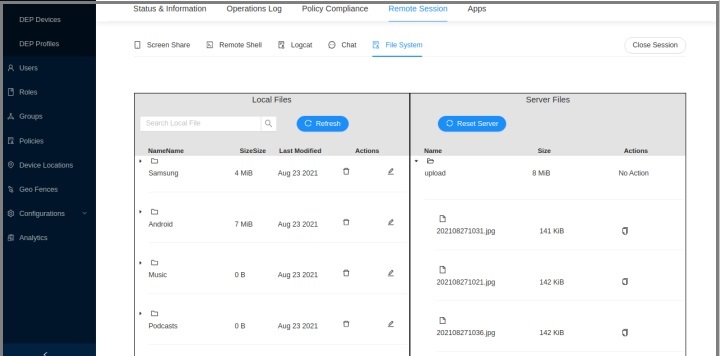
-
You can then transfer the files between the FTP server and your device. If you want to transfer files from your device to the server, select the file that you want to transfer and copy it. Paste that file in the desired location on the server. Follow the same steps if you want to transfer files from the server to the device.
Renaming Files
-
Select a file that you want to rename and click Edit.
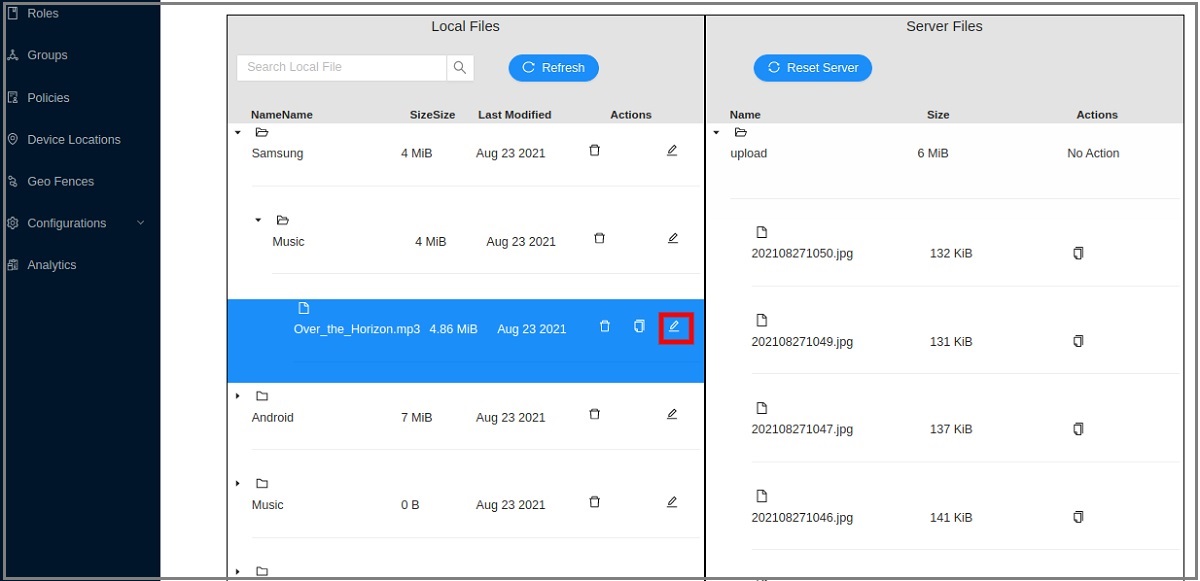
-
Rename the file and click OK.

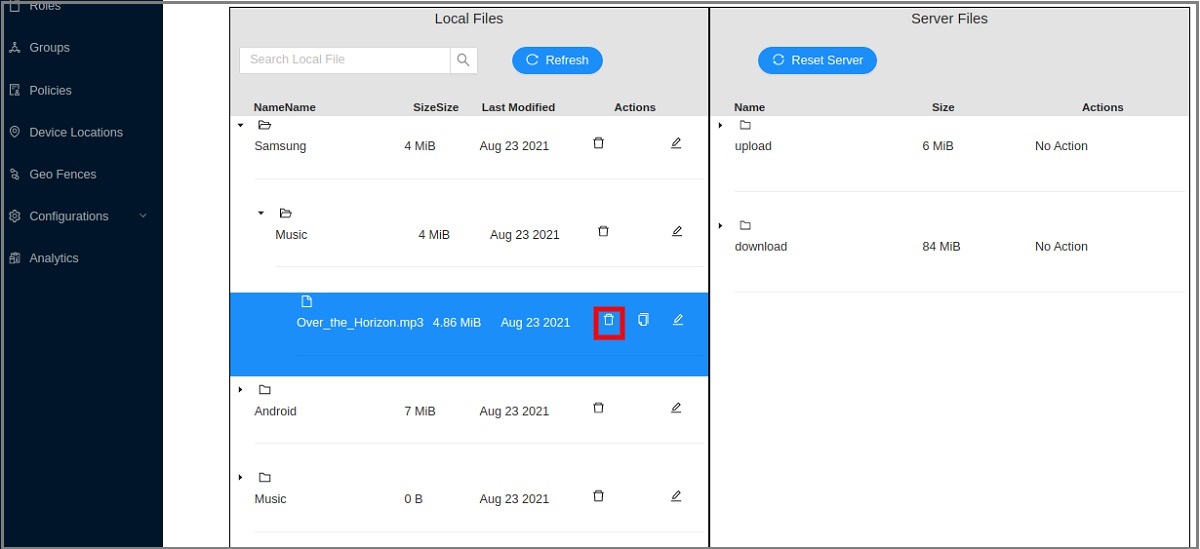
Deleting Files
-
Click Delete on the record you want to delete and then click OK.
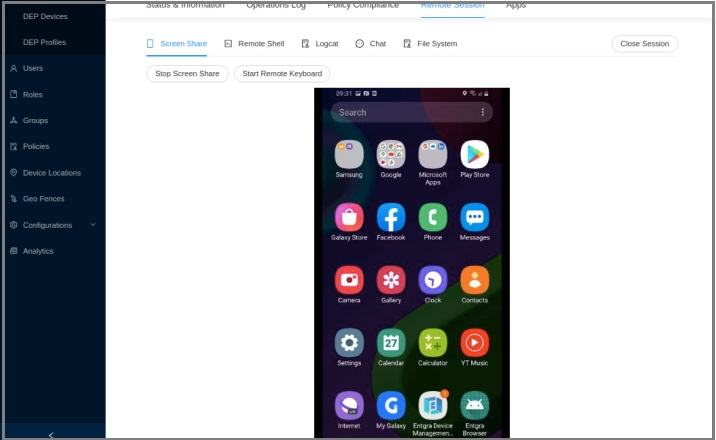
View Device Screen Remotely
To troubleshoot a device, it can be helpful to view the device’s screen so you can monitor how the device owner is using it and then take actions yourself, such as opening applications and configuring settings.
To view the screen, take the following steps:
- If you haven not already set up a remote session, set it up now.
-
Click Screen Share > Start.
-
A message is sent to the device asking the device owner to share the screen with Entgra IoT Server. After the device owner accepts this message, you can view the device’s screen.
-
Click Stop Screen Share to stop viewing the screen of the device.
View and Interact with the Device Remotely
Viewing the screen of the device alone does not help you to solve the issue. You need to be able to carry out actions on the shared screen to successfully troubleshoot the device. Follow the steps given below to try it out:
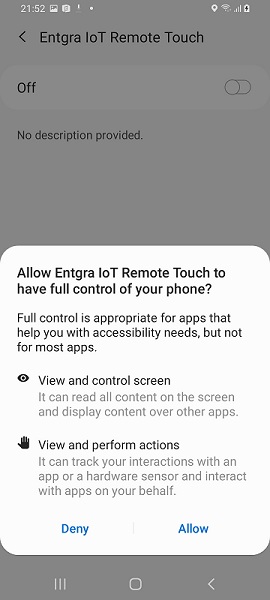
Remote Touch Inputs
Method 1 : Using Accessibility Service (For non rooted devices)
PREREQUISITES
Android OS version should be higher than Android 7.0 Nougat (API 24) or
Agent needs to run as a privileged system app. (has to have signed with system signing key and app needs to be a system app)
To start giving touch inputs using the mouse, device owner have to enable Entgra IoT Remote Touch accessibility service from automatically popped up settings page on the device. (If it's already enabled "Entgra IoT Remote Touch" accessibility service at enrollment, this step is not necessary)
Method 2 : Using System APIs
Remote Keyboard Inputs
-
Click Start Remote Keyboard to enable the Entgra Remote Keyboard. Then it will pop up the setting screen which can enable the custom IME.
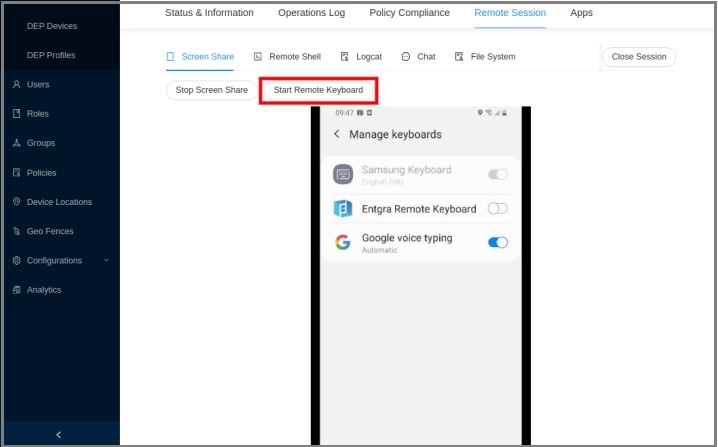
-
Once you enable that you have to choose the keyboard from the notification bar.
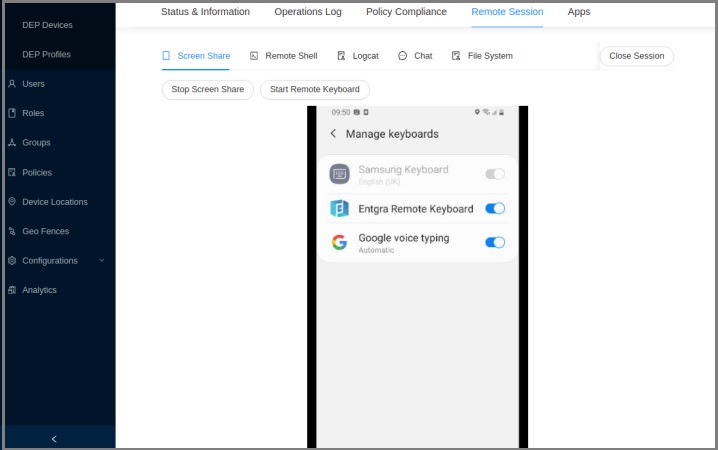

-
After that you can give the inputs from your hardware keyboard.
Android Device Information
This section explains about the Device Infomation which can be seen in an Android Device.
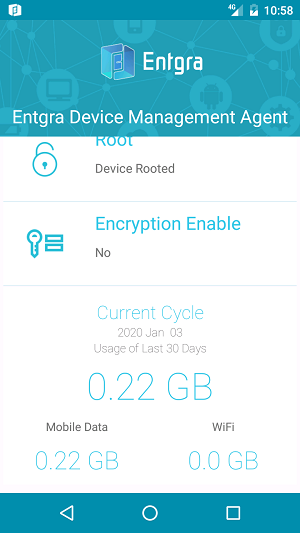
Android Data Usage
This feature enables the measure of data usage of the devices over the last 30 days. It distinctly measures the usage of Mobile data and WiFi separately. The users can view this under the Device Information of the Agent.
 .
.
Android Enterprise Guide
What is Android Enterprise?
Android enterprise allows EMMs to integrate with Google Play and make the enrollment and management of your mobile devices and apps much easier. Android enterprise offers some unique enrollment flows which allows enterprises to gain full control over devices using Fully Managed and Dedicated Device enrollments.
Configure Android Enterprise
Before you start using the capabilities of Android enterprise, there is a configuration step that enables Entgra to connect to Google Enterprise. This step will allow Entgra to manage your device uniquely to your enterprise. In more technical terms, Entgra requires a special token to talk to Google APIs (known as ESA) and a unique enterprise ID to identify your organisation and its devices and apps uniquely.
The steps below will enable you to get these tokens:
Before we begin
-
Get an access token from Entgra. This token provided by Entgra is only valid for a period of 1 hour. Therefore, please make sure to mention the time that you are planning to perform these steps. This is a token that gives you access to start the onboarding process which will allow you to register a new enterprise ID and a token from Google known as ESA.
a. If you are using Entgra EMM cloud, create a new ticket in the support system with the following title Requesting a token for Android Enterprise Onboarding. In the description, please mention the time window you are planning to perform the onboarding steps. Example: We are planning to configure at 9AM EST on 24/02/2021.
b. If you are using the on-premises version, please send an email to biz-dev@entgra.io with the following subject Requesting a token for Android enterprise onboarding. In the body, please mention the time window you are planning to perform the onboarding steps. Example: We are planning to configure at 9AM EST on 24/02/2021.
-
You will need a Google account which is dedicated to EMM related work. We recommend creating a new Google account (a free account). Please keep this account details securely as this will be having administrative rights over your enterprise account.
-
If you have any other Google accounts you have signed in using your browser, please open a private browser window and sign in to your new Google account.
-
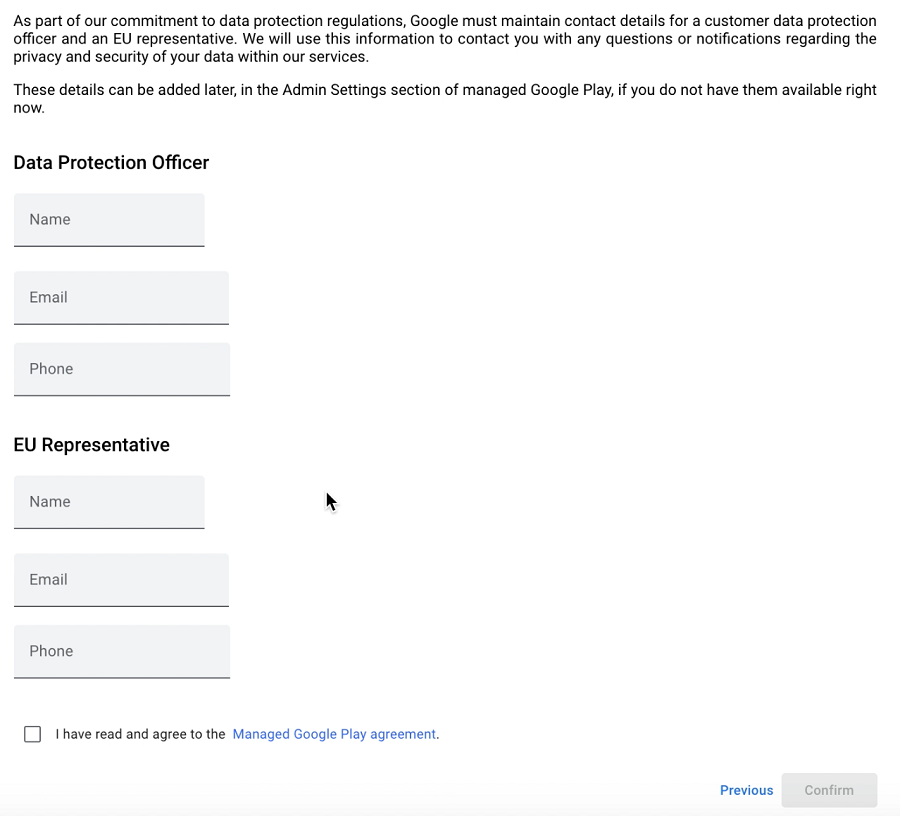
Before you begin, please note that during the onboarding process, you will be prompted to provide your organization name and fill the following form. Filling this form is optional based on your countries regulations such as GDPR. Also note that agreeing to the managed Google Play agreement at the bottom of this form is mandatory. Please review this prior to starting the onboarding process.
Configuration Steps
-
On the endpoint-mgt portal, Go to Android for work configuration section as shown in the bellow image.

-
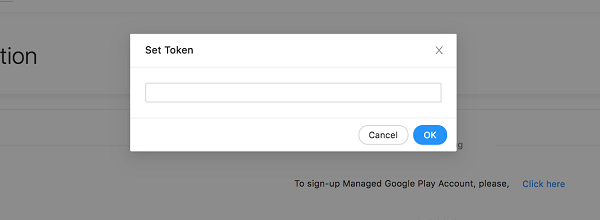
Under EMM initiating section, click here.
-
A popup will be displayed as below. Enter the token you received from Entgra and click OK.
-
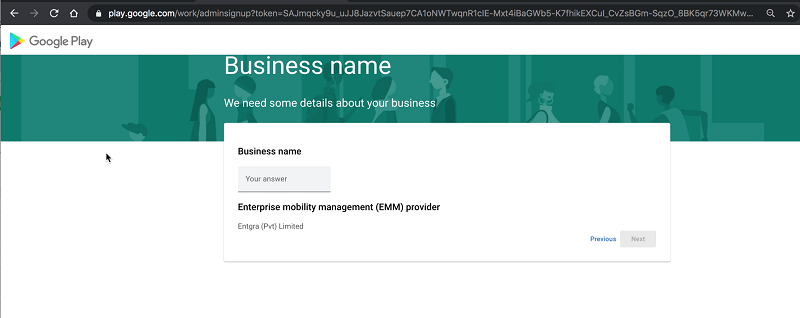
You will be redirected to Google’s Enterprise onboarding page where you are required to provide your organisation name.
-
Fill the form and click Confirm. On the next screen that appears, click Complete registration.

-
You will be redirected to the platform configuration page. Stay on this page until you see the following notification on the top right corner that shows the end of successful completion of configurations.
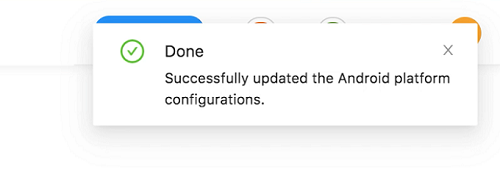
Now the link between Entgra EMM and your new enterprise is established successfully! We have everything we need to start importing applications from Google Play store to the EMM server.
Importing Apps from Google Play Store
Although EMM server can now communicate with Google Play store, we need to define the exact apps that are to be imported to the EMM server. Importing the apps you need to EMM will bring all the icons, screenshots from Google Play Store to the EMM publisher portal, which will enable installing the same on devices. This import process allows you to import public apps on Play Store such as Gmail or facebook to the EMM publisher portal.
Steps
-
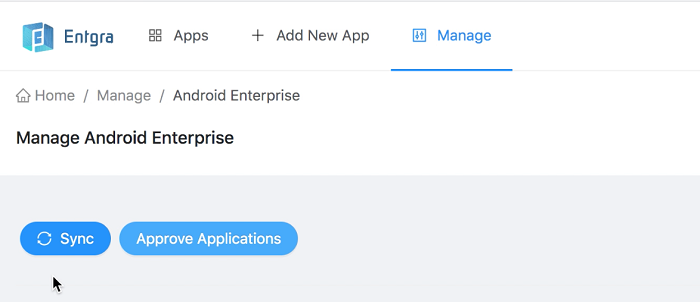
Go to the publisher portal and hover over the Manage menu and click Android Enterprise.
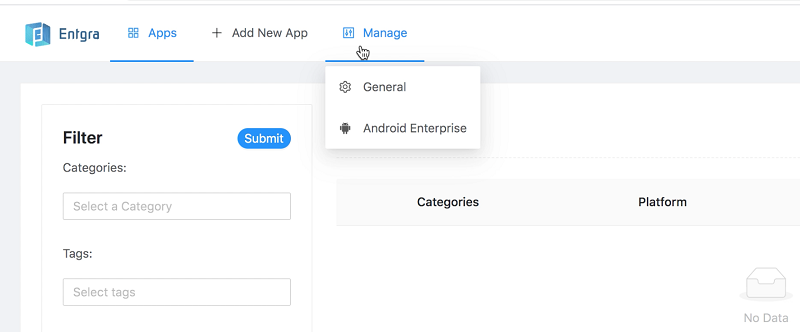
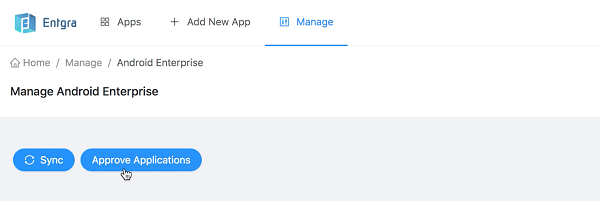
-
Next, click Approve applications.

-
Now you will get a popup with the Google Play store where you can search for any application that you wish to import to the EMM server. Example: Gmail.
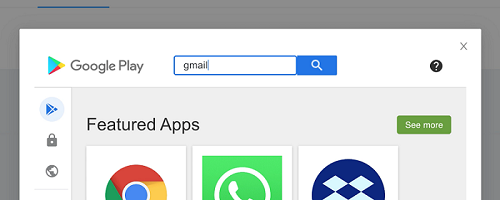
-
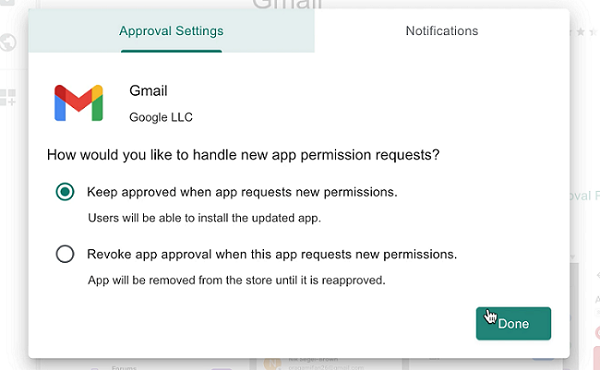
Click Approve and you may need to approve the permissions for this application.
-
Click Done and close the popup windows.
-
Finally, click Sync to fetch all the approved applications to the EMM portal and automatically move them to the published state.
Authorize Devices to Install Apps
With Android enterprise, the EMM server plays a facilitator role or simply a UI where commands can be sent to Google. The actual app installation is done by the Google Play store. Therefore instructions must be given to Google Play store and allow the devices in EMM to be granted permission to install on devices.
There are 2 steps to achieve this:
- Define the Play Store layout
- Define which apps are allowed on which devices
Define the Play Store Layout
As shown in the enrollment using Android enterprise, a device that gets onboarded will get a Google account added to them. This means that there will be a Google Play store access to the specified user via the Play Store app on the device. As part of the authorization process, it is required to define how the apps were allowed to be available on the device and become visible to the user. In other words, we need to define the layout of the Google Play store app that becomes visible to the end user.
There are few parts in the Play Store app layout:
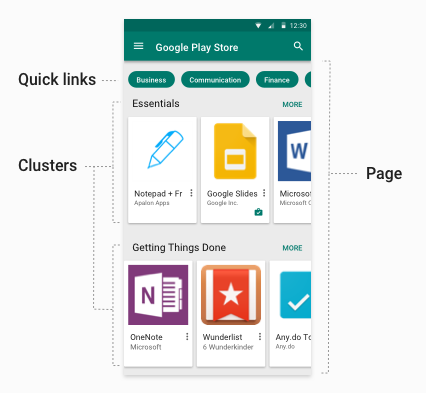
- Page - A Page consists of a set of app clusters. The page is vertically scrollable
- Cluster - A cluster is a group of alls that are categories according to some logical need. Example: Business apps cluster, entertainment apps cluster, etc. A cluster resides in a page and a cluster is horizontally scrollable.
- Quick Links - These appear at the top of every page and these are links to other pages
Create a Page
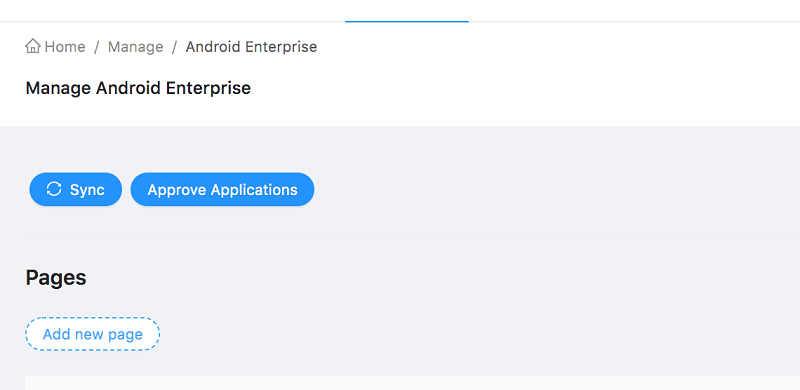
- Go to the publisher portal and hover over Manage menu and click Android Enterprise.
-
Click Add new page.
-
Enter a name for the page and click Create Page.

-
In the pages list, click set as homepage to mark this new page as the first page in the Play Store.

Create a Cluster
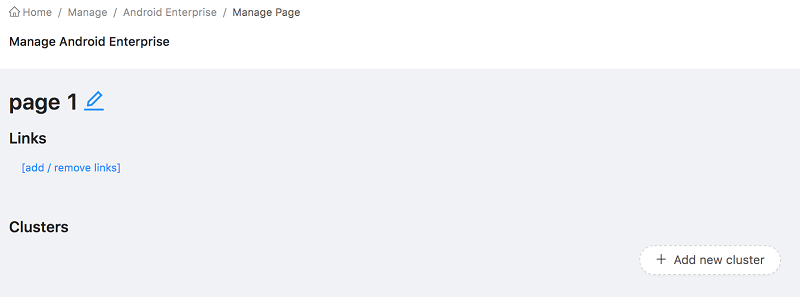
- Selet a page from the list of pages, at the page list created earlier.
-
Click Add new cluster.
-
To name the cluster, click on the edit icon next to text New cluster.
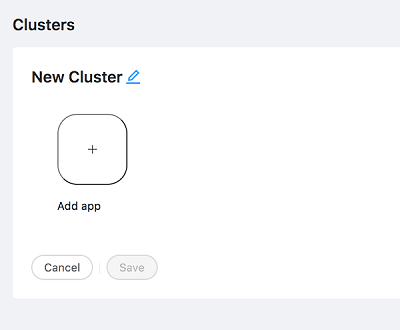
-
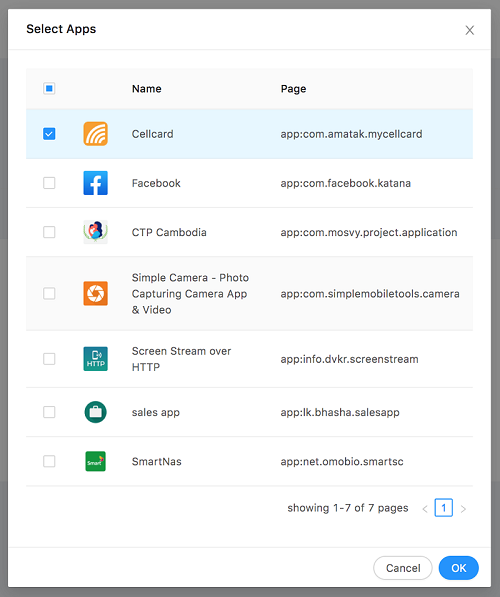
To add an app to the cluster, click Add app and select the app you wish to add from the popup and click OK.
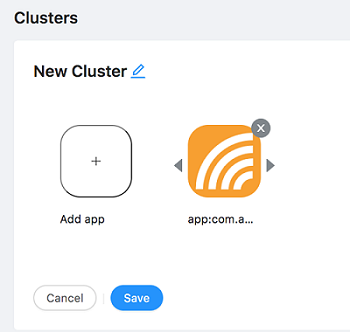
-
Click Save to save the cluster.
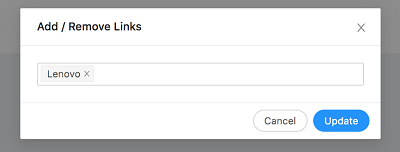
Create/Remove Quick Links
You can link multiple pages together by adding links to a page. Alternatively, follow the same procedure to remove already existing links from pages.
- Click on a page from the page list, that was created in the Create a Page step.
-
Click Add/remove links.
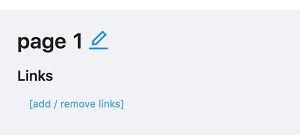
-
From the pop-up, add or remove pages to create/remove links and click Update.
Defining Permissible Apps Devices
When installing an app, it can be installed to the device groups, roles or users in the EMM server. At the same time, there are different properties such as whether to install the application while the device is plugged in to charging, whether to auto install app if the user tries to remove, etc. These properties need to be defined per user/group/role for better management. To achieve this, the process of defining the properties has been added to a policy.
-
Create new policy or edit an existing policy and go to Enrollment Application Install Policy.
-
Select the checkbox next to any app that you wish to make available to the assignees of this policy (devices in group/role/user).
-
Select the Add configurations checkbox and fill the form.
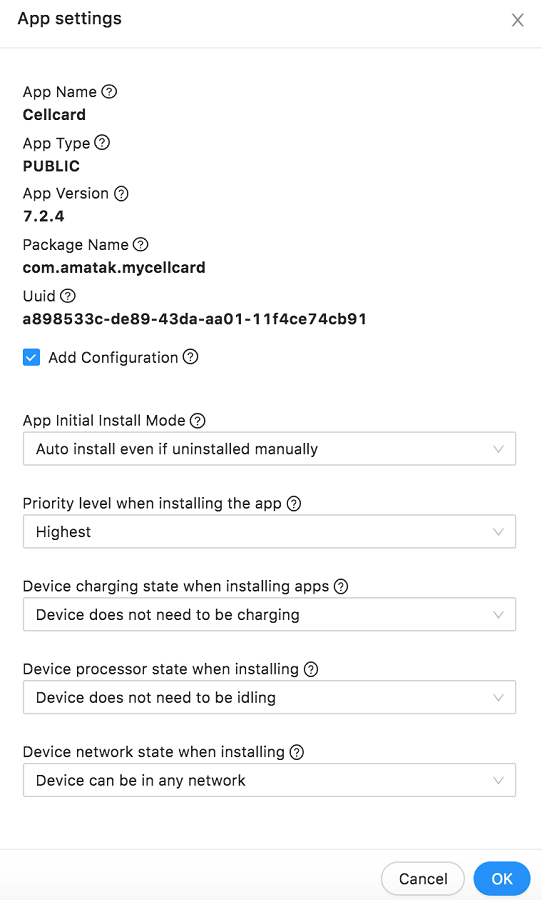
Per App Configuration Form Explanation
Per App Configuration Form Explanation
Input Field Dropdown Option Details App Initial Install Mode Auto install once only when enrolling Do not install automatically Auto install even if uninstalled manually Priority level when installing the app Highest to Lowest When there are multiple apps defined in the policy to be installed, the priority defined here will be used by playstore to determine which app to install first. Highest priority means the first to install. Device charging state when installing apps Device must be charging The app will not be installed until the device is connected to a charger Device does not need to be charging App will be installed regardless of the charging conditions of the device. However, please note on low power conditions, the device may behave based on the vendors preferences. Device processor state when installing Device does not need to be idling Install the application without considering the status of the device’s active state. i.e device does not need to be in the idle mode to start installation. Device must be idling Device network state when installing Device can be in any network App will be installed even if the device is on mobile data or even the network is marked metered. Device must be in an unmetered network Only install apps if the device is connected to WiFi Global Configurations for All Apps
Global Configurations for All Apps
There are 2 fields at the bottom of the Enrollment App Install policy which applies to all Android Enterprise enrolled devices that are configured via this policy. Given below is a description of those fields:
Input Field Dropdown Option Details App Auto Update Policy When connected to WiFi Any updates to applications in the device can begin only on WiFi Auto Update Anytime Any updates to applications in the device can begin at anytime Ask User To Update Any updates to applications in the device will only begin when the user agrees to update Disable Auto Update Disable updates to applications. Users need to go to the playstore and manually update applications. App Availability to a User All Approved Apps For Enterprise Any app that has been imported to the EMM server via the Import apps from Google playstore step is available for the user of the device to install manually. All Apps From Play store Users are free to instal any application from the playstore. Only Allow listed Apps User can only install apps that are specifically allowed by filling the Per app configuration form above and applied via a policy. -
Click OK save and apply the policy to required devices.
Onboarding Devices
There are 2 ways to onboard a new device / a factory resetted device:
- Device enrollment with AFW identifier
- Enroll a device with QR code
If you have enrolled a device already using COPE mode, it is possible to still add a Google account and migrate the device to Fully Managed enrollment format. (Refer - Onboard already enrolled COPE devices)
Device Enrollment with AFW Identifier
Technical explanation on the enrollment method
You may skip this section if you wish to proceed straight with enrolling using the AFW method.
AFW based enrollment works by the device connecting to the Google Play store and downloading the Entgra agent application.
Given below is a rough explanation on the steps that happen.
Prerequisites
Factory reset a device and type in the Wifi credentials to join a network and be at the screen where you are prompted to enter Google account username.
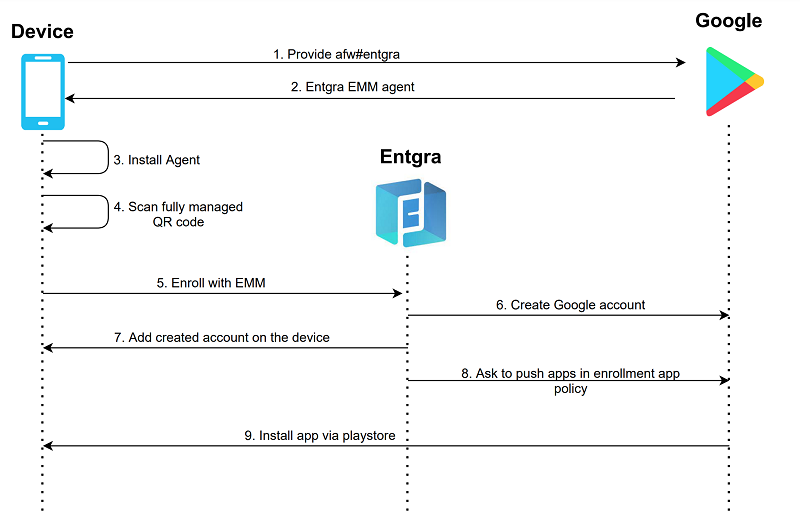
Steps
- User enters the special value
afw#entgraand try to add a Google account. Device connects to Google backend and checks the EMM provider identifid by the IDafw#entgra. - Google play will push the EMM agent of Entgra to the device.
- Agent gets installed and opened automatically.
- User needs to go to the QR scanning step as shown in the video and scan a QR code of type Fully managed.
- Entgra agent begins the enrollment.
- As part of the enrollment process, Entgra connects to Google play and creates a Google account on behalf of the device.
- Agent will add the new Google account with the help of Google play services.
- Agent will connect to EMM to check for policies. If there is a specified Enrollment app install policy for this user, the allowed apps will be picked and the EMM agent will provoke play store to install any required application based on the policy.
- Google will push apps to the device based on the policy given by the EMM agent.
AFW (Android for work) identifier is a special identifier used by Google to identify the EMM providers uniquely. Entgra’s identifier is afw#entgra.
Enroll a Device with QR Code
Instead of using the AFW base enrollment, it is possible to use the standard COPE enrollment. However, note that when generating a QR code, it is required to select Fully Managed instead of COPE. The rest of the steps are identical to the standard QR based COPE enrollment.
Enrollment Video
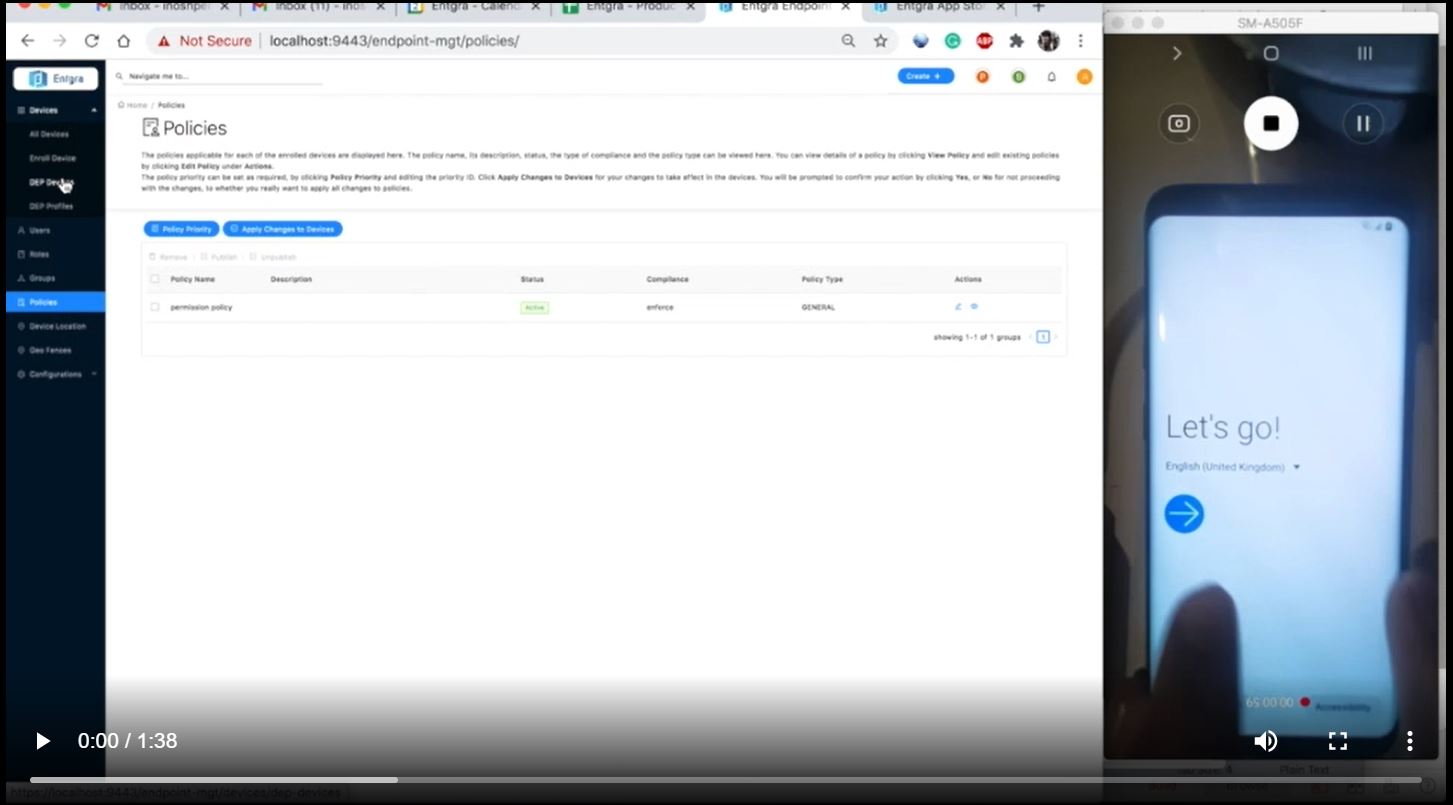
Onboard Already Enrolled COPE Devices
If you have a device that is already onboarded as a COPE device, this device can be converted to a Fully managed device that works with Android enterprise.
- Go to the device that you need onboard as a fully managed device.
-
Click Create Account and click OK.
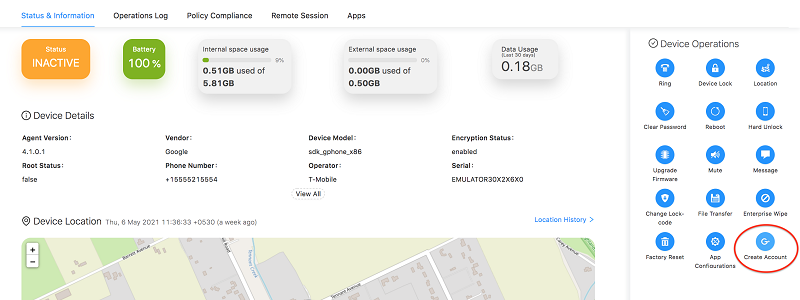
Account creation will take a few minutes.