Enrollment Guide
The Enrollment guide is split into four main sections, taking you through different types of enrollments available for Android, iOs, macOS and Windows devices.
Different device types support different ways of enrollment with the server depending on the features that are required to be supported. Different features supported by enrollment types are described in the features section.
Detailed explanations and procedures for enrollment are given under each of the following device categories:
Enroll Android Devices
This section describes the types of enrollment available for Android Devices and how to enroll an Android device. The available enrollment types are:
- Bring Your Own Device (BYOD)
- Corporately-Owned Personally-Enabled (COPE)
- Dedicated Device Enrollment (COSU/KIOSK)
- Google Work Profile
- Fully Managed
Note
- Before enrolling, make sure to set up Android Platform Configurations in the Configurations section.
- Install the Entgra Android Device Management Agent. Note that this step is only necessary for enrollment modes other than QR enrollment after a factory reset.
Install Entgra Android Device Management Agent
Android devices are enrolled and managed using an application that is installed on the device, known as the Device Management Agent App. The Entgra Agent app can be installed by downloading it directly either from the Entgra UEM server or via the Play Store, as described below.
Download from Entgra UEM server
There is an agent app bundled with the UEM server that can be downloaded to your mobile device and installed.
Prerequisites
- The server has to be downloaded and started.
- Must have been logged on to the server's Endpoint Management Portal.
Steps
- Go to the Enroll Device section.
- Select Android under device types.
- Scan the QR code using the Android device. (New Android OS versions include the QR code scanning app in-built. If this is not available, a QR code scanning app can be downloaded from the Play Store)
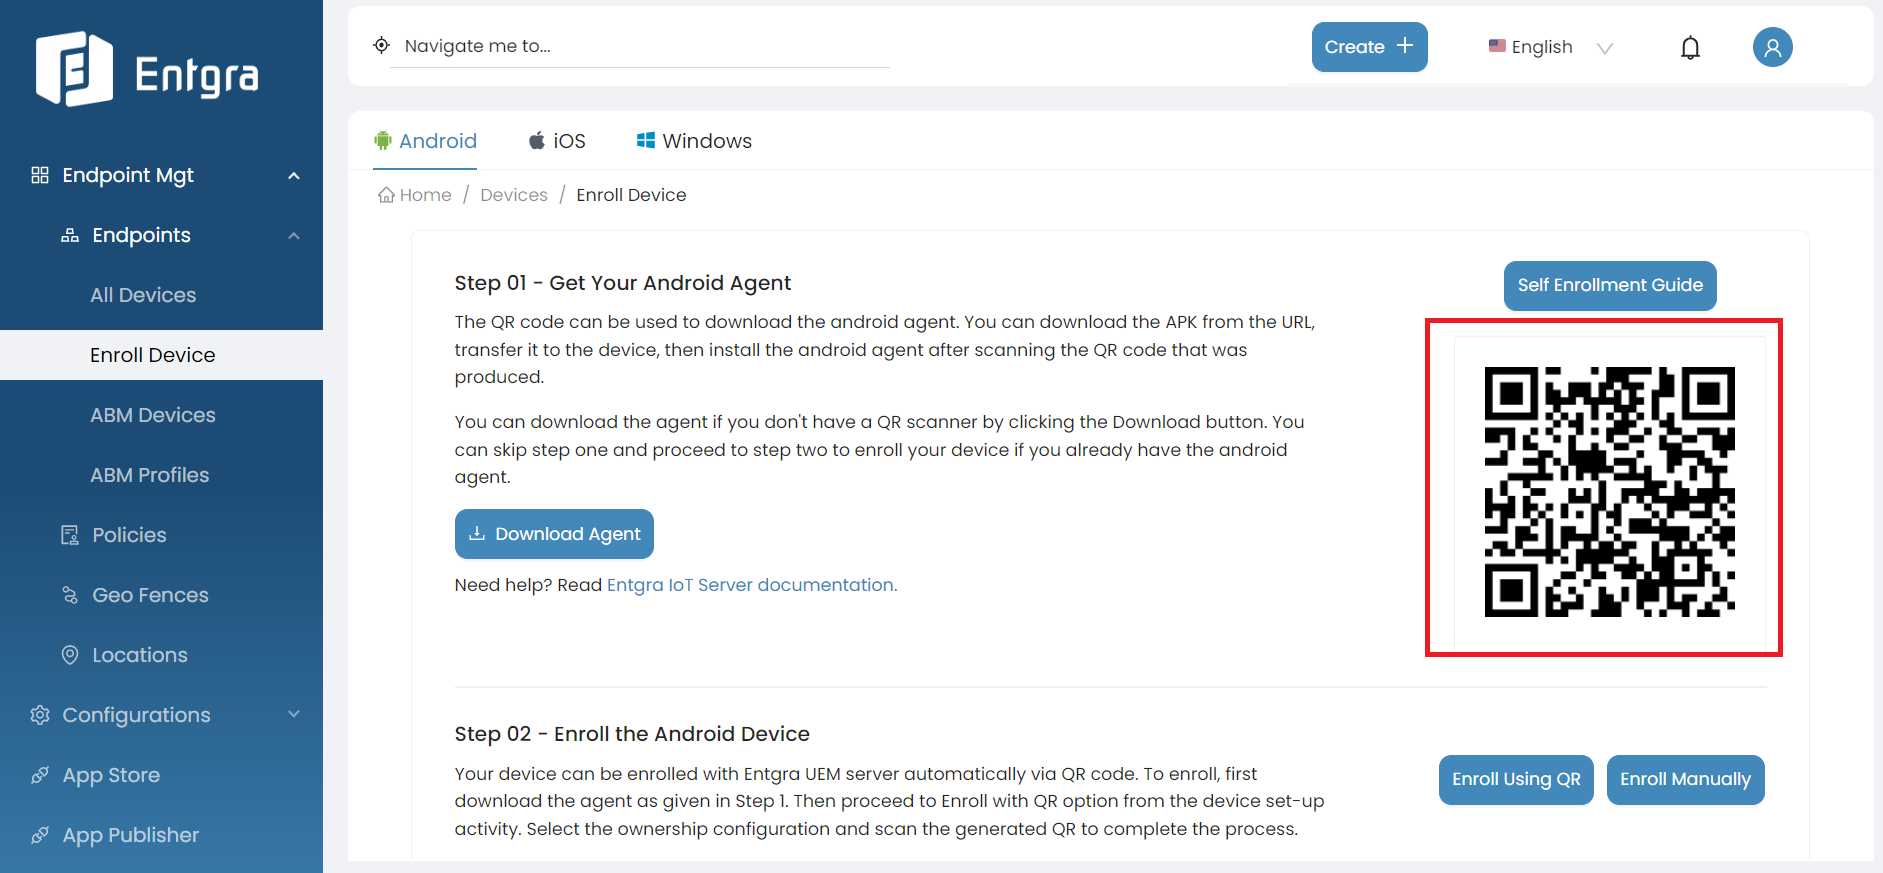
- Follow the QR code scanned link to download the agent to the device.
Alternatively, this page can be accessed via the mobile device browser itself
- Follow steps 1-2 on the phone’s browser.
- Click on Download Agent to download the APK to the device.
- Once the app is downloaded, click Open.
- Depending on the OS version of the device, unknown sources has to be enabled to install the agent. In Android 8 and upwards, once you click Open, the following screen will be displayed. Select Allow from this source and go back.
- Click Install to install the agent.
Download from the Playstore
Visit the link https://play.google.com/store/apps/details?id=io.entgra.iot.agent using your mobile device or go to the Google Play Store app on the mobile device and search for Entgra Device Management Agent and install the app.
Android Enrollment Configurations
Android Platform Configurations
Please follow the Configurations section for setting up Android Platform Configurations.
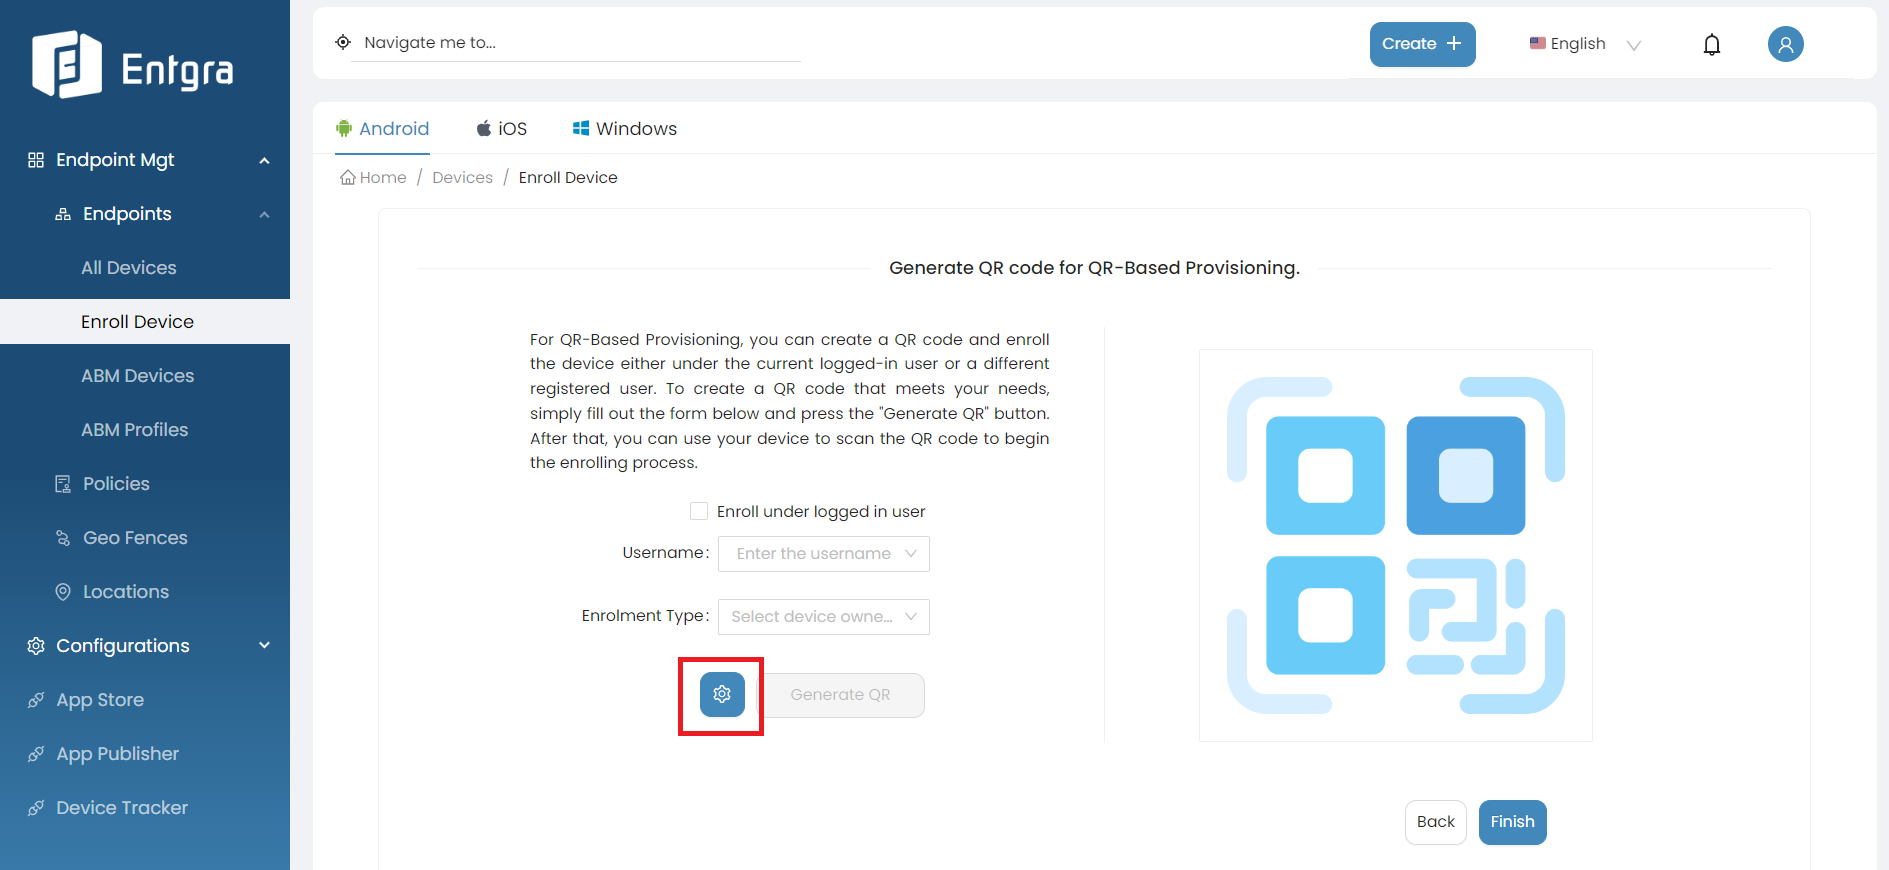
QR Configurations
- Go to the Enroll Device section.
- Select Android under device types.
-
Select Enroll Using QR under the step 2.
-
Click the Settings icon.
-
You can set up following configurations before generating the QR code.
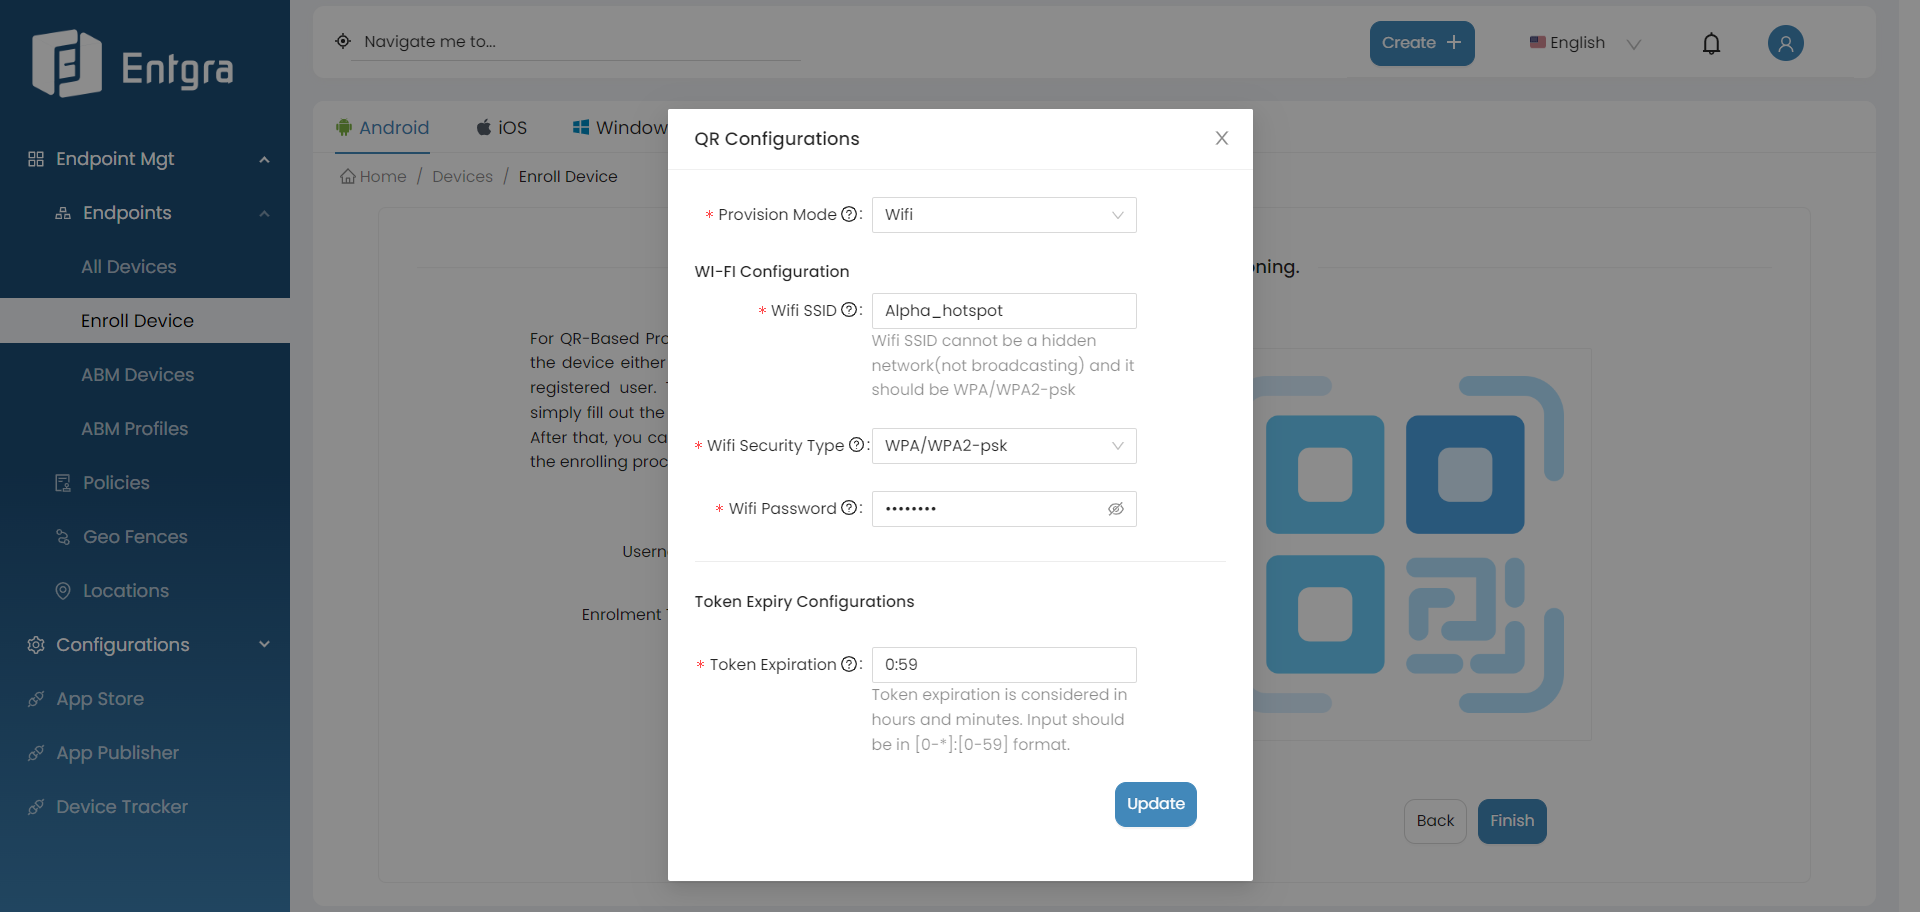
Key Description Provision Mode Define the device's connectivity mode to use during enrollment. You can select either 'Wi-Fi' to connect to a Wi-Fi network or 'Mobile' to use a mobile data connection for enrolling the device. (Please note that the mobile data connection option is available only for Android devices running version 13 and above. Do not use this option for devices running Android versions below 13) Wifi SSID Wifi SSID cannot be a hidden network(not broadcasting) Wifi Security Type Wi-Fi security type of network should be WPA/WPA2-psk Wifi Password Password of the Wi-Fi network Token Expiration Customize how long the QR codes remain valid. Token expiration is considered in hours and minutes. Input should be in [0-*]:[0-59] format. (Example: 3 hours and 5 minutes should be written as 3:05)
BYOD Enrollment
BYOD Enrollment AKA Legacy enrollment allows you to manage settings and apps on the device. This type of enrollment offers wider control over the device allowing features such as the ones indicated below:
-
Factory Reset Protection (FRP) - for managing devices and for recovering in the event of employee leaving.
-
Reset device passwords - secure this feature on encrypted devices. Block removal of the device administrator.
-
Admin controlled passcodes - that enable locking the user out of a device.
Available enrollment modes for BYOD enrollment:
BYOD Manual Enrollment
Prerequisites
- The server has to be downloaded and started.
- Must have been logged on to the server's Endpoint Management Portal.
- Install Entgra Android Agent on your android device.
- Optionally, Basic Concepts of Android Device Management will be beneficial as well.
Steps
- Open the Entgra Agent application on your android device.
- Click Continue after reading the Disclaimer that appears.
- Click on Manual Enrollment.
- On the next screen that appears next, click BYOD Enrollment.
- Click Skip And Go To Enrollment on the screen that appears next.
- Type in the server address which is the IP of the server and port as
8280. If you are using Entgra Cloud, type cloud server address here. Click Start Registration. - Type in the Username:
admin, Password:adminthen click Sign In. If you are an Entgra Cloud user, please do add your organization(tenant) name as well. - If you agree to the policy agreement that is shown next, click Agree to proceed.
- Click Activate on the device screen to enable Entgra Device Management Agent as a device admin app.
- Click Allow if you agree to the request for permissions for access to the device as indicated.
- Click Allow if you agree to use data usage monitoring to allow the server to check the data usage of the device.
- Allow the agent to change Do not Disturb status which is used to ring the device.
- Enter and confirm a PIN code, which is required by the administrator to perform any critical tasks with user consent. Then click Set PIN Code to complete the enrollment.
- Click Allow to enable Entgra IoT Remote Touch.
BYOD Enrollment Using QR Code
Prerequisites
- The server has to be downloaded and started.
- Must have been logged on to the server's Endpoint Management Portal.
- Install Entgra Android Agent on your android device.
- Optionally, Basic Concepts of Android Device Management will be beneficial as well.
Steps
Generate QR Code
- Go to Enroll Device section on Endpoint Management Portal.
- Select Android.
- Click Enroll Using QR.
- Add Username and select device ownership as BYOD.
- Click Generate QR Code.
Enroll Device as BYOD
- Open the Entgra Agent application on the Android mobile device.
- Click Continue after reading the Disclaimer that appears.
- In the screen that follows, click Enroll with QR Code.
- Scan QR code that is generated on the server.
- If you agree to the policy agreement that is shown next, click Agree to proceed.
- Click Activate on the device screen to enable Entgra Device Management Agent as a device admin app..
- Click Allow if you agree to the request for permissions for access to the device as indicated.
- Click Allow if you agree to using data usage monitoring to allow the server to check the data usage of the device.
- Allow the agent to change Do not Disturb status which is used to ring the device.
- Enter and confirm a PIN code, which is required by the administrator to perform any critical tasks with user consent. Then click Set PIN Code to complete the enrollment.
- Click Allow to enable Entgra IoT Remote Touch.
COPE Enrollment
COPE (corporately-owned personally-enabled) enrollment is ideal for devices where the organization gives out devices for its employees. With granular control over device data and security, and access to Android’s full suite of app management features, this type of enrollment offers comprehensive device management capabilities.
Some of the available features include setting the minimum password requirements on the device, ability to remotely wipe and lock the device, and setting up default responses to app permission requests. It is also possible to remotely install and/or remove apps with this type of enrollment.
Available enrollment modes for COPE enrollment:
COPE Manual Enrollment
Prerequisites
- The server has to be downloaded and started.
- Must have been logged on to the server's Endpoint Management Portal.
- Install ADB on your machine and enable USB Debugging on your Android device.
- Install Entgra Android Agent on your android device.
- Follow the Configurations section to set up necessary Android platform configurations.
- Optionally, Basic Concepts of Android Device Management will be beneficial as well.
Steps
Enable Device Owner
- The enrollment will be on hold until user enables the device owner. Enter the following command in the terminal or on the console to enable device owner.
Important
To execute ADB commands, first need to install ADB on your machine. To install ADB and enable USB debugging on your android device, please follow this documentation.
Enroll Device Manually
- Open the Entgra Agent application on your Android device.
- Click Continue after reading the Disclaimer that appears.
- On the next screen that appears next, click Manual Enrollment.
- Next, click COPE Enrollment in the screen that appears.
- Type in the server address which is the IP of the server and port as
8280. If you are using Entgra Cloud, type cloud server address here. Click Start Registration. - Type in the Username:
admin, Password:adminthen click Sign In. If you are an Entgra Cloud user, please do add your organization(tenant) name as well. - Click Allow if you agree to the request for permissions for access to the device as indicated.
- Click Allow if you agree to using data usage monitoring to allow the server to check the data usage of the device.
- Allow the agent to change Do not Disturb status which is used to ring the device.
- Click Allow to enable Entgra IoT Remote Touch.
COPE Enrollment Using QR Code (With Agent)
Prerequisites
- The server has to be downloaded and started.
- Must have been logged on to the server's Endpoint Management Portal.
- Install ADB on your machine and enable USB Debugging on your Android device.
- Install Entgra Android Agent on your android device. You can also install the Android Agent app using necessary adb commands. Example:
adb install filename.apk (adb install android-agent.apk) - Follow the Configurations section to set up necessary Android platform configurations.
- Optionally, Basic Concepts of Android Device Management will be beneficial as well.
Steps
Generate QR Code
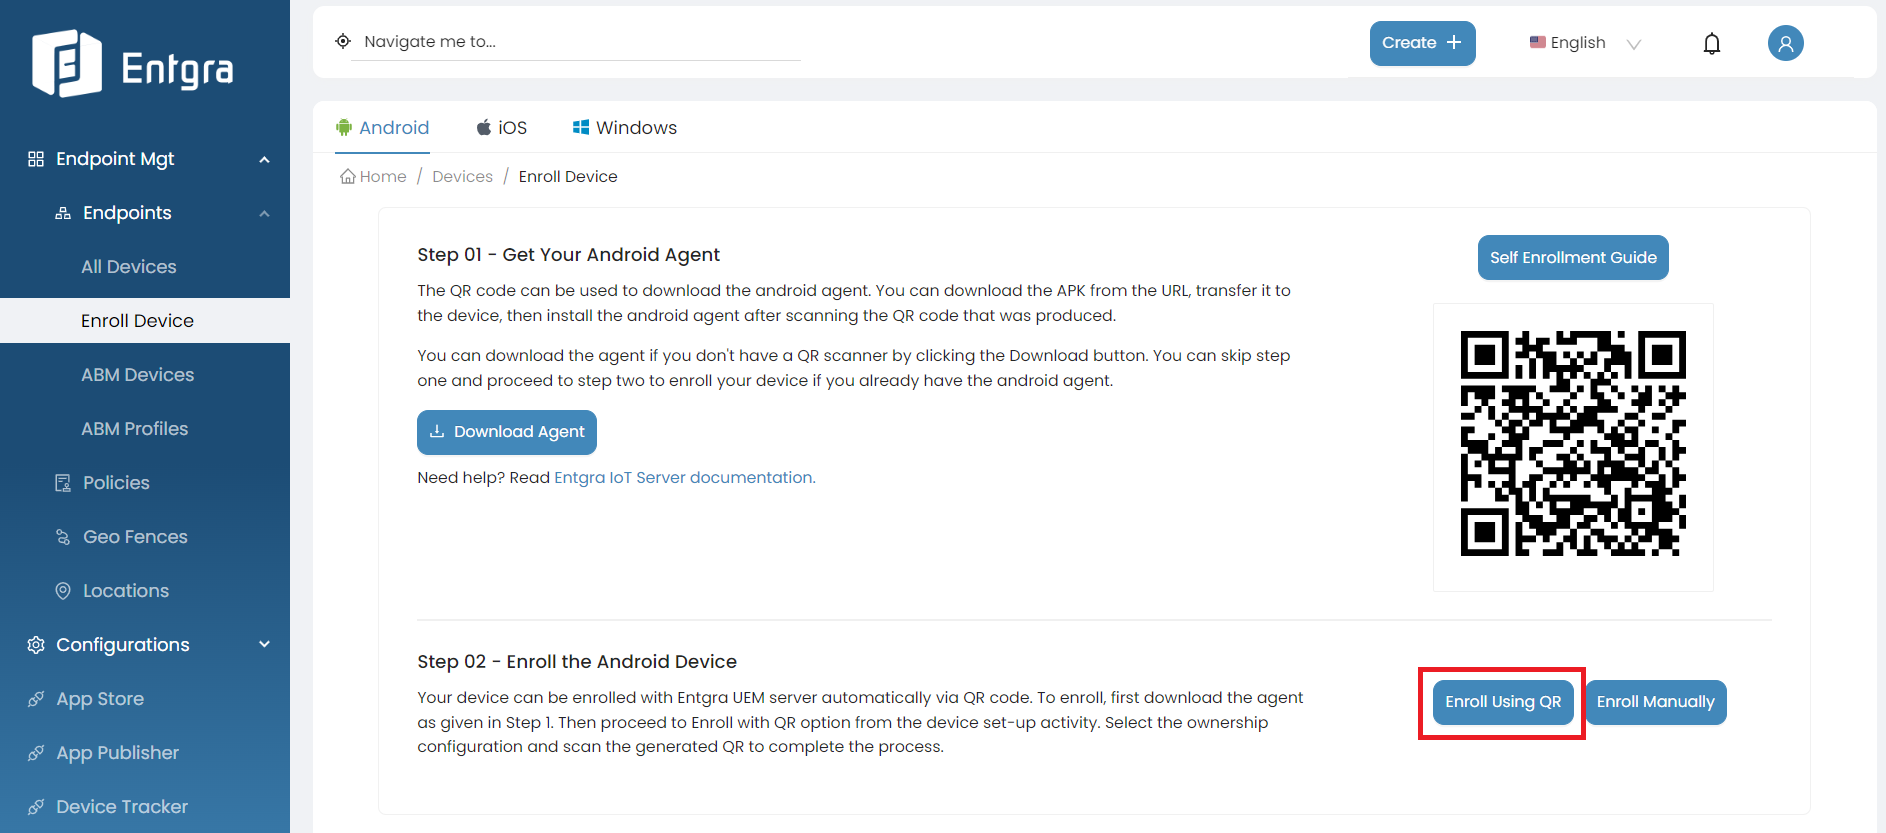
- Go to Enroll Device section on Endpoint Management Portal.
- Select Android.
- Click Enroll Using QR.
- Add Username and select device ownership as COPE.
- Click Generate QR Code.
Scan QR Code
- Open the Entgra Agent application on the Android mobile device.
- Click Continue after reading the Disclaimer that appears.
- In the screen that follows, click Enroll with QR Code.
- Scan QR code that is generated on the server.
Enable Device Owner
The enrollment will be on hold until user enables the device owner. To enable device owner, you need to turn on USB Debugging on your Android device. Also need to install ADB on your machine.
- After enabling USB debugging and install ADB to your machine successfully, Enter the following command in the terminal or on the console to enable device owner.
Important
To execute ADB commands, first need to install ADB on your machine. To install ADB and enable USB debugging on your android device, please follow this documentation.
Grant Permissions
- Click Allow if you agree to the request for permissions for access to the device as indicated.
- Click Allow if you agree to using data usage monitoring to allow the server to check the data usage of the device.
- Allow the agent to change Do not Disturb status which is used to ring the device.
- Click Allow to enable Entgra IoT Remote Touch.
COPE Enrollment Using QR Code After Factory Reset (Without Agent)
Prerequisites
- The server has to be downloaded and started.
- Must have been logged on to the server's Endpoint Management Portal.
- Follow the Configurations section to set up necessary Android platform configurations.
- Optionally, Basic Concepts of Android Device Management will be beneficial as well.
Steps
Generate QR Code
- Go to Enroll Device section on Endpoint Management Portal.
- Select Android.
- Click Enroll Using QR.
- Add Username and select device ownership as COPE.
- Click Settings icon to configure WIFI.
- Click Generate QR Code.
Enroll Device
- After switching on your new or factory resetted android device, tap the screen 7 times.
- It will turn on your device camera to scan the QR code.
- Follow the on-screen instructions to complete the enrollment process.
- Click Allow if you agree to the request for permissions for access to the device as indicated.
- Click Allow if you agree to using data usage monitoring to allow the server to check the data usage of the device.
- Allow the agent to change Do not Disturb status which is used to ring the device.
- Click Allow to enable Entgra IoT Remote Touch.
Dedicated Device Enrollment (COSU/KIOSK)
The Dedicated type of Android Device Enrollment, also known as COSU (Corporately-Owned Single-Use) or KIOSK, is widely used with fully managed devices that serve a specific purpose. Examples of this type of usage include employee-facing device usage such as inventory management, field service management, transport, and logistics as well as customer-facing device usage like kiosks, digital signage, hospitality check-in, etc.
Some of the significant features of Dedicated devices are:
- Lock down devices to specific whitelisted apps
- Block users from escaping locked-down devices to enable other actions.
- Set lock screen restrictions
- Device sharing between multiple users (such as shift workers or public-kiosk users)
- Suspend over-the-air (OTA) system updates over critical periods by freezing the OS version.
- Remotely wipe and lock work data
- Automatic compliance enforcement
- Lock app(s) to screen
- Automatic compliance enforcement
- Distribute apps silently
Available enrollment modes for KIOSK enrollment:
KIOSK Enrollment Using QR Code (With Agent)
Prerequisites
- The server has to be downloaded and started.
- Must have been logged on to the server's Endpoint Management Portal.
- Install ADB on your machine and enable USB Debugging on your Android device.
- Install Entgra Android Agent on your android device. (You can also install the Android Agent app using necessary adb commands.Example:
adb install filename.apk (adb install android-agent.apk)) - Follow the Configurations section to set up necessary Android platform configurations.
- Optionally, Basic Concepts of Android Device Management will be beneficial as well.
Steps
Generate QR Code
- Go to Enroll Device section on Endpoint Management Portal.
- Select Android.
- Click Enroll Using QR.
- Add Username and select device ownership as COSU (KIOSK).
- Click Generate QR Code.
Scan QR Code
- Open the Entgra Agent application on the Android mobile device.
- Click Continue after reading the Disclaimer that appears.
- In the screen that follows, click Enroll with QR Code.
- Scan QR code that is generated on the server.
Enable Device Owner
The COSU(KIOSK) enrollment will be on hold until user enables the device owner. To enable device owner, you need to turn on USB Debugging on your Android device. Also need to install ADB on your machine.
- After enabling USB debugging and install ADB to your machine successfully, Enter the following command in the terminal or on the console to enable device owner.
Important
To execute ADB commands, first need to install ADB on your machine. To install ADB and enable USB debugging on your android device, please follow this documentation.
Grant Permissions
- If you agree to the policy agreement that is shown next, click Agree to proceed.
- Click Allow if you agree to the request for permissions for access to the device as indicated.
- Click Allow if you agree to using data usage monitoring to allow the server to check the data usage of the device.
- Allow the agent to change Do not Disturb status which is used to ring the device.
- Click Allow to enable Entgra IoT Remote Touch.
KIOSK Enrollment Using QR Code After Factory Reset (Without Agent)
Prerequisites
- The server has to be downloaded and started.
- Must have been logged on to the server's Endpoint Management Portal.
- Follow the Configurations section to set up necessary Android platform configurations.
- Optionally, Basic Concepts of Android Device Management will be beneficial as well.
Steps
Generate QR Code
- Go to Enroll Device section on Endpoint Management Portal.
- Select Android.
- Click Enroll Using QR.
- Add Username and select device ownership as COSU (KIOSK).
- Click Settings icon to configure WIFI.
- Click Generate QR Code.
Enroll Device
- After switching on your new or factory resetted android device, tap the screen 7 times.
- It will turn on your device camera to scan the QR code.
- Follow the on-screen instructions to complete the enrollment process.
- Click Allow if you agree to the request for permissions for access to the device as indicated.
- Click Allow if you agree to using data usage monitoring to allow the server to check the data usage of the device.
- Allow the agent to change Do not Disturb status which is used to ring the device.
- Click Allow to enable Entgra IoT Remote Touch.
Android Enterprise Enrollment
Android Enterprise allows EMMs to integrate with Google Play and make the enrollment and management of your mobile devices and apps much easier. Android enterprise offers some unique enrollment flows which allow enterprises to gain full control over devices. Two primary enrollment modes are:
Important
Before process Android Enterprise Enrollments, you must set up Android Enterprise Configurations under Android For Work section in Platform Configurations. Note that this step is necessary for aforementioned Android Enterprise Enrollment types.
Google Work Profile Enrollment
This mode is suitable for a Bring Your Own Device (BYOD) scenario. It creates a separate, secure space on the device known as the "work profile." The work profile keeps work-related apps and data isolated from the user's personal apps and data. Administrators can manage and secure the work profile without affecting the user's personal space.
Google Work Profile QR Enrollment Through Agent
After setting up Android Enterprise Configurations, you can perform a Google Work Profile enrollment via Entgra Android Agent. The enrollment process is almost similar to the BYOD QR Enrollment and it only differs from selecting Google Work Profile instead of BYOD from the ownership types dropdown.
Prerequisites
- The server has to be downloaded and started.
- Must have been logged on to the server's Endpoint Management Portal.
- Set up Android Enterprise Configurations
- Install Entgra Android Agent on your android device.
- Optionally, Basic Concepts of Android Device Management will be beneficial as well.
Steps
Generate QR Code
- Go to Enroll Device section on Endpoint Management Portal.
- Select Android.
- Click Enroll Using QR.
- Add Username and select device ownership as Google Work Profile.
- Click Generate QR Code.
Enroll Device
- Open the Entgra Agent application on the Android mobile device.
- Click Continue after reading the Disclaimer that appears.
- In the screen that follows, click Enroll with QR Code.
- Scan QR code that is generated on the server.
- If you agree to the policy agreement that is shown next, click Agree to proceed.
- Click Activate on the device screen to enable Entgra Device Management Agent as a device admin app..
- Click Allow if you agree to the request for permissions for access to the device as indicated.
- Click Allow if you agree to using data usage monitoring to allow the server to check the data usage of the device.
- Allow the agent to change Do not Disturb status which is used to ring the device.
- Enter and confirm a PIN code, which is required by the administrator to perform any critical tasks with user consent. Then click Set PIN Code to complete the enrollment.
- Click Allow to enable Entgra IoT Remote Touch.
Fully Managed Enrollment
Fully Managed type of enrollment is ideal for COPE (corporately-owned personally-enabled) devices where the organization gives out devices for its employees. With granular control over device data and security, and access to Android’s full suite of app management features, this type of enrollment offers comprehensive device management capabilities.
Some of the available features include setting the minimum password requirements on the device, ability to remotely wipe and lock the device, and setting up default responses to app permission requests. It is also possible to remotely install and/or remove apps with this type of enrollment.
Available enrollment modes for Fully Managed enrollment:
- Fully Managed QR through agent
- Fully Managed QR after factory reset
- Onboard Already Enrolled COPE Devices as Fully Managed
Fully Managed Enrollment Using QR Code (With Agent)
After setting up Android Enterprise Configurations, you can perform a Fully Managed Enrollment using QR code via Entgra Android Agent.
The enrollment process is almost similar to the COPE QR Enrollment and it only differs from selecting Fully Managed instead of COPE from the ownership types dropdown.
Prerequisites
- The server has to be downloaded and started.
- Must have been logged on to the server's Endpoint Management Portal.
- Install ADB on your machine and enable USB Debugging on your Android device.
- Install Entgra Android Agent on your android device. (You can also install the Android Agent app using necessary adb commands.Example:
adb install filename.apk (adb install android-agent.apk)) - Follow the Configurations section to set up necessary Android platform configurations.
- Optionally, Basic Concepts of Android Device Management will be beneficial as well.
Steps
Generate QR Code
- Go to Enroll Device section on Endpoint Management Portal.
- Select Android.
- Click Enroll Using QR.
- Add Username and select device ownership as Fully Managed.
- Click Generate QR Code.
Scan QR Code
- Open the Entgra Agent application on the Android mobile device.
- Click Continue after reading the Disclaimer that appears.
- In the screen that follows, click Enroll with QR Code.
- Scan QR code that is generated on the server.
Enable Device Owner
The Fully Managed enrollment will be on hold until user enables the device owner. To enable device owner, you need to turn on USB Debugging on your Android device. Also need to install ADB on your machine.
- After enabling USB debugging and install ADB to your machine successfully, Enter the following command in the terminal or on the console to enable device owner.
Important
To execute ADB commands, first need to install ADB on your machine. To install ADB and enable USB debugging on your android device, please follow this documentation.
Grant Permissions
- Click Agree in the screen that appears, if you agree to and accept the licence.
- Click Allow if you agree to the request for permissions for access to the device as indicated.
- Click Allow if you agree to using data usage monitoring to allow the server to check the data usage of the device.
- Allow the agent to change Do not Disturb status which is used to ring the device.
- Click Allow to enable Entgra IoT Remote Touch.
Fully Managed Enrollment Using QR Code After Factory Reset (Without Agent)
The enrollment process is almost similar to the COPE QR Enrollment After Factore Reset and it only differs from selecting Fully Managed instead of COPE from the ownership types dropdown.
Prerequisites
- The server has to be downloaded and started.
- Must have been logged on to the server's Endpoint Management Portal.
- Follow the Configurations section to set up necessary Android platform configurations.
- Optionally, Basic Concepts of Android Device Management will be beneficial as well.
Steps
Generate QR Code
- Go to Enroll Device section on Endpoint Management Portal.
- Select Android.
- Click Enroll Using QR.
- Add Username and select device ownership as Fully Managed.
- Click Settings icon to configure WIFI.
- Click Generate QR Code.
Enroll Device
- After switching on your new or factory resetted android device, tap the screen 7 times.
- It will turn on your device camera to scan the QR code.
- Follow the on-screen instructions to complete the enrollment process.
- Click Allow if you agree to the request for permissions for access to the device as indicated.
- Click Allow if you agree to using data usage monitoring to allow the server to check the data usage of the device.
- Allow the agent to change Do not Disturb status which is used to ring the device.
- Click Allow to enable Entgra IoT Remote Touch.
Onboard Already Enrolled COPE Devices as Fully Managed
If you have a device that is already onboarded as a COPE device, this device can be converted to a Fully managed device that works with Android enterprise.
- Go to the device that you need onboard as a fully managed device.
-
Click Create Account and click OK.
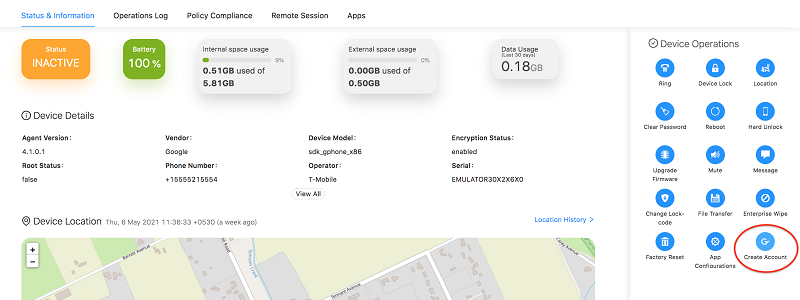
Account creation will take a few minutes.
Enroll iOS
This section describes how an iOS device can be enrolled to the UEM server. Before moving into iOS device enrollment it would be beneficial to understand the basic concepts of iOS related MDM concepts.
Prerequisites
- Prior to enrolling an iOS device, there are some configurations that need to be done on the server.
- If you have not requested for iOS plugin before, please contact Entgra to get a copy. If macOS support is needed in the plugin, please mention this in the description.(Although iOS is a supported device type of Entgra UEM server, by default it is not bundled with the server.)
- As mentioned in system requirements, maven is needed to install the plugin.
Install iOS plugin
iOS device plugin is not bundled with the server as out-of-the-box and as mentioned in prerequisites, it has to be requested from Entgra. A zip file containing the installable will be sent by Entgra and this can be installed with Maven.
Steps
- Copy the iOS plugin zip mentioned in the prerequisites to
IOT_HOMEfolder and extract. - Using command prompt, goto
IOT_HOME/ios-feature-deployer/folder. - Execute the following command mvn clean install
-f ios-feature-deployer.xml. - When the following question is asked Do you agree? (y,n) Type y and Enter to agree. Else, n to abort.
Run iOS Configurator
iOS configurator is a script designed to cut down certain manual configurations related to iOS.
Steps
- Using command prompt, goto IOT_HOME/ios-configurator/ folder
- Press Enter key to provide the default value and provide the following mandatory information with the server machine’s IP address:
- Common Name
- Server address
Customizing the iOS Bundle ID
If the bundle ID for the iOS agent is changed, the following changes have to be applied to the server configurations.
Steps
-
Open
iot-server.shfile inIOT_HOME/binfolder and search for key-Dagent-bundleand add the agent bundle ID as the value. -
Example
-Dagent-bundle=“org.wso2.carbon.emm.mdmagent”.
Create MDM APNS Certificate
Communication from server to device (OS MDM client) about new commands are delivered through Apple push notification service (APNS). To facilitate this, the UEM server needs to communicate with APNS servers and this requires a special certificate. In order to create an MDM APNS certificate, one of the following is needed,
- MDM vendor signing certificate which allow an EMM vendor to sign MDM APNS certificates for their customers
- Get an MDM vendor to provide you with an MDM APNS certificate
Steps to get Entgra to provide you with an MDM APNS certificate
-
This is the fastest approach and Entgra provides this server to valid customers. To do this, execute the following 2 commands on the commands prompt. The values provided when running these commands have no operation importance.
openssl genrsa -des3 -out customerPrivateKey.pem 2048 openssl req -new -key customerPrivateKey.pem -out customer.csr -
Keep the customerPrivateKey.pem file generate with above commands, secure along with the password used for private key. Email customer.csr file along with a description about the project details to contact@entgra.io to get a MDM APNS certificate. After an evaluation of the request, Entgra may send a file called plist_encoded
-
Go to the Apple Push Certificate Portal at https://identity.apple.com/pushcert/ and log in with an Apple ID. It is highly recommended not to use personal Apple IDs for this process and to create a separate Apple ID for the organization. This Apple ID is needed when these certificate needs to be renewed and failure to access this Apple ID in the future will result in having to re-enrol all the devices in production.
-
If you are trying to renew the certificate, click Renew.
- If not, Click Create Certificate and agree to the terms and conditions.
- Upload the encoded
plist_encodedfile you received via email from Entgra. -
Download the generated MDM signing certificate
(MDM_Certificate.pem). The MDM signing certificate is a certificate for 3rd party servers provided by Apple. -
Run the following command and note down the userID value in the output. This will later be indentified as the topic ID.
openssl x509 -in MDM_Certificate.pem -text -noout -
Run the following 2 commands,
openssl rsa -in customerPrivateKey.pem -out customerKey.pem cat MDM_Certificate.pem customerKey.pem > MDM_APNSCert.pem -
Open the MDM Apple Push Notification service (APNs) Certificate
(MDM_APNSCert.pem)and ensure that there is a line break between the contents of the two files.
Example: The content will look as follows:
—–END CERTIFICATE———-BEGIN RSA PRIVATE KEY—–
Therefore, add a line break to separate the 2 certificates after 5 - (dashes) so that the content will look like what’s shown below:
`-----END CERTIFICATE-----
-----BEGIN RSA PRIVATE KEY-----`
- Run the following command to convert the
MDM_APNSCert.pemfile to theMDM_APNSCert.pfxfile. You will need to provide a password when converting the file. `openssl pkcs12 -export -out MDM_APNSCert.pfx -inkey customerPrivateKey.pem -in MDM_APNSCert.pem'
Decide Your Enrollment Method
Before moving on to next steps, a decision needs to be made according to the features required for the business usecase. As mentioned previously, iOS and MacOS has an in-built MDM client which is capable of performing majority of management tasks. However the agent is needed, if the business requirement needs the following feature,
- Location tracking
- Ring the device
- Send a short notification message to device
If the above 3 features are not mandatory, please skip ahead to adding Platform Configurations section.
Create Agent APNS Certificate
This certificate is required to carry out operations on the device that need to be triggered via the iOS agent, such as ringing the device, getting the device location, and sending notifications or messages to the device. Therefore, if you are not installing the iOS agent on your devices, you do not need this certificate and this section can be skipped.
Prerequisites
- You have to be enrolled in the Apple Developer Program as an individual or an organization before starting the iOS server configurations.
- A valid distribution certificate that you obtained from Apple.
-
Clone the ios-agent repository to a preferred location.
git clone https://gitlab.com/entgra/ios-agent -
Open the emm-agent-iosfromX-Codeand follow the subsequent steps:-
Change the org.wso2.carbon.emm.mdmagent Bundle Identifier to a value prefered. Example:
org.<ORGANIZATION_NAME>.emm.ios.agent -
Select the development team, provisioning profile and sign certificate from Xcode.
-
If you are unsure of how to select the development team, or adding the provisioning profile or signing the certificate via Xcode, see the blog post on How to export “in-house” developed iOS app as an enterprise application.
-
-
Log in to the Apple Developer program and follow the subsequent steps:
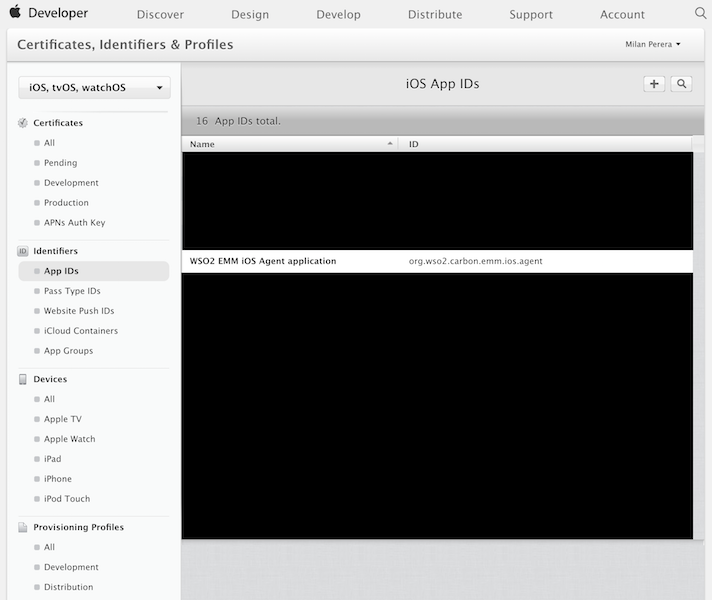
- Before you follow the steps, confirm that your machine is connected to the Internet and that Xcode has a valid developer account.
- Navigate to Certificates, IDs & Profiles that is under Identifiers. Click App IDs and see if the Bundle ID that you defined under Xcode is listed here.
-
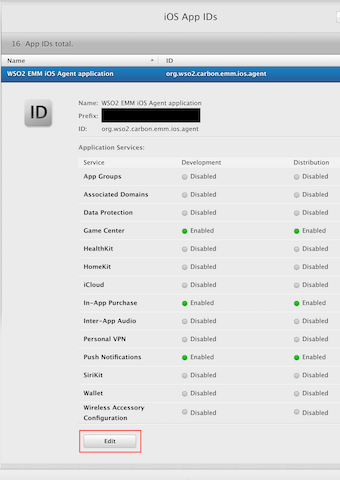
Click the Bundle ID, and click Edit.
-
Creating an APNs SSL certificate:
Step 1: Select Push Notifications to enable the setting.
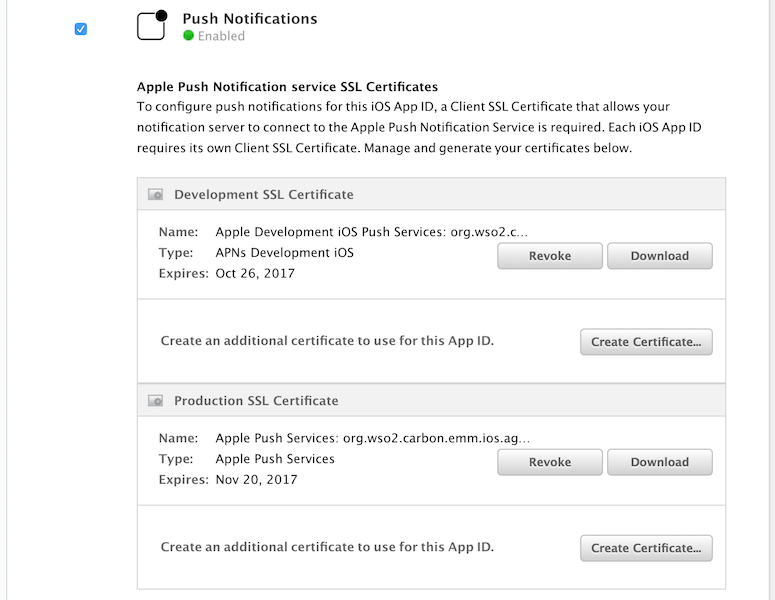
Once push notification is enabled, you are able to generate the development and production certificates.Step 2: To try out the create certificate use case, let us create a development SSL certificate. Please note that the development SSL certificate is created only as an example. You can create a production SSL certificate if you have registered with the Apple Developer Program as an Organization.
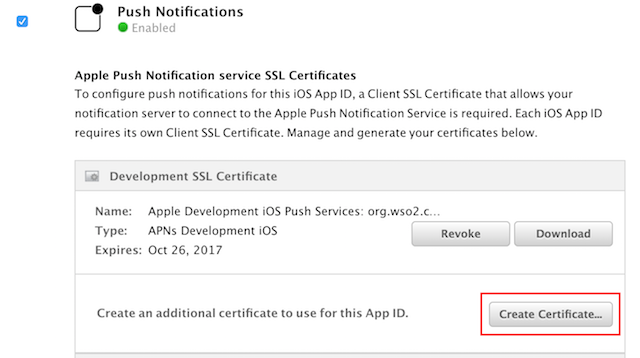
Click Create Certificate that is under Development SSL Certificate.
-
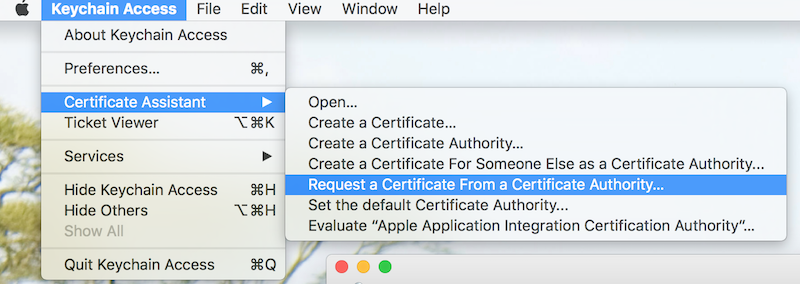
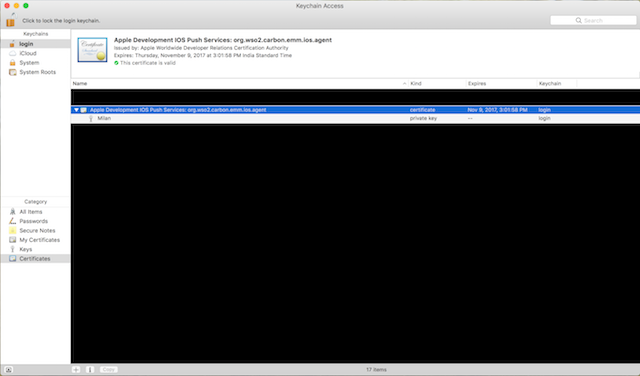
Creating a CSR file using the keychain access tool in the Mac OS:
Step 1: Launch the keychain access application.
Step 2: On the menu bar click KeyChain Access > Certificate Assistant > Request a Certificate from Certificate Authority.
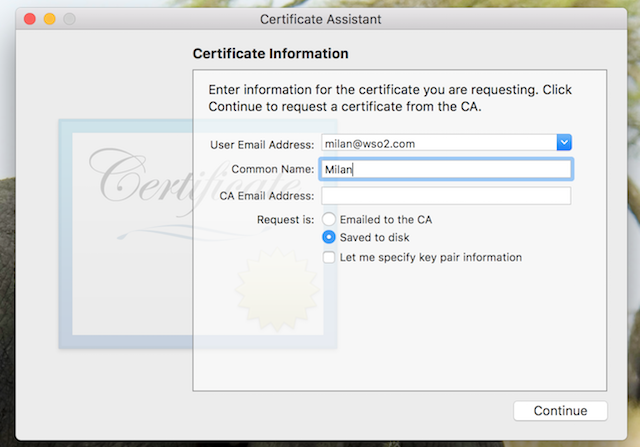
Step 3: Define the email address, common name, select Saved to disk, and click Continue. Example:
-
Go back to the Apple Developer Portal, upload the generated certificate, and click Continue.

-
Exporting the certificate to the pfx format.
8.1. Click Download to download the file.
8.2. Double-click the downloaded file to open it with the Keychain access tool.
8.3. Right-click the certificate and select export.
8.4. Define the location where you wish to save the file and set a password for the exported file when prompted.
8.5. Rename the p12 extension of the file to pfx.
Add Platform Configurations
Before proceeding, note, if you require Apple DEP support, please complete Apple DEP configurations section first.
Steps
-
Log in to the device management console and Click > CONFIGURATION MANAGEMENT > PLATFORM CONFIGURATIONS > iOS Configurations and fill in the form with values you wish.
-
Use the generated MDM-APNS certificate for both the MDM certificate and the generated APNS certificate for the APNS certificate.
-
MDM Certificate: Upload the MDM APNS pfx file created
(MDM_APNSCert.pfx) -
MDM Certificate Password: Give the same password you gave when converting the MDM_APNS certificate from the pem to the pfx format.
-
MDM Certificate Topic ID: Give the topic ID of the certificate. If you are unsure of the topic ID, refer step 6 under generating the MDM APNS certificate.
-
APNS Certificate: If you are using Agent and completed Create agent APNS certificate section, please use that pfx. If not upload the MDM_APNSCert.pfx here as well APNS
-
Certificate Password: Give the same password you gave when converting the Agent APNS certificate to the pfx format. If Agent is not used, provide the same password as
MDM_APNSCert.pfx
-
Apple (iOS and MacOS) DEP Configurations
Device Enrollment Program (DEP) is a program provided by Apple to allow device management solutions to have control over corporate-owned devices. Let us take a look at what you need to do, to get started and understand why you need DEP.
Prerequisites
Apple server configurations must have been completed.
Benefits of using DEP
- Enables Zero Touch Provisioning (ZTP) for device enrollments for the convenience of IT administrators.
- Provides better control over iOS devices and provides the features described in the features section.
- Restrict the user from removing EMM Management from the device.
- Enrolling the Apple Device in the Enrollment Program
- The first step is to enroll your organization with Apple Device Enrollment Program (DEP) and link Entgra UEM Server’s EMM solution to your DEP portal. Follow the steps given below to enroll with DEP.
Steps
-
Generate a DEP Token to Link EMM with Apple.
- Now that the DEP account is created, EMM server must be made aware of this DEP account. In order to allow EMM server to talk to Apple DEP servers and link with the DEP account, a special server token has to be generated from Apple DEP portal and passed to EMM server.
Prerequisites
Download and install OpenSSL. Linux OS's have OpenSSL installed by default.
-
Linking the Entgra with Apple DEP
- You can configure the device startup settings (activation) of the iOS devices, to skip configurations or include additional configurations. This is done by creating profiles in Entgra UEM Server and assigning them to the devices.
-
Adding Devices to the Apple DEP Portal
- The Apple Device Enrollment Program (DEP) allows iOS devices purchased through the DEP program as well as those purchased outside of the program to be enrolled as supervised devices to a mobile device management system. You are required to add the devices to the Apple DEP portal to link the devices with the DEP system.
-
Adding Devices Purchased via DEP
-
Adding iOS Devices using the Apple Configurator
- The devices purchased outside DEP can be added manually to the DEP account. You need to plug in each device to a Mac and factory reset the device using THE Apple Configurator. Follow the steps given below:
Prerequisites
- Devices that have an OS that is iOS 11 or higher.
- Apple Configurator 2.5 or higher.
-
Creating and Assigning Activation Profiles to Devices
-
Enrolling DEP Devices
-
Please refer iOS DEP Device enrollment section.
Enroll iOS Device as BYOD without Agent
Prerequisites
- Server has to be downloaded and started.
- Must have been logged on to the server's Endpoint Management Portal.
- Click Enroll Device
(https://{IP}:{port}/devicemgt/device/enroll). - Click iOS.
- Scan the QR code that appear with a QR code scanning app or type
https://{IP}:{port}/ios-web-agent/enrollmentin safari browser.
If the Device is above iOS 12.2
(If you have installed OS updates after March 2019)
If the Device is bellow iOS 12.2
Enroll iOS Device as BYOD with Agent
Prerequisites
- Server has to be downloaded and started.
- Must have been logged on to the server's Endpoint Management Portal.
- Click Add Device
(https://{IP}:{port}/devicemgt/device/enroll). - Click iOS under DEVICE TYPES.
- Scan the QR code that appears with a QR code scanning app or type
https://IP:port/ios-web-agent/enrollmentin safari browser.
If the Device is above iOS 12.2
(If you have installed OS updates after March 2019)
If the Device is below iOS 12.2
iOS DEP Enrollment
iOS DEP Device Enrollment (with/without agent)
All you need to do is start up the iOS device that was given to you by your organization and your device will be enrolled with EMM as a DEP device.
If your organization has configured the DEP profile to prompt for your username and password, you need to enter the username and password that is used within the organization.
Enroll macOS
Enroll macOS Device Manually
Prerequisites
- The server has to be downloaded and started.
- Must have been logged on to the server's Endpoint Management Portal.
- Click iOS from DEVICE TYPES.
- Type
https://{IP}:{port}/ios-web-agent/enrollmentin safari browser.
Steps
-
Copy the URL of QR code to the browser of the mac OS device.
-
Click Enroll without agent.
-
Click Install UEM Server Certificate.
-
Open Key Chain Acess Application.
-
Open the downloaded UEM Server Certificate.
-
Set trust to Always trust for the downloaded UEM Server Certificate.
-
Click Next.
-
Type the Username:
admin, Password:adminthen click Sign in. -
Accept the Licence Agreement to continue.
-
You will be prompted to confirm the installation of the profile to the device. Then click Install to install the profile to the device.
-
You will be prompted to confirm the installation of the Mobile Device Management profile. Then click Install to install the Mobile Device Management profile to the device.
Enroll Windows
Windows Server Configuration
The Entgra IoTS client sends requests to the Entgra IoTS server through a Proxy Server. The Windows Entgra IoTS protocol constructs a URI that uses the host name by appending the domain of the email address to the subdomain, enterpriseenrollment for each device request. Therefore, you can either purchase a domain name or create a DNS entry in https://enterpriseenrollment.
For example, discover the Entgra IoT server by sending a request through: https://enterpriseenrollment./ENROLLMENTSERVER/Discovery. As the Entgra IoT server cannot create Windows service endpoints, it is advisable to use a proxy server between the device and the Entgra IoT server.
The following subsections are given as examples to guide you on how to configure the proxy server for Windows. You can use any proxy server for this task but we recommend that you use NGINX as it is simple to try out.
Nginx Configuration
A preferred server can be used as a proxy server between the device and the Entgra IoT server. The steps documented below are only an example of configuring the proxy server using NGINX, which is a known reverse proxy server.
Follow the steps given below to configure the proxy Server:
-
Install NGINX in your production environment. Refer the following to install NGINX on a MAC or Ubuntu environment. * nginx installation guide
-
Get an SSL certificate. Make sure that the common name of the certificate you are getting matches the constructed URI.
NOTE: The Entgra IoTS client sends requests to the Entgra IoTS server through a Proxy Server. The Windows Entgra IoTS protocol constructs a URI that uses the hostname by appending the domain of the email address to the subdomain, enterpriseenrollment for each device request. Therefore, you can either purchase a domain name or create a DNS entry in the https://enterpriseenrollment.
a. In order to create the SSL certificate a file called openssl.cnf with the below content should be created:
[req]
distinguished_name = req_distinguished_name
req_extensions = v3_req
[req_distinguished_name]
    countryName = SL
    countryName_default = SL
    stateOrProvinceName = Western
    stateOrProvinceName_default = Western
    localityName = Colombo
    localityName_default = Colombo
    organizationalUnitName = ABC
    organizationalUnitName_default = ABC
    commonName = dev.abc.com
    commonName_max = 64
[ v3_req ]
# Extensions to add to a certificate request
basicConstraints = CA:FALSE
keyUsage = nonRepudiation, digitalSignature, keyEncipherment
subjectAltName = @alt_names
[alt_names]
DNS.1 = dev.abc.com
DNS.2 = enterpriseenrollment.dev.abc.com
NOTE: Add any domain name needed to subject alternatives - DNS
b. Create the Private key.
openssl genrsa -out server.key 2048
Create a Certificate Signing Request (CSR). Press enter to every input.
openssl req -new -out server.csr -key server.key -config openssl.cnf
c. Sign the SSL Certificate.
openssl x509 -req -days 3650 -in server.csr -signkey server.key -out server.crt -extensions v3_req -extfile openssl.cnf
d. Sign the SSL Certificate.
openssl x509 -req -days 3650 -in server.csr -signkey server.key -out server.crt -extensions v3_req -extfile openssl.cnf
-
Navigate to the
/etc/nginx directory, create a folder named ssl, and add the CA certificate and the private key to this folder. -
Configure the
/etc/nginx/nginx.conffile with the details of the SSL certificate and the Windows endpoints as explained below.
a. Compare the sample configuration file given below with your nginx.conf file and add the missing properties.
NOTE: What's given below is only an example. Compare your configuration file with what's given below and add the missing configurations or uncomment the commented configurations in the nginx.conf file.
#user  nobody;
worker_processes  1;
#error_log  logs/error.log;
#error_log  logs/error.log  notice;
#error_log  logs/error.log  info;
#pid        logs/nginx.pid;
events {
        worker_connections  1024;
}
http {
        include mime.types;
        default_type application/octet-stream;
        sendfile on;
        #tcp_nopush on;
        #keepalive_timeout 0;
        keepalive_timeout 65;
        #gzip on;
        server {
                listen 443 ssl;
                server_name enterpriseenrollment.dev.abc.com;
                ssl_certificate /etc/nginx/ssl/server.crt;
                ssl_certificate_key /etc/nginx/ssl/server.key;
                access_log /tmp/access.log;
                error_log /tmp/error.log debug;
                location /EnrollmentServer/Discovery.svc {
                        if ($request_method = GET) {
                        return 200;
                }
                        proxy_set_header X-Forwarded-Host $host:$server_port;
                        proxy_set_header X-Forwarded-Server $host;
                        proxy_set_header X-Forwarded-For $proxy_add_x_forwarded_for;
                        proxy_pass https://192.168.1.10:8243/api/device-mgt/windows/v1.0/discovery/post;
                        proxy_http_version 1.1;
                }
                location /ENROLLMENTSERVER/PolicyEnrollmentWebservice.svc {
                        proxy_set_header X-Forwarded-Host $host:$server_port;
                        proxy_set_header X-Forwarded-Server $host;
                        proxy_set_header X-Forwarded-For $proxy_add_x_forwarded_for;
                        proxy_pass https://192.168.1.10:8243/api/device-mgt/windows/v1.0/certificatepolicy/xcep/1.0.0;
                        proxy_http_version 1.1;
                }
                location /ENROLLMENTSERVER/DeviceEnrollmentWebservice.svc {
                        proxy_set_header X-Forwarded-Host $host:$server_port;
                        proxy_set_header X-Forwarded-Server $host;
                        proxy_set_header X-Forwarded-For $proxy_add_x_forwarded_for;
                        proxy_pass https://192.168.1.10:8243/api/device-mgt/windows/v1.0/deviceenrolment/wstep/;
                        proxy_http_version 1.1;
                }
                location /ENROLLMENTSERVER/Win10DeviceEnrollmentWebservice.svc {
                        proxy_set_header X-Forwarded-Host $host:$server_port;
                        proxy_set_header X-Forwarded-Server $host;
                        proxy_set_header X-Forwarded-For $proxy_add_x_forwarded_for;
                        proxy_pass http://192.168.1.10:8243/api/device-mgt/windows/v1.0/deviceenrolment/enrollment;
                        proxy_http_version 1.1;
                }
                location /Syncml/initialquery {
                        proxy_set_header X-Forwarded-Host $host:$server_port;
                        proxy_set_header X-Forwarded-Server $host;
                        proxy_set_header X-Forwarded-For $proxy_add_x_forwarded_for;
                        proxy_pass http://192.168.1.10:8243/api/device-mgt/windows/v1.0/syncml/devicemanagement/request/;
                        proxy_http_version 1.1;
                }
                location /devicemgt {
                        proxy_set_header X-Forwarded-Host $host:$server_port;
                        proxy_set_header X-Forwarded-Server $host;
                        proxy_set_header X-Forwarded-For $proxy_add_x_forwarded_for;
                        proxy_pass http://192.168.1.10:8243/api/device-mgt/windows/v1.0/management/devicemgt/pending-operations;
                        proxy_http_version 1.1;
                }
                location /web-agent-windows {
                        proxy_set_header X-Forwarded-Host $host:$server_port;
                        proxy_set_header X-Forwarded-Server $host;
                        proxy_set_header X-Forwarded-For $proxy_add_x_forwarded_for;
                        proxy_pass https://192.168.1.10:9443/web-agent-windows;
                        proxy_http_version 1.1;
                }
                location /entgra-ui-request-handler {
                        proxy_set_header X-Forwarded-Host $host:$server_port;
                        proxy_set_header X-Forwarded-Server $host;
                        proxy_set_header X-Forwarded-For $proxy_add_x_forwarded_for;
                        proxy_pass https://192.168.1.10:9443/entgra-ui-request-handler;
                        proxy_http_version 1.1;
                }
                location /api/device-mgt/windows/v1.0/federated/bst/authentication {
                        proxy_set_header X-Forwarded-Host $host:$server_port;
                        proxy_set_header X-Forwarded-Server $host;
                        proxy_set_header X-Forwarded-For $proxy_add_x_forwarded_for;
                        proxy_pass https://192.168.1.10:9443/api/device-mgt/windows/v1.0/federated/bst/authentication;
                        proxy_http_version 1.1;
                }
                location /api/device-mgt/windows/v1.0/configuration/license {
                        proxy_set_header X-Forwarded-Host $host:$server_port;
                        proxy_set_header X-Forwarded-Server $host;
                        proxy_set_header X-Forwarded-For $proxy_add_x_forwarded_for;
                        proxy_pass https://192.168.1.10:9443/api/device-mgt/windows/v1.0/configuration/license;
                        proxy_http_version 1.1;
                }
        }
        include servers/*;
        include /etc/nginx/conf.d/*.conf;
        include /etc/nginx/sites-enabled/*;
}
b. Configure the SSL certificate details.
server {
        listen 443;
        server_name enterpriseenrollment.dev.abc.com;
        ssl_certificate /etc/nginx/ssl/server.crt;
        ssl_certificate_key /etc/nginx/ssl/server.key;
You need to configure the following properties:
| Property | Description | Example |
|---|---|---|
| server_name | Define the common name of the certificate. | enterpriseenrollment.dev.abc.com |
| ssl_certificate | Define where you saved the SSL certificate. | /etc/nginx/ssl/server.crt |
| ssl_certificate_key | Define where you saved the private key of the certificate. | /etc/nginx/ssl/server.key |
b. Configure the Windows endpoints.
Required Windows endpoints:
https://
Example:
location /ENROLLMENTSERVER/PolicyEnrollmentWebservice.svc {
    proxy_set_header X-Forwarded-Host $host:$server_port;
    proxy_set_header X-Forwarded-Server $host;
    proxy_set_header X-Forwarded-For $proxy_add_x_forwarded_for;
    proxy_pass https://192.168.1.10:8243/api/device-mgt/windows/v1.0/certificatepolicy/xcep;
    proxy_http_version 1.1;
}
| Property | Description |
|---|---|
| location | This property specifies the "/" prefix that needs to be compared with the URI sent from the request. For more information, see the NGINX documentation. |
| proxy_pass | Define the respective Windows endpoint. |
| proxy_set_header | Required to configure Windows for reverse proxy. |
Note
Before heading to the enroll devices, set up Windows Configurations under Platform Configurations.
Enroll a Windows Device using Web Agent
Steps
-
Go to Windows Settings > Accounts > Access work or school.
-
Click Enroll only in device management under related settings. Input
admin@<EMAIL_DOMAIN>in the pop-up window as the email address. eg:admin@dev.abc.com. -
(Optional) Enter the MDM Server URL as
EnterpriseEnrollment.<EMAIL_DOMAIN>. eg:EnterpriseEnrollment.dev.abc.com. -
Enter the username and password to log in to the Entgra IoT Server.
-
Finally accept the license agreement to enroll the device.
Enrolling a Windows Device
-
Click Start.
-
Search for Access work or school.
-
Click Access work or school.
-
Click Enroll only in device management under related settings [ss1].
-
Enter the domain name based on the CN (common name) configured on the ssl certificate with
`admin@appended at the start i.e.admin@dev.abc.com[ss2]. -
Optionally, if the above does not work, enter the MDM Server URL replacing
admin@withenterpriseenrollment.i.e.enterpriseenrollment.dev.abc.com. -
Click Next.
-
A window will open up for login with Entgra IoT Server [ss4].
-
Enter the username and password.
-
Click log-in.
-
Finally accept the license agreement to enroll the device.
Enroll a Windows Device
Prerequisites
- Server has to be downloaded and started.
- Must have been logged on to the server's Endpoint Management Portal.
- Click Add device
(https://{IP}:{port}/devicemgt/device/enroll). - Click Windows from DEVICE TYPES.
Steps
- Add host configuration to the windows host files.
- Add the server certificate to trusted root certification authorities.
- Go to access to work or school in Windows settings.
- Click enroll only in device management.
- Input
admin@in the pop-up window.
Enrollment Issue Diagnosis
You may encounter issues while trying to enroll your Windows devices to the server. There are tools that can help diagnose the enrollment or device management issue accurately for Windows devices managed by the MDM server. By using these tools, you can examine the MDM logs collected from the desktop to determine the root cause of the issue.
- How to Diagnose MDM Failure in Windows 10
Reference: Diagnose MDM failures in Windows 10
Follow the steps below to download the MDM Diagnostic Information log from Windows PC:
- Enroll the device to the MDM server.
- Go to Settings > Accounts > Access Work or School.
- Click on the Info button of the account.
- At the bottom of the page, select the Create Report button under Advanced Diagnostic Report section.
- Click Export.
- Go to C:/Users/Public/Documents/MDMDiagnostics to see the exported report.
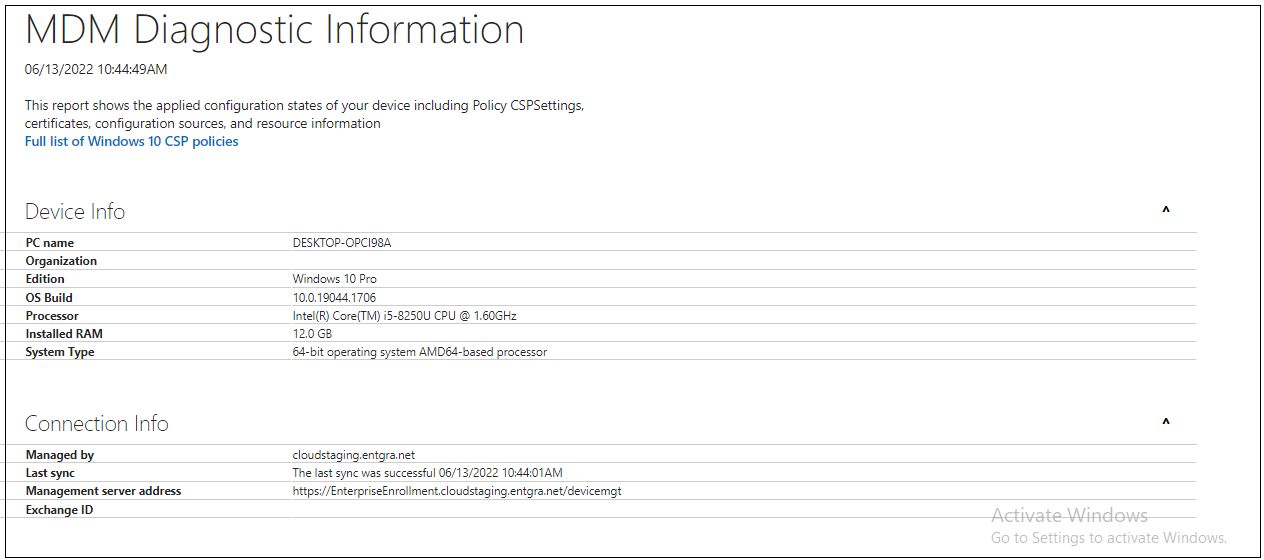
That report contains detailed information on the areas given below:
- Device info
- Connection info
- Device management account
- Certificates
- Enrolled configuration sources and target resources
- Managed policies
- GPCSEWreapper policies
- Blocked grouped policies
-
Unmanaged policies
Before you work with Fiddler, you have to install it to the Windows machine that you want to diagnose.
- Enroll the device to the MDM server.
-
Go to this link to download the Fiddler: https://www.telerik.com/download/fiddler?_ga=2.66045742.1046222453.1655091182-1922922192.1653555788
-
Install it to the machine.
- Open Fiddler Classic.
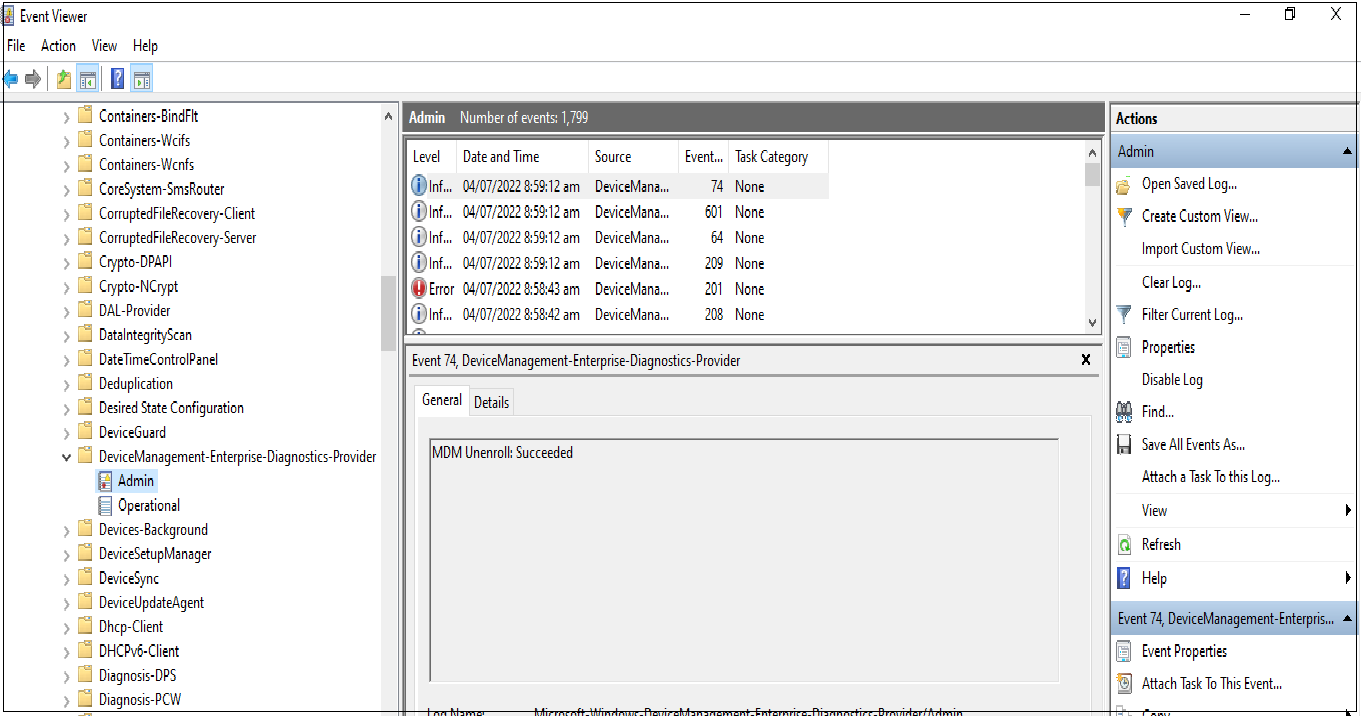
- Event Viewer
Microsoft Windows Server Event Viewer is a monitoring tool that shows a log of events that can be used to troubleshoot issues on a Windows-based system. Follow the steps below to open the Event View:
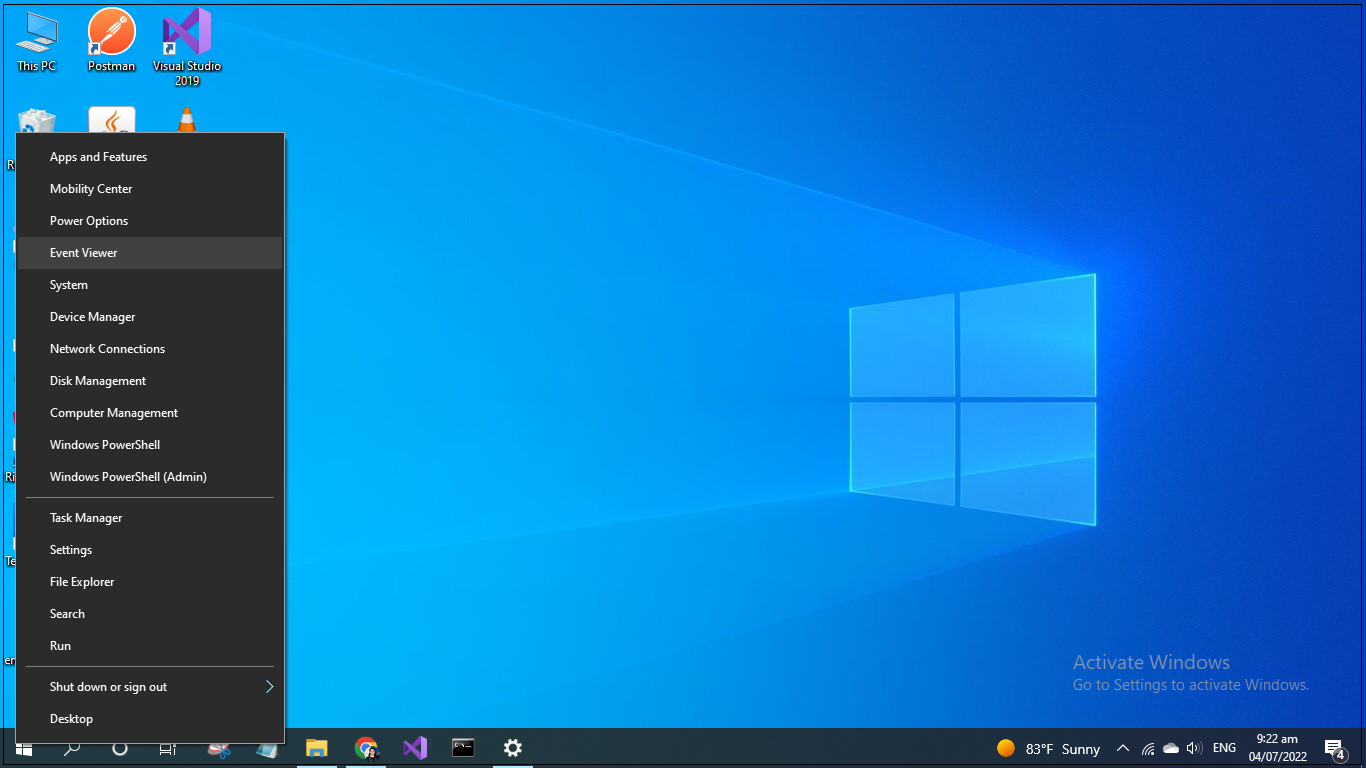
- Click Start > Control panel > System and security > Administrative tools > Event viewer Or;
-
Right click Start and select Event viewer.
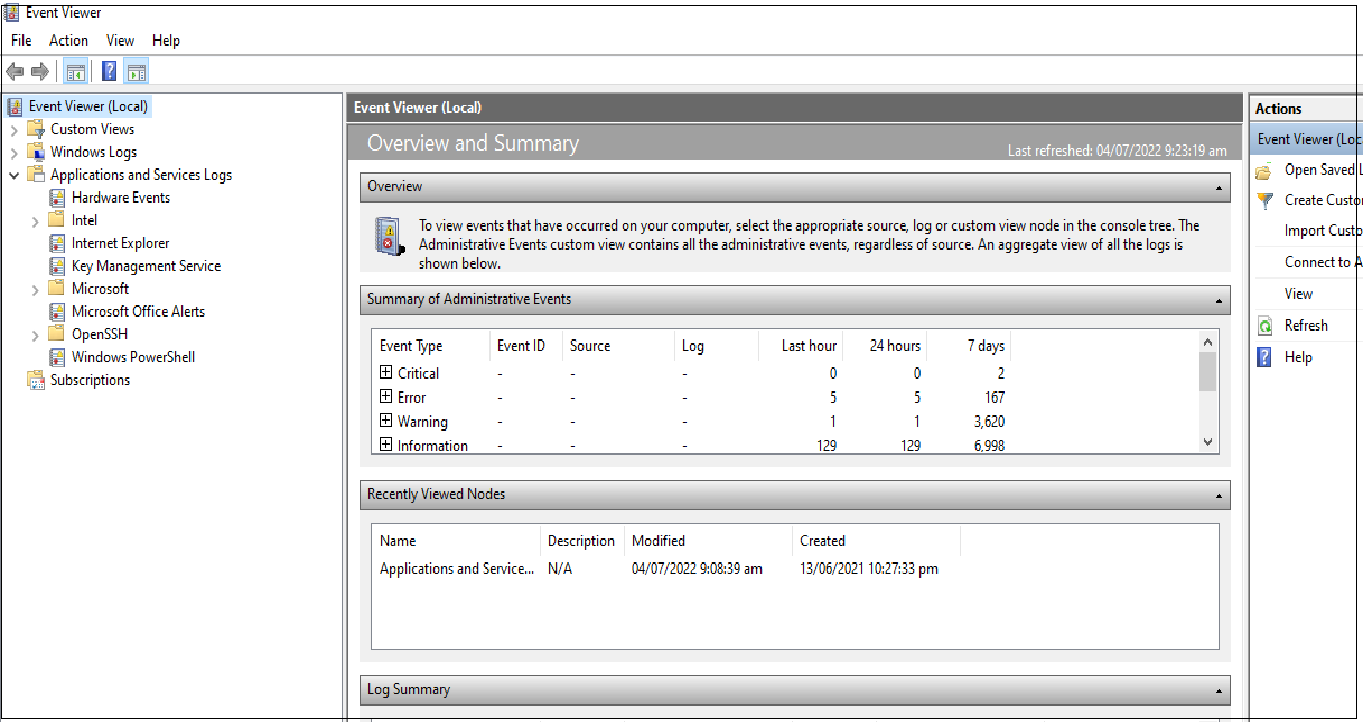
-
Then go to the Applications and Services logs > Microsoft > Windows > DeviceManagement-Enterprise-Diagnostics-Provider > Admin.