Manage Enrolled Devices
General Operations
View an Enrolled Device
-
Sign in to the Entgra UEM Server console.
-
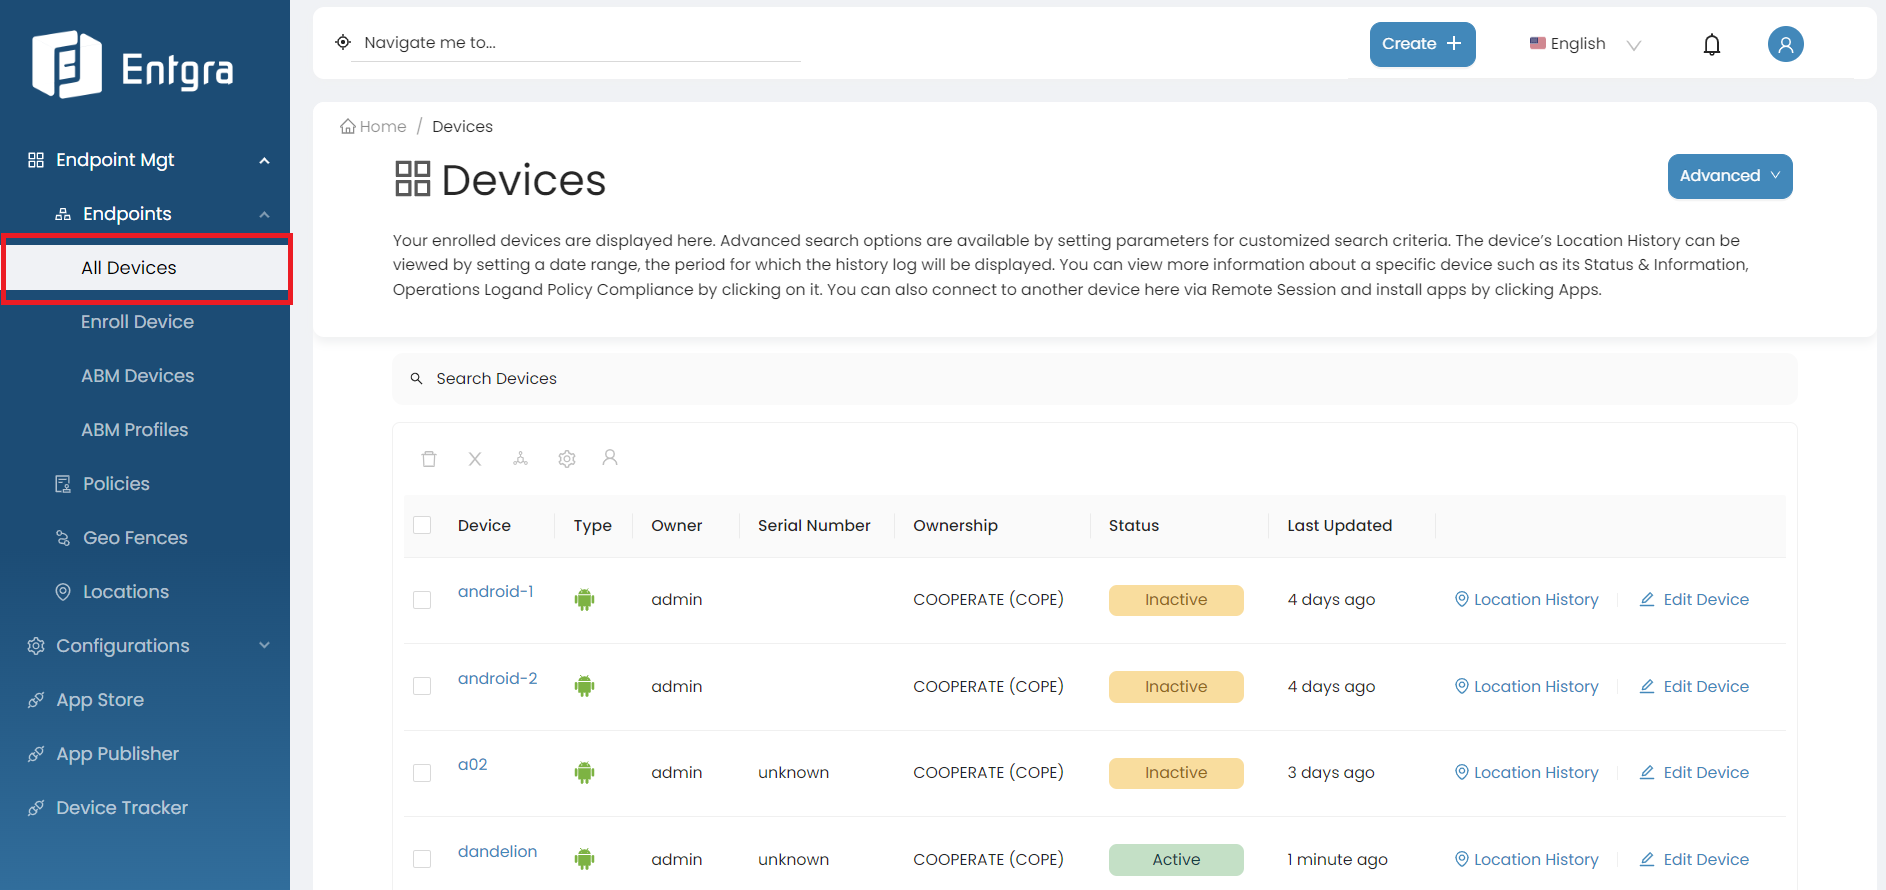
Click All Devices under Endpoints.
-
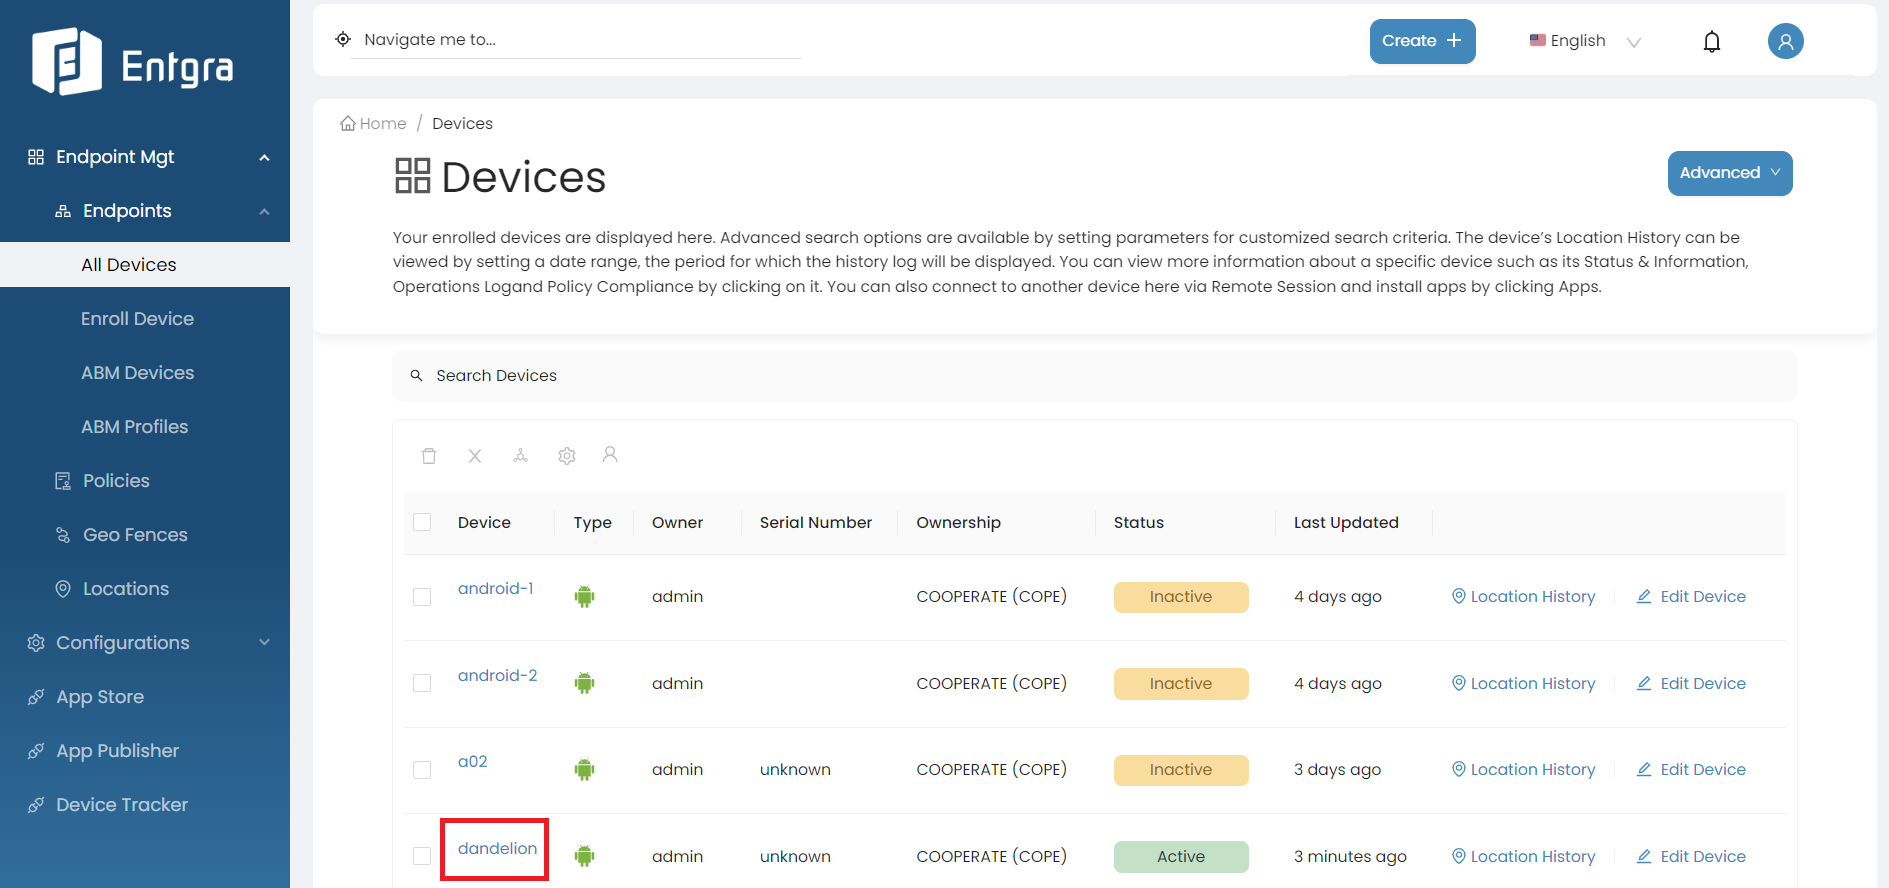
Click on one device (Example : dandelion).
-
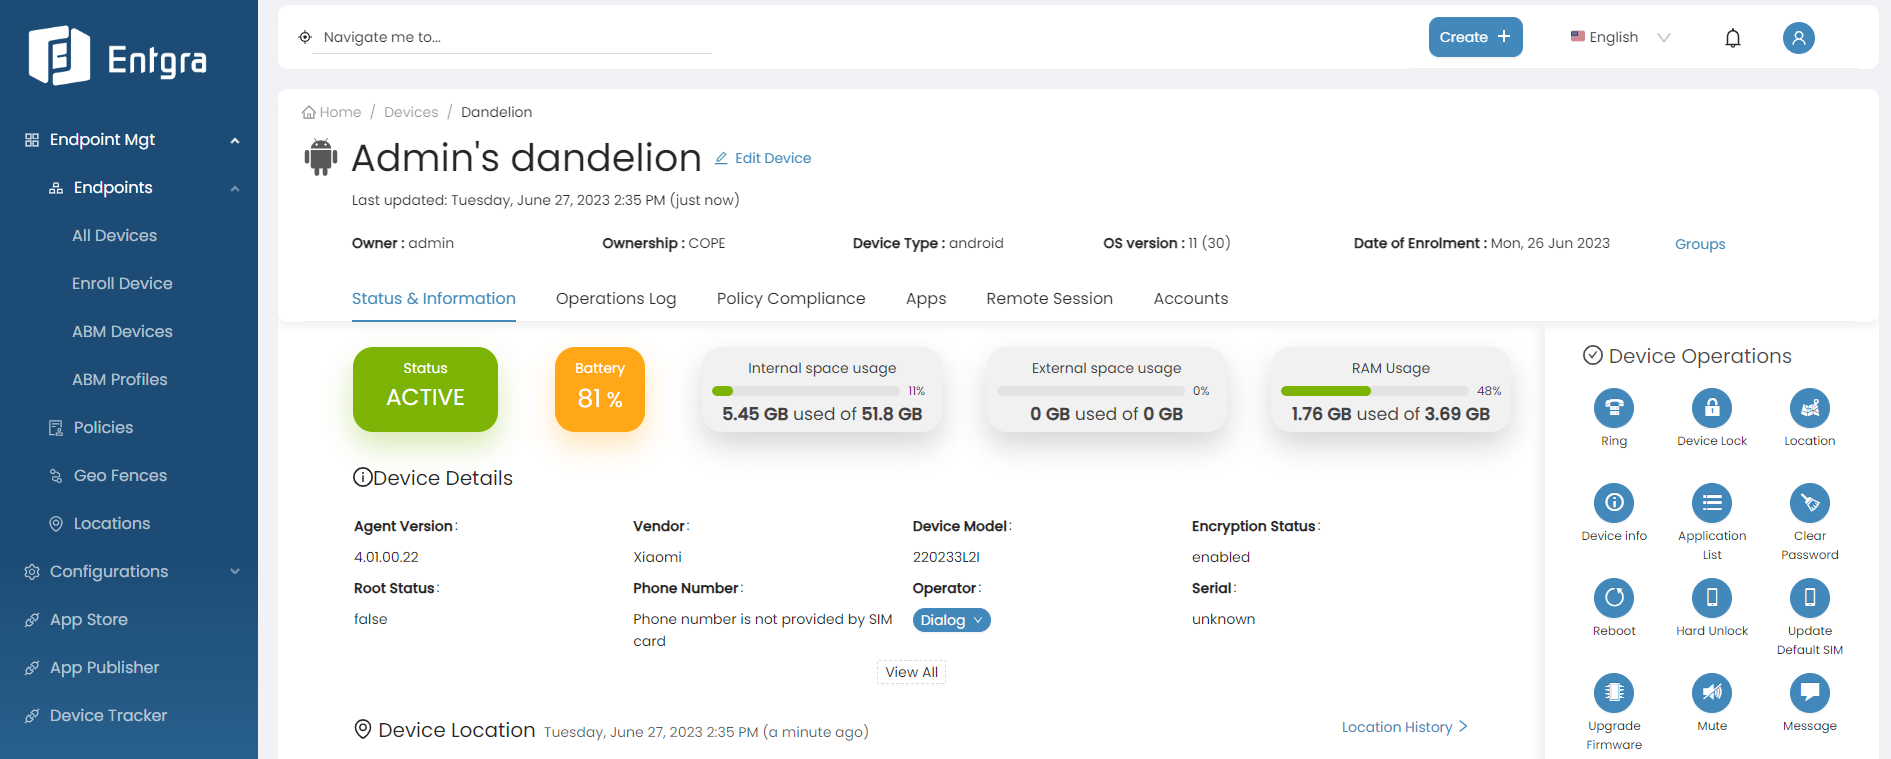
You will be directed to the device details page.
Search Devices
-
Sign in to the Entgra UEM Server console.
-
Click All Devices under Endpoints.
-
Click on the Search Devices bar on top of the devices table.
-
Add relevant tags for searching and then click Search icon.
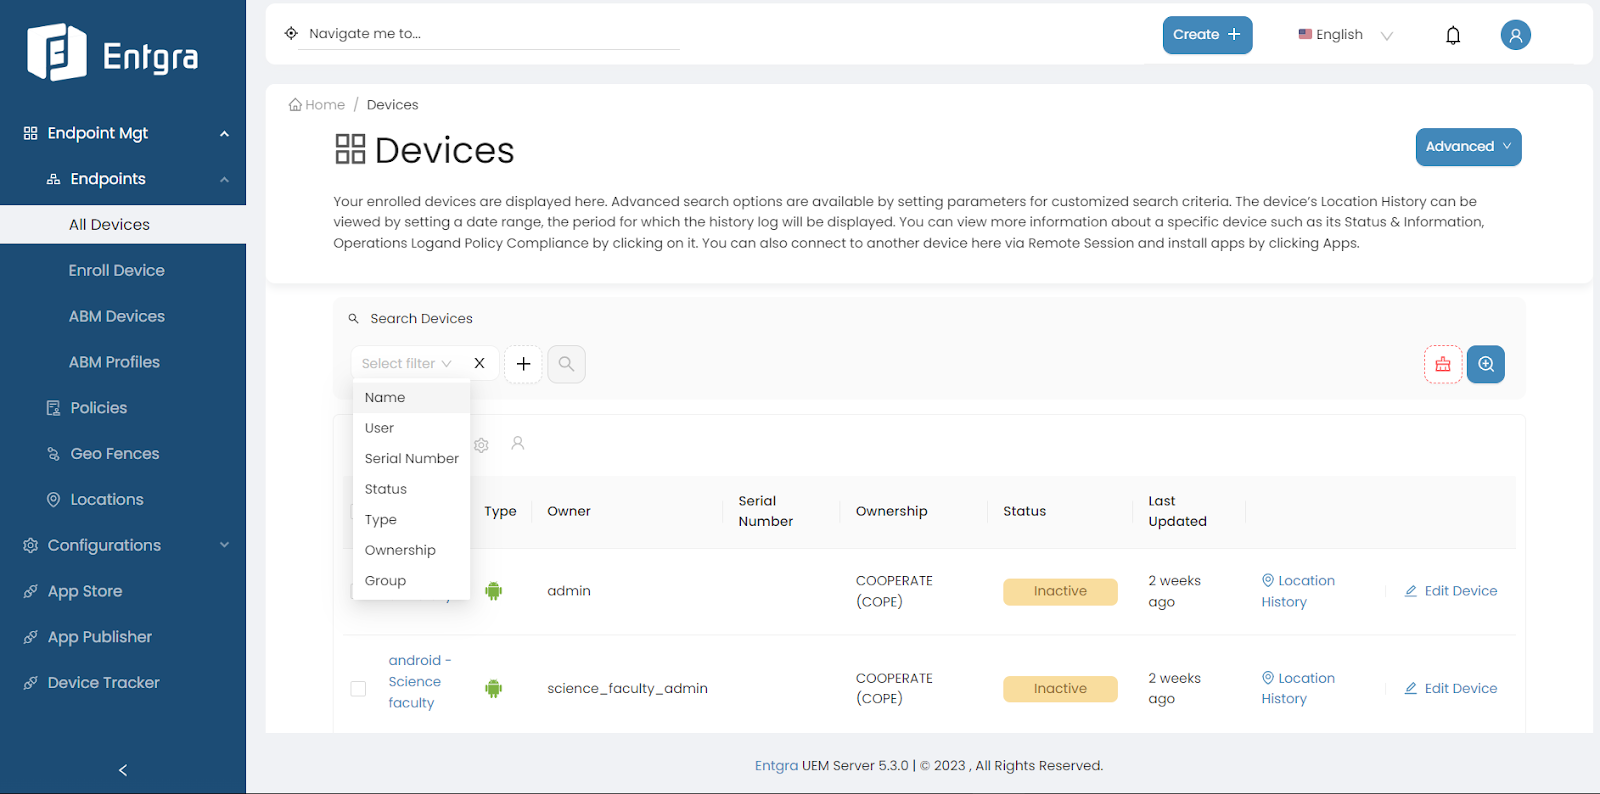
Tags Parameters Name Search for devices by part of the device name User Search for devices by the owner name Serial Number Search for devices by part of the serial number Status Search for devices by device status Type Search for devices by device OS type Ownership Search for devices by device ownership type Group Search for devices by predefined groups
Disenroll Devices
-
Sign in to the Entgra UEM Server console.
-
Click All Devices under Endpoints.
-
Select the device(s) that you wish to disenroll from the console.
-
Click on Disenroll icon and Yes to confirm disenrolling the device.

-
Then the disenrolled device will be removed from the All Devices table.
Delete Devices
Note
You can only delete disenrolled devices.
-
Sign in to the Entgra UEM Server console.
-
Click All Devices under Endpoints.
-
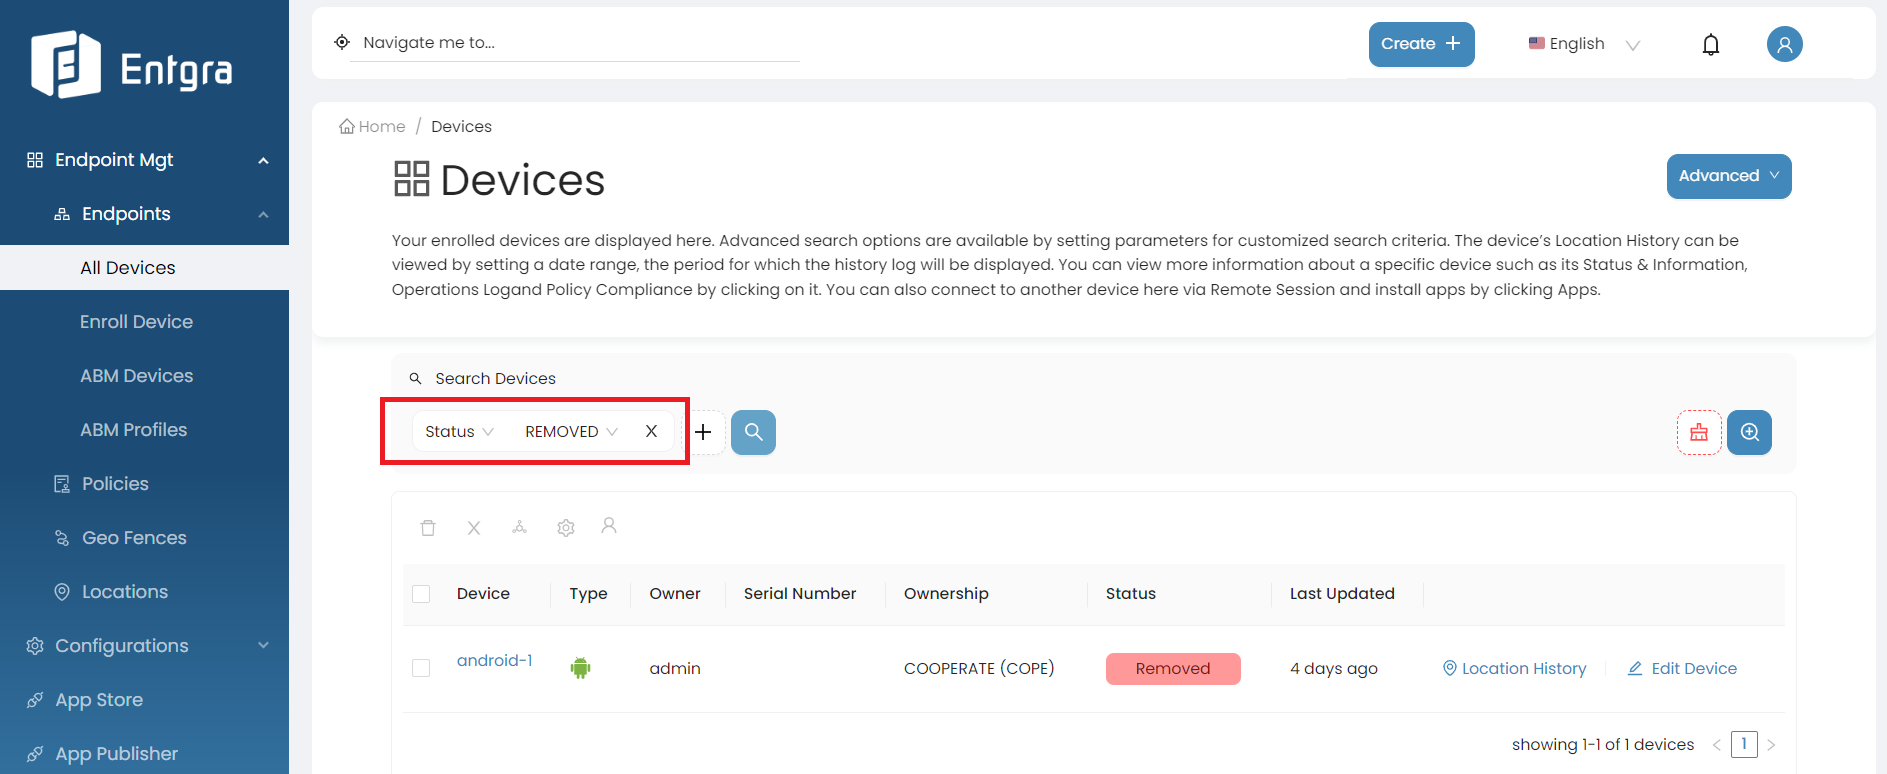
Click on the Search Devices bar on top of the devices table.
-
Select Removed as the status for searching and then click Search icon.
-
Select the already disenrolled device(s) that you wish to delete from the console.
-
Click on Delete icon and Ok to confirm deleting the device.
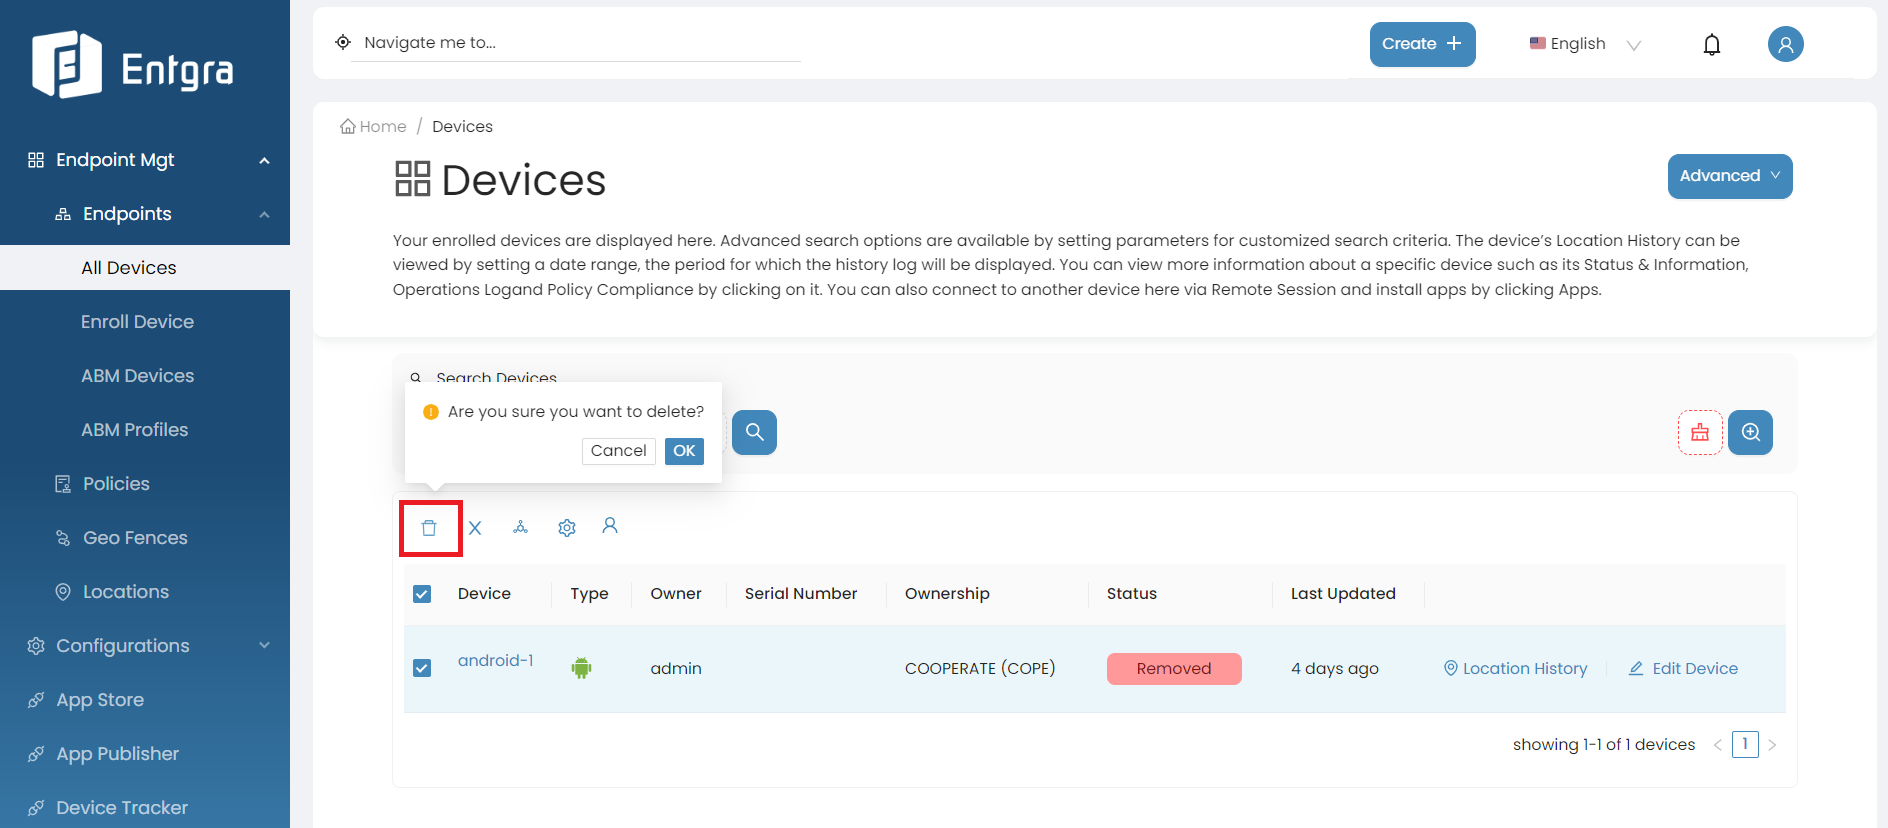
-
Then the device will be deleted from the console.
Grouping Devices
-
Sign in to the Entgra UEM Server console.
-
Click All Devices under Endpoints.
-
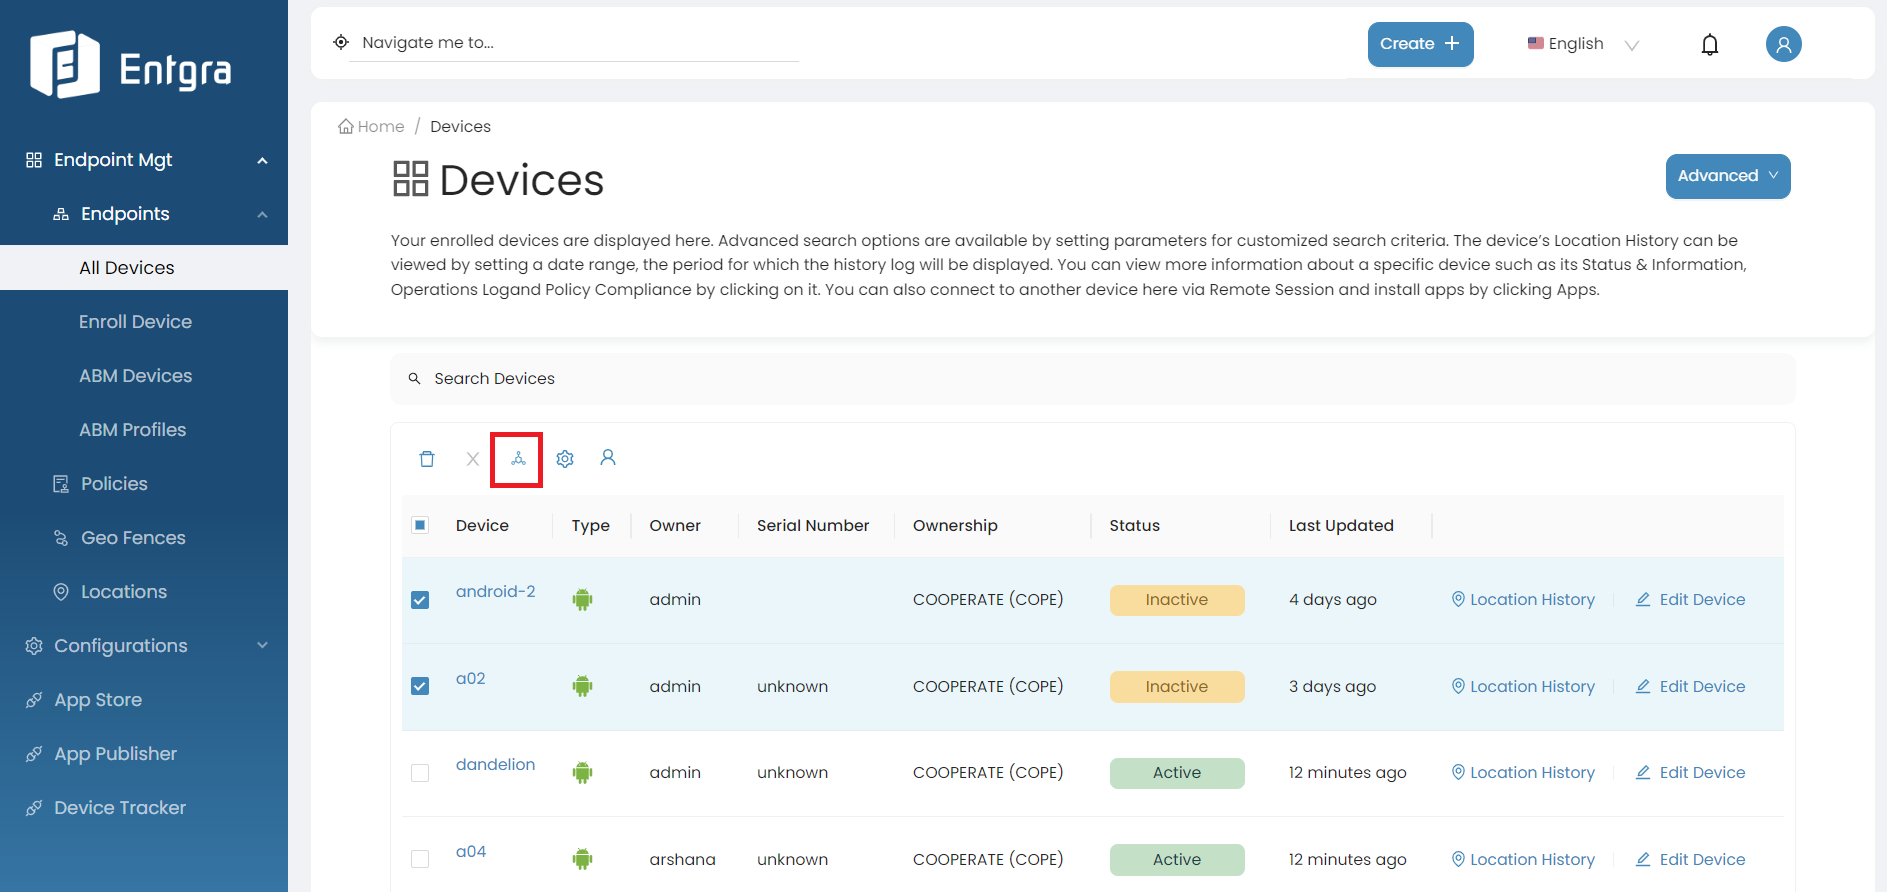
Select the devices that you wish to add to a group.
-
Click on Add to Group icon.
-
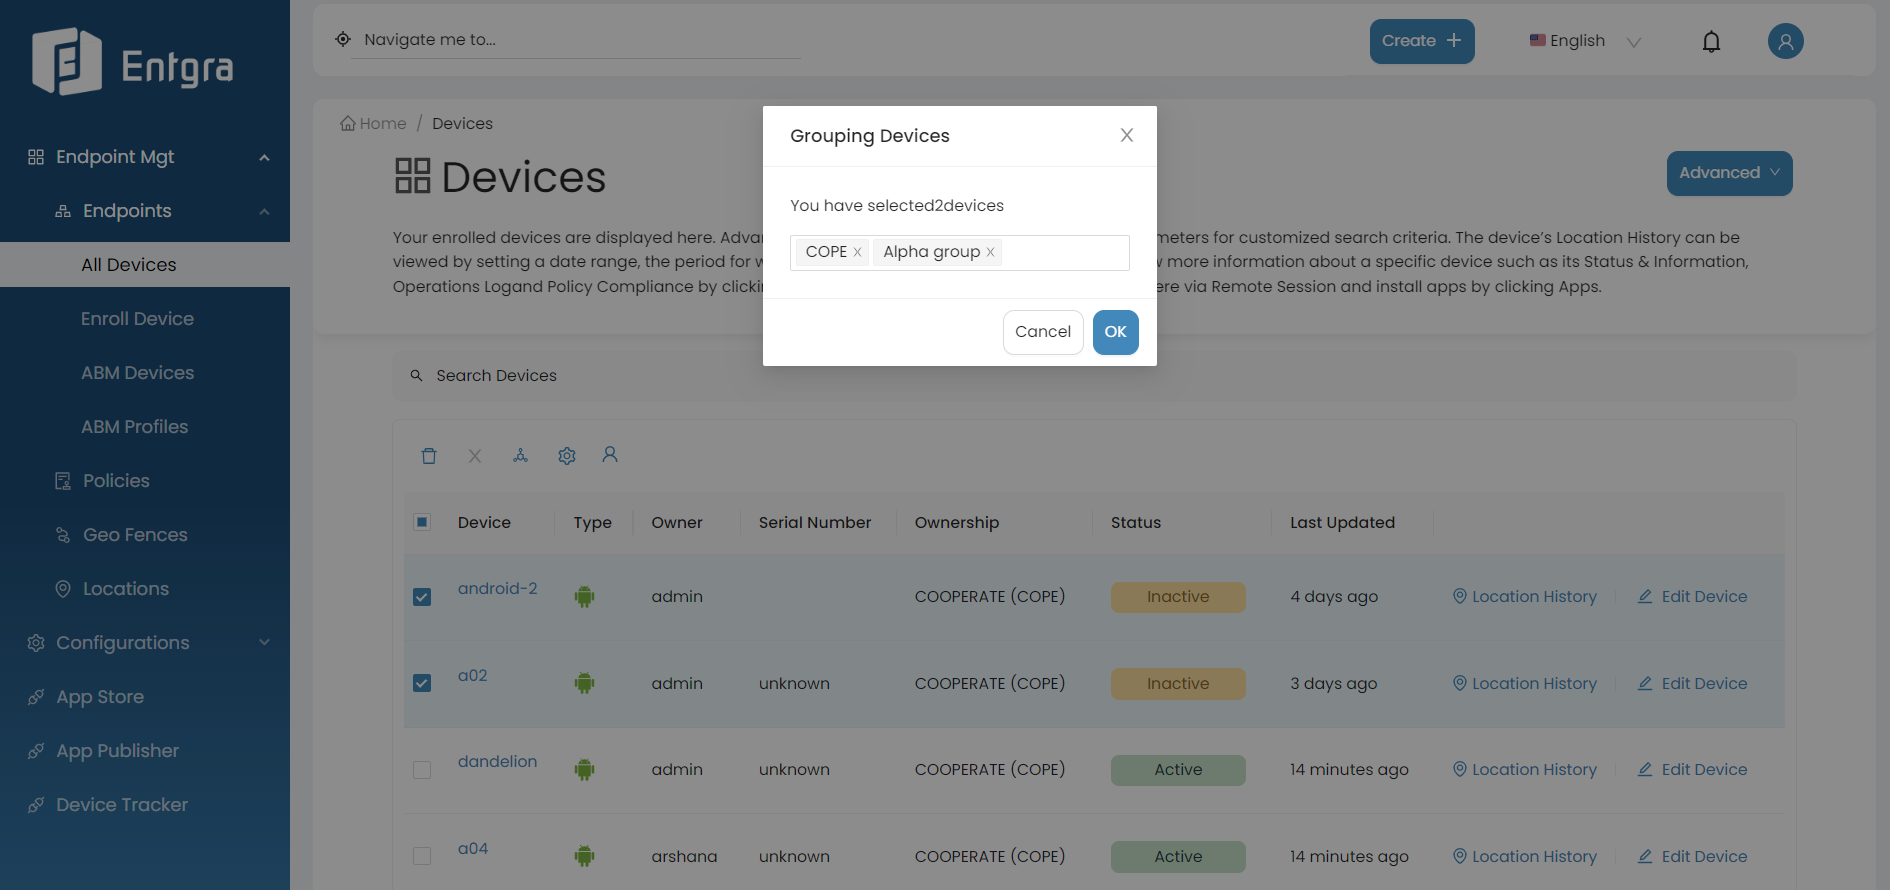
Select a group/groups from the list to add devices and click Ok.
-
For more group functionalities, refer to the Manage Groups section under Configurations.
Add Operations to Devices
Entgra UEM Server facilitates one time operations that can be performed remotely via the Endpoint Management Console. These operations are useful for runtime maintenance of devices.
Android Supported Operations
The following table lists out the operations that can be applied to an Android device.
| Operation | Description |
|---|---|
| Ring | Ability to Ring the device via Entgra UEM Server. |
| Device Lock | Ability to Lock the device via Entgra UEM Server. When Hard lock enabled (OEM Mode Only) is selected, the device can be unlocked only through EMM. This is available only in COPE enrollment. Optionally, messege can be sent to the device via Entgra UEM Server while applying this operation. |
| Location | Ability to request coordinates of device location via Entgra UEM Server. |
| Device Info | Ability to get Device Information - Fetch the device's runtime information. |
| Application List | Ability to get Installed Applications - Fetch the device's installed application list. |
| Clear Password | Ability to clear current password via Entgra UEM Server.(This functionality is only working with profile owners from Android 7.0 API 24 onwards). |
| Reboot | Ability to reboot the device via Entgra UEM Server. This configuration will be available only for COPE/COSU enrollment types. |
| Hard Unlock | Ability to unlock a device that has been locked with the hard lock option or to unlock a device from kiosk mode temporally |
| Update Default SIM | Ability to update current installed SIM card as default SIM card. |
| Upgrade Firmware | Ability to upgrade firmware via Entgra UEM Server. |
| Mute | Ability to enable mute in the device via Entgra UEM Server. |
| Message | Ability to send message operation via Entgra UEM Server. The title of the message can be defined seperately in the Title box. The message can be defined in the message box. |
| Change Lock-code | Ability to enable or disable current lock code via Entgra UEM Server.(This functionality is only working with profile owners from Android 7.0 API 24 onwards.) |
| File Transfer | Ability to download files from the device and upload files to the device via Entgra UEM Server. |
| Enterprise Wipe | Ability to remove enterprise applications via Entgra UEM Server. |
| Factory Reset | Ability to Factory reset the device via Entgra UEM Server. Enter the Pin code of the device to complete this operation. |
| App Configurations | Ability to send remote configurations to an app. |
| Alternate App Install | Ability to install an application directly through a device operation. |
iOS macOS Supported Operations
Available operations for iOS and macOS vary according to how Apple defines the protocol and also depending on whether the device is a Bring Your Own Device (BYOD) or a Company Owned Personally Enabled (COPE) device.
The table below depicts a summary of this information.
| iOS | iOS | macOS | |
|---|---|---|---|
| Operation | BYOD | COPE | BYOD |
| Get Device Information - Fetch the device's runtime information. | ✓ | ✓ | ✓ |
| Get Installed Applications - Fetch the device's installed application list. | ✓ | ✓ | ✓ |
| Get Device Location Information - Fetch the device's current location. | ✓ | ✓ | X |
| Ring Device - Ring the device for the purpose of locating the device in case of misplace. | ✓ | ✓ | X |
| Install/Uninstall/update applications - Manage apps installed on the device. | ✓ | ✓ | X |
| Enterprise data wipe - Wipe the entreprise portion of the device. | ✓ | ✓ | ✓ |
| Lock Device - Lock the device remotely. Similar to pressing the power button on the device and locking it. | ✓ | ✓ | ✓ |
| Send Notification - Send a notification(message) to the device. | ✓ | ✓ | X |
| Clear Passcode - Clear the passcode of a mobile device. | ✓ | ✓ | X |
| Wipe Device(factory reset) - Factory reset a device. | ✓ | ✓ | ✓ |
| Restart - Restart command is issued to restart the device. | ✓ | ✓ | ✓ |
| Shutdown - Shutdown command is issued to shutdown the device. | ✓ | ✓ | ✓ |
| External profile add and remove APIs | ✓ | ✓ | X |
| Fetch security information of devices. | ✓ | ✓ | X |
Windows Supported Operations
The following operations can be executed on a Windows device.
| Operation | Description |
|---|---|
| Disenroll | Remove selected devices |
| Wipe data | Wipe the enterprise portion of the device |
| Location | Fetch the device's current location |
| Reboot | Reboot the device remotely |
Add Operations to Multiple Devices
-
Sign in to the Entgra UEM Server console.
-
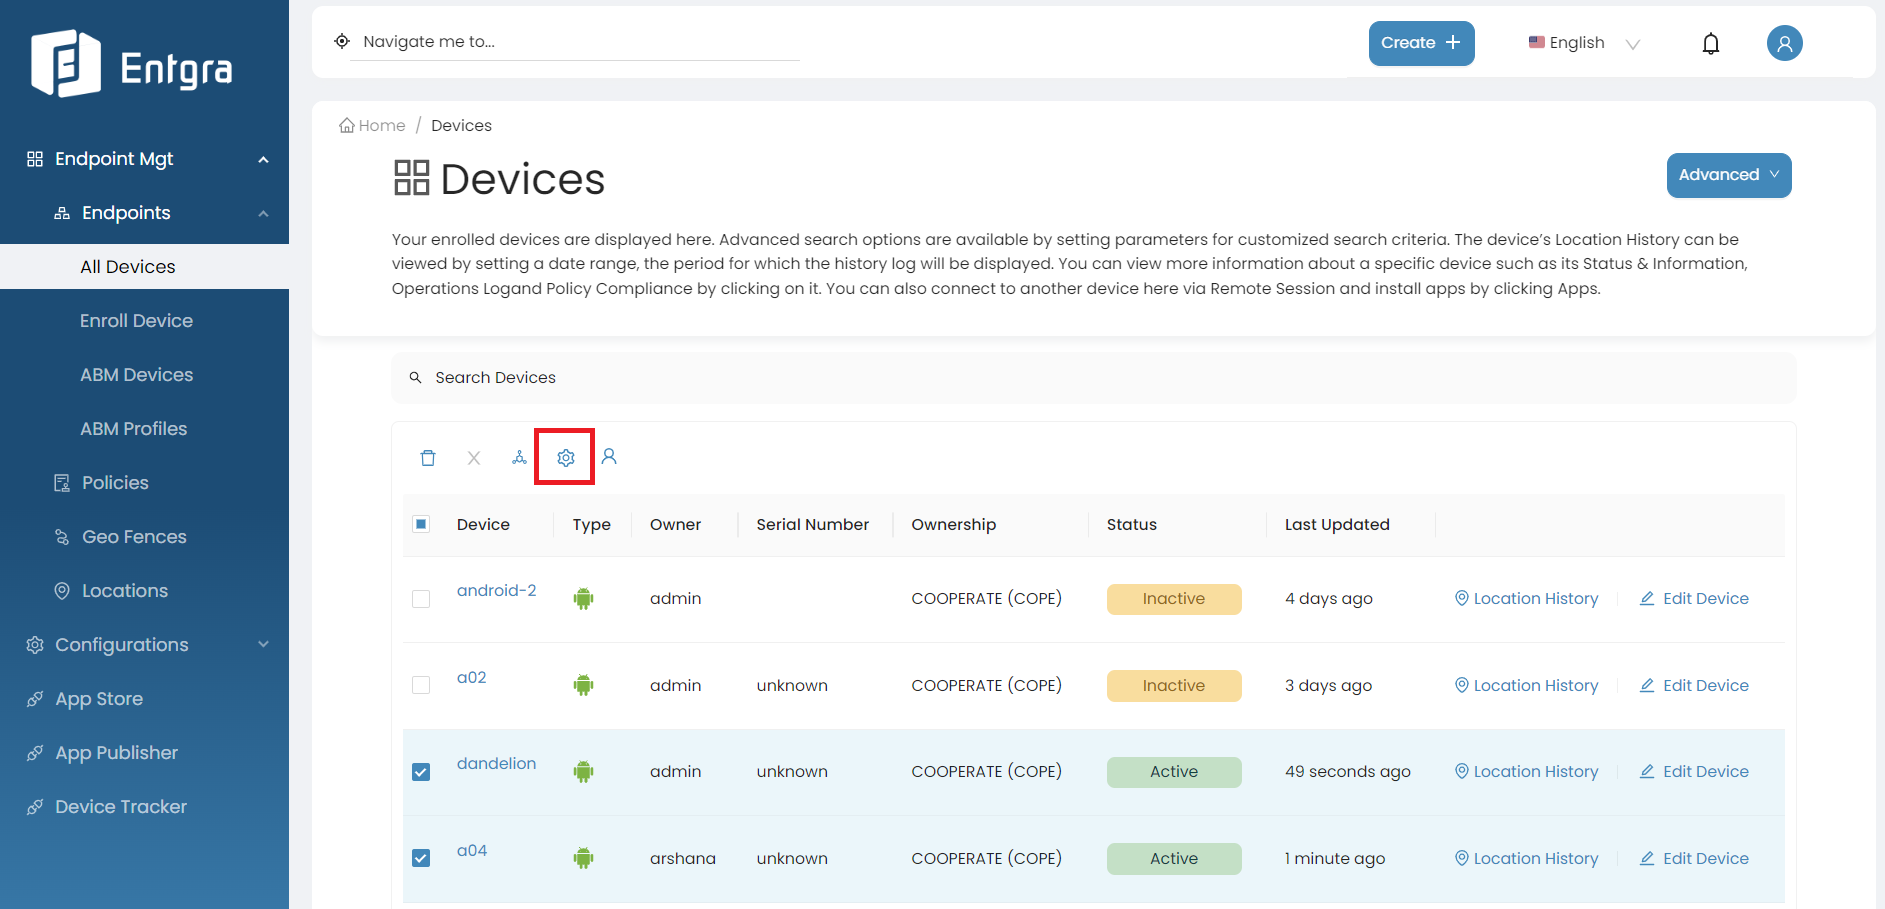
Click All Devices under Endpoints.
-
Select the devices that you wish to trigger an operation.
-
Click on Add Operations icon.
-
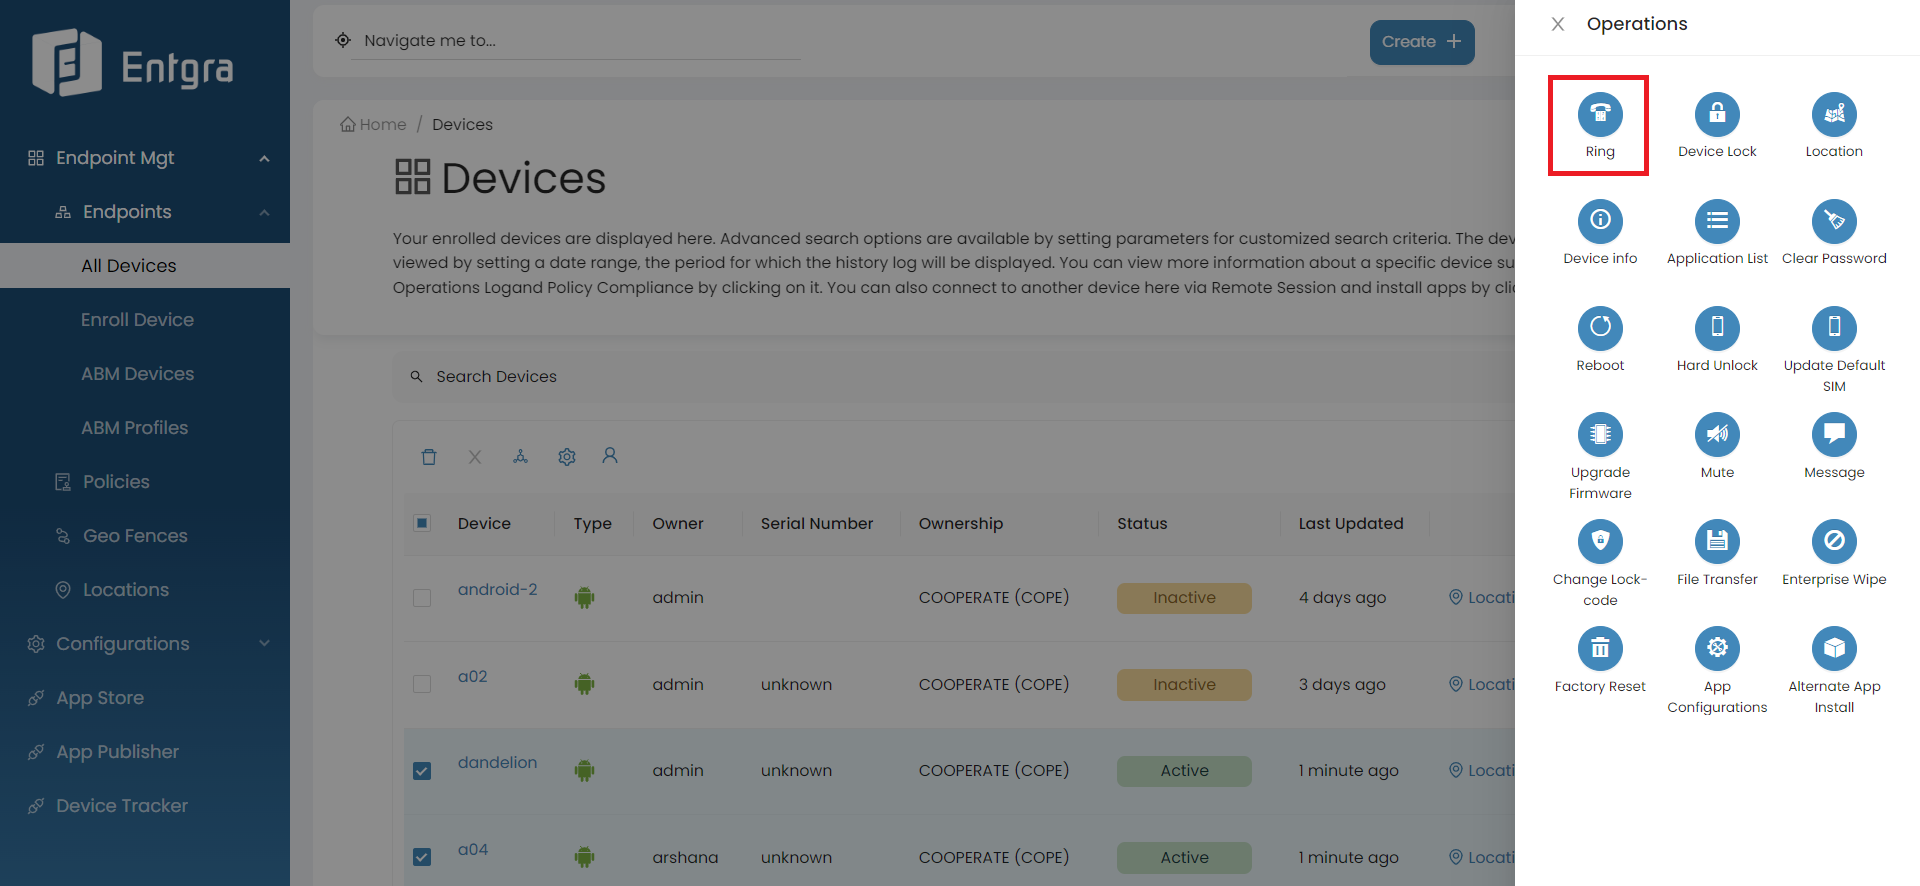
Click on the operation that you need to apply to the device. In this tutorial, let us apply the Ring device operation.
-
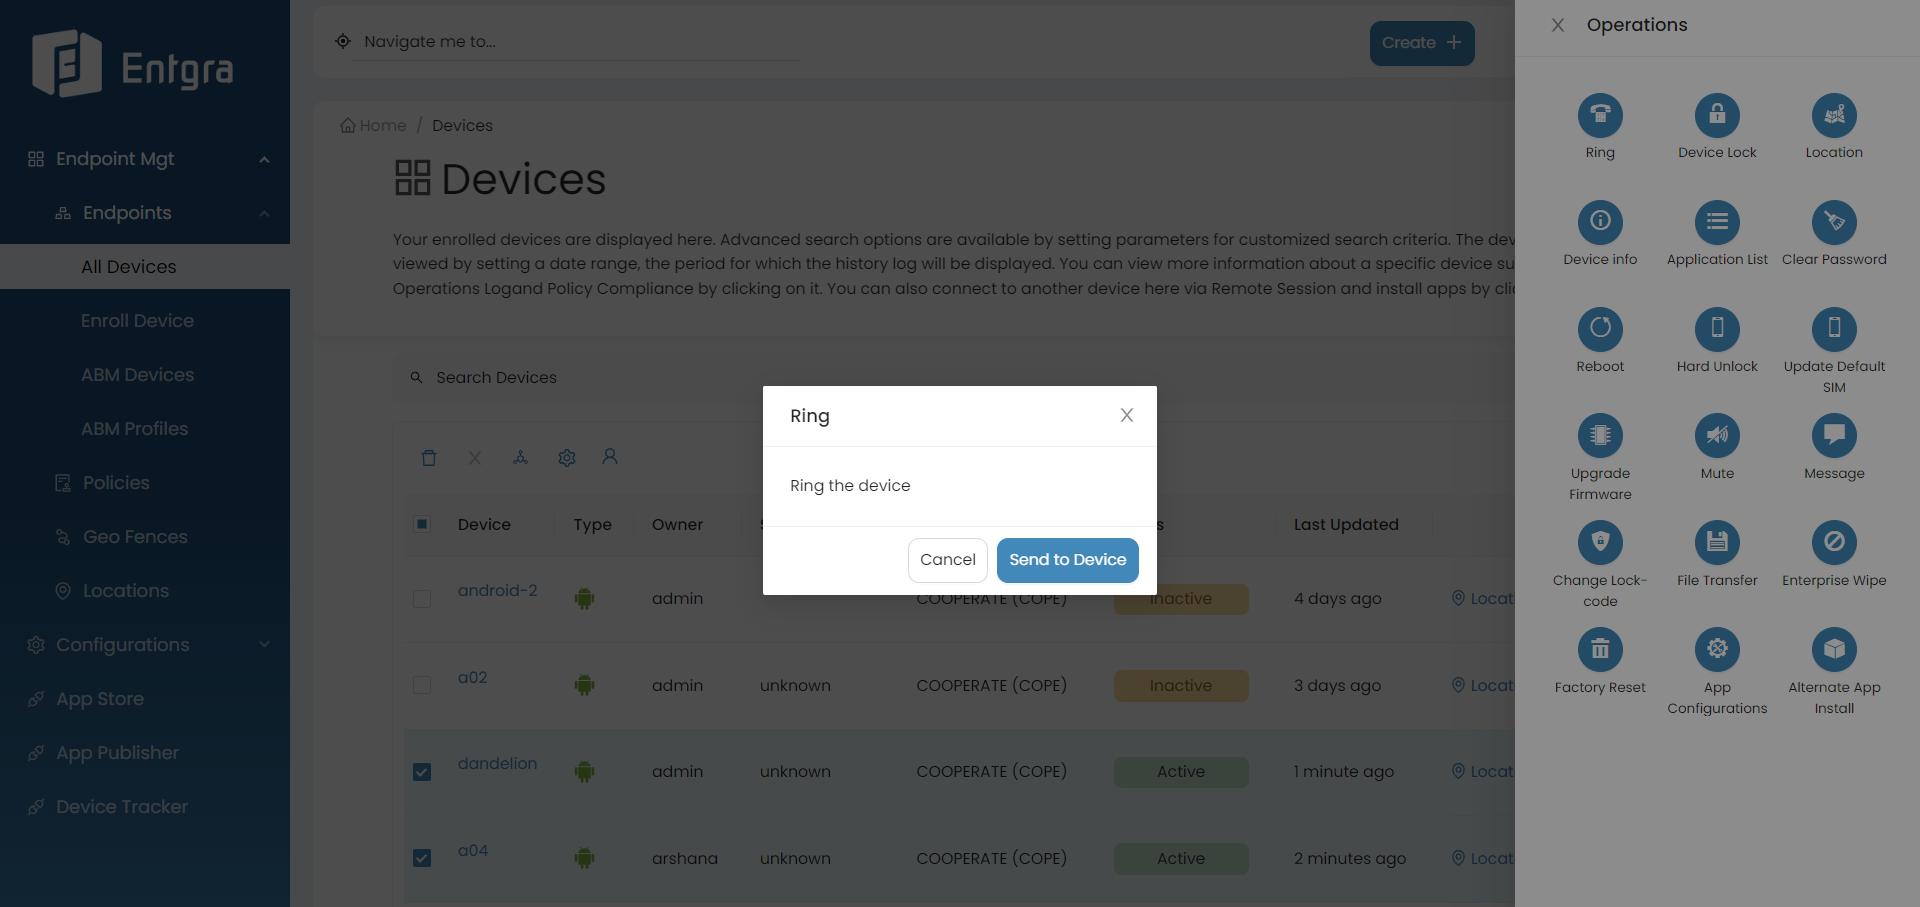
A popup message will be displayed on the screen. And click Send to Device to confirm the operation.
Further explore this feature by referring to our comprehensive blog article
Add Operations to a Single Device
-
Sign in to the Entgra UEM Server console.
-
Click All Devices under Endpoints.
-
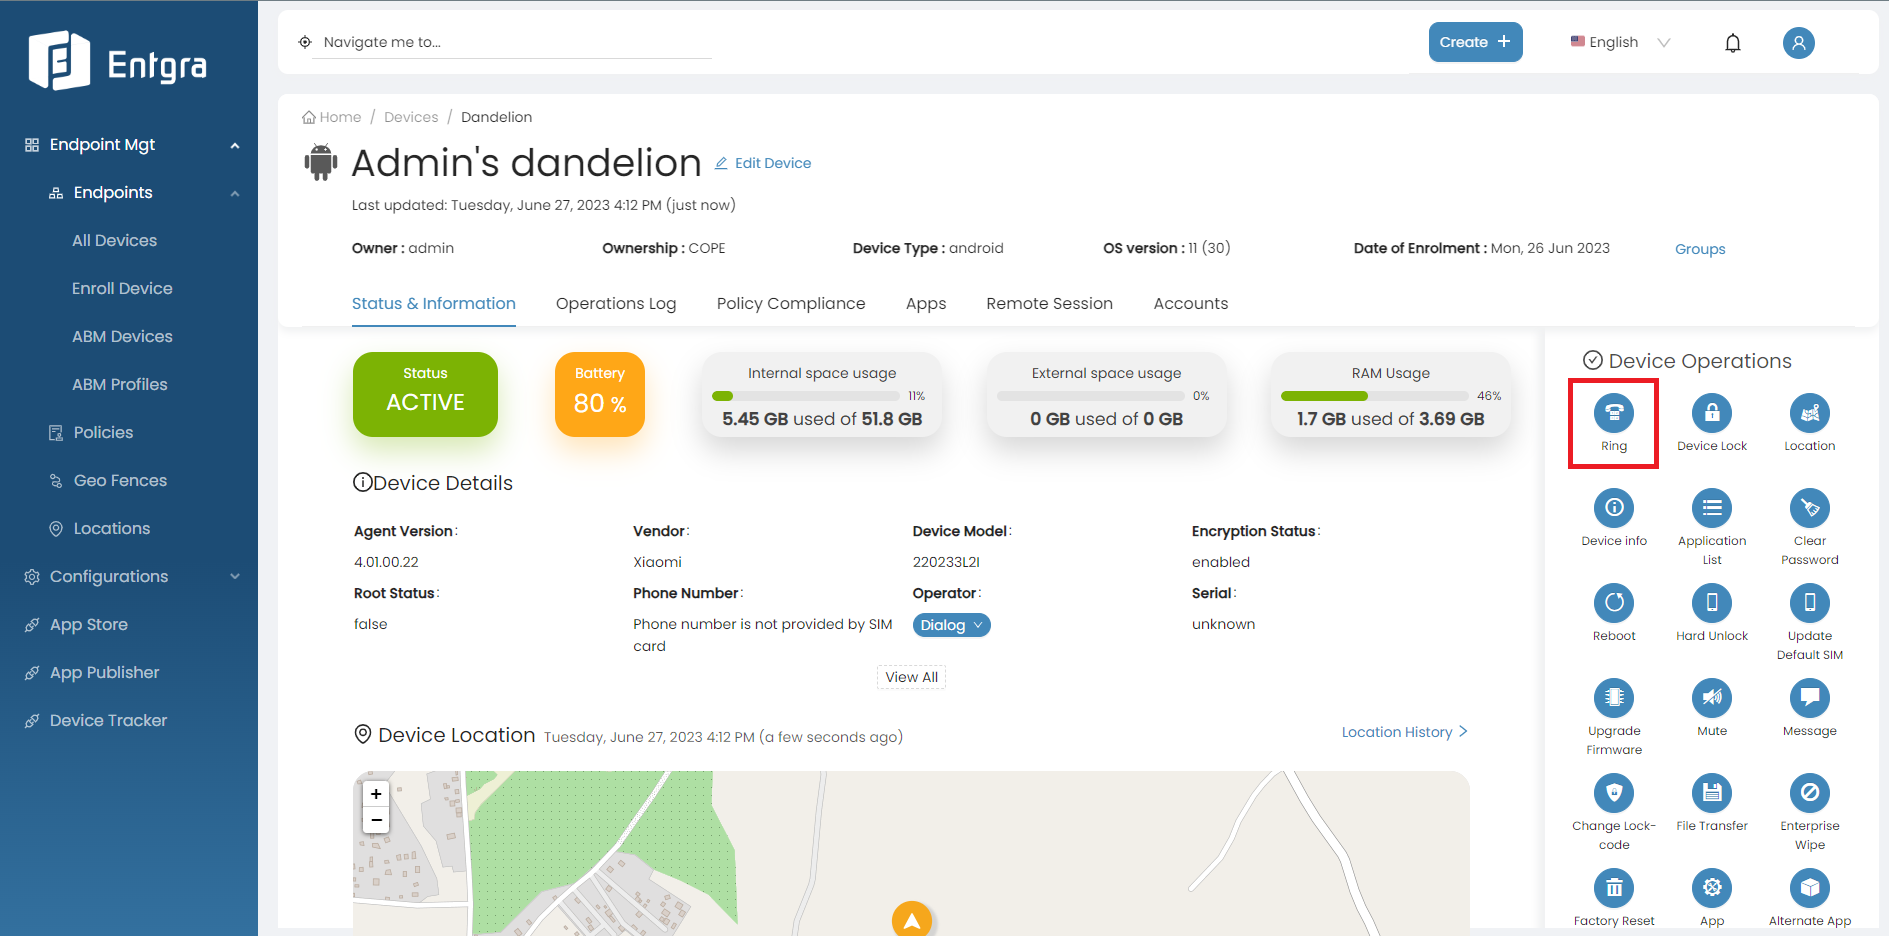
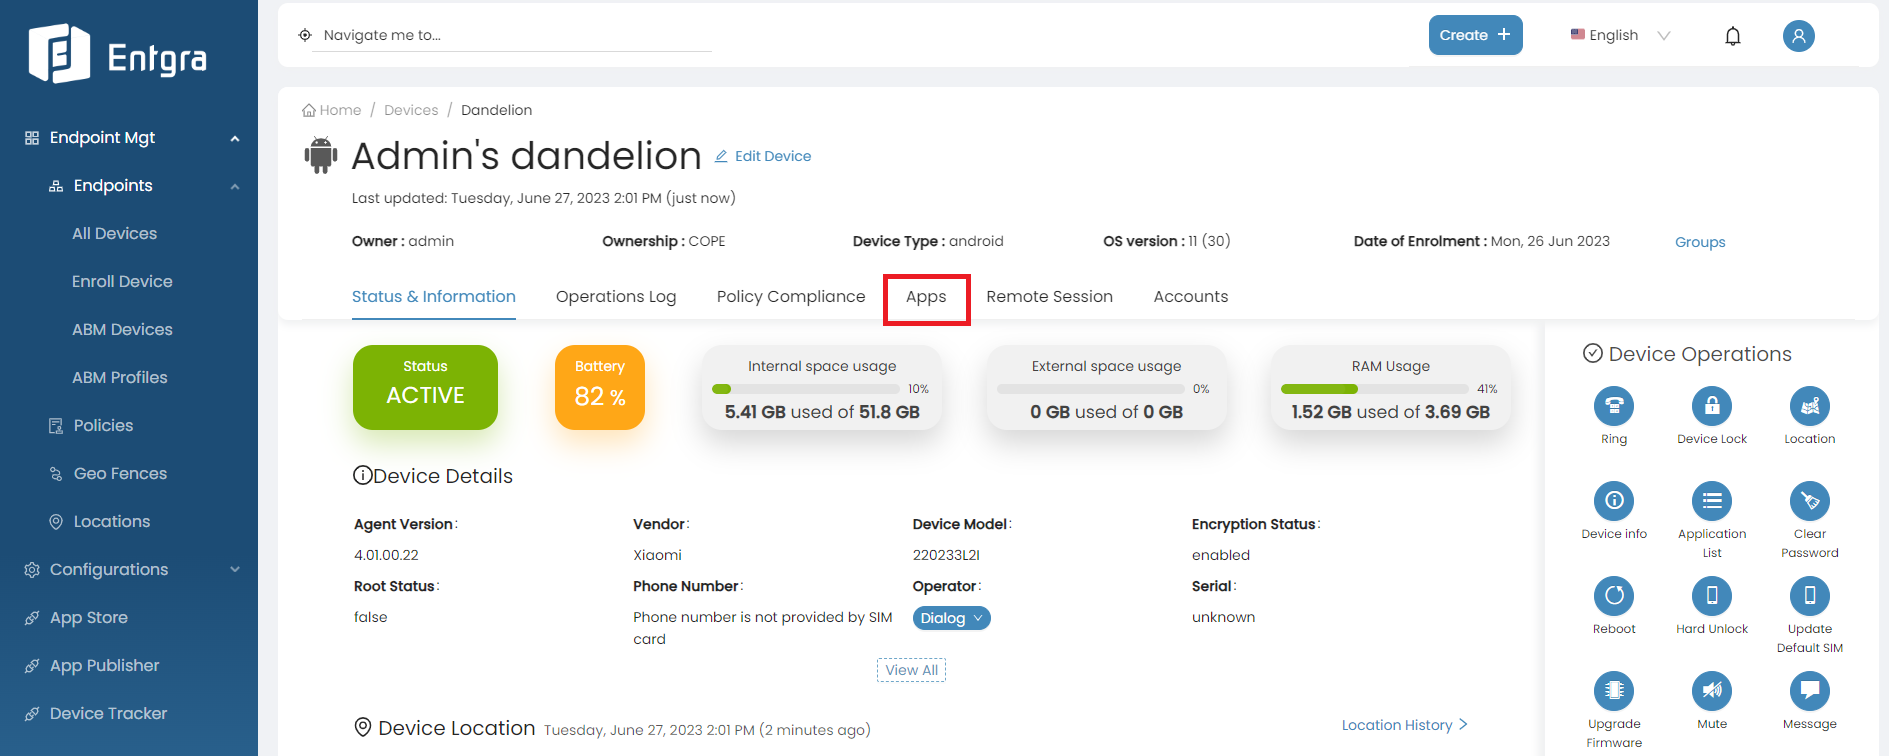
Click on one device (Example : dandelion).
-
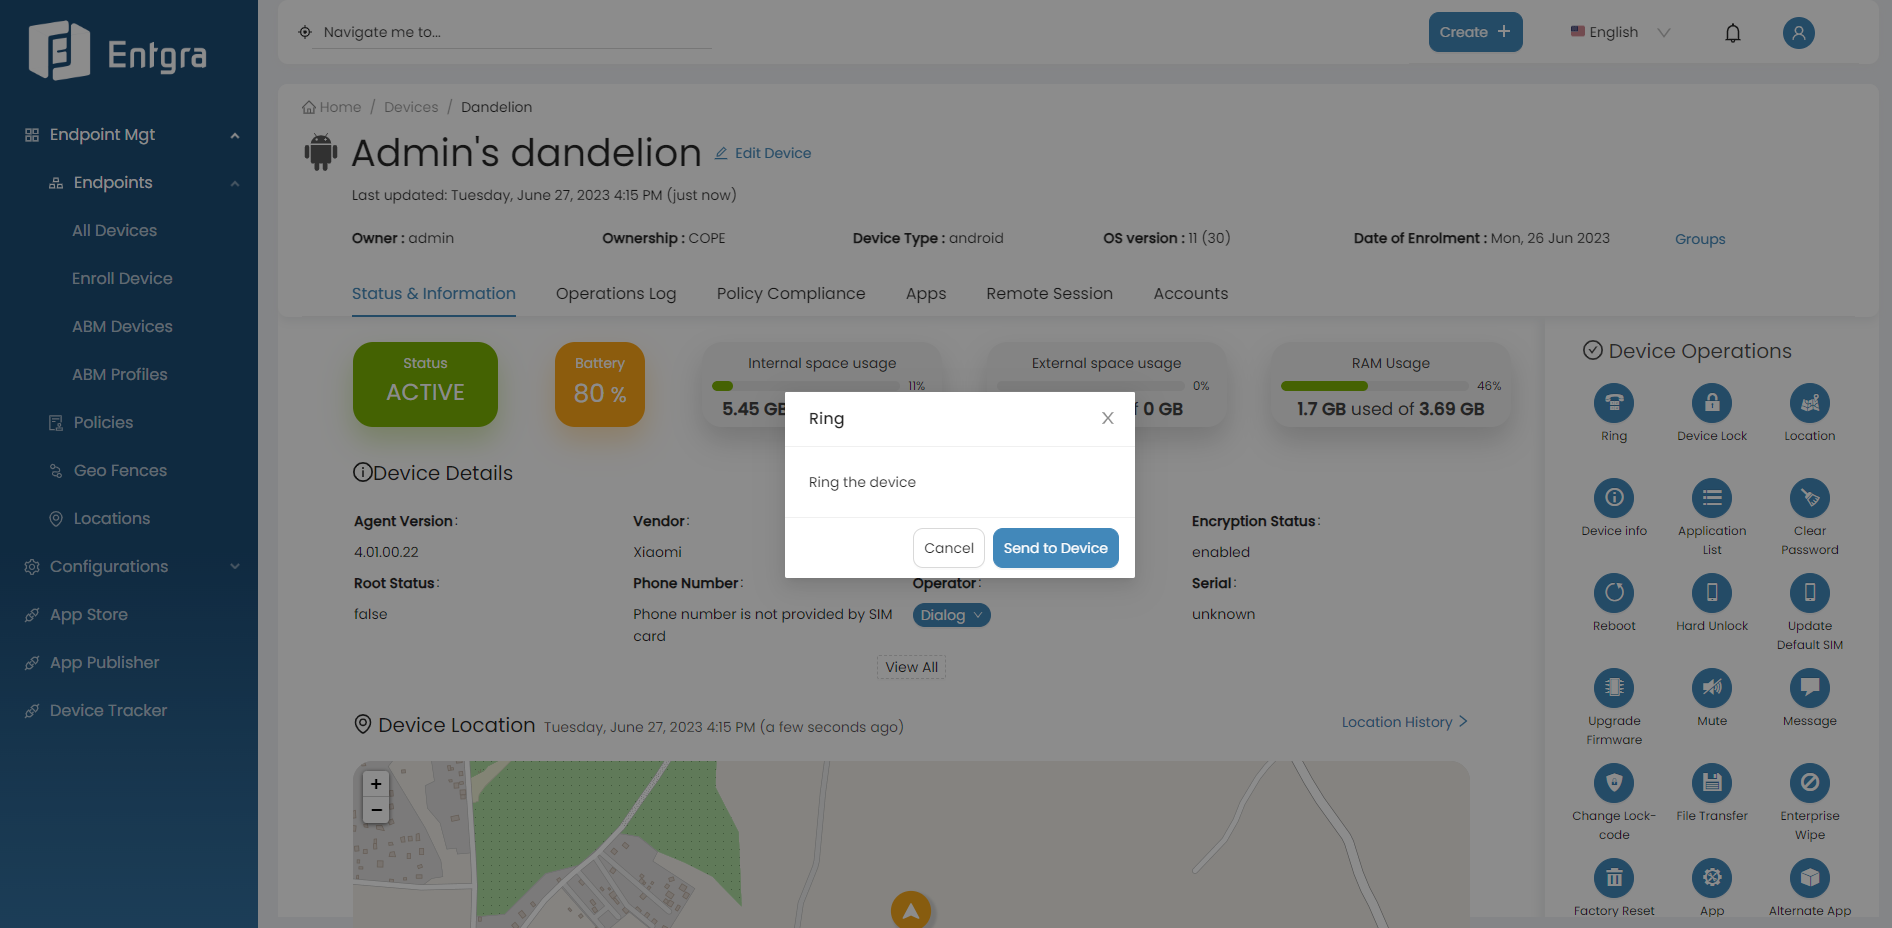
On the device details page, click on the operation that you need to apply to the device. In this tutorial, let us apply the Ring device operation.
-
A popup message will be displayed on the screen. And click Send to Device to confirm the operation.
-
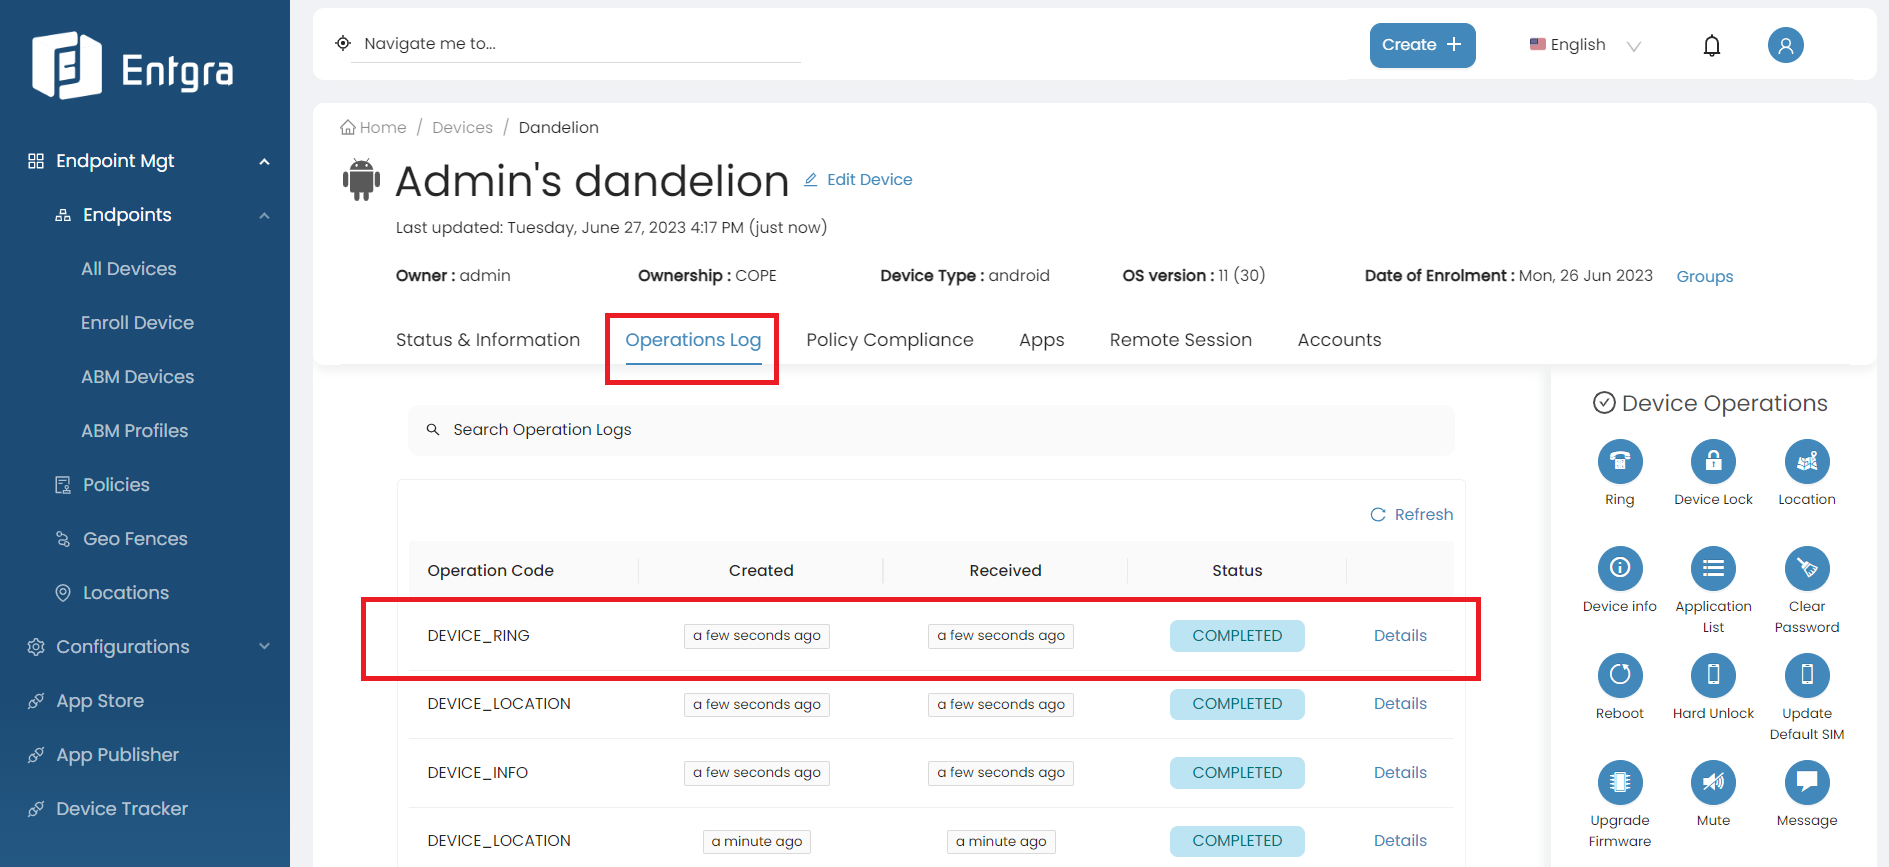
In the Operations Log, you can see the status of the operation triggered on the device.
Update Enrollment
The update enrollment feature gives UEM admins the capability to change the owner of the enrolled devices. Follow the steps given below to update device enrollment:
-
Sign in to the Entgra UEM Server console.
-
Click All Devices under Endpoints.
-
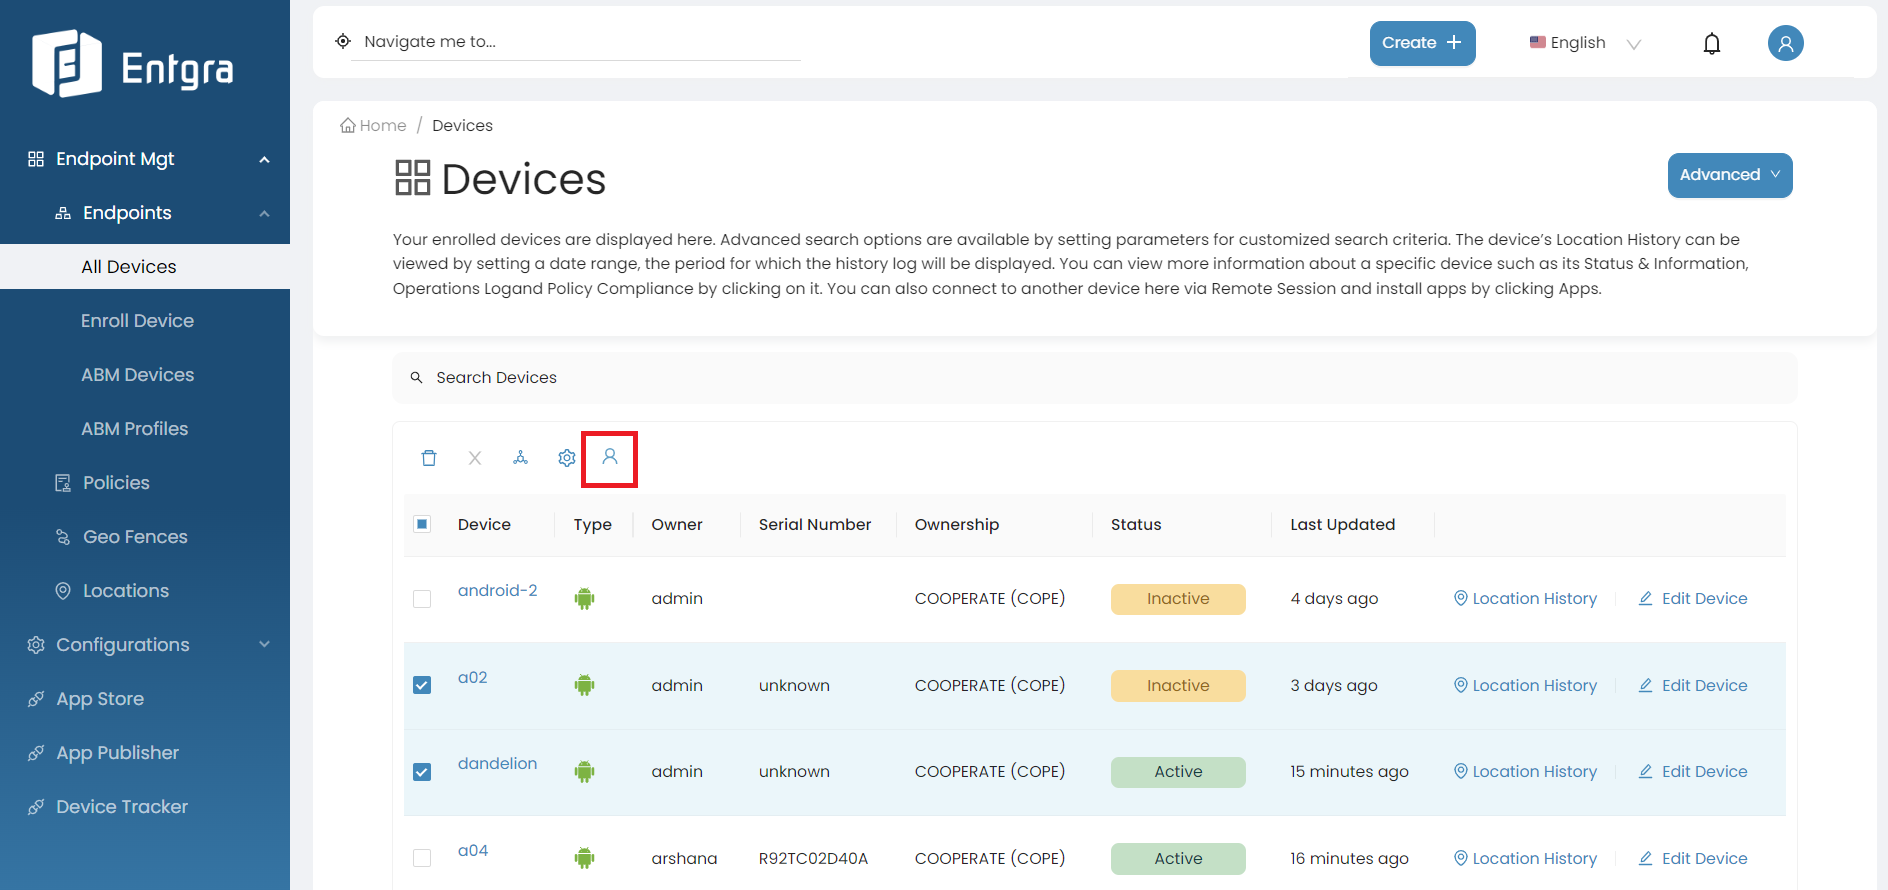
Select the devices that you wish to update enrollment.
-
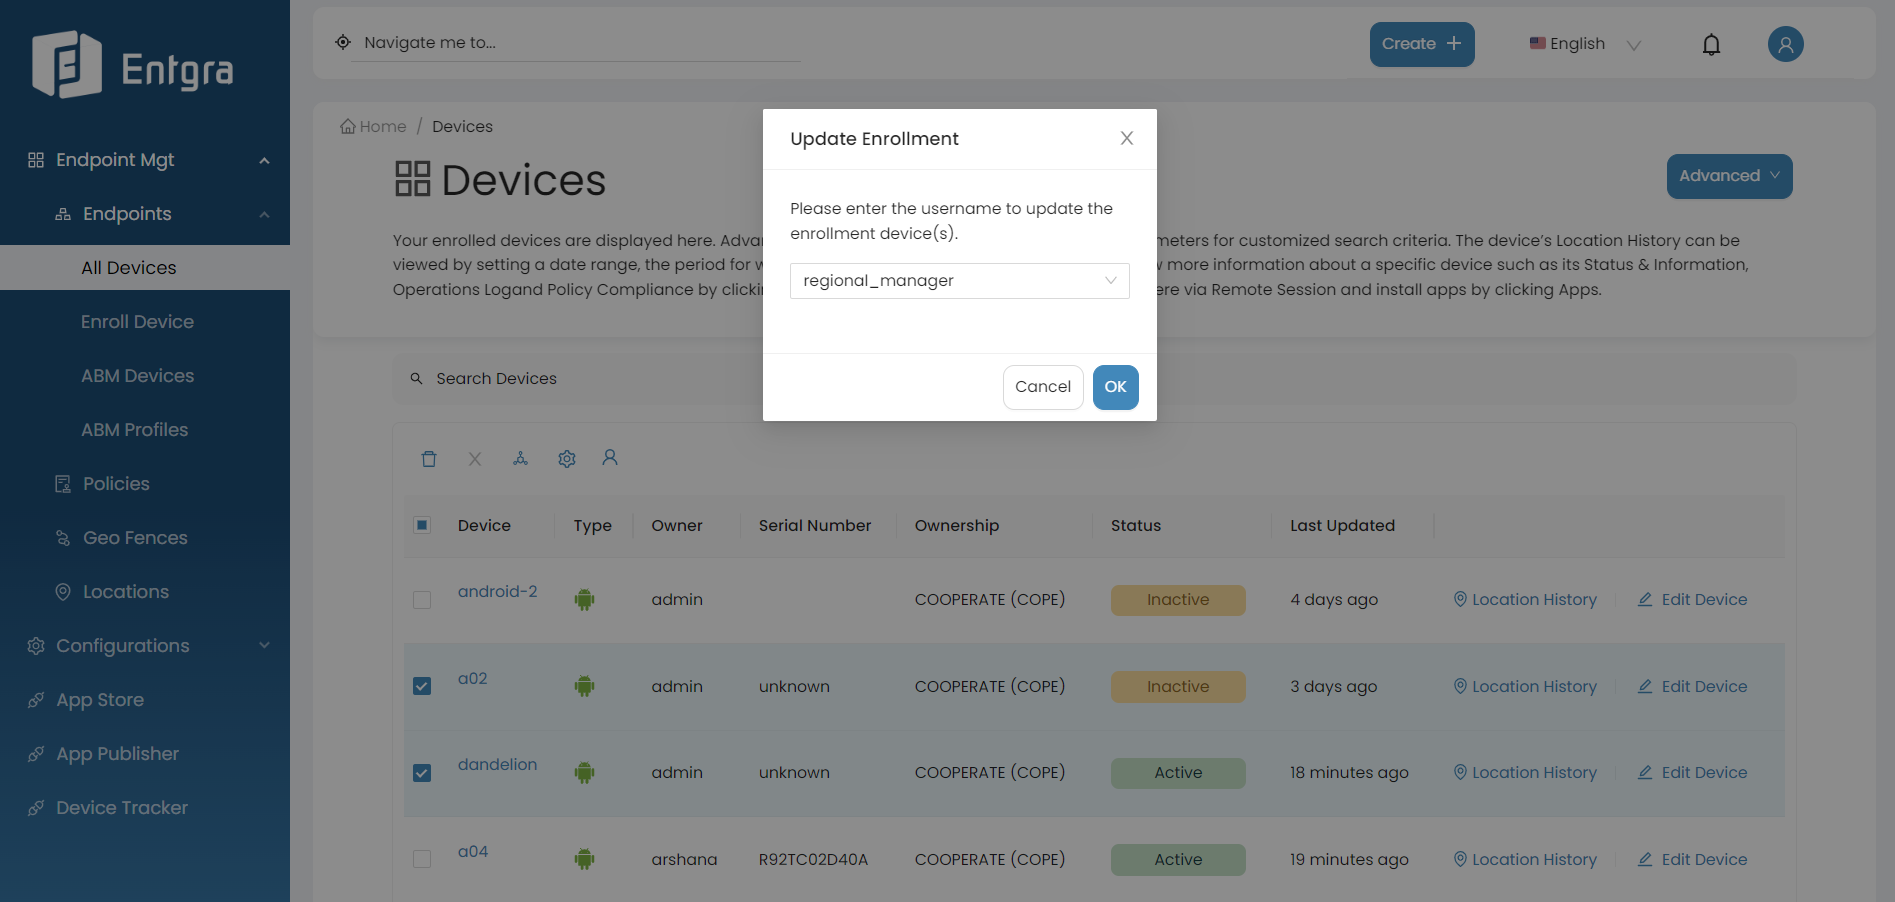
Click on Update Enrollment icon.
-
Select a new owner from the list click Ok to update the enrollment.
Monitoring the Device Status
Due to various reasons, the devices registered with Entgra UEM Server might not be able to communicate with the server continuously. When the device is not actively communicating with the server, you need to know about it to be able take necessary actions, such as checking if the device is malfunctioning, whether it needs to be repaired, or if the device has been stolen.
In the endpoint management console, click All Devices under Endpoints. You can see all your registered devices and their device statuses.
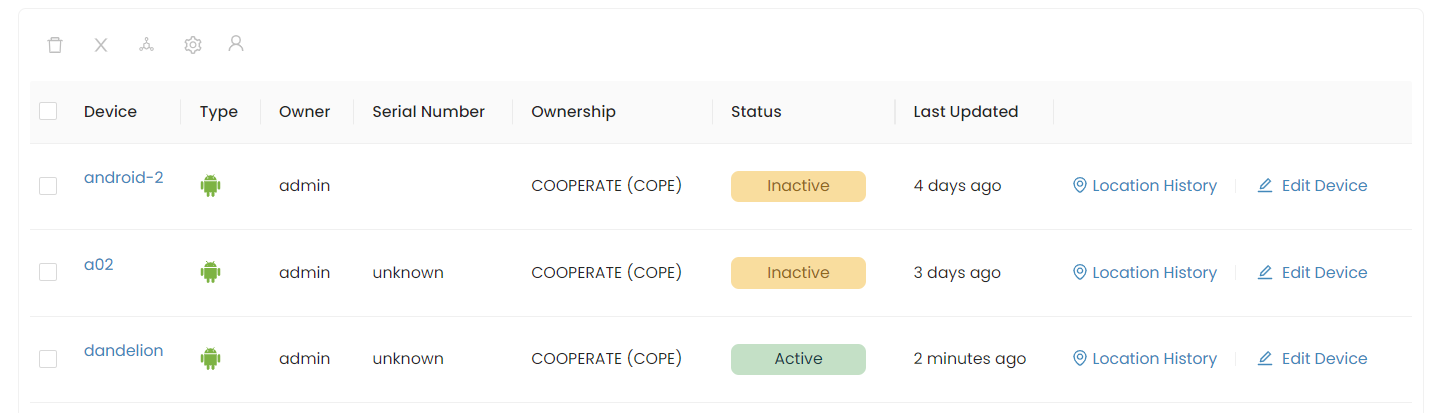
To get a clear understanding, let us look at how this works in the Entgra UEM Server.
-
If the device and the server are actively communicating, the device is shown as Active.
-
If the server is unable to communicate with the device within a defined time period, the device will be displayed as Unreachable.
-
If the server is still unable to communicate with the device after a defined time period, the device will be shown as Inactive.
-
If the device starts to communicate with the device after some time, the device status is updated back to Active.
The device’s status has the following lifecycle:
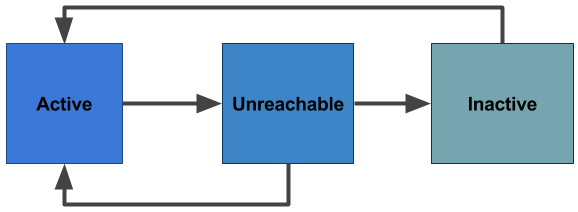
The device monitoring task is not applicable for all IoT devices. Therefore, you can choose to enable or disable it for your device type.
Let us take a look at how you can configure Entgra UEM Server and your device type to monitor the device status.
Open the <IOTS_HOME>/conf/cdm-config.xml file and make sure the DeviceStatusTaskConfig is enabled. This configuration is enabled by default.
If the DeviceStatusTaskConfig is enabled (or enabled on a node that is in a clustered setup) it will run the status monitoring task in the server. If the configuration is disabled, the server will not monitor the status of the devices.
true
Configure the device type to go into the unreachable state and then to the inactive state after a specified time.
Navigate to the <IOTS_HOME>/repository/deployment/server/devicetype directory, open the <DEVICE_TYPE>.xml file, and configure the fields given below:
The default configuration in the android.xml file is shown below:
true 300 300 600
git
In addition to the above configurations, for the device monitoring task to actively function, you need to have pending operations on the device end. When there are pending operations the device communicates with the server to send the operation details to the server and through it, the server keeps track and ensures that the device is active.
View Device Location History
-
Sign in to the Entgra UEM Server console.
-
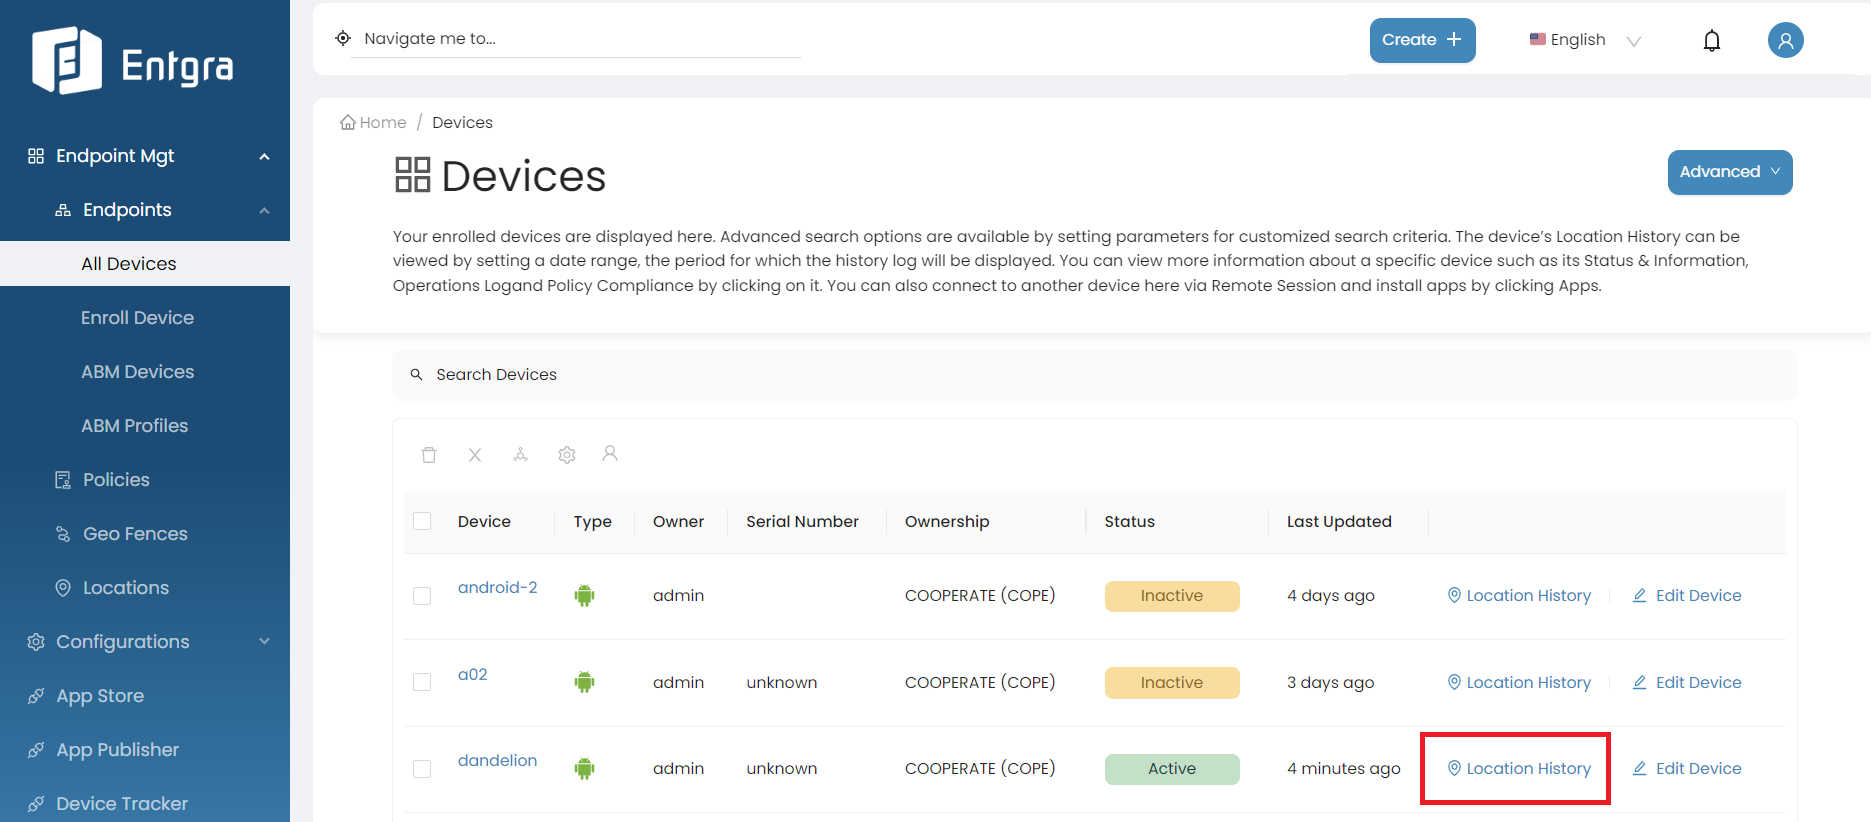
Click All Devices under Endpoints.
-
Click Location History under the device that you want to view the location history.
-
Select the period of time that you want to view the location history and click Ok.
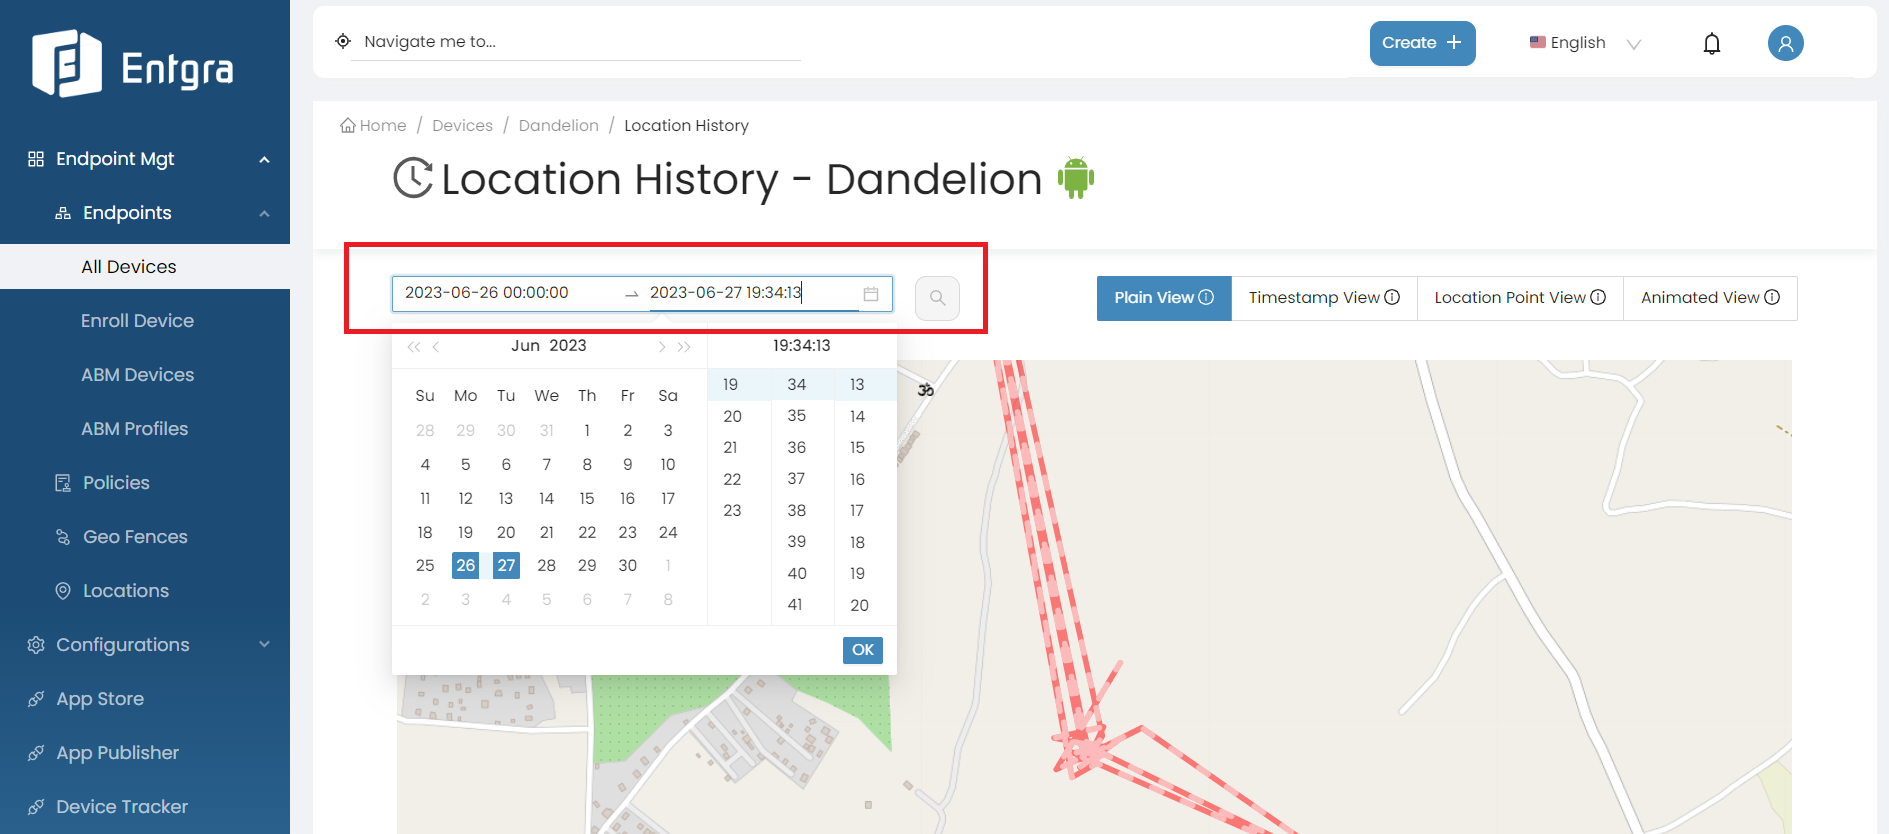
-
Select the preferred view type.
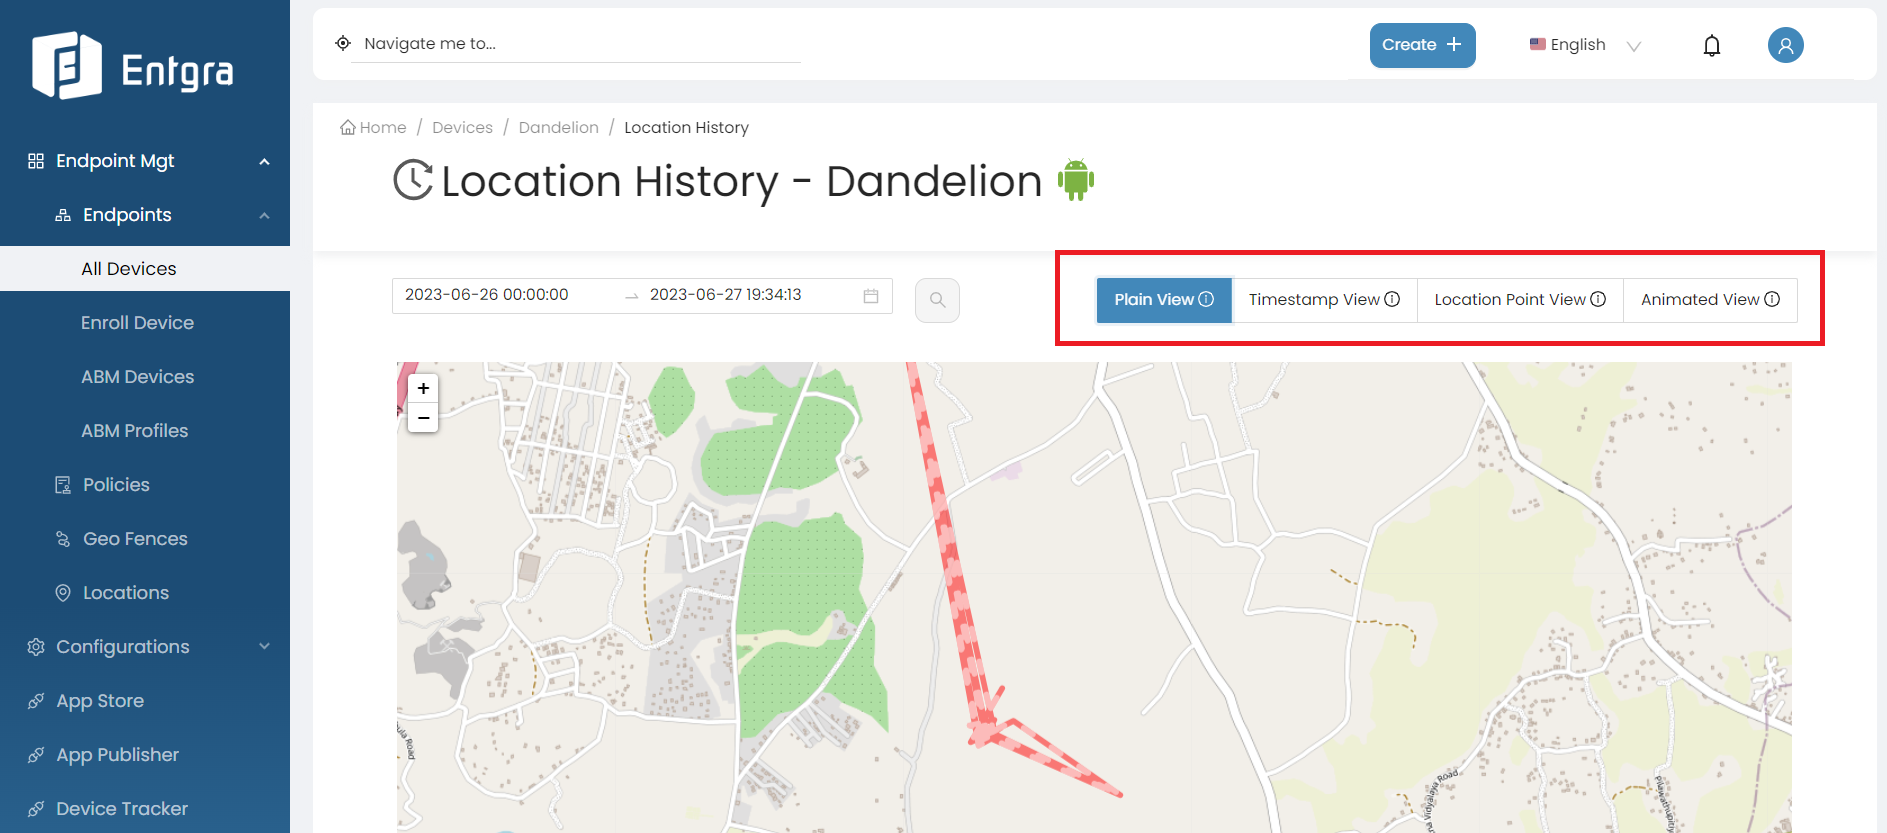
Type Description Plan View Plain view of the path traveled between selected dates. Timestamp View Traveled path with timestamps on location points. (Hover on location points to see the timestamp). Location Point View Location points without traveled path. Animated View Animated view of the traveled path between selected dates.
Change Device Name
The UEM server adminstrator is able to modify device names by following the steps given below.
-
Sign in to the Entgra UEM Server console.
-
Click All Devices under Endpoints.
-
Click Edit Device under the device that you want to change the name.

-
Enter the new name for the device and click Rename.
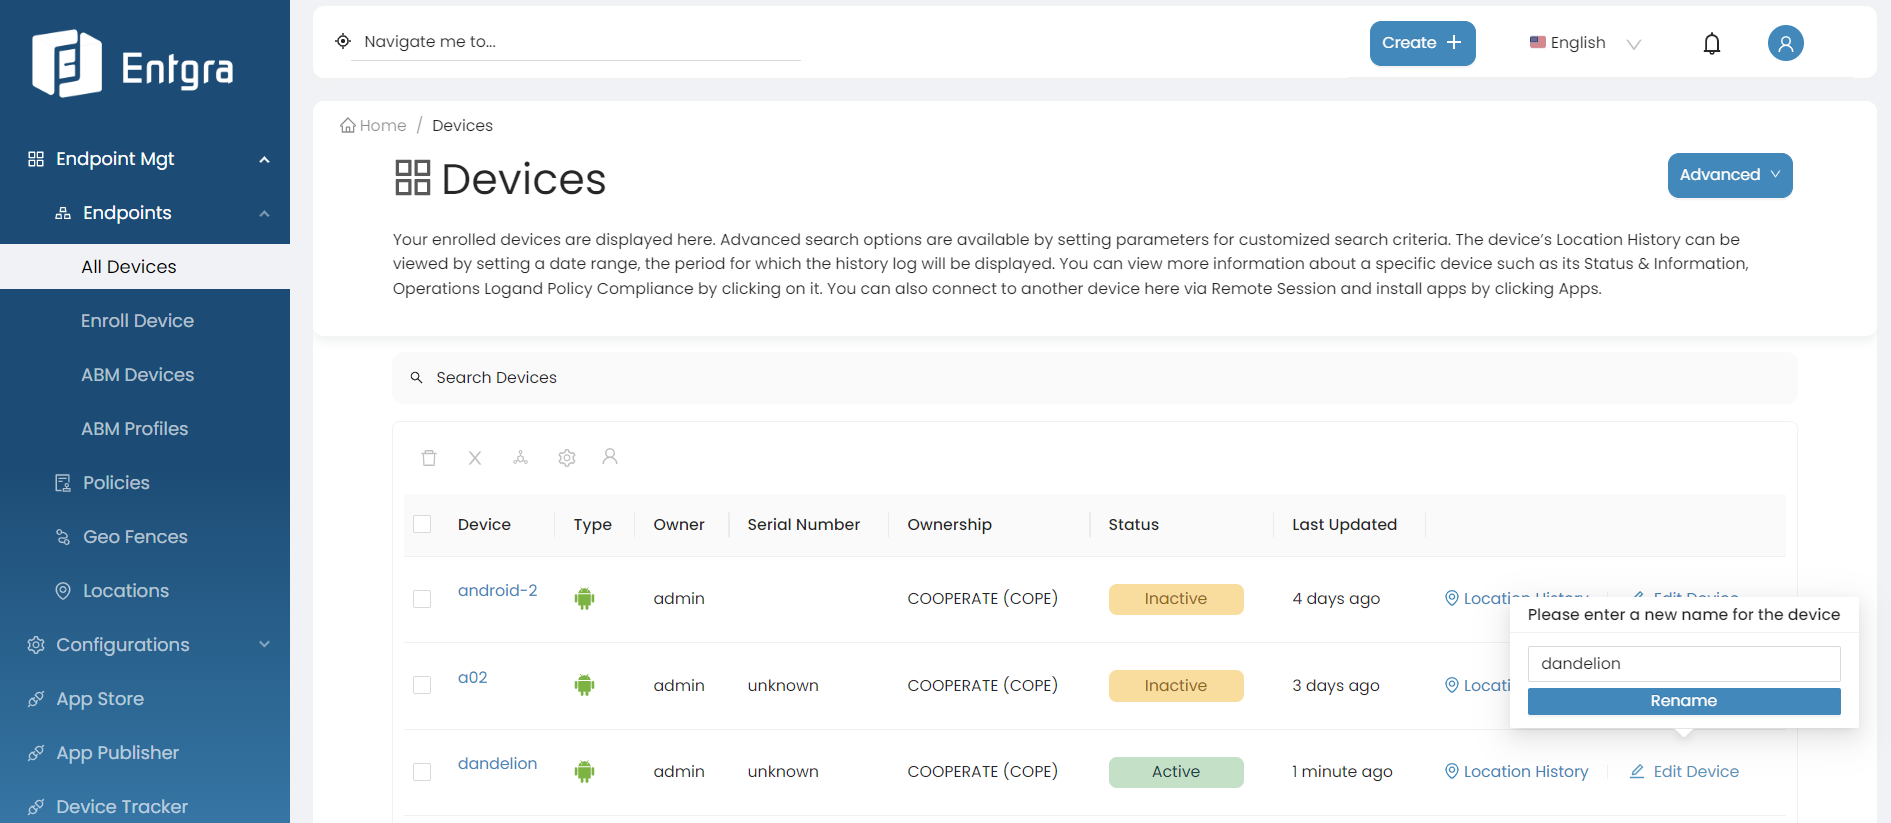
Renaming the device here triggers the SEND_USERNAME operation, and a notification is sent to the device to inform the device owner that the device name has changed.
Display Changed Device Name
A UEM server adminstrator is able to modify device names using APIs. This new features also enables a user to notice the changed/modified device name.
In order to be able to view the changed device name, follow the steps below:
-
Go to Entgra Device Management Agent in the device.
-
Click Device Information.
-
Under Device Name, the changed device name is shown.
The administrator can use a standard way to name all the devices that helps in easy identification and troubleshooting.
Android Supported Features
Android Supported Features List
The table below summarizes the supported features for Android devices:
| Feature Description | Legacy (BYOD) | Android Enterprise | COSU (Kiosk) | COPE Enrollment | System App |
|---|---|---|---|---|---|
| Live Feed | X | ✓ | X | ✓ | ✓ |
| FTP file transferring | X | ✓ | X | ✓ | ✓ |
| Entgra App catalog | ✓ | ✓ | X | ✓ | ✓ |
| Hardware properties | ✓ | ✓ | X | ✓ | ✓ |
| Block App uninstall | ✓ | ✓ | X | ✓ | ✓ |
| Device theme policy | ✓ | ✓ | X | ✓ | ✓ |
| Remotely clear app data | ✓ | ✓ | X | ✓ | ✓ |
| Grafana based dashboards | X | ✓ | X | ✓ | ✓ |
| Remote screen keyboard and mouse inputs in screen-sharing mode. | ✓ | ✓ | ✓ | ✓ | ✓ |
| Allow-list/Block-list connected peripherals plugged-in. | ✓ | ✓ | ✓ | ✓ | ✓ |
| Force devices to be locked on to a given WiFi network. | ✓ | ✓ | ✓ | ✓ | ✓ |
| Entgra secure browser application with remote settings | ✓ | ✓ | ✓ | ✓ | ✓ |
| Device location history view to track the fleet’s history. | ✓ | ✓ | ✓ | ✓ | ✓ |
| Display a custom message when the device is locked and for locked settings. | ✓ | ✓ | ✓ | ✓ | ✓ |
| Offline un-enrollement via a special per device admin pin code. | ✓ | ✓ | ✓ | ✓ | ✓ |
| Get Device Information - Fetch the device's runtime information. | ✓ | ✓ | ✓ | ✓ | ✓ |
| Get Device Location Information - Fetch the device's current location. | ✓ | ✓ | ✓ | ✓ | ✓ |
| Get Installed Applications - Fetch the device's installed application list. | ✓ | ✓ | ✓ | ✓ | ✓ |
| Ring Device - Ring the device for the purpose of locating the device in case of misplacement. | ✓ | ✓ | ✓ | ✓ | ✓ |
| Transfer files from a remote server(FTP) to device folder. | ✓ | ✓ | ✓ | ✓ | ✓ |
| Transfer files from a device folder to an FTP location. | ✓ | ✓ | ✓ | ✓ | ✓ |
| Mute Device - Put the device in silent mode. | ✓ | ✓ | ✓ | ✓ | ✓ |
| Change Lock Code - Changes the device's currently set lock code. From Android N upwards, clear passcode will not work. | X | X | ✓ | ✓ | ✓ |
| Clear Password - Remove any password that the device owner has put. From Android N upwards, clear passcode will not work. | X | X | ✓ | ✓ | ✓ |
| Send Notifications/Messages - Send a notification (message) to the device. | ✓ | ✓ | ✓ | ✓ | ✓ |
| Enterprise Wipe - Wipe the entreprise portion of the device. | ✓ | ✓ | ✓ | ✓ | ✓ |
| Device Lock (soft lock) - Lock the device remotely. Similar to pressing the power button on the device and locking it. | ✓ | ✓ | ✓ | ✓ | ✓ |
| Reboot Device - Restart the phone for example for troubleshooting purposes. | X | X | ✓ | ✓ | ✓ |
| Upgrade Firmware - Upgrade Android operating firmware ensuring that firmware and the device has to be compatible and only applicable in OEM scenarios. | X | X | X | X | ✓ |
| Execute Shell Command - Remotely execute the shell commands on the device's command prompt. | X | X | X | X | ✓ |
| Hard Lock - Lock a device remotely by an admin and only the admin can unlock the device. | X | X | ✓ | ✓ | ✓ |
| Manage Web Clip - Install a shortcut link to a web page/web app on the phone's home screen. | ✓ | ✓ | ✓ | ✓ | ✓ |
| Trigger Google Play App - Install an app from the google play store. | ✓ | ✓ | ✓ | ✓ | ✓ |
| Install/Uninstall/update applications - Capability to perform various application management tasks such as install, uninstall and update apps. - Install an app from the google play store. | ✓ | ✓ | ✓ | ✓ | ✓ |
| View Device Screen - Screen sharing with the Admin. - Install an app from the google play store. | ✓ | ✓ | ✓ | ✓ | ✓ |
| Remote Control Device - Allow Admin to remotely control the device. | ✓ | ✓ | ✓ | ✓ | ✓ |
| Get Logcat - View the log of the operating system. | ✓ | ✓ | ✓ | ✓ | ✓ |
| Silent App Install - Install apps on the device without prompting the user to click install. | ✓ | ✓ | ✓ | ✓ | ✓ |
| Remote Kiosk Enable - Enable or disable kiosk mode remotely for maintenance reasons, troubleshooting etc. | X | X | X | ✓ | X |
Hardware Properties
This feature, when enabled, captures device hardware properties and displays them off the device details. The displayed hardware properties are,
- DEVICE_TEMPARETURE_BATTERY
- DEVICE_TEMPARETURE_CPU
- DEVICE_TEMPARETURE_GPU
- DEVICE_TEMPARETURE_SKIN
- DEVICE_FAN_SPEED
- DEVICE_CPU_USAGE
You can see the hardware properties of the device by as follows:
-
Sign in to the Entgra UEM Server console.
-
Click All Devices under Endpoints.
-
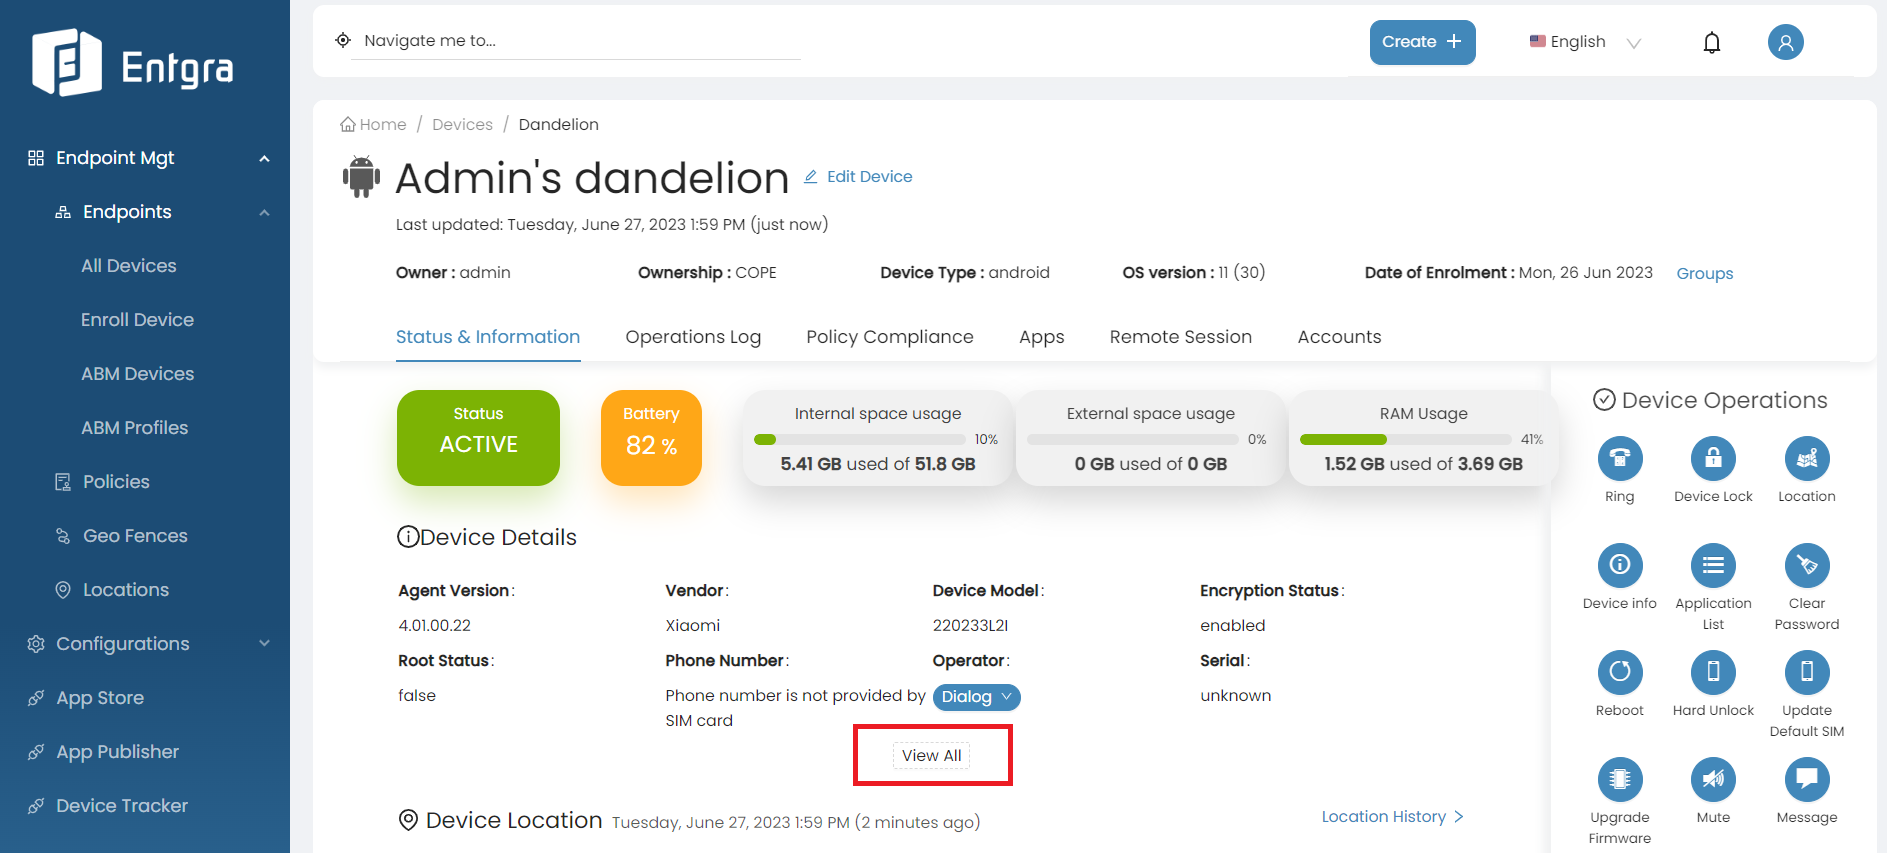
Click on the device that you wish to view hardware properties.
-
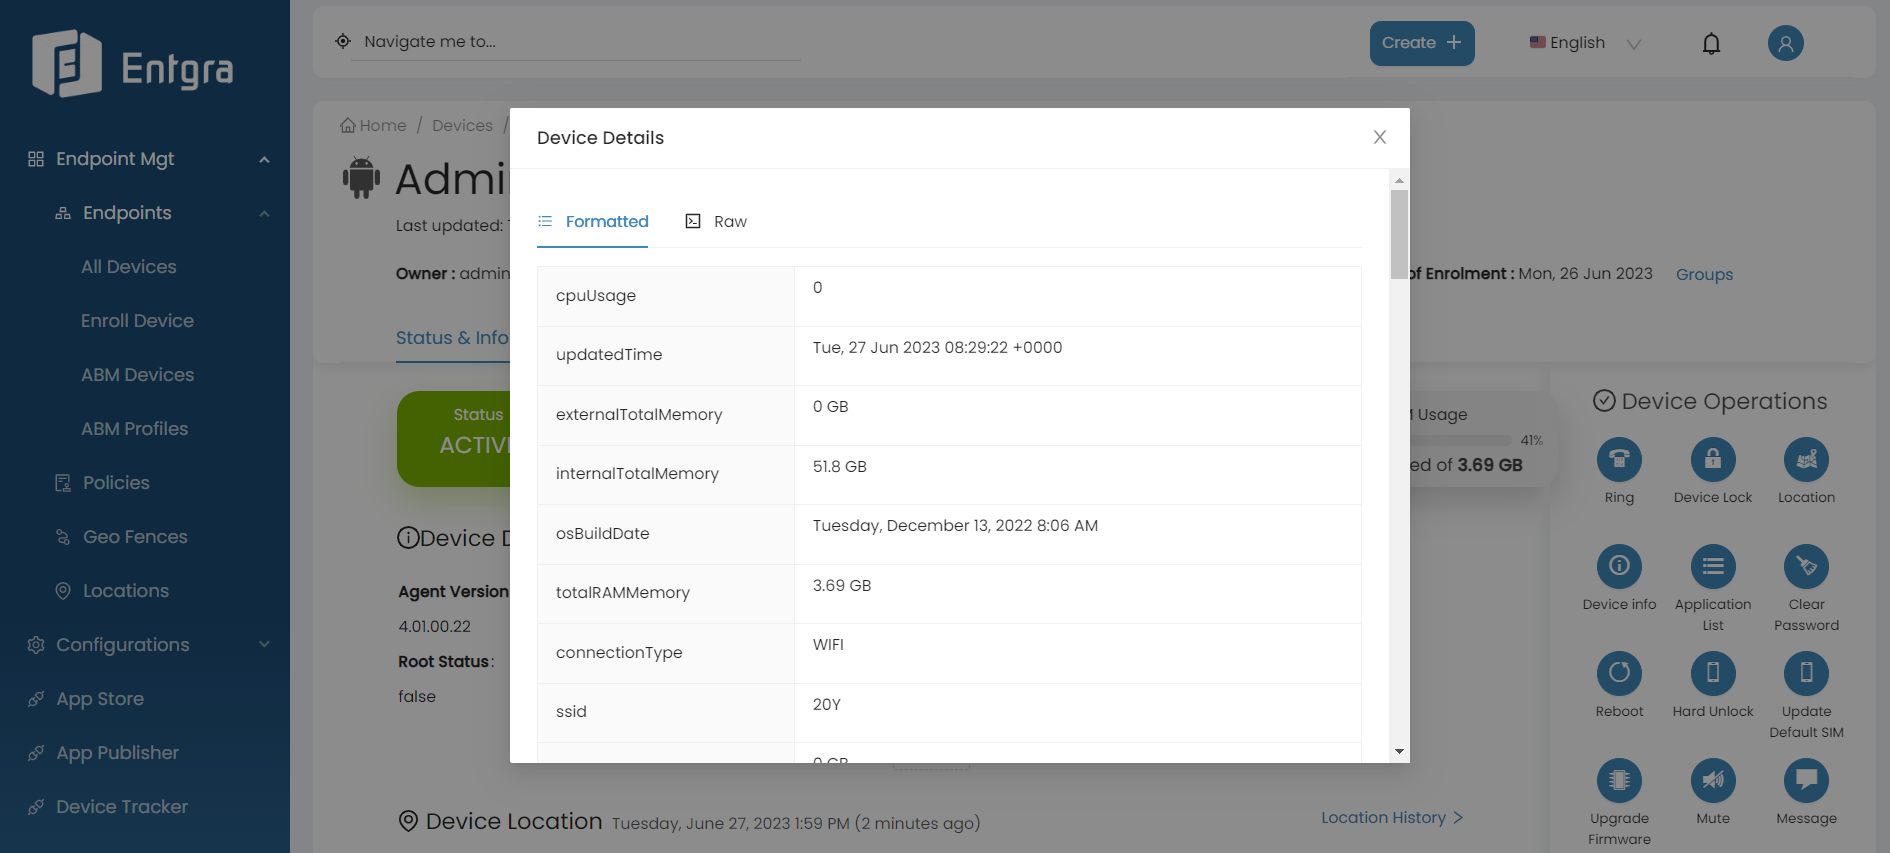
On the device details page, click View All.
-
As shown below, you will see the hardware properties of the device along with other device details.
Clear App Data Remotely
This feature is used by the device owner or profile owner to clear application user data remotely of a given package. This is equivalent to the user choosing to clear the app's data from within the device settings UI.
In case of misplacing the device, the administrator can clear the app data of corporate apps that have already been installed on the device by using this feature.
To access this feature:
-
Sign in to the Entgra UEM Server console.
-
Click All Devices under Endpoints.
-
Click on the device that you wish to view hardware properties.
-
Go to Apps tab.
-
You can now see the installed apps on the device.
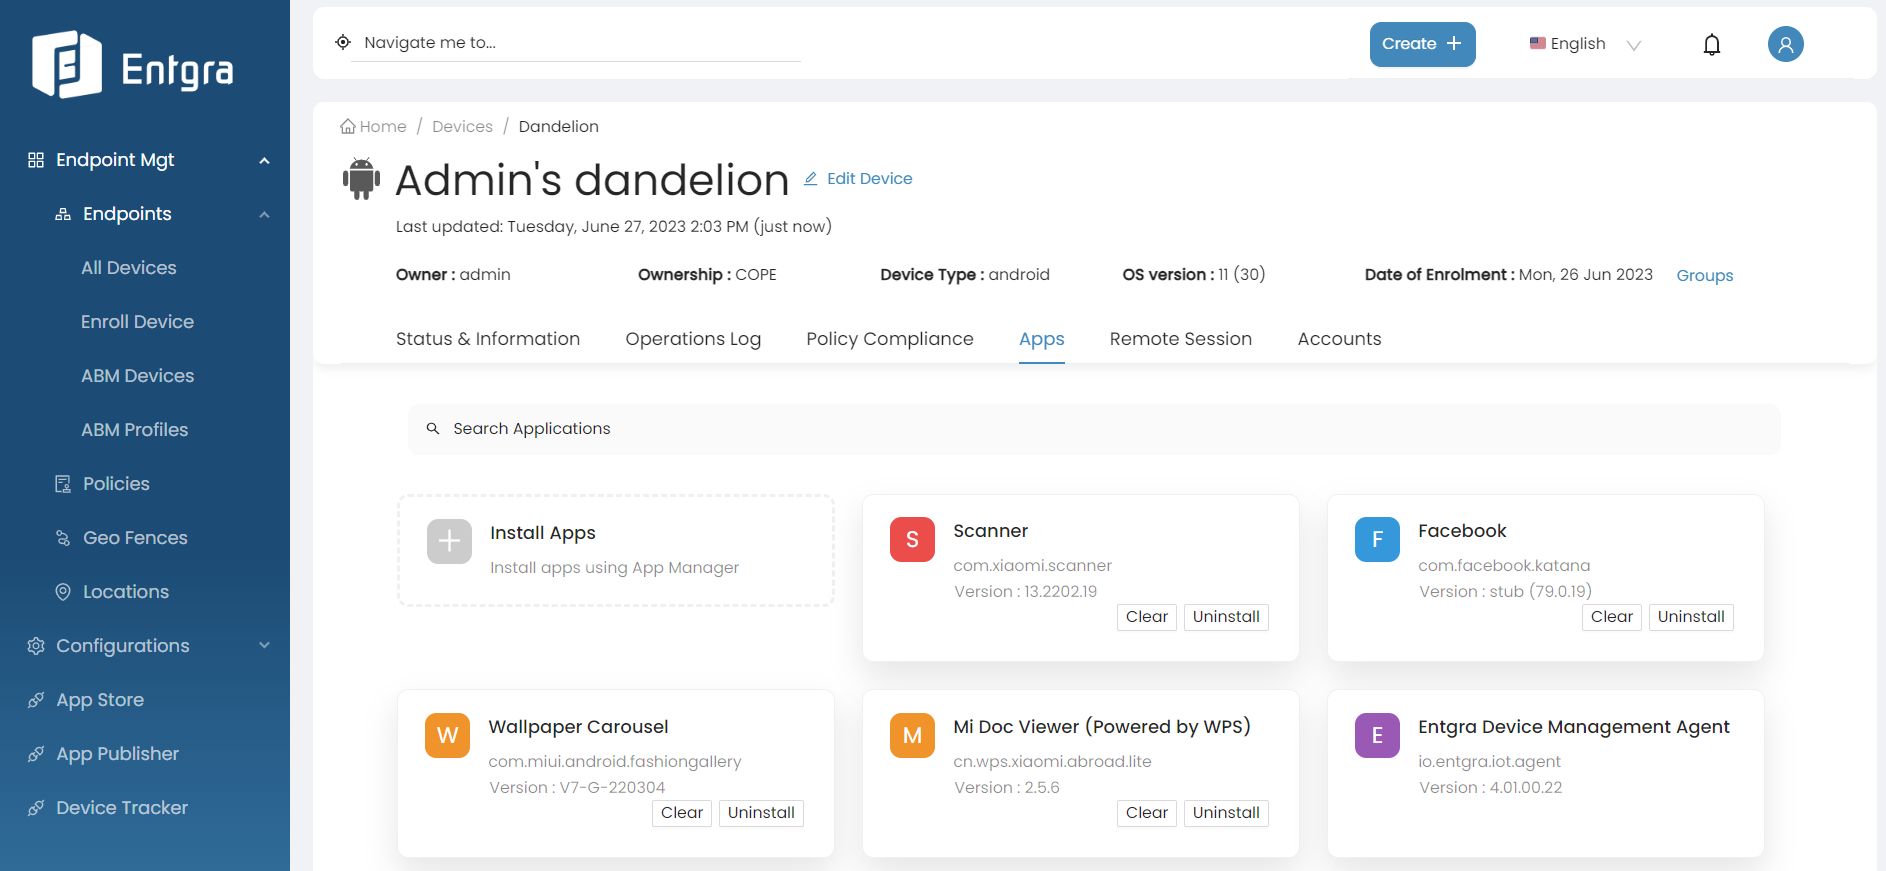
-
Click Clear to erase the appa data.
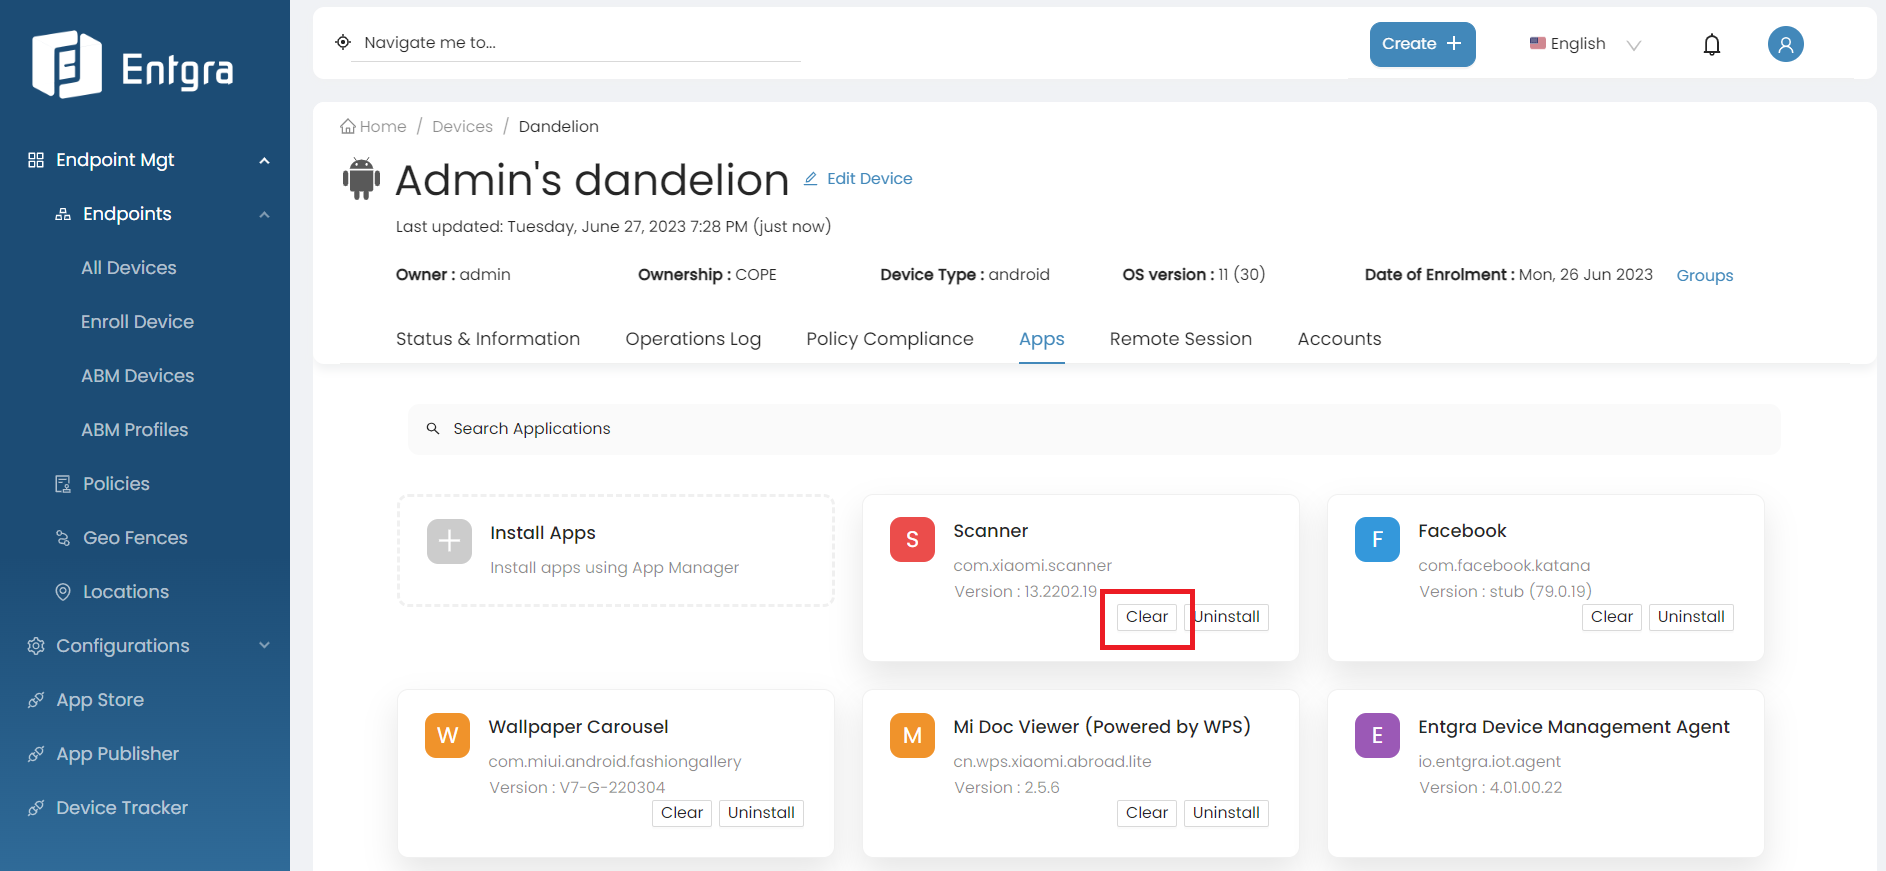
Note
This feature is not applicable for apps of BYOD devices as they are personal devices. It is not advisable to clear all app data of personal applications, as the user may wish to retain some data.
Android Device Remote Control
The remote control feature allows administrators to troubleshoot devices that are enrolled with Entgra UEM Server using the endpoint management console.
You can create a remote session, send adb shell commands, view the device logs, chat with the end user, transfer the files with FTP server, and remotely view and interact with the screen of an Android device.
Let's take a look at how you can start using it.
BEFORE YOU BEGIN
- Make sure to enroll an Android device. For more information, see Android Device.
- Make sure that your Android device supports the Android Lollipop (API level 21) version or above to use the screen feature.
- The enrolled device needs to be connected to the network at all times.
Create a Remote Session
Follow the steps given below to create a remote session between the device and Entgra UEM Server:
-
Sign in to the Entgra UEM Server console.
-
Click All Devices under Endpoints.
-
Click on the device that you wish to create a remote session.
-
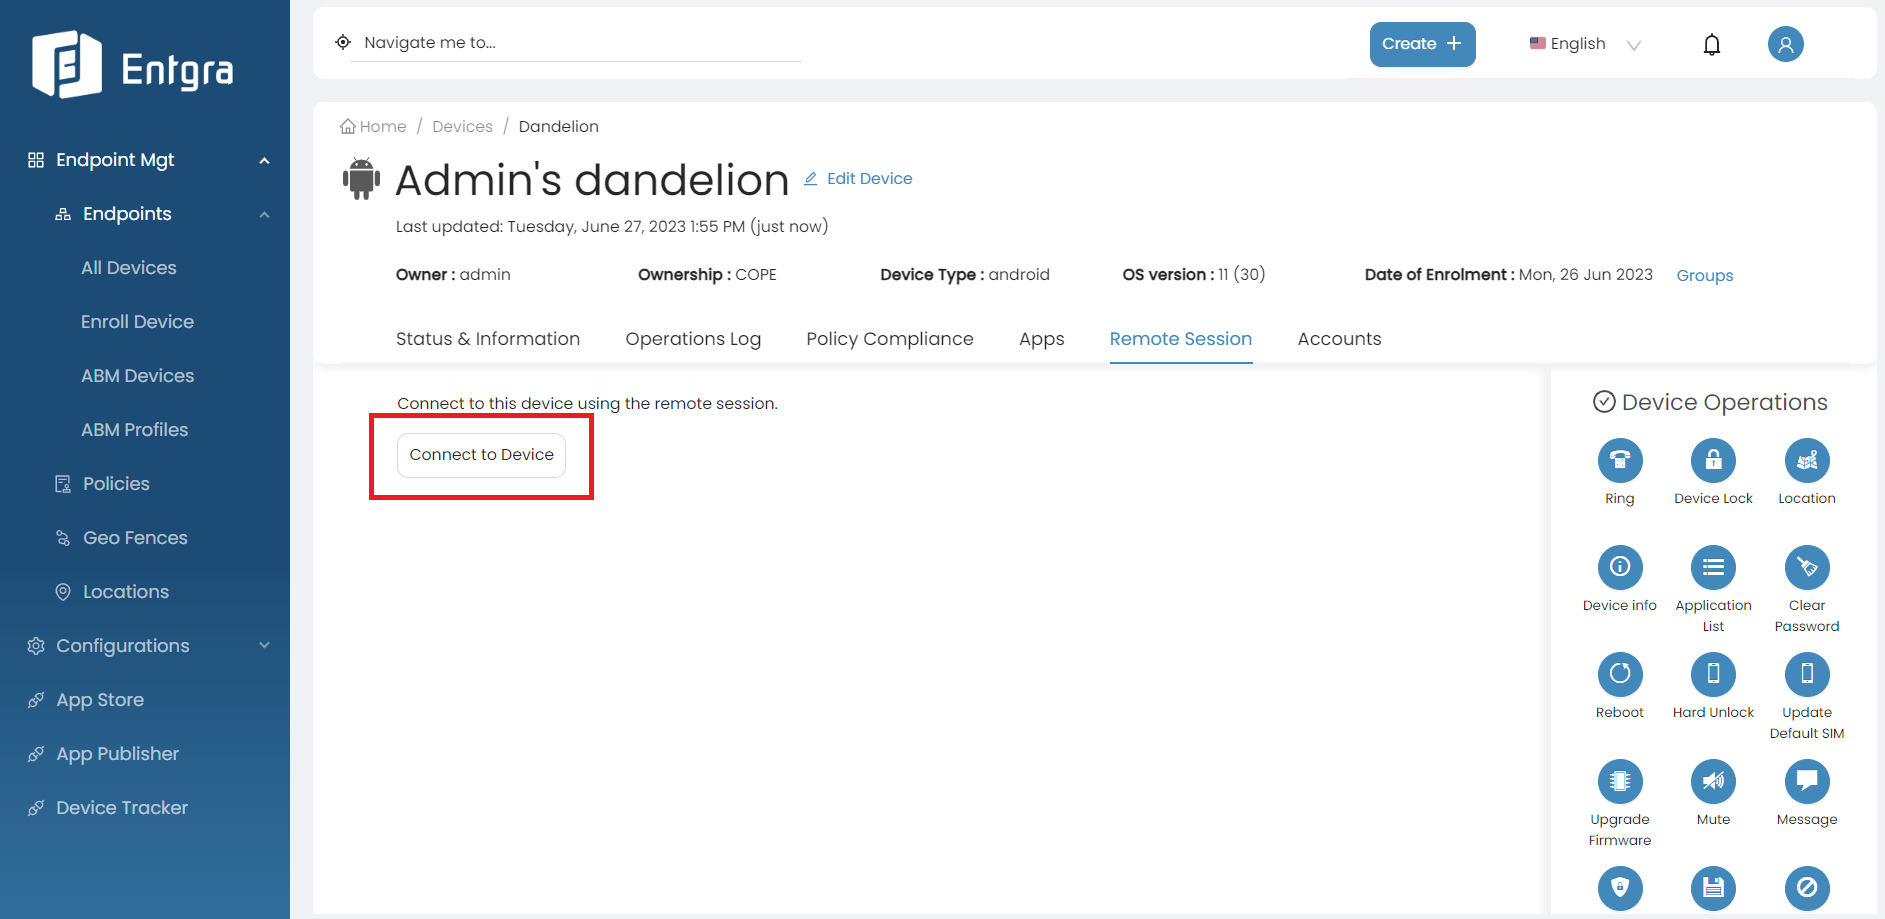
Go to Remote Session tab.
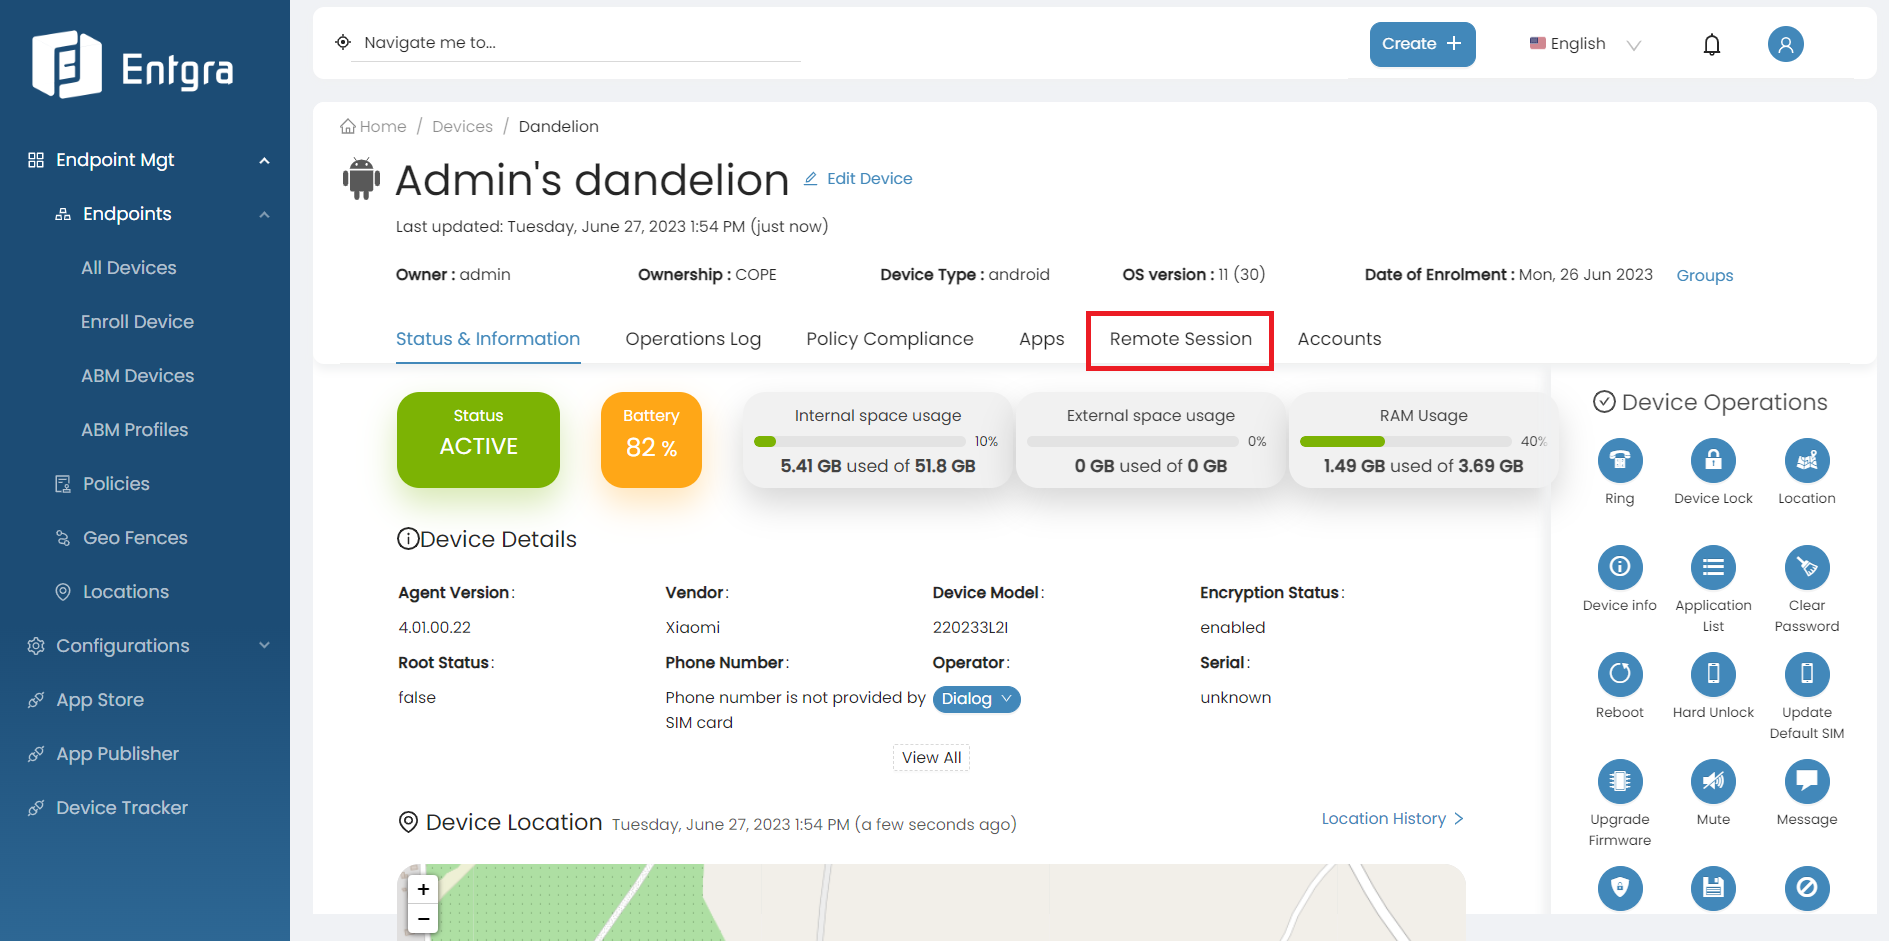
-
Click Connect to Device to start a remote session with the device.
-
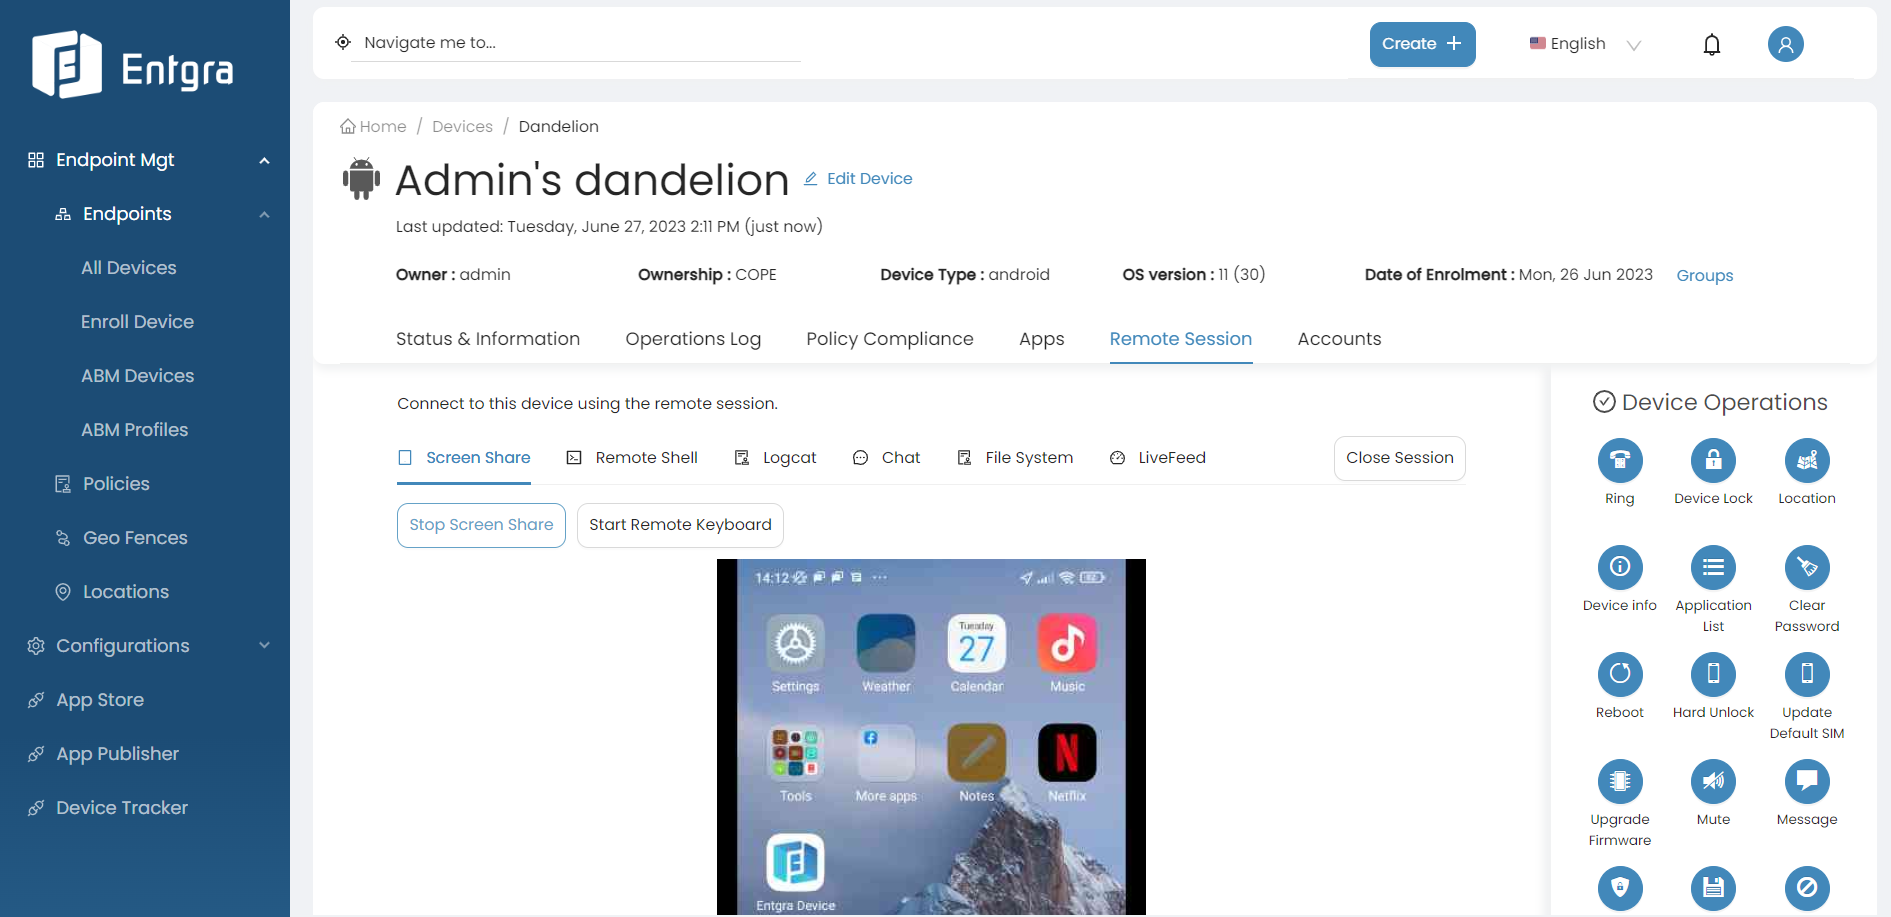
When the server connects to the device, you will see the following screen with Start screen share and Close Session options:
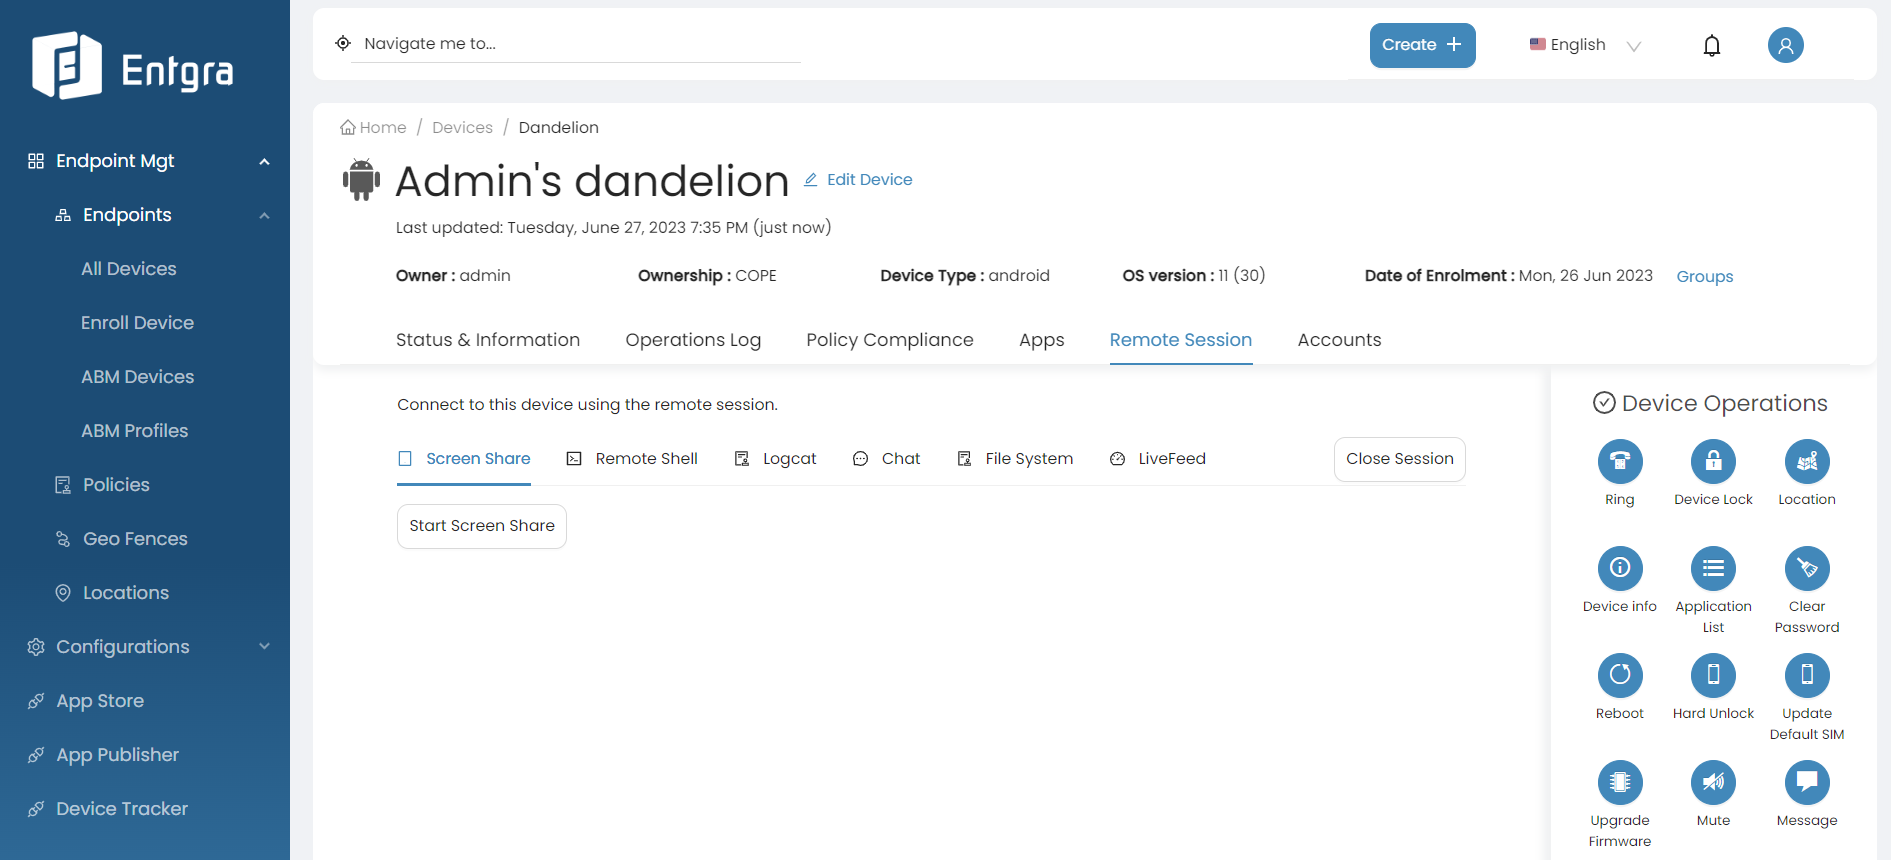
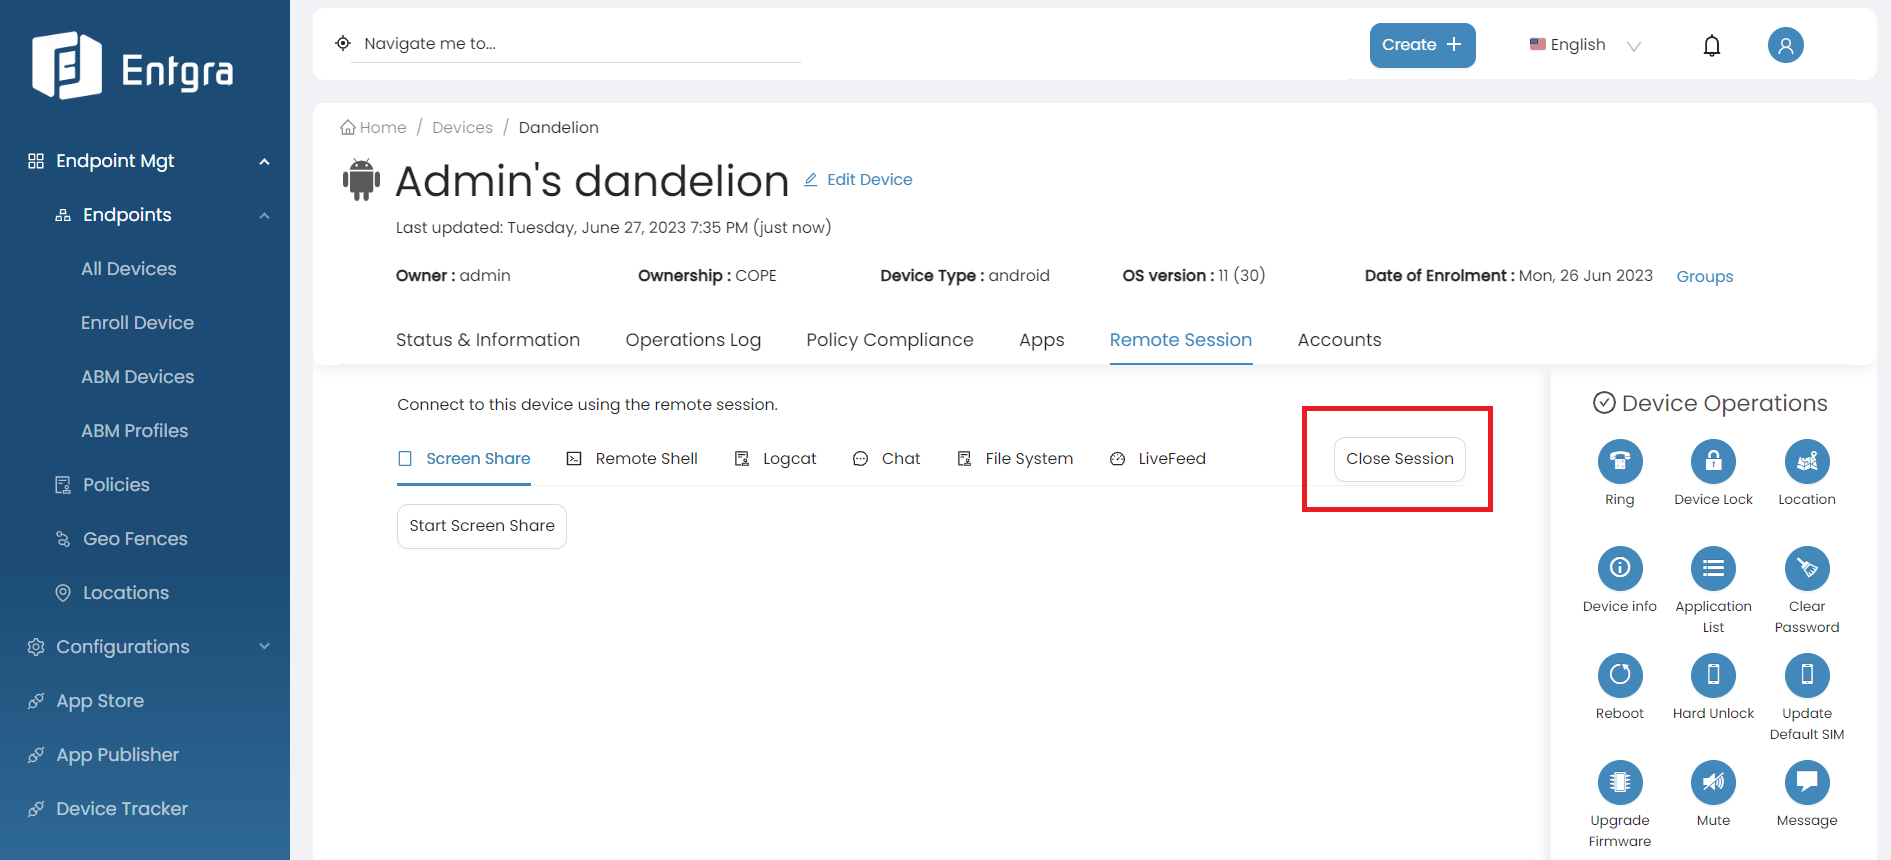
You can now continue to troubleshoot the device as described in the next sections. To stop the remote sharing session, click Close Session.
Screen Share
To troubleshoot a device, it can be helpful to view the device’s screen so you can monitor how the device owner is using it and then take actions yourself, such as opening applications and configuring settings.
To view the screen, take the following steps:
-
set up a remote session, if you haven't already set it up.
-
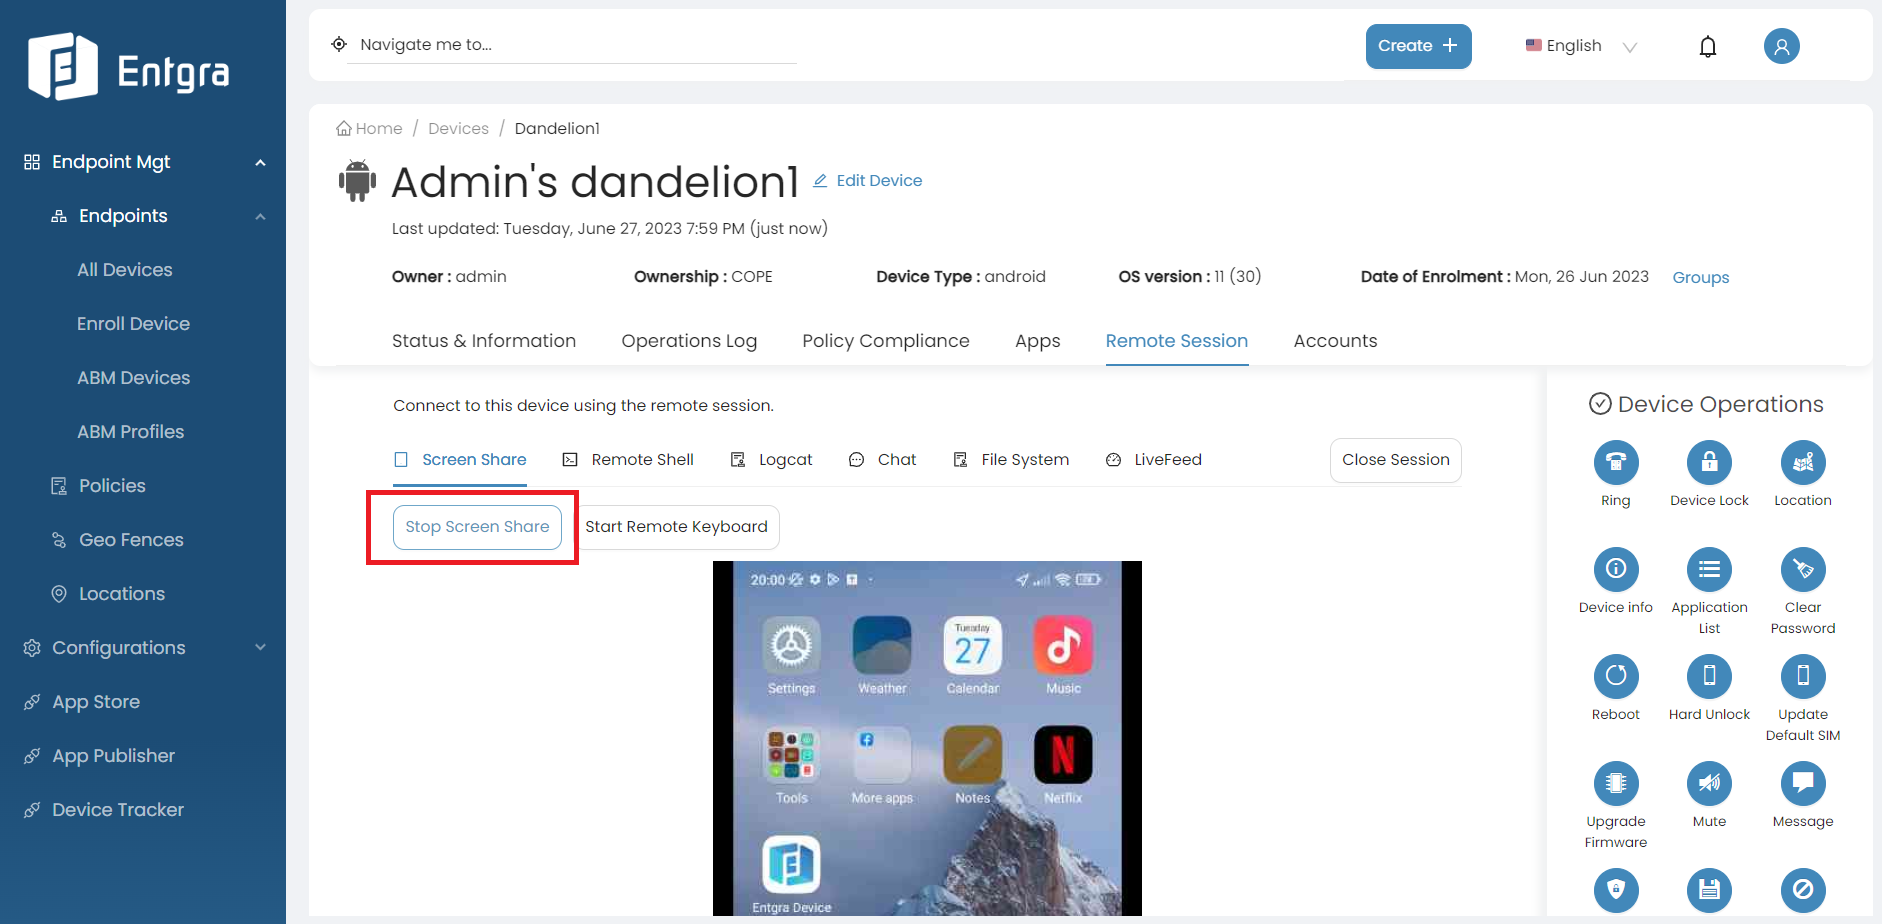
Click Start Screen Share.
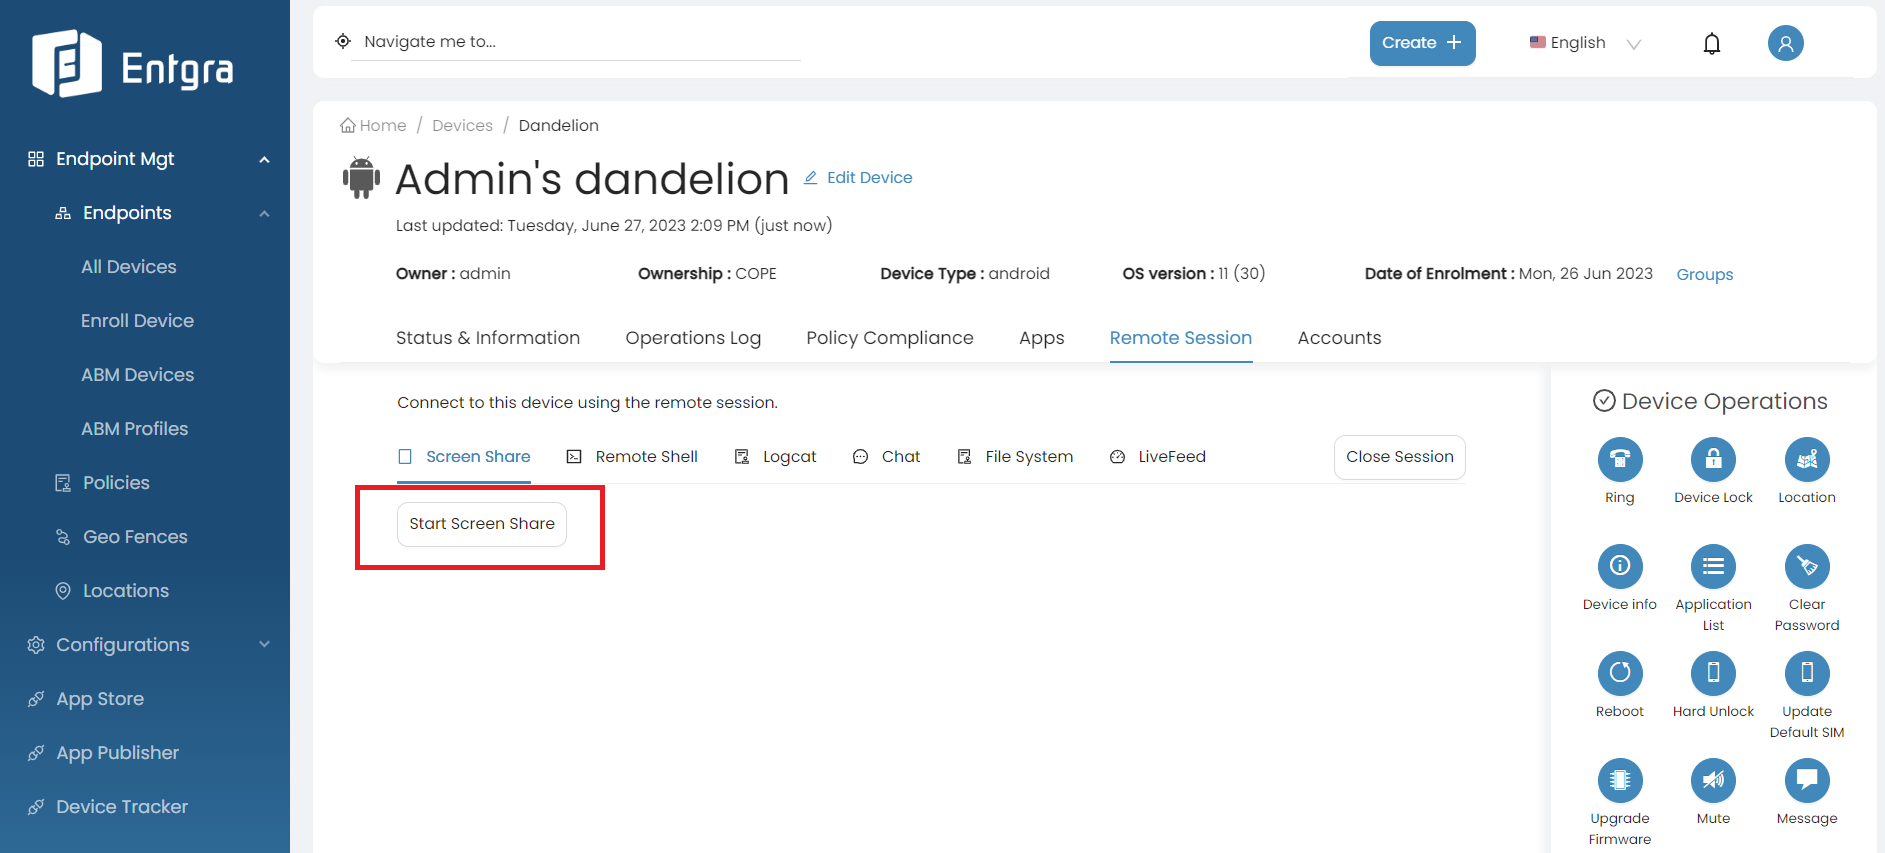
-
A message is sent to the device asking the device owner to share the screen with Entgra UEM Server. After the device owner accepts this message, you can view the device’s screen.
-
Click Stop Screen Share to stop viewing the screen of the device.
Viewing the screen of the device alone does not help you to solve the issue. You need to be able to carry out actions on the shared screen to successfully troubleshoot the device. Follow the steps given below to try it out:
Remote Touch Inputs
Method 1 : Using Accessibility Service (For non rooted devices)
PREREQUISITES
- Android OS version should be higher than Android 7.0 Nougat (API 24) or
- Agent needs to run as a privileged system app. (has to have signed with system signing key and app needs to be a system app)
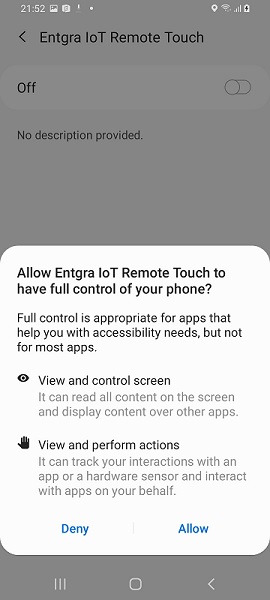
- To start giving touch inputs using the mouse, device owner have to enable Entgra UEM Remote Touch accessibility service from automatically popped up settings page on the device. (If it's already enabled "Entgra UEM Remote Touch" accessibility service at enrollment, this step is not necessary)
Method 2 : Using System APIs
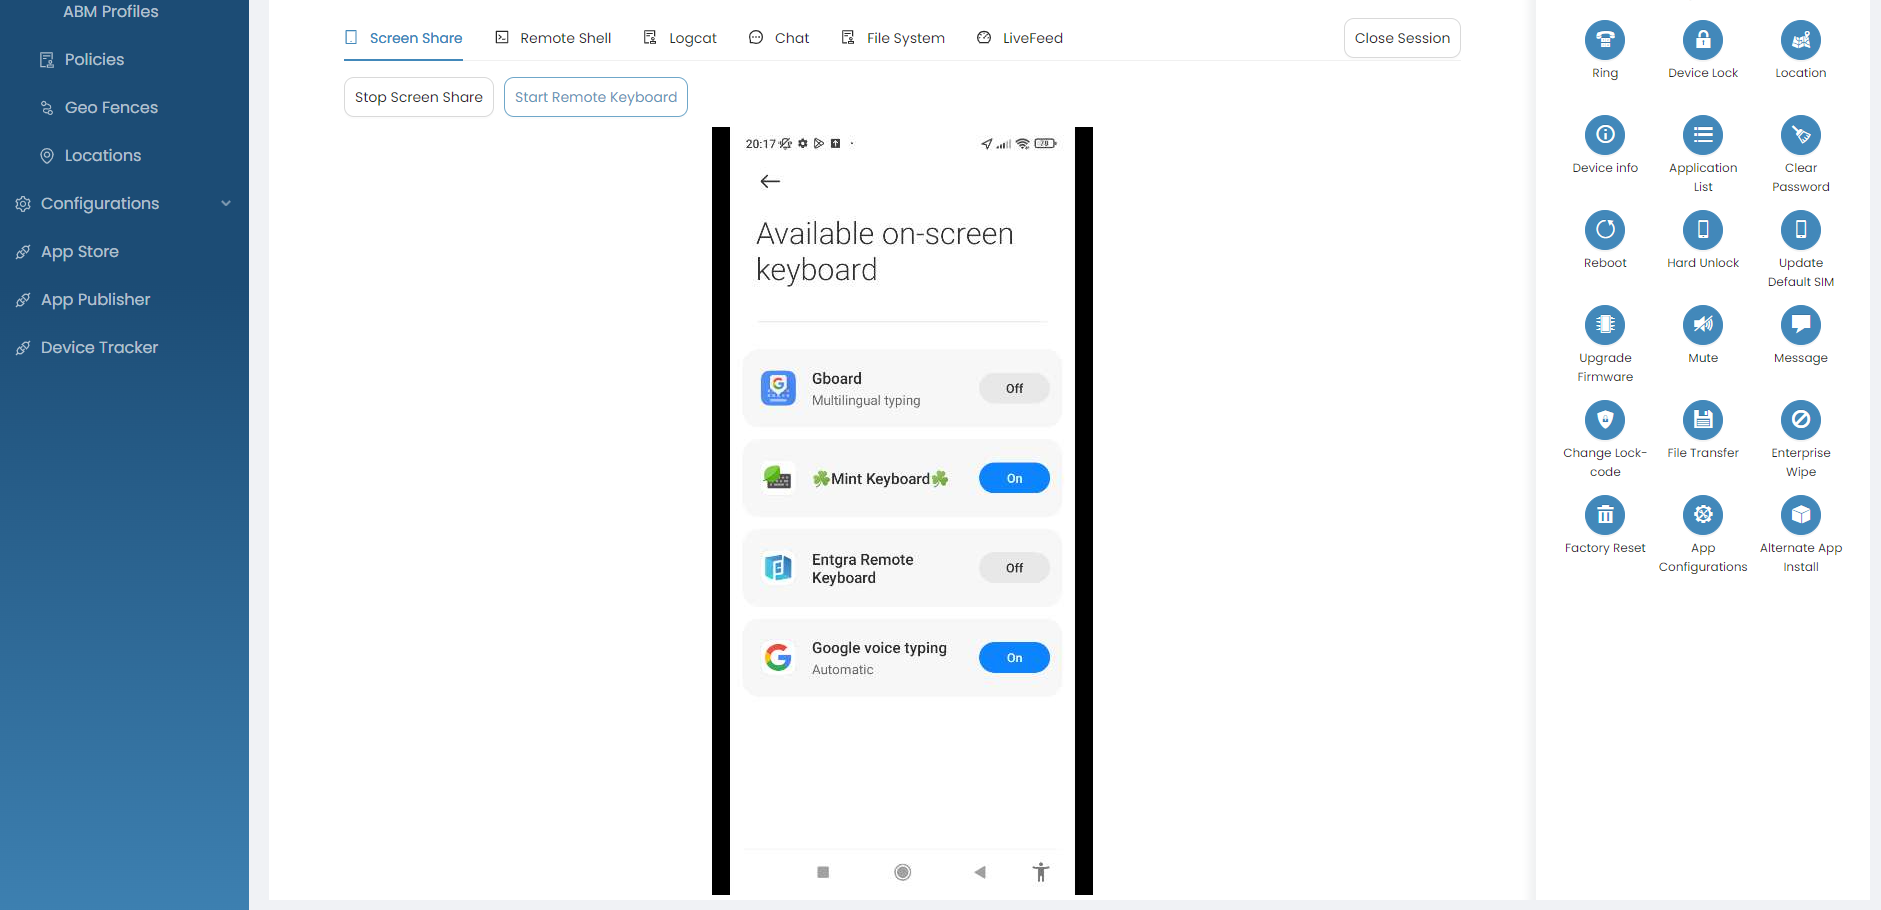
Remote Keyboard Inputs
-
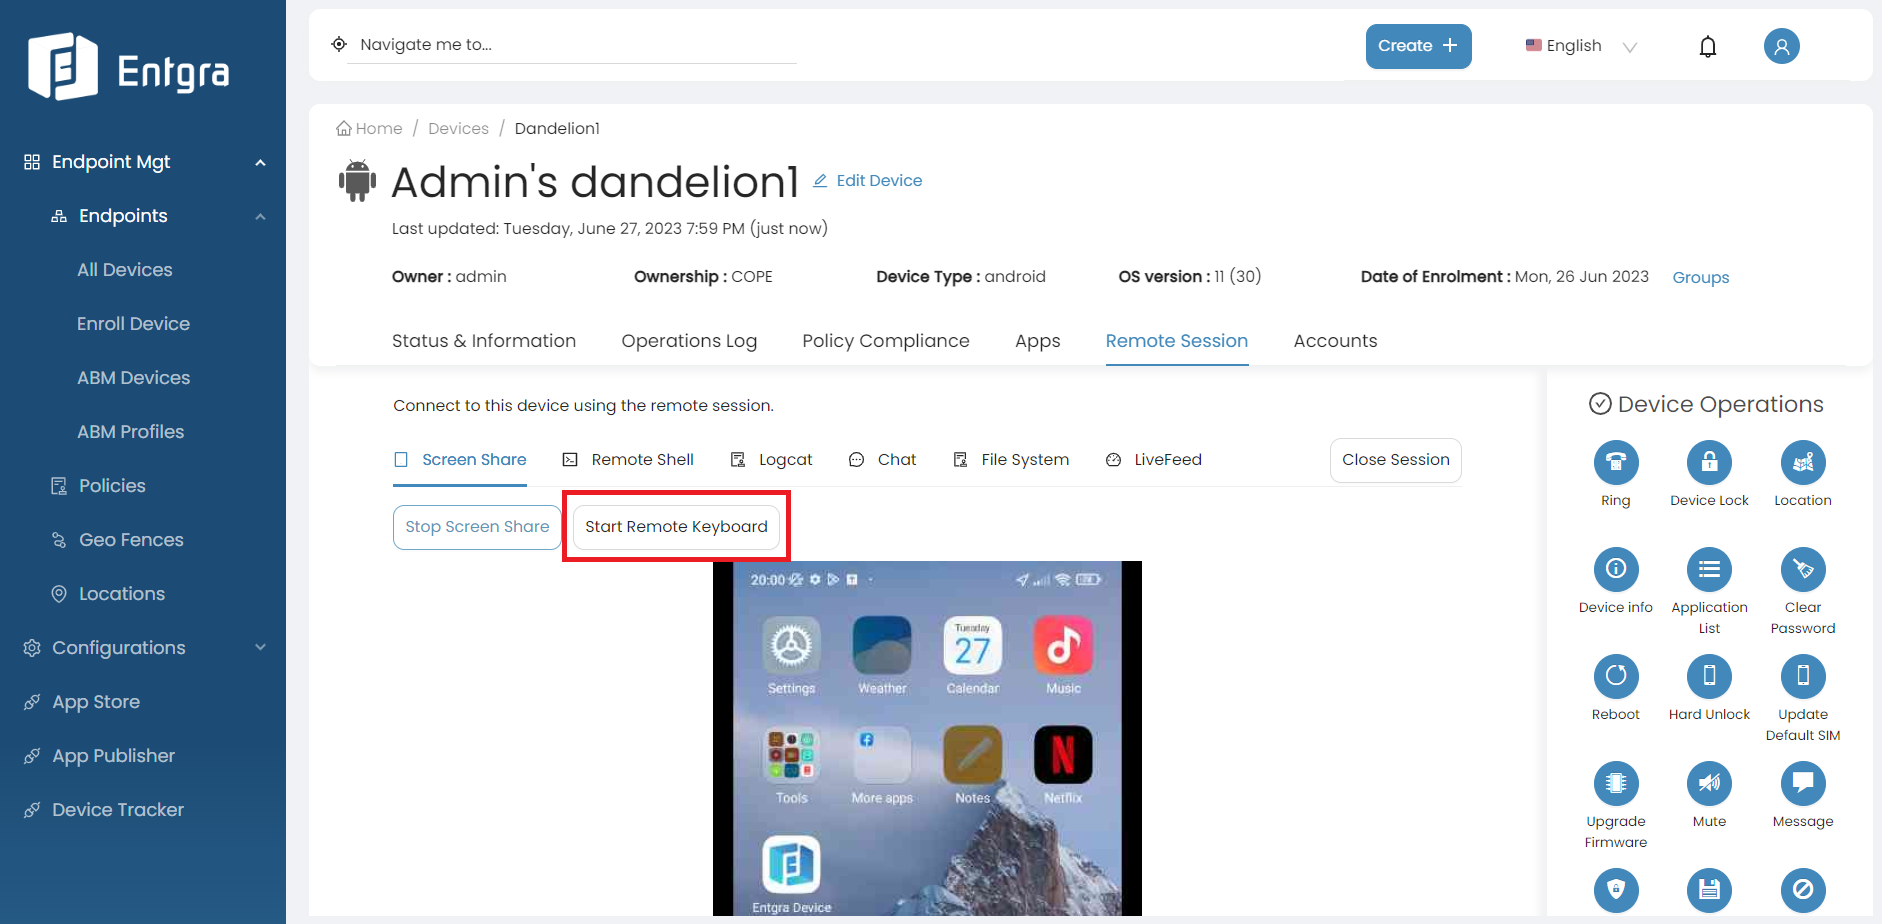
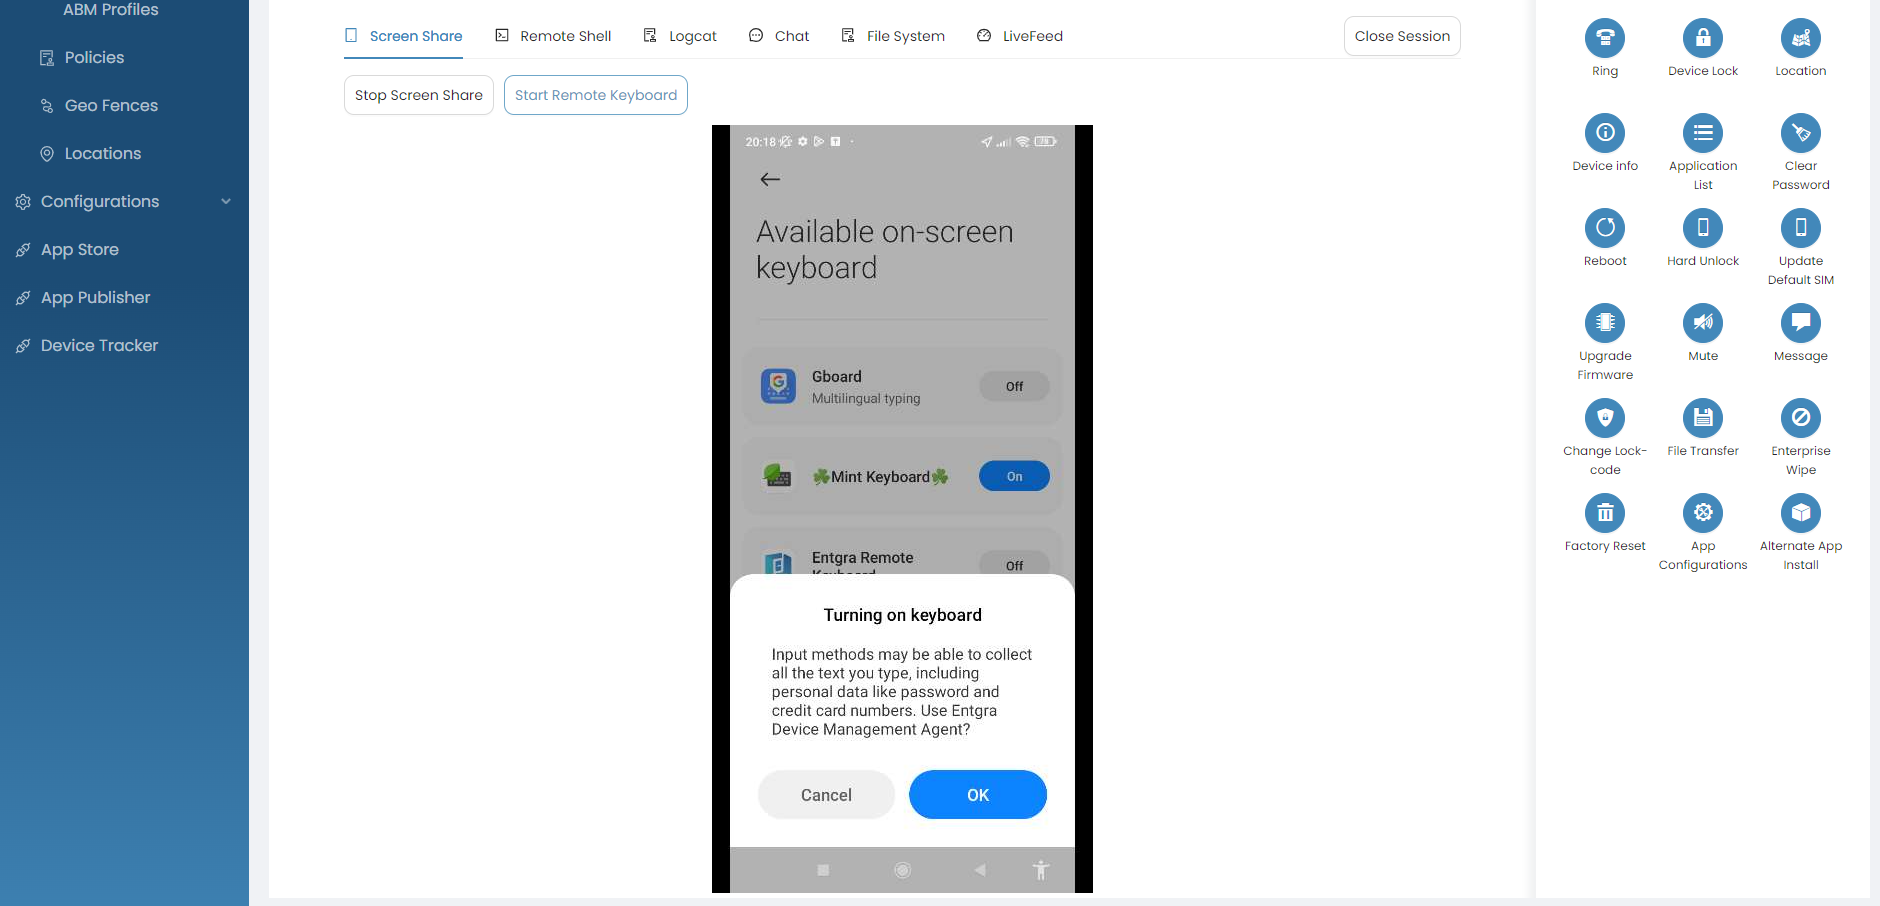
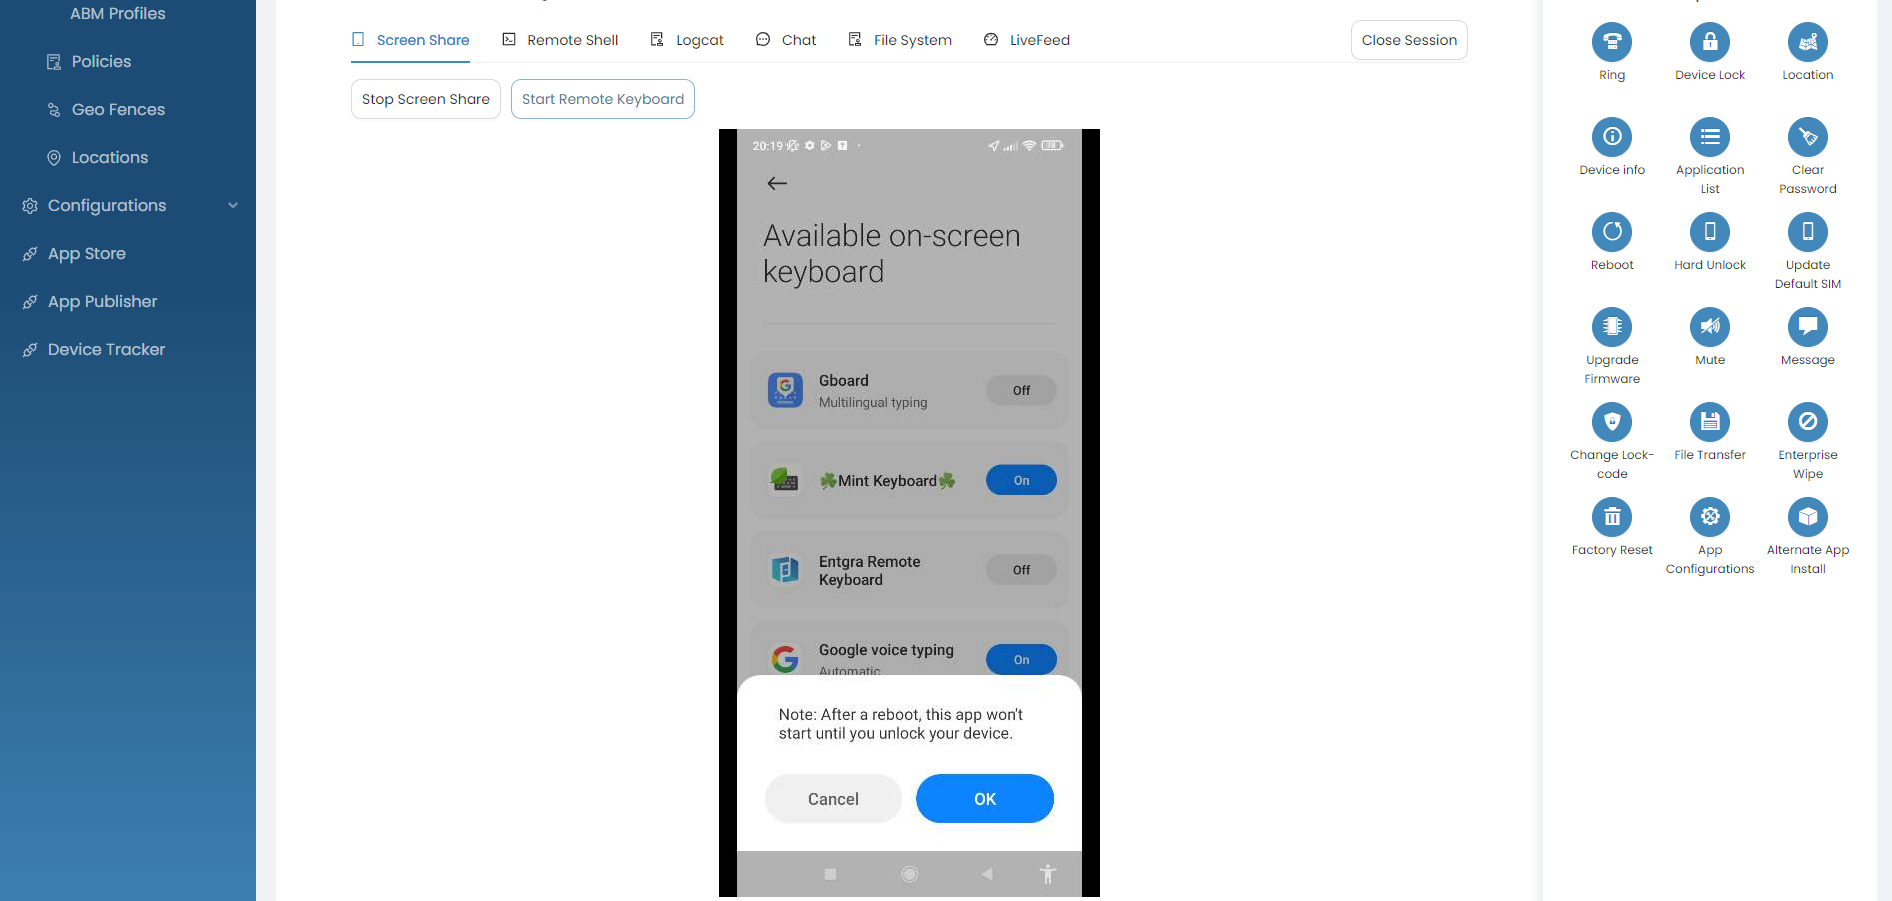
Click Start Remote Keyboard to enable the Entgra Remote Keyboard. Then it will pop up the setting screen which can enable the custom IME.
-
Once you enable that you have to choose the keyboard from the notification bar.
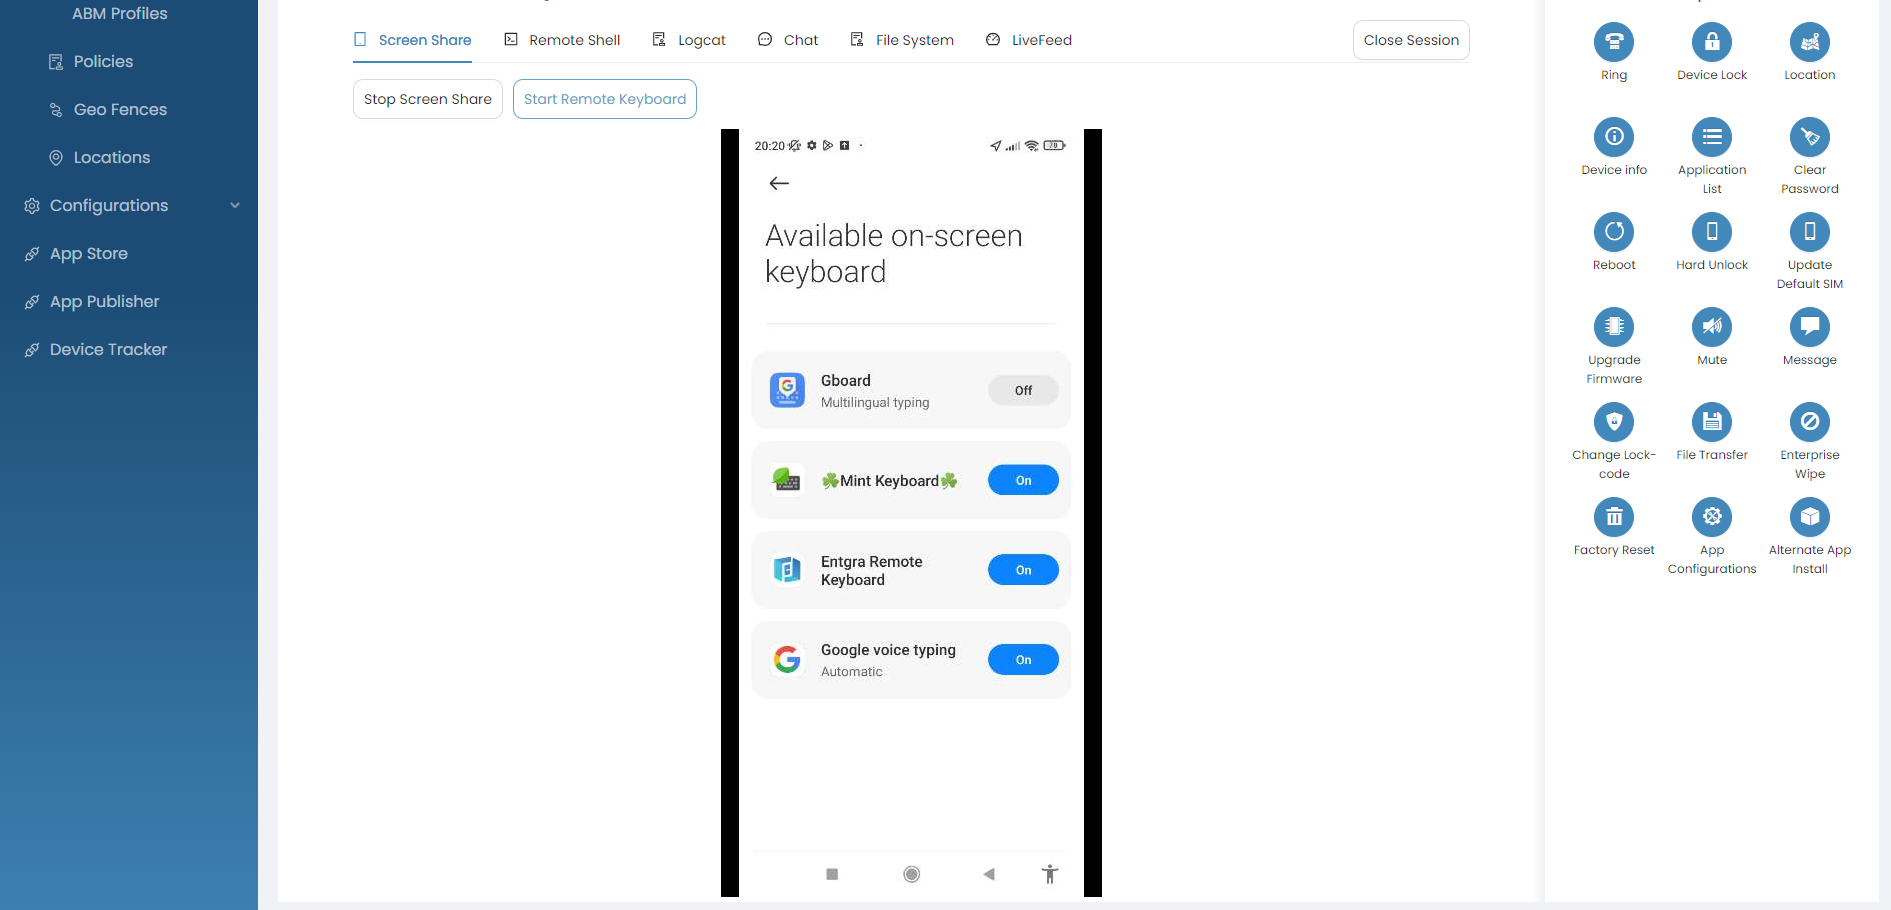
-
After that you can give the inputs from your hardware keyboard.
Further explore this feature by referring to our comprehensive blog article
Remote Shell
Android Debug Bridge (adb) is a command line tool that lets you communicate with an emulator or connected Android device. Follow the steps given below to troubleshoot the device using adb shell commands:
-
set up a remote session, if you haven't already set it up.
-
Click Remote Shell.
-
Write the shell command (see adb shell commands for the available commands) and press Enter.
For example, if you want to get the CPU and memory usage of the device, use the
topadb command.
Sample output: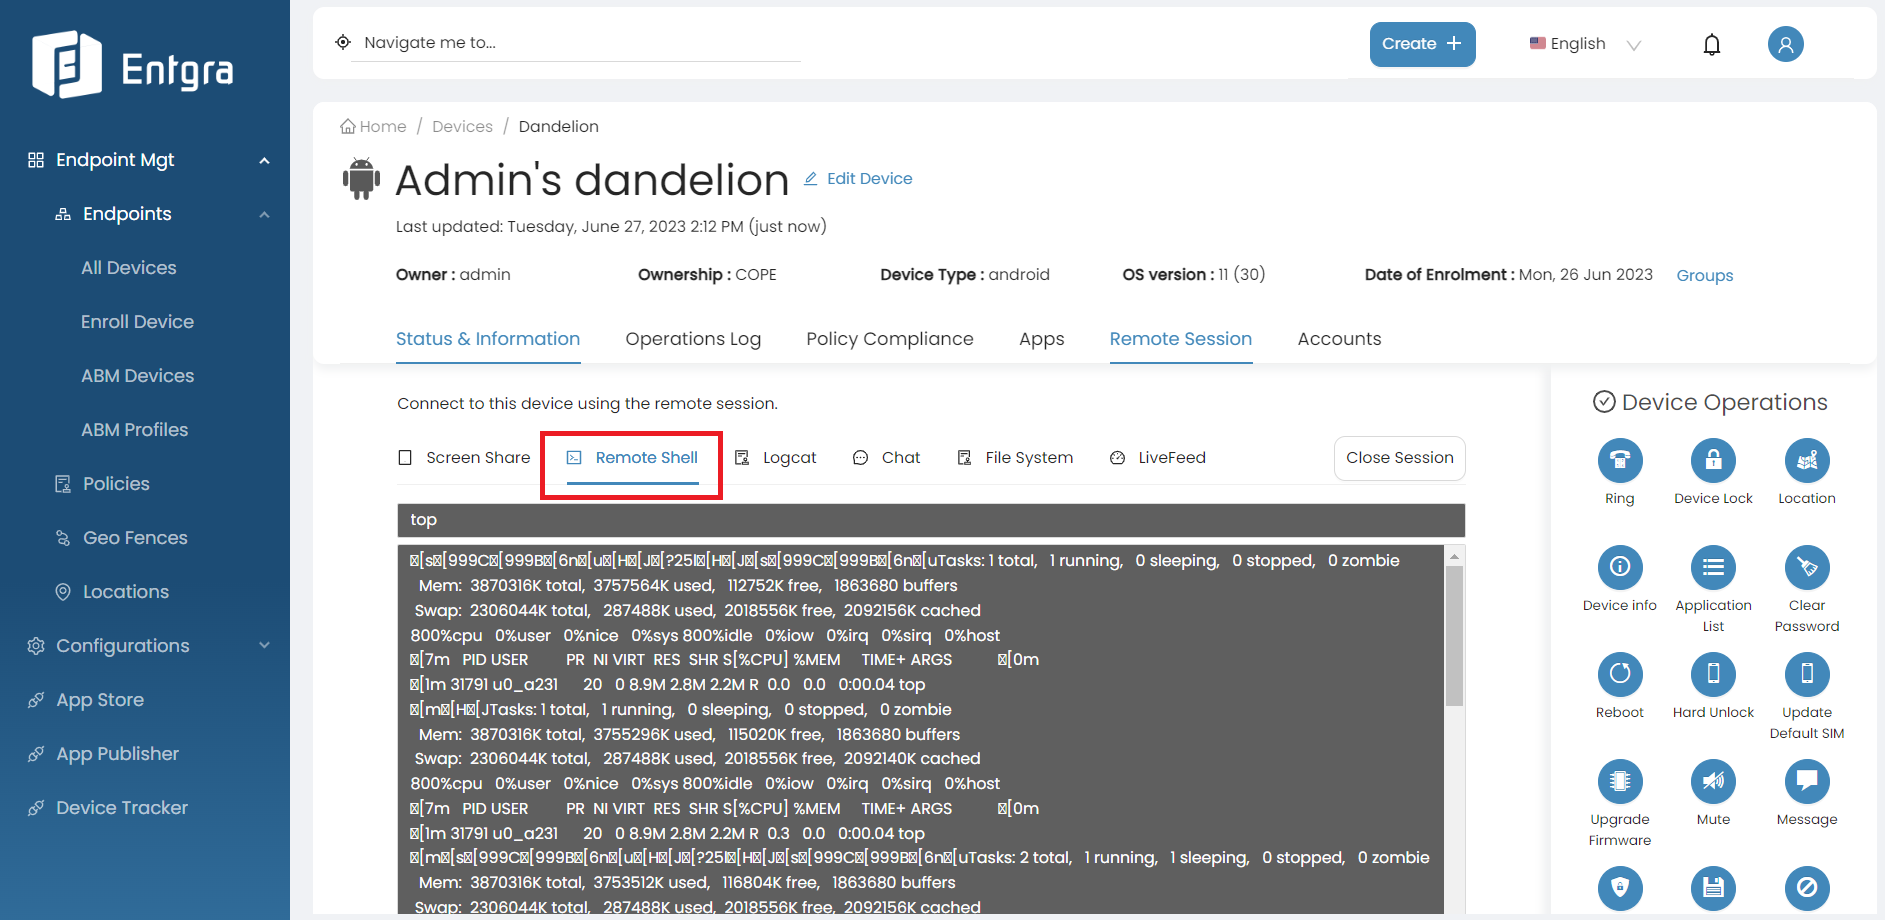
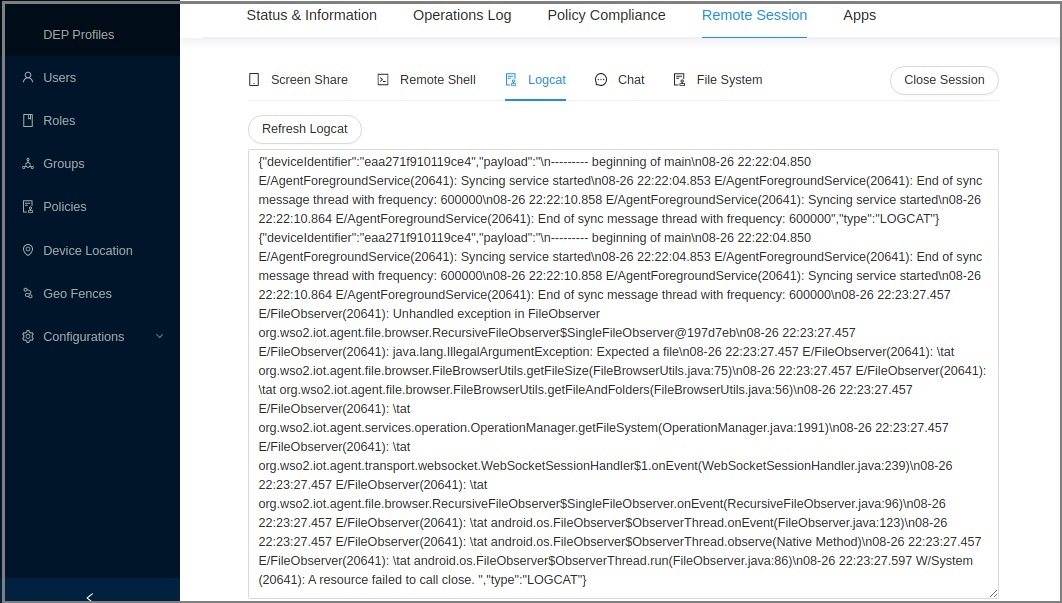
Logcat
Logcat is a tool that displays messages from the device log in real time and keeps a history so you can view the old messages. Follow the steps given below to view the device logs.
-
set up a remote session, if you haven't already set it up.
-
Click Logcat.
You can now see the log for the device.
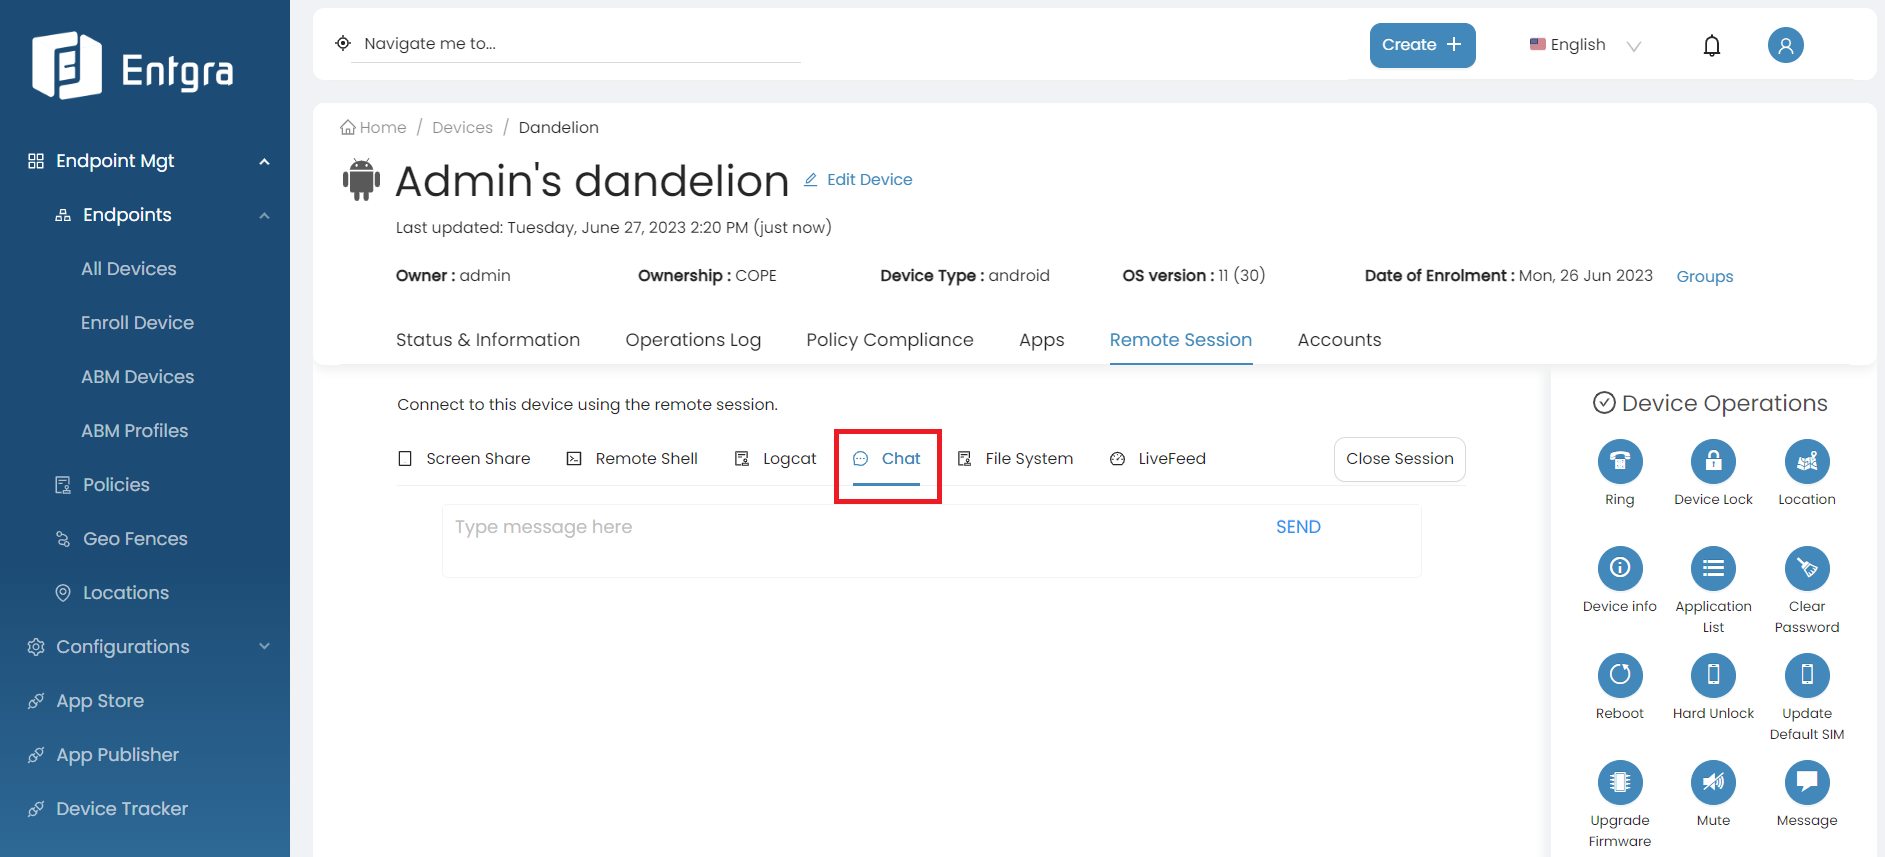
Chat
Chat is a tool that can be used to communicate/connect with the device owner. The device owner can also communicate through the Entgra Device Management Agent.
-
set up a remote session, if you haven't already set it up.
-
Click Chat.
-
Type the message that you want to send and press Send.
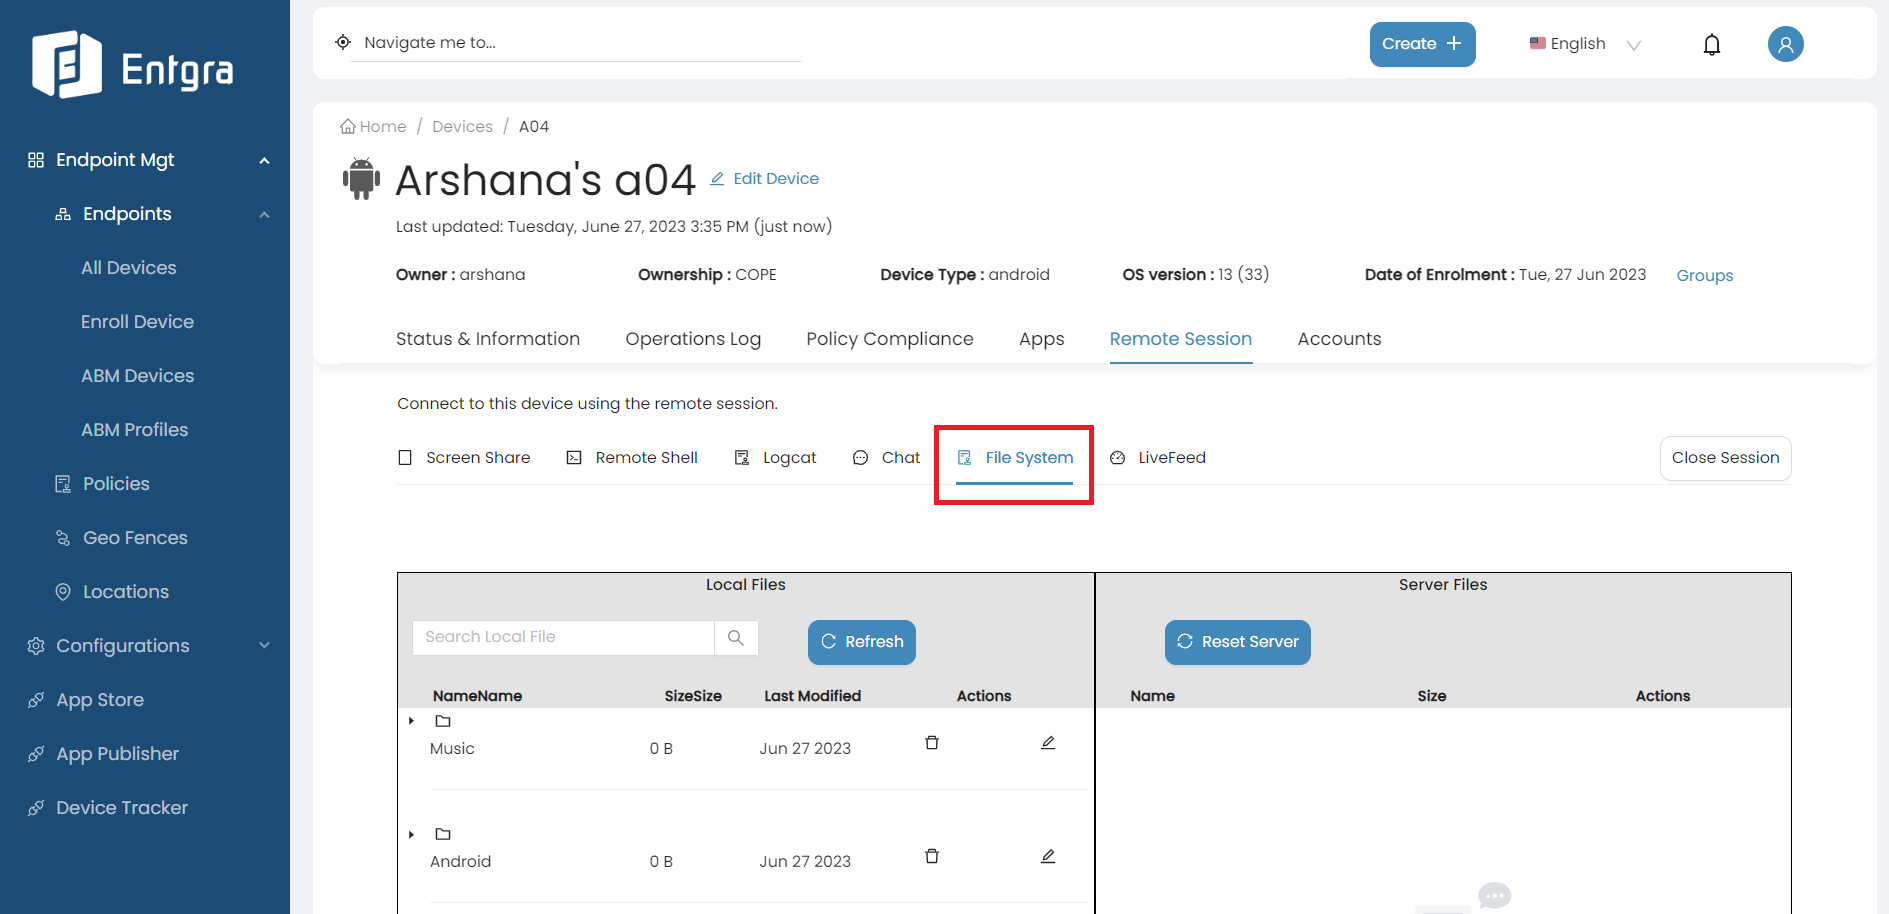
File System
File System is a file transferring tool to transfer the files from the local device to the FTP server and vice-versa. In addition, the user has the ability to rename and delete files.
How to Transfer Files
-
Befor setting up a remote session, go to General Platform Configurations and add a new FTP Server.
-
set up a remote session, if you haven't already set it up.
-
Click File System.
-
In the Local Files section, you can see all the files of your device. Select the added FTP server in the Server Files section. There, youwill see the files that are available on the server.
-
You can then transfer the files between the FTP server and your device.
If you want to transfer files from your device to the server, select the file that you want to transfer and copy it. Paste that file in the desired location on the server. Follow the same steps if you want to transfer files from the server to the device.
Renaming Files
-
Befor setting up a remote session, go to General Platform Configurations and add a new FTP Server.
-
set up a remote session, if you haven't already set it up.
-
Click File System.
-
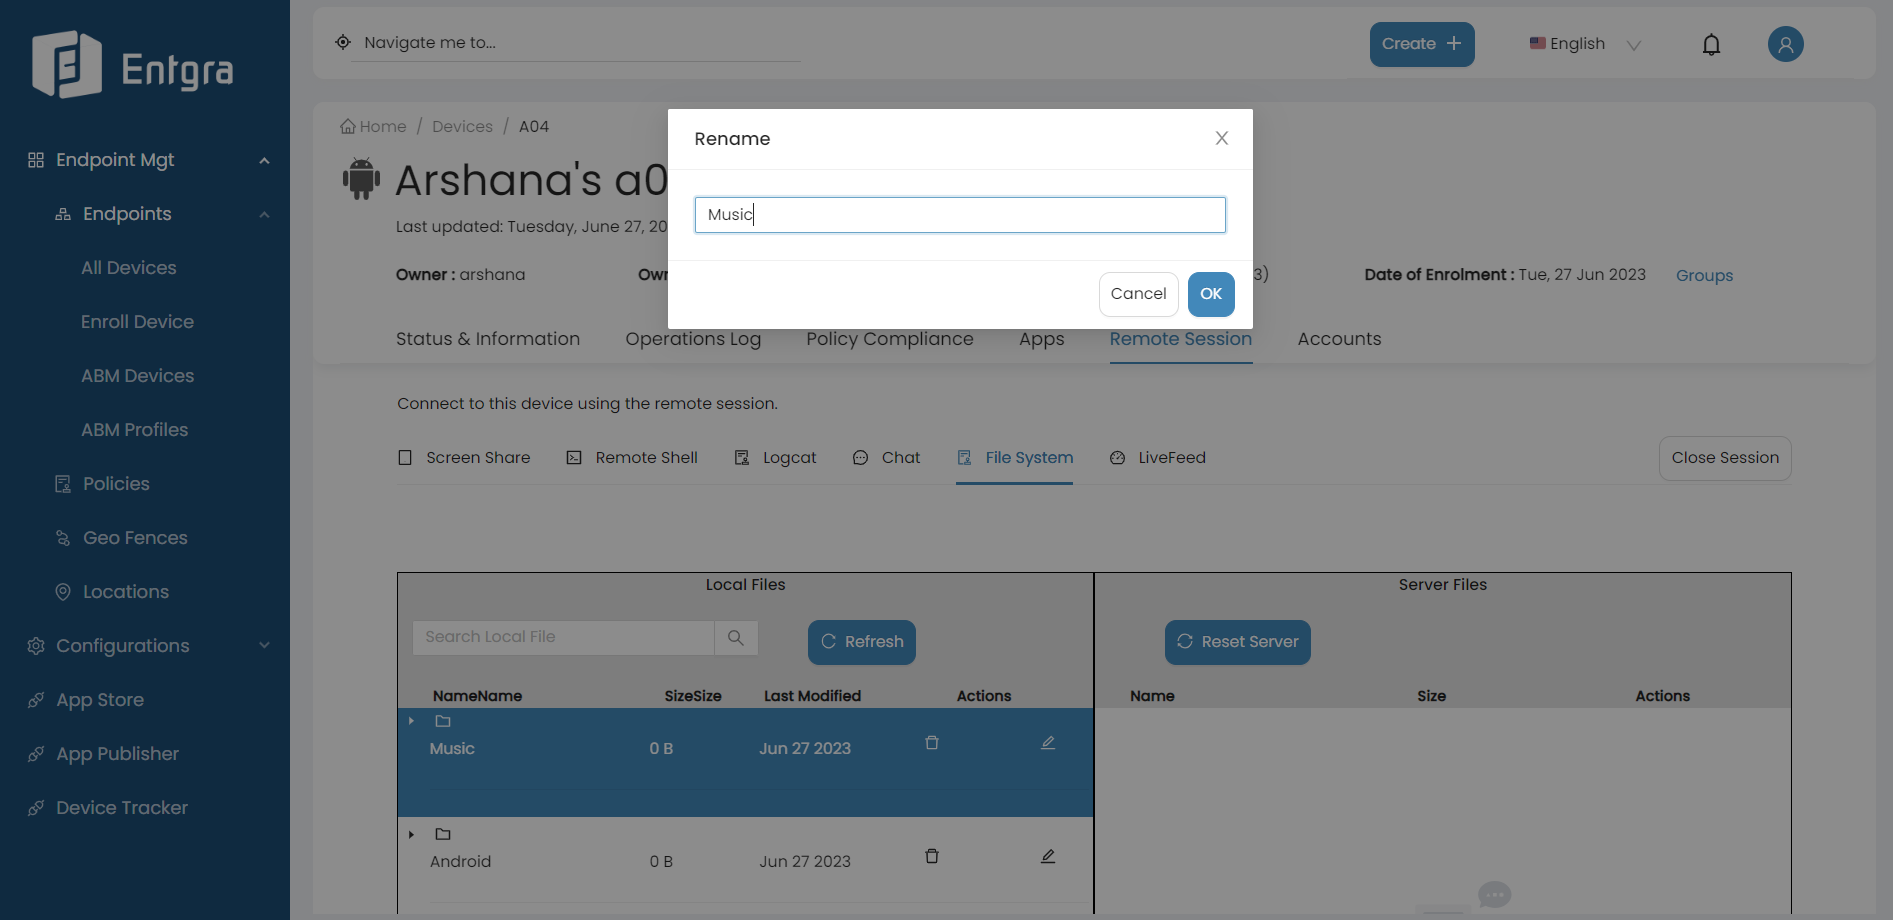
Select a file that you want to rename and click Edit.
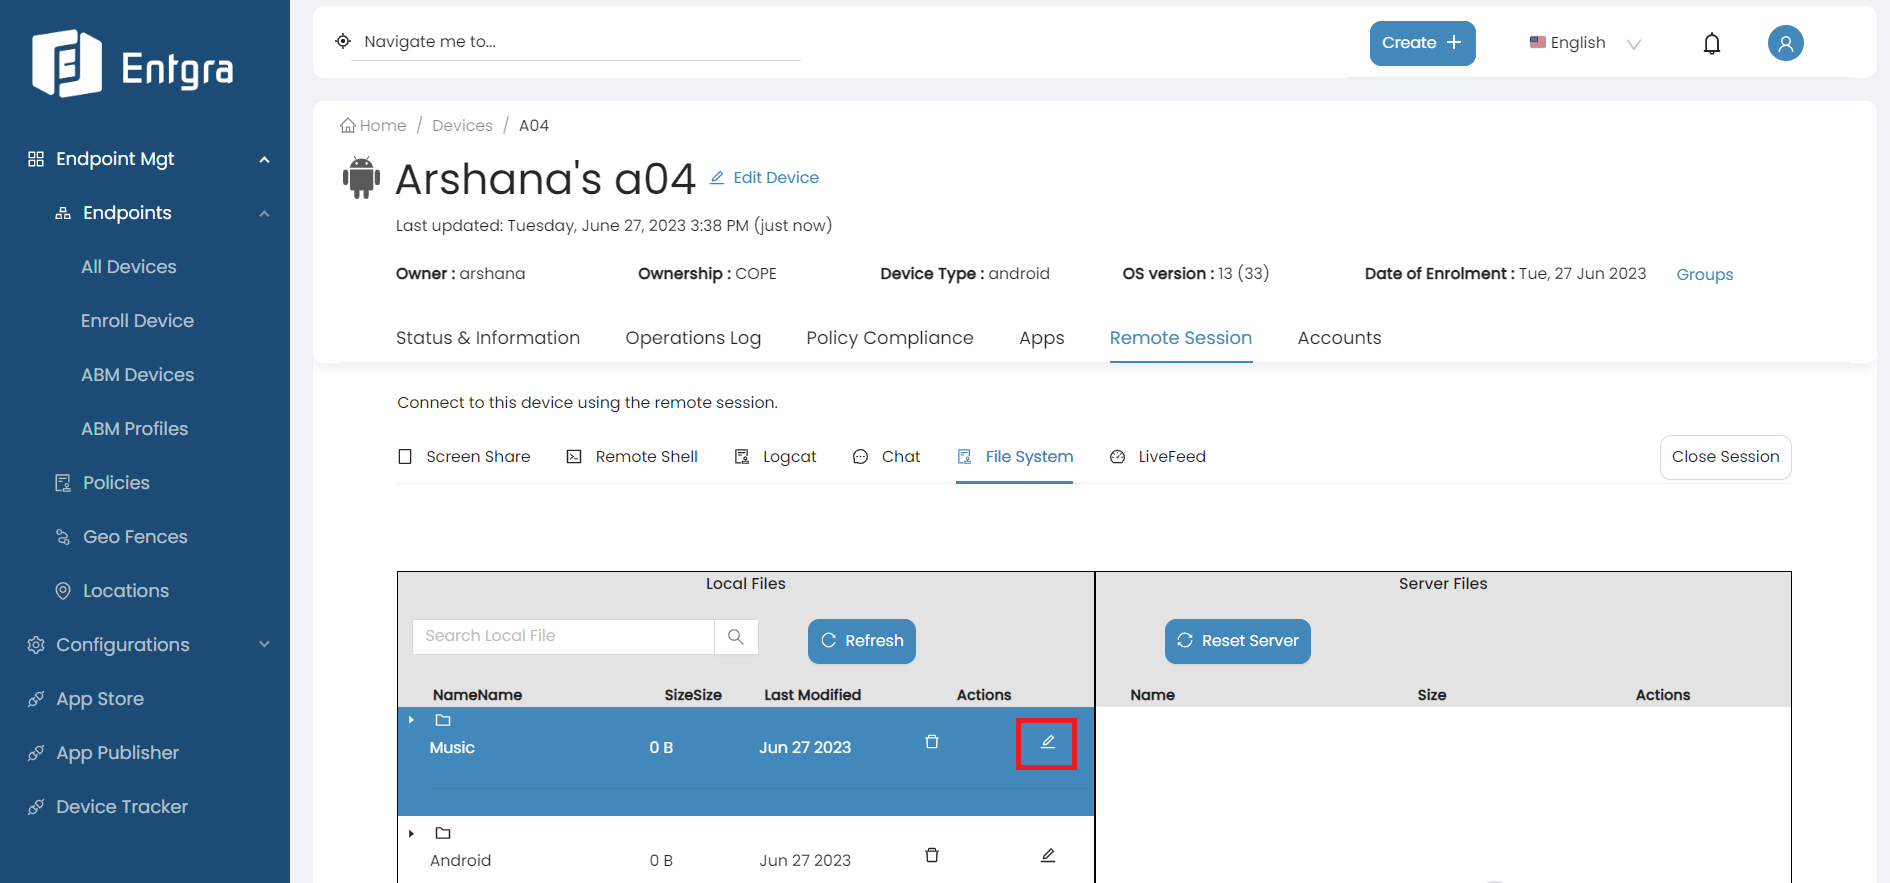
-
Rename the file and click OK.
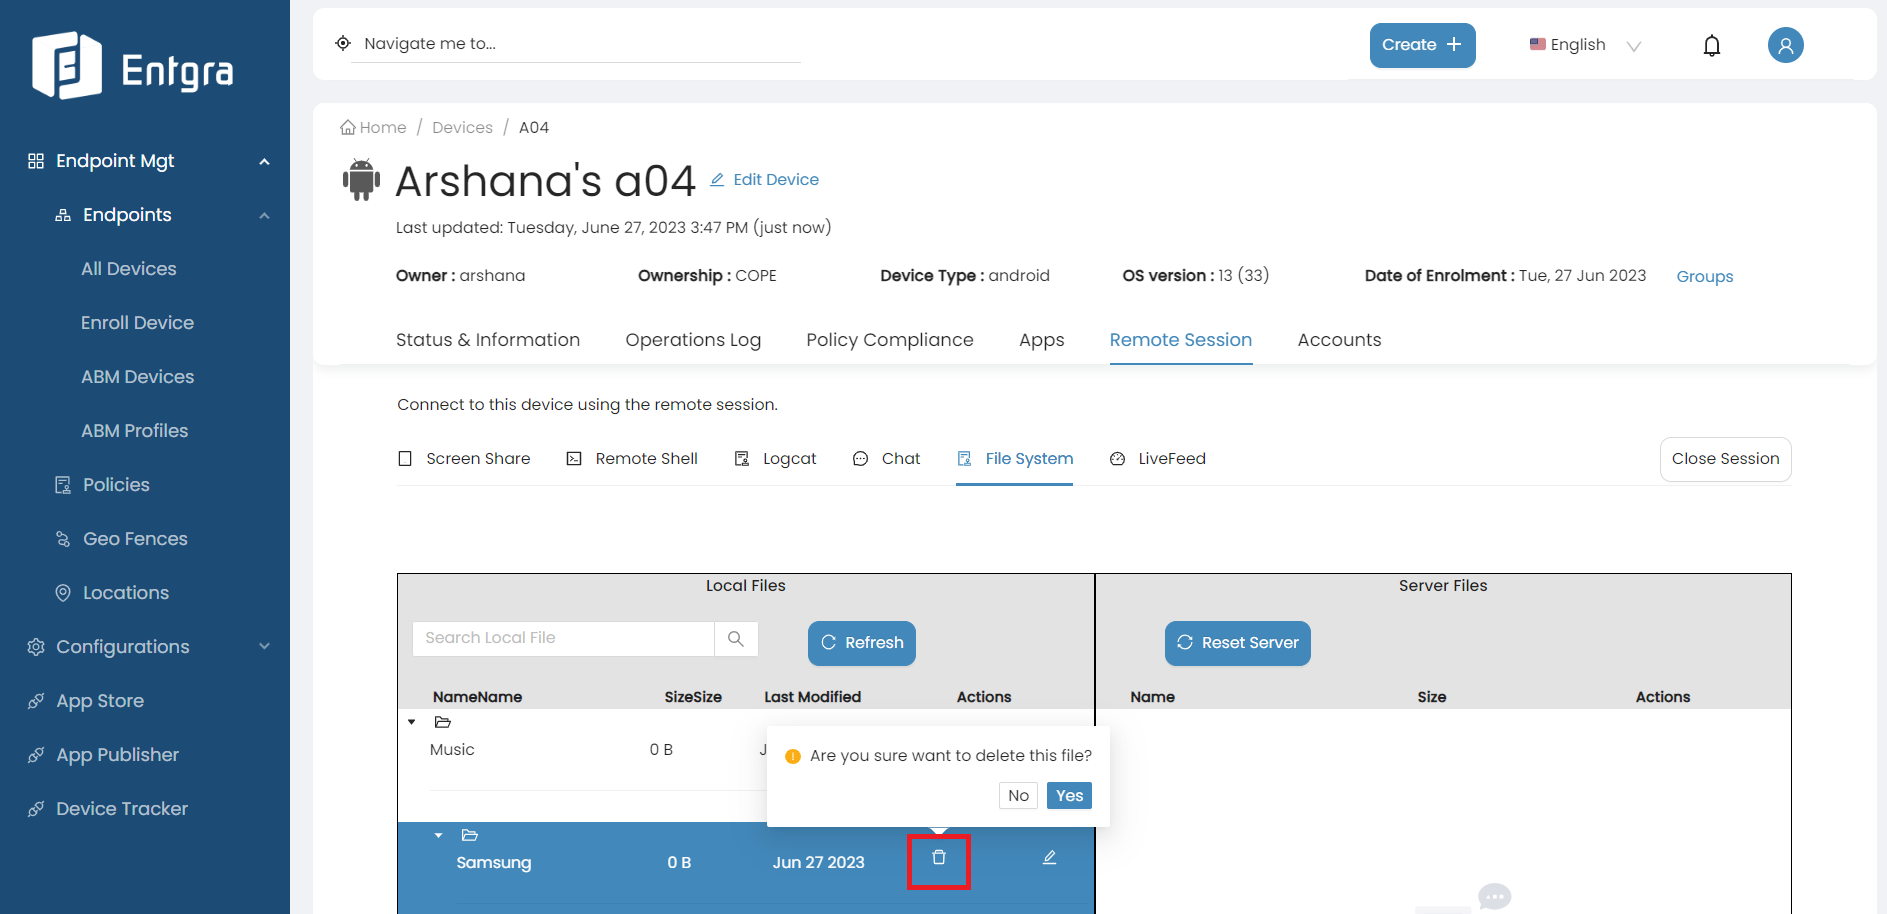
Deleting Files
-
Befor setting up a remote session, go to General Platform Configurations and add a new FTP Server.
-
set up a remote session, if you haven't already set it up.
-
Click File System.
-
Click Delete on the record you want to delete and then click OK.
Further explore this feature by referring to our comprehensive blog article
Live Feed
Android devices are now enabled with Live Feed for remote troubleshooting of the devices.
In case of device syncing issue or app installation failing issue, the admin can remotely access the device by using this feature. The admin is able to remotely access and observe device live data and analysing the root cause for troubleshooting.
Follow the steps below for accessing this feature:
-
set up a remote session, if you haven't already set it up.
-
Click Live Feed.
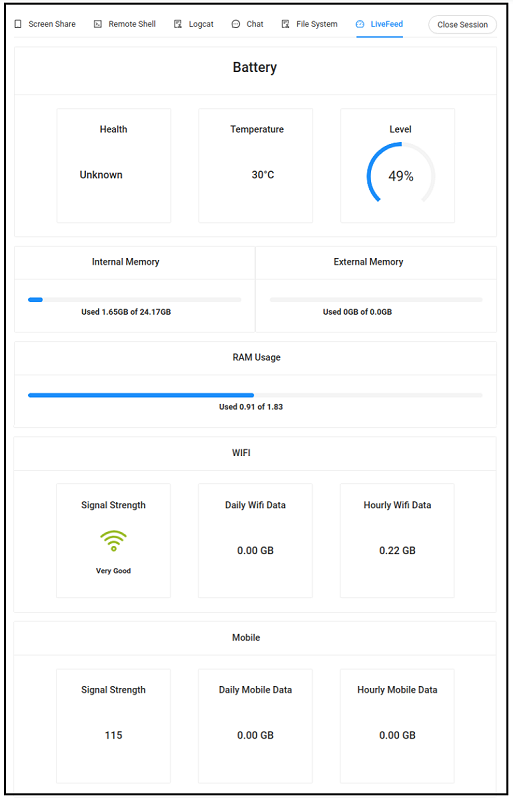
All of the above shown data is derived from the live data of the device.
Field Description Battery details The health of the battery, temperature, and charging percentage. Device memory Internal memory usage and external memory usage of the device are shown separately. RAM usage RAM usage of the device. WiFi connectivity WiFi connectivity strength of the device plus daily and hourly WiFi data consumption. Mobile connectivity Mobile connectivity strength of the device plus daily and hourly mobile data consumption.
Further explore this feature by referring to our comprehensive blog article
Entgra MDM Now Includes LiveFeed, Enabling Admins To Remotely Track Device Details With Ease