App Publisher
Application management section takes you through on How to Publish an App, manage its Lifecycle and new releases.
There is also a section on Google Enterprise App Management guiding you through on how to enroll a device as a Google enterprise enabled work profile.
Follow the instructions below to sign in to the Entgra App Publisher portal:
-
Sign in to the Entgra UEM Server Endpoint Management Console.
-
Click App Publisher.
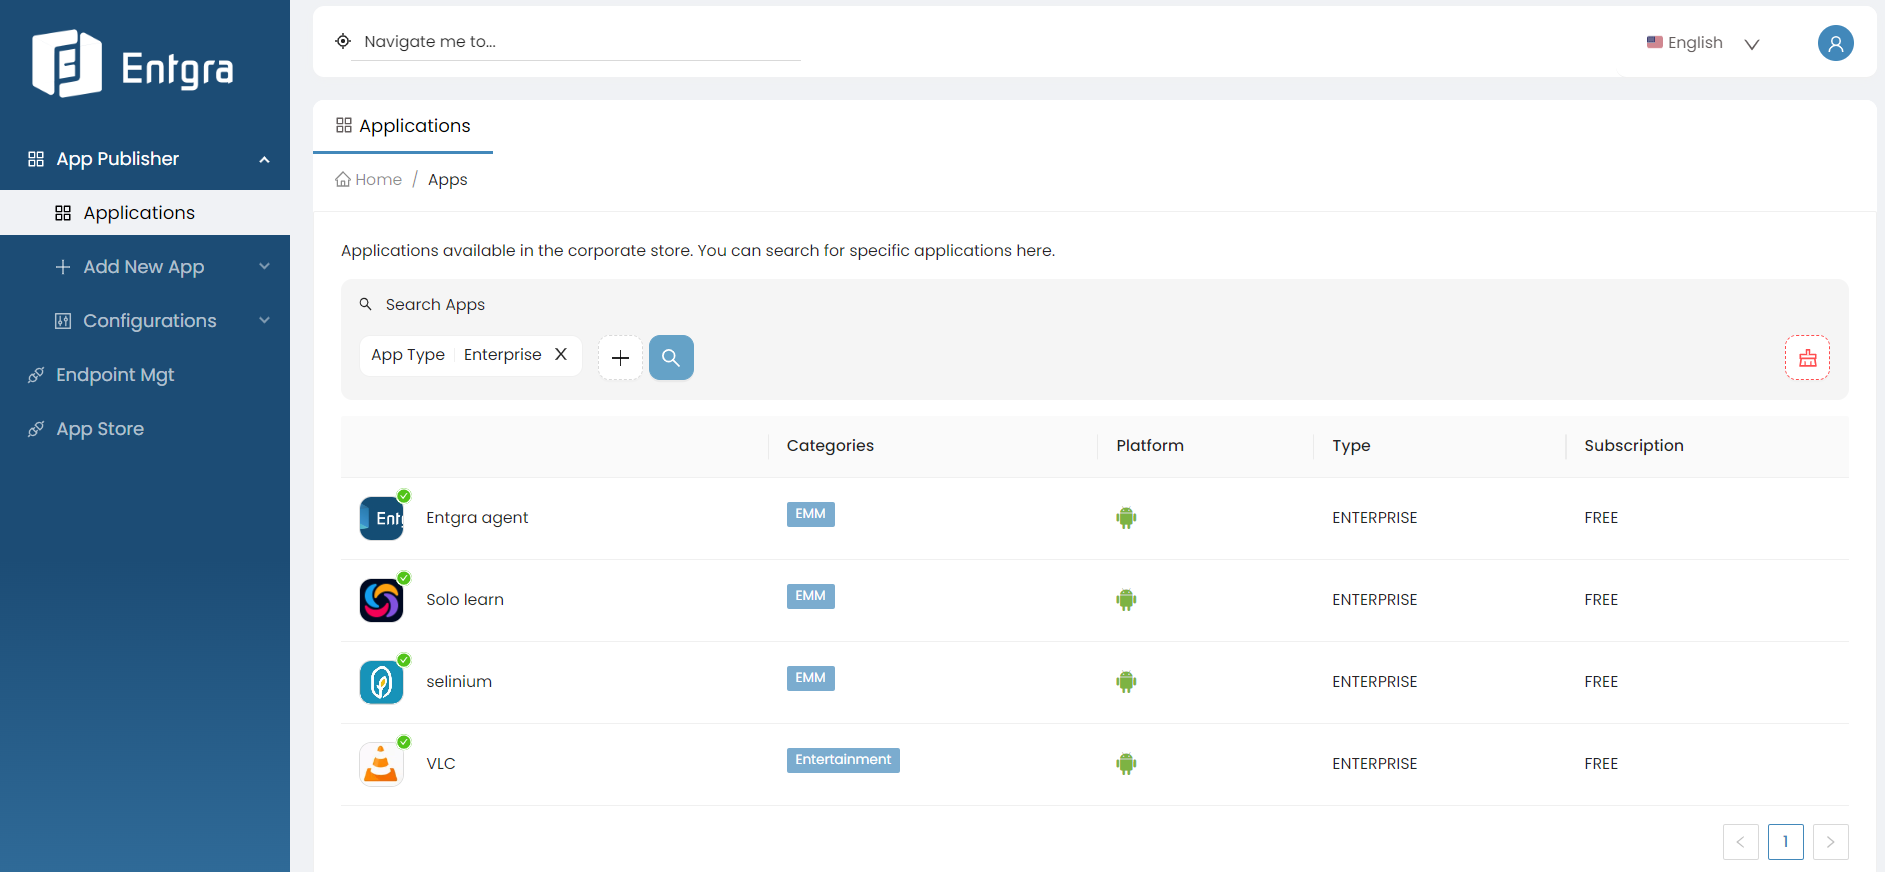
View Available Apps
-
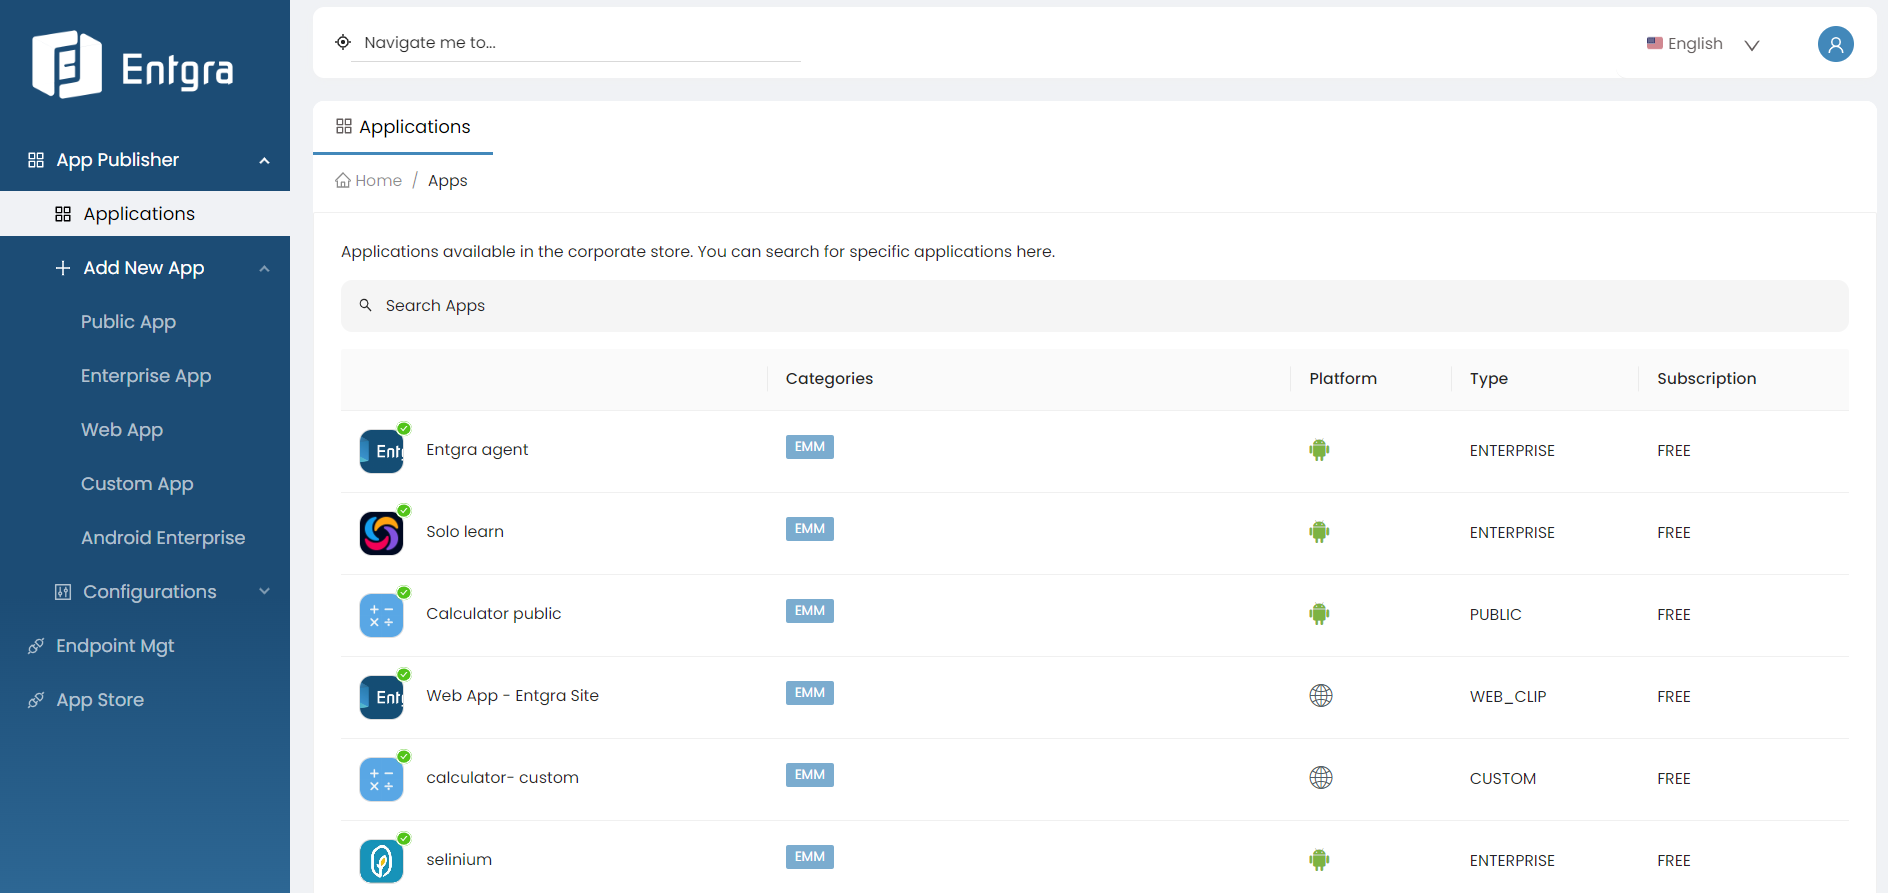
Go to the Applications page in the App Publisher portal.
-
You can view all available applications in the App Publisher portal.
Search Apps
-
Click on the Search Apps bar on top of the applications table.
-
Add relevant tags for searching and then click Search icon.
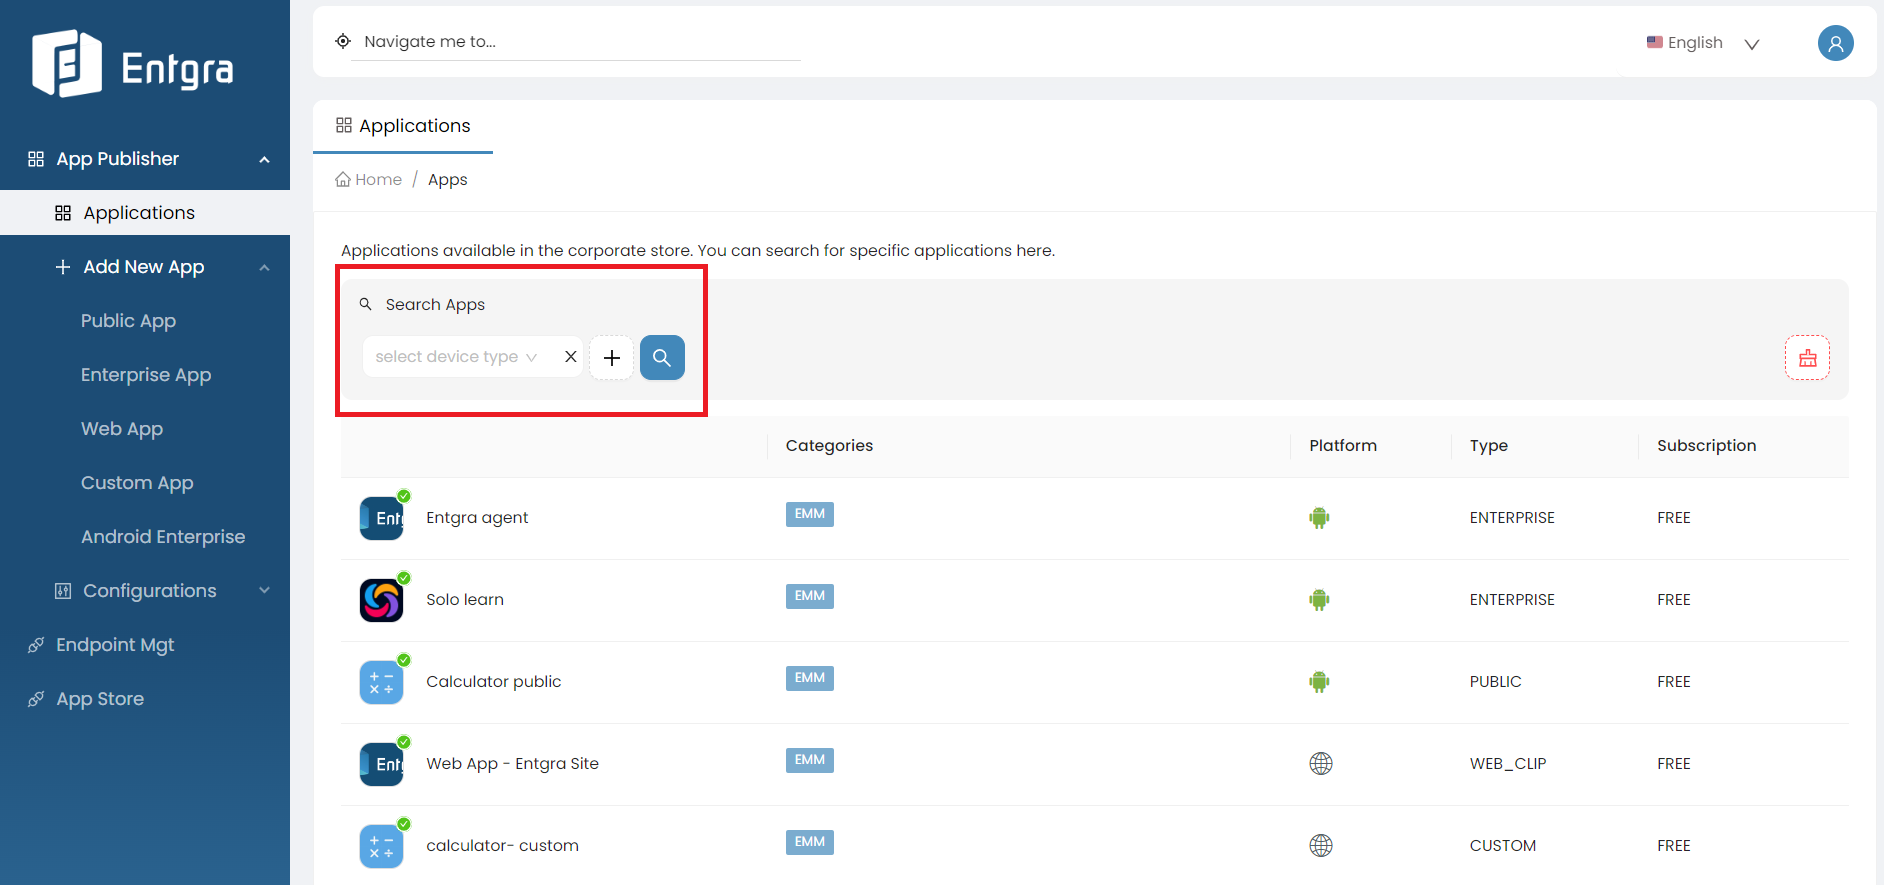
Tags Parameters Category Search for apps by available categories Tag Search for apps by available tags Device Type Search for apps by OS type App Name Search for apps by part of the app name App Type Search for apps by type of the app App Status Search for apps by stages of its lifecycle
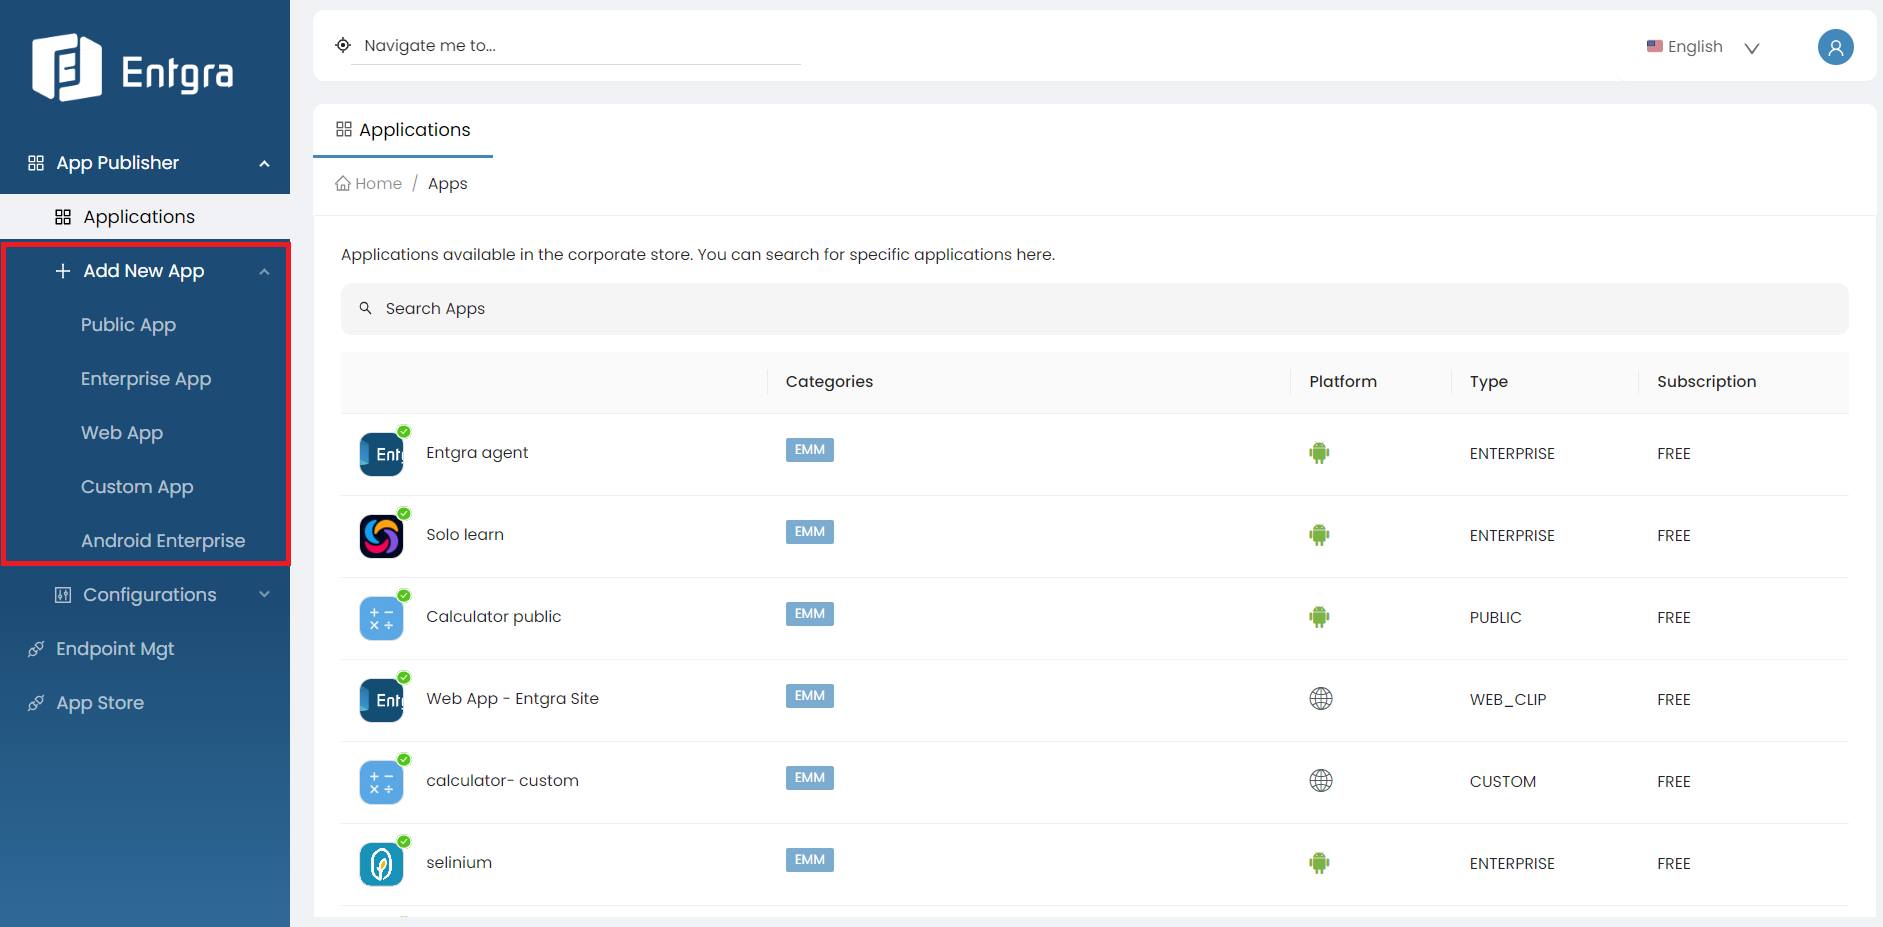
Add New App
Steps
-
Go to the Publisher portal.
-
On the navigation bar, click Add New App +.
-
Select the application type from drop-down.
Application Type Description Public App Refers to publicly available apps on the Play Store. Enterprise App Refers to all apps that have been created by the organization. Web App Refers to apps that are designed and developed to to access a web page or website. Custom App Refers to your own custom apps. -
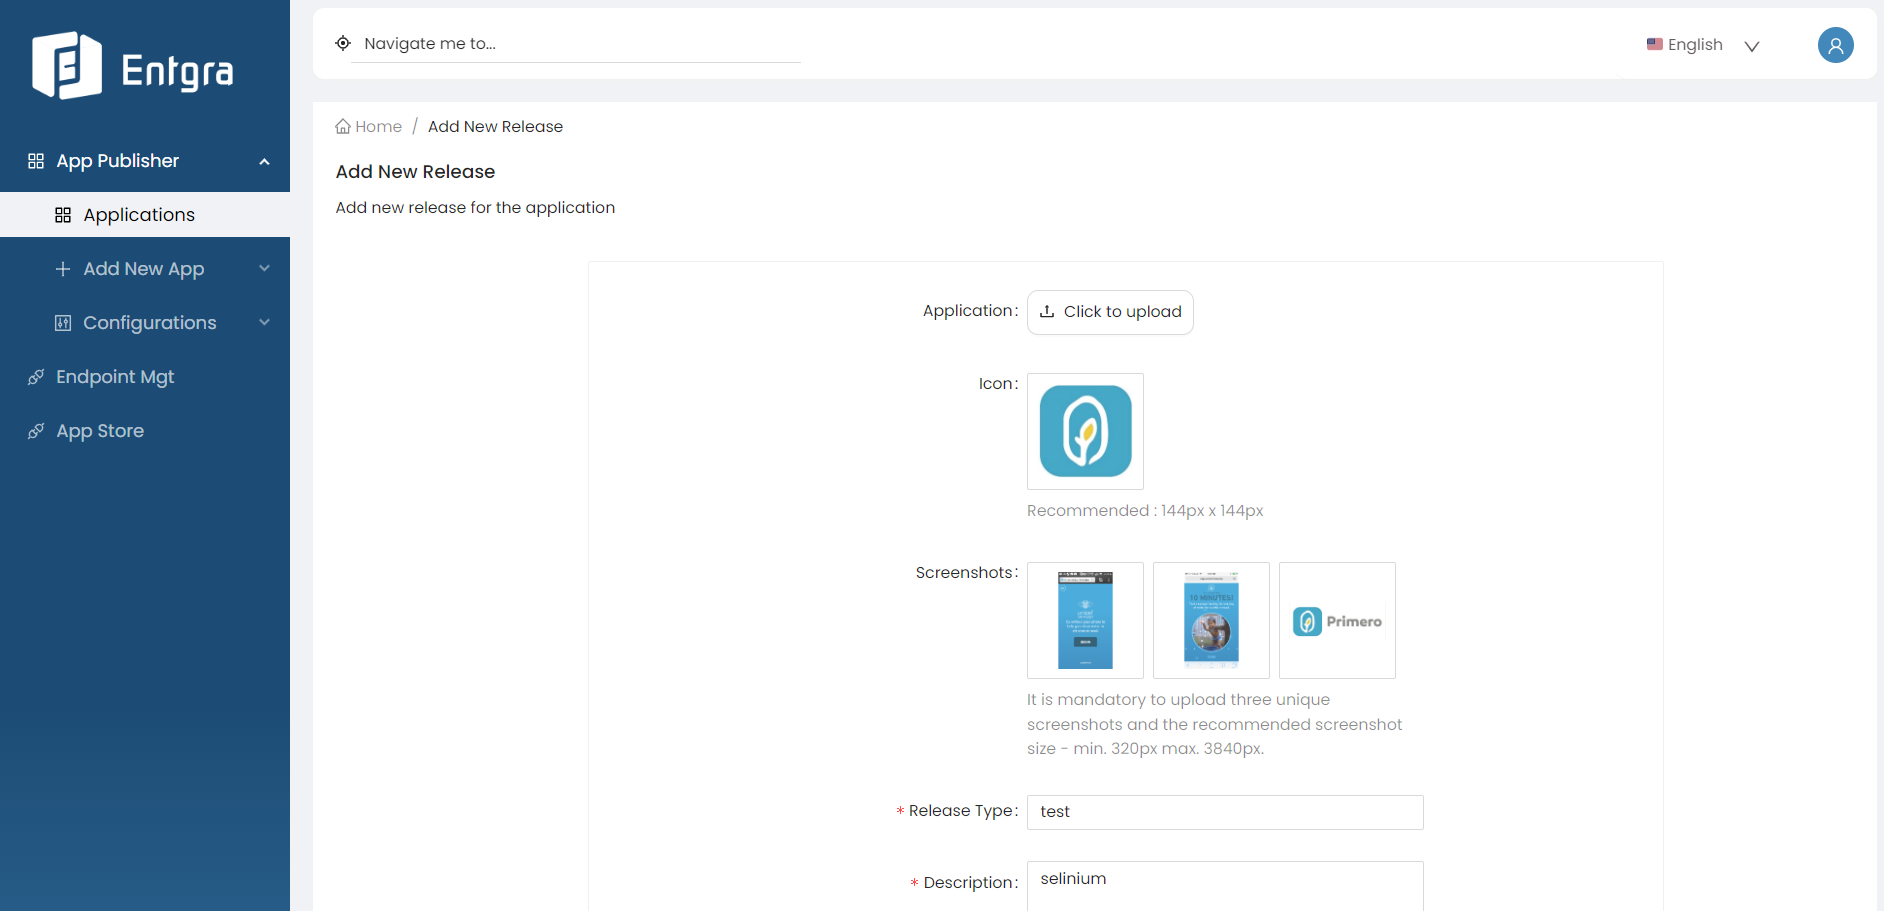
Fill the forms respectively.
Field Description Device Type Specific operating system type on which the app is designed to work optimally. App Name The name of the app that is displayed to the user. App Description A summarized description of the app. Visible Roles Enter the user roles that this app will be visible to. Categories Select the category that this app needs to be listed under. Tags You can group mobile applications under a specific category using tags. Icon The image that will be used as the application icon in the Store and when the application is installed on a device. Screenshots Screenshots of the app so that the user can get an understanding of what the app offers. A maximum of 3 screenshots are allowed. Package Name Enter the exact package ID of the Play Store app. Need support to identify the package name ? Version Version of the public application. If you have previously entered a different version of this app, make sure to enter a unique version number. Release Type Type of the release. Description A summarized description about the release. Supported OS Versions Specific operating system versions on which the app is designed to work optimally. Field Description Device Type Specific operating system type on which the app is designed to work optimally. App Name The name of the app that is displayed to the user. App Description A summarized description of the app. Visible Roles Enter the user roles that this app will be visible to. Categories Select the category that this app needs to be listed under. Tags You can group mobile applications under a specific category using tags. Application Upload the APK file. The APK file size should not exceed 200MB. Icon The image that will be used as the application icon in the Store and when the application is installed on a device. Screenshots Screenshots of the app so that the user can get an understanding of what the app offers. A maximum of 3 screenshots are allowed. Supported OS Versions Specific operating system versions on which the app is designed to work optimally. Field Description App Name The name of the app that is displayed to the user. App Description A summarized description of the app. Visible Roles Enter the user roles that this app will be visible to. Categories Select the category that this app needs to be listed under. Tags You can group mobile applications under a specific category using tags. Icon The image that will be used as the application icon in the Store and when the application is installed on a device. Screenshots Screenshots of the app so that the user can get an understanding of what the app offers. A maximum of 3 screenshots are allowed. URL Enter the URL of the webpage or website. Version Version of the public application. If you have previously entered a different version of this app, make sure to enter a unique version number. Supported OS Versions Specific operating system versions on which the app is designed to work optimally. Release Type Type of the release. Description A summarized description about the release. Field Description Device Type Specific operating system type on which the app is designed to work optimally. App Name The name of the app that is displayed to the user. App Description A summarized description of the app. Visible Roles Enter the user roles that this app will be visible to. Categories Select the category that this app needs to be listed under. Tags You can group mobile applications under a specific category using tags. Application Upload the APK file. The APK file size should not exceed 200MB. Icon The image that will be used as the application icon in the Store and when the application is installed on a device. Screenshots Screenshots of the app so that the user can get an understanding of what the app offers. A maximum of 3 screenshots are allowed. Package Name Enter the exact package ID of the Play Store app. Need support to identify the package name ? Version Version of the public application. If you have previously entered a different version of this app, make sure to enter a unique version number. Release Type Type of the release. Description A summarized description about the release. -
Click Directly move the release to published state to avoid publishing the app manually. (Optional)
-
Click submit.
-
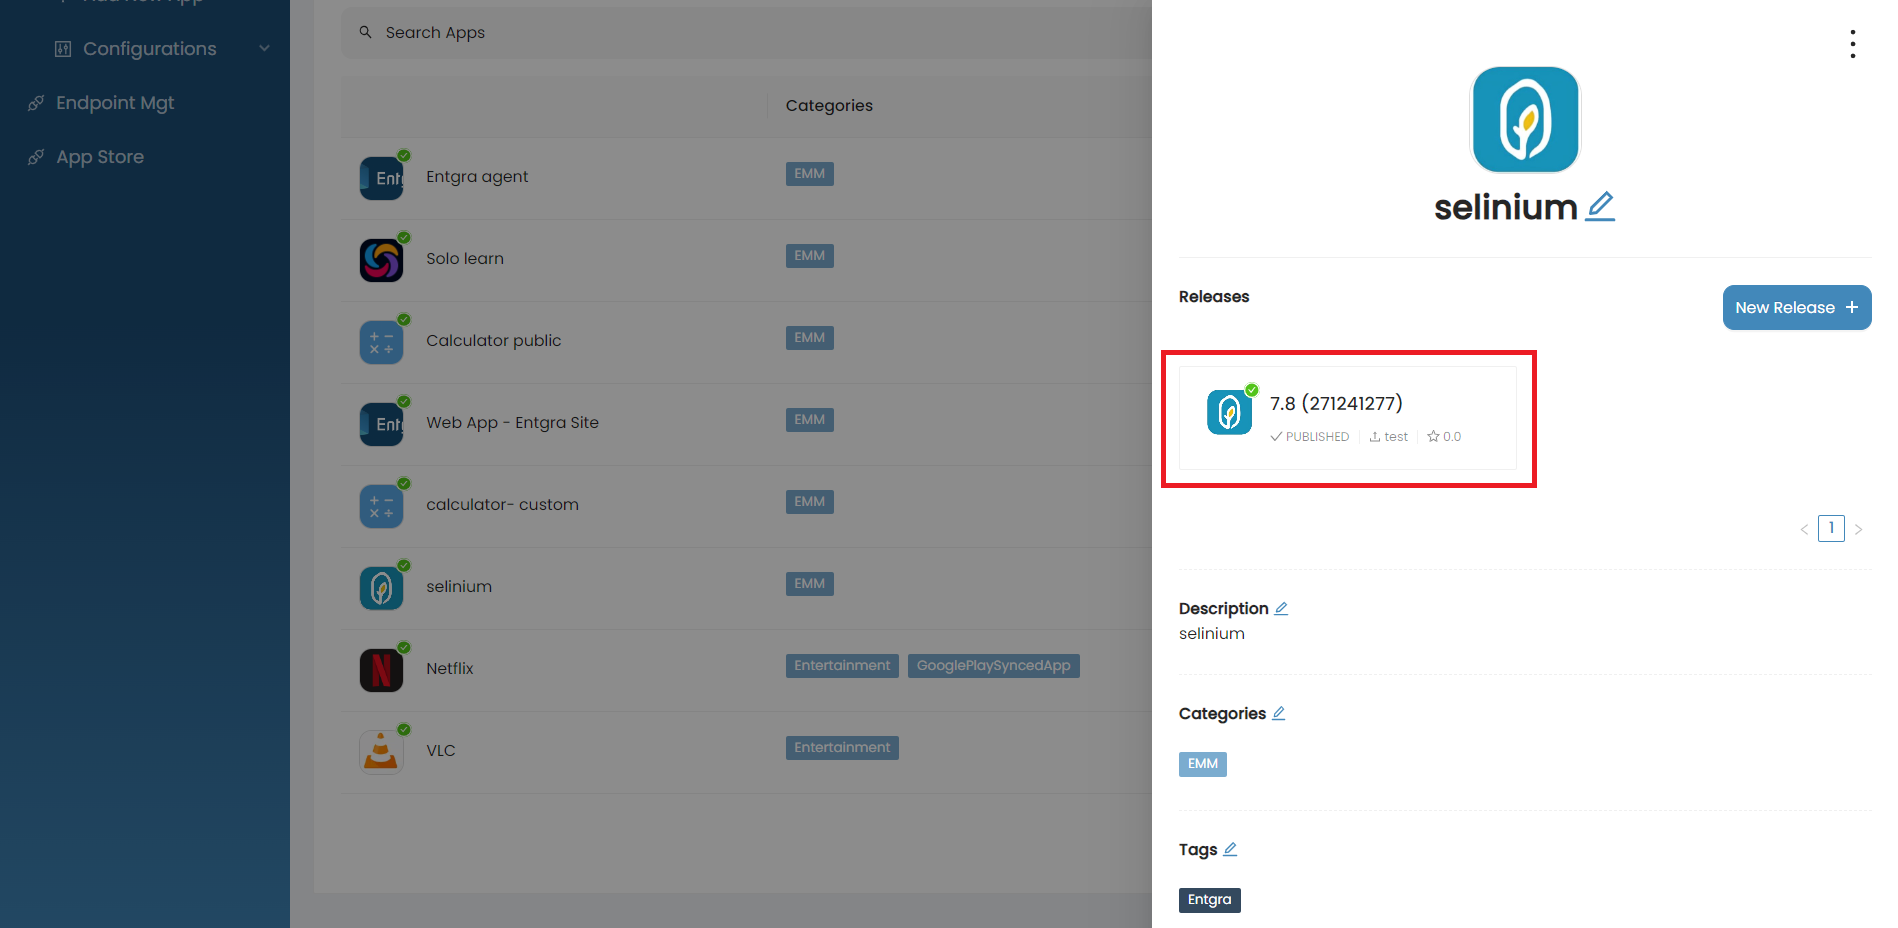
Next, find the app from the table and go to that application release.
-
Change state to IN-REVIEW -> APPROVED -> PUBLISHED.
-
Go to the Store section of the application to view the published app.
Manage App Life Cycle
The application (app) approval process involves all the states in an application lifecycle from creation to retirement. Your actions are restricted based on the permissions that are assigned to you.
Steps
-
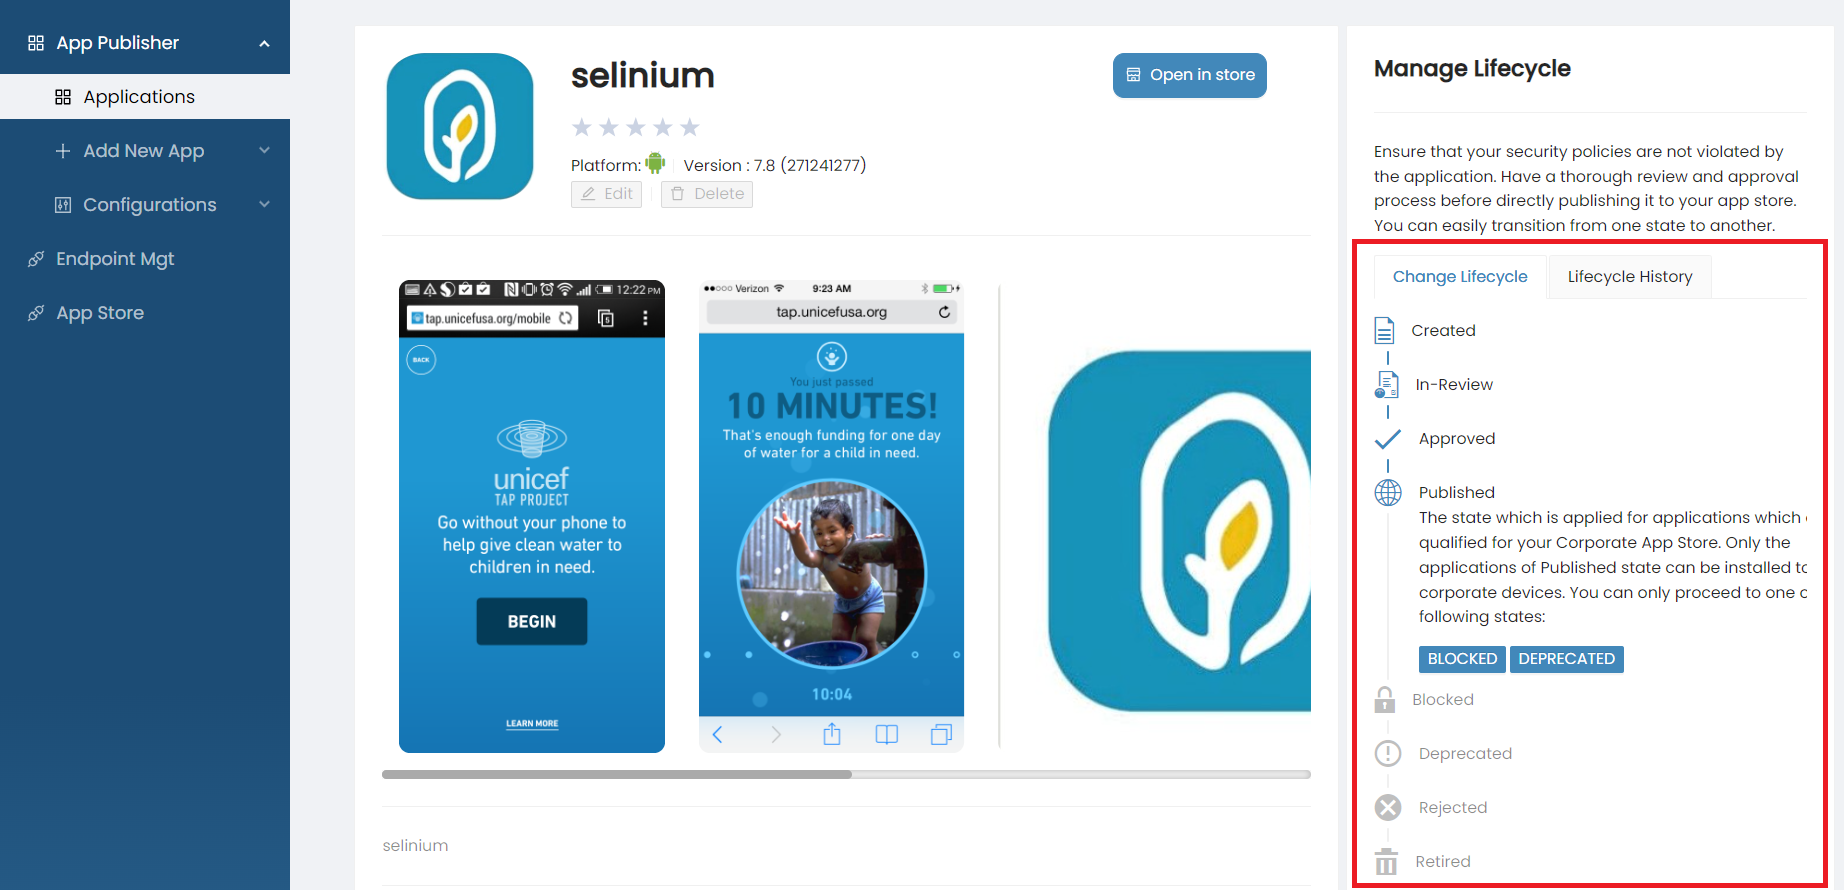
Find the published application from the table.
-
Go to the published application and click on released version.
-
You can view the app's lifecycle.
-
You can carry out the following actions in the application lifecycle managing process.
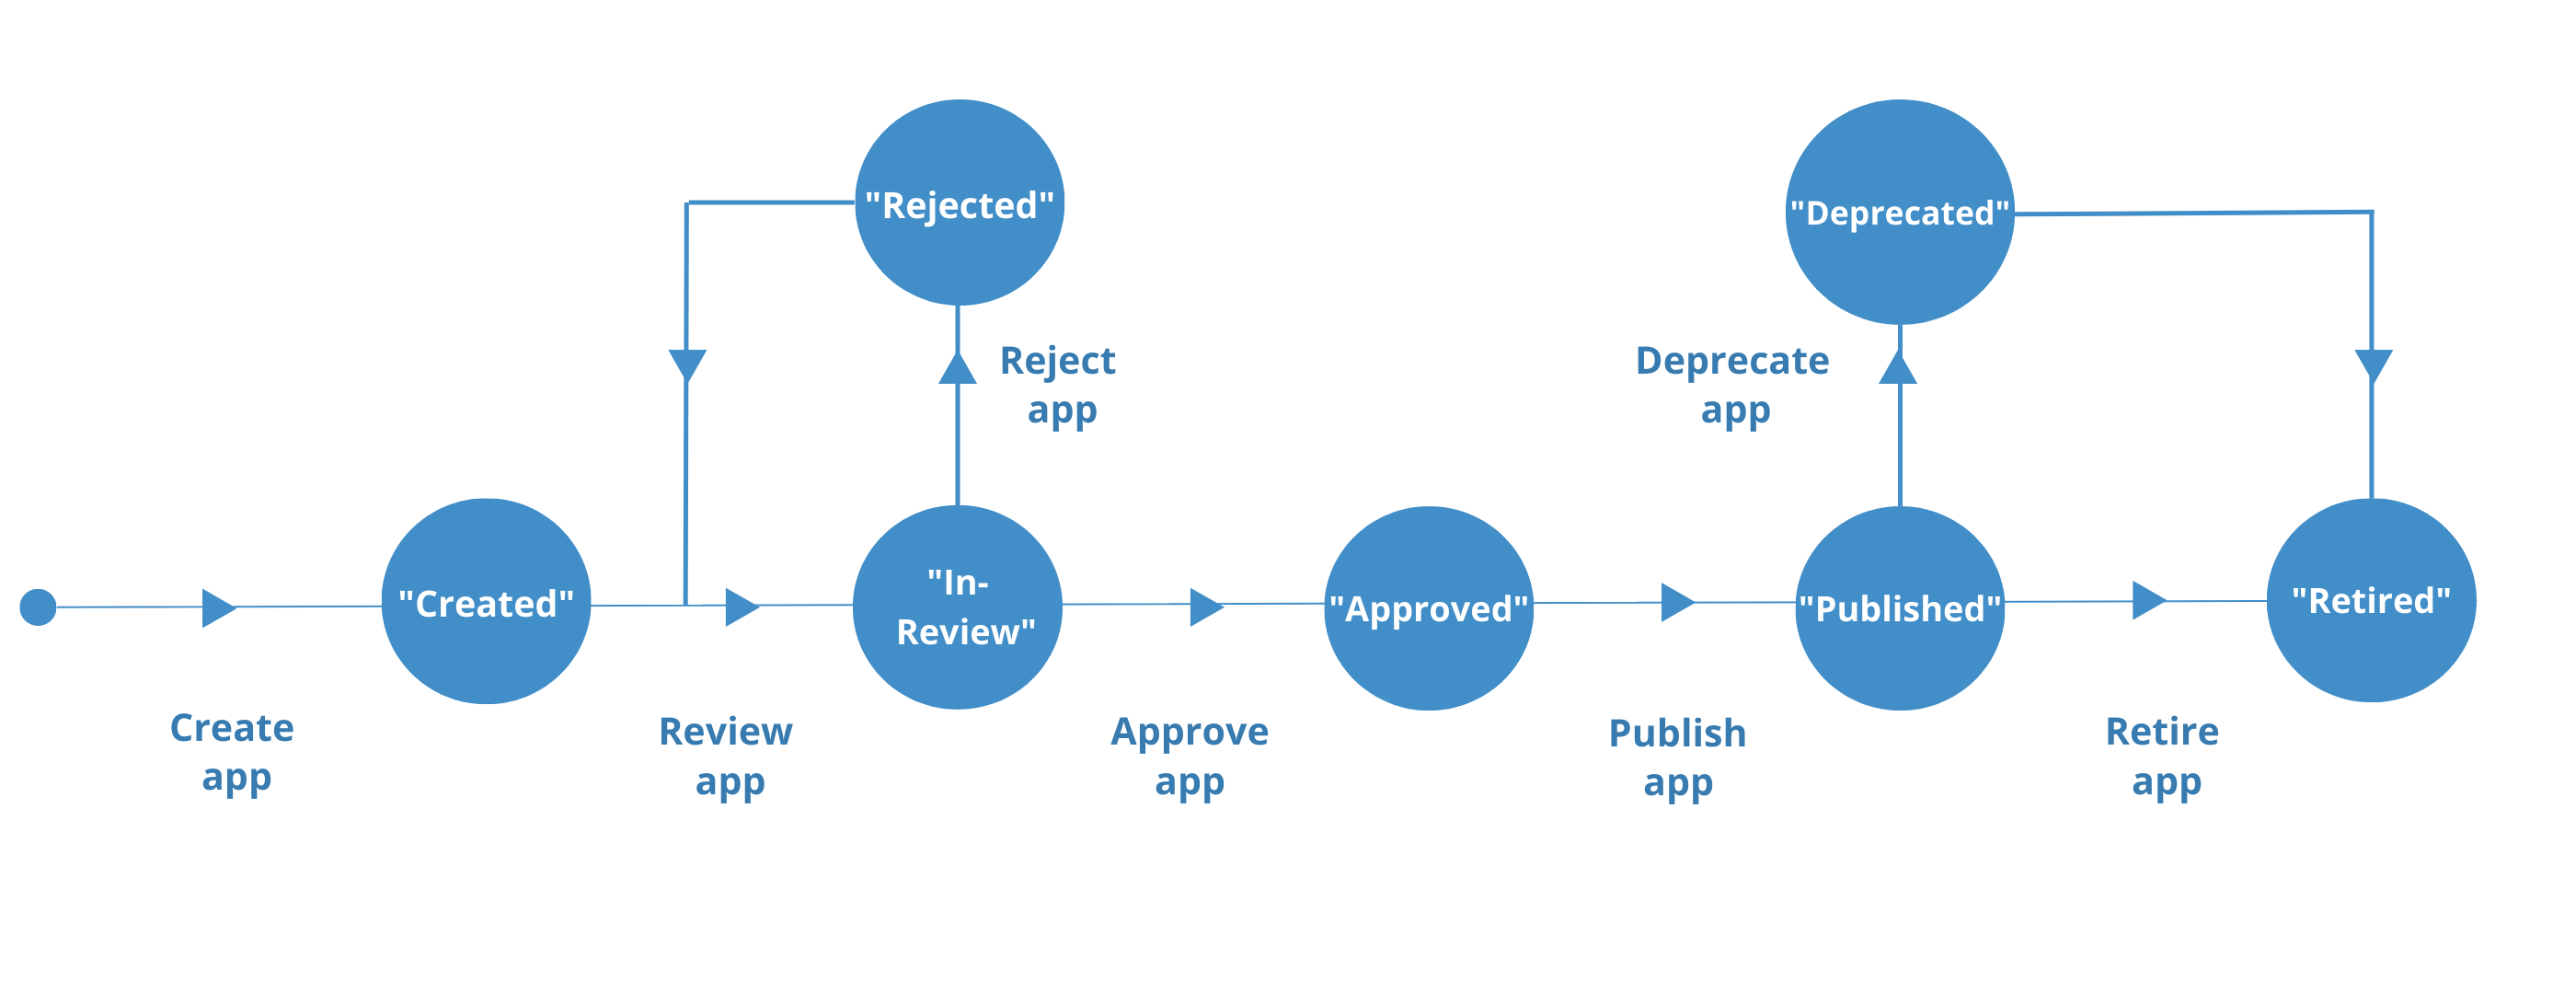
State Description Created The lifecycle state for a newly created app is Created. In-Review Review apps before publishing in the app store. Approved Approve apps that pass the review process. Published Publish approved apps. All published apps are visible in the App Store. Blocked Block apps for a certain period of time either to publish or deprecate at a future date. Deprecated All deprecated apps are automatically removed from the Store, to stop all new installations. Deprecated apps are supported by App Publisher. Rejected Reject apps that fail the review process. Retired Retired apps are not supported by App Publisher in the future. In such instances, all retired apps are automatically removed from the Store, to stop all new installations. -
After retiring, you can hide the app. Then the app will be removed from the store and the app details will not show on the publisher.
Further explore this feature by referring to our comprehensive blog article
App Management Made Easier: Using Entgra UEM For App Lifecycle Management
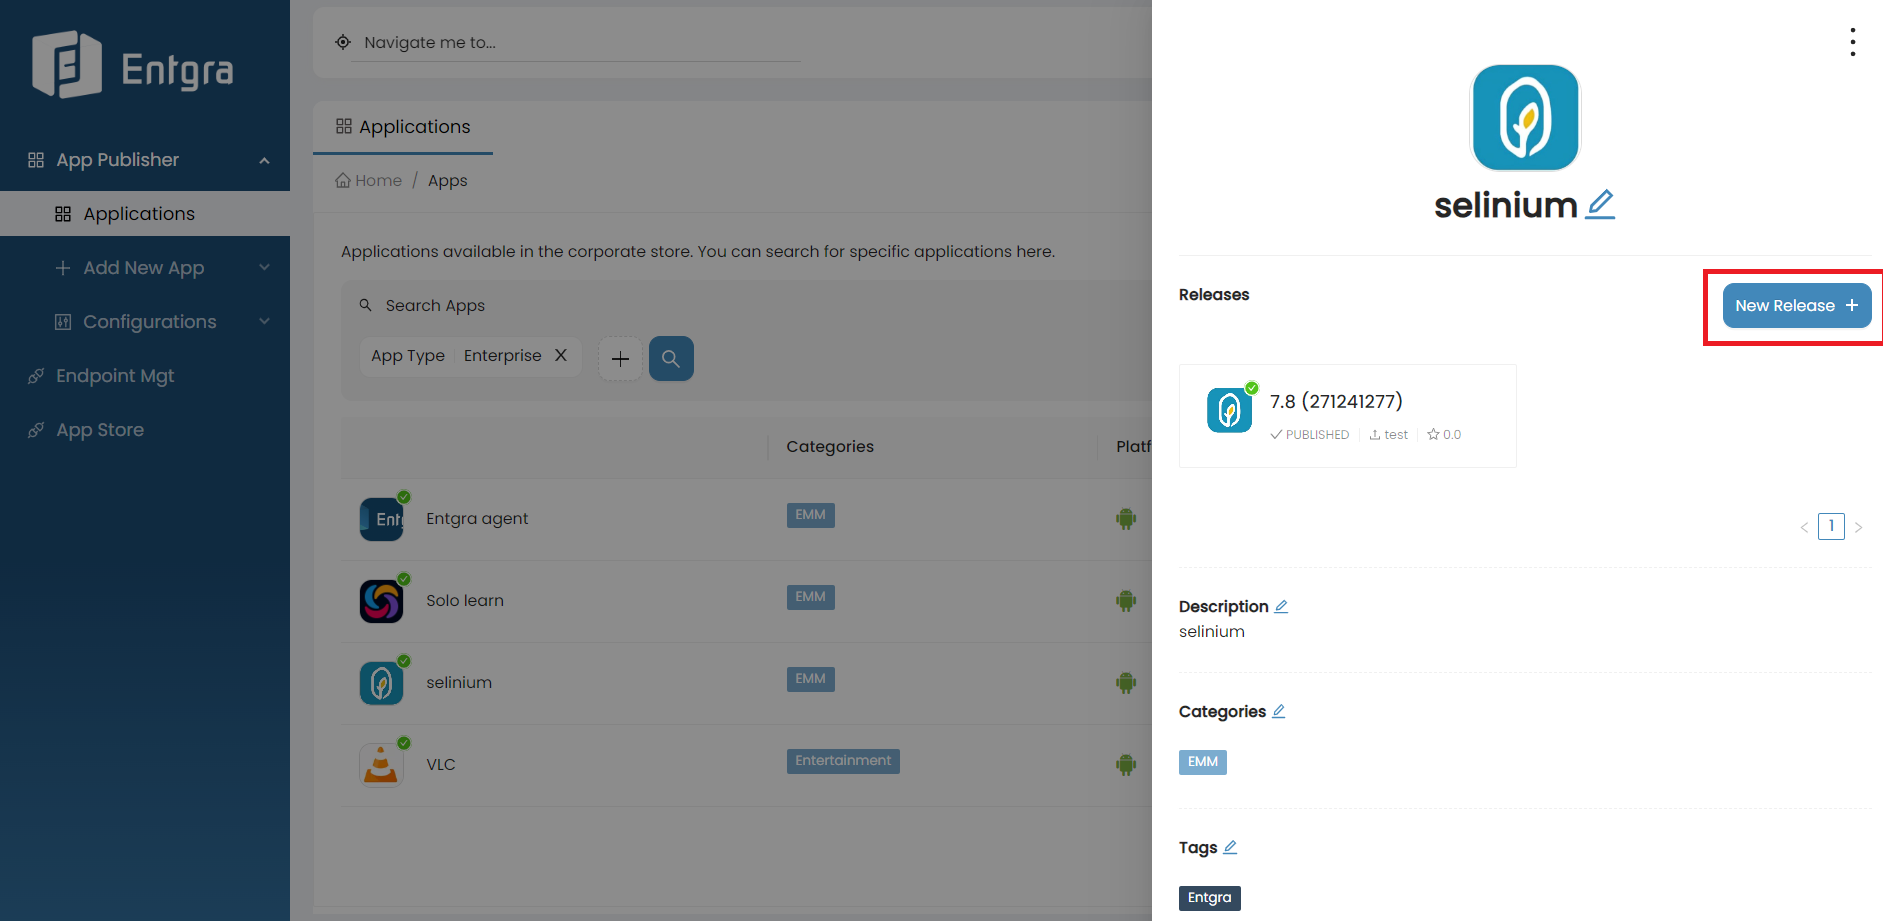
Add New App Releases
Note
-
Only enterprise applications can have multiple releases.
-
When a new release or update of the app is available, there will also be a new version for the app.
Steps
-
Click on the enterprise application from the Apps table of the publisher.
-
Click New Release +.
-
Fill the form respectively. (Do not give the same apk for new release).
-
Click submit.
-
Go to the previous release and change its state to DEPRECATED in lifecycle.
-
Go to the newly added release and publish it.
App Configurations
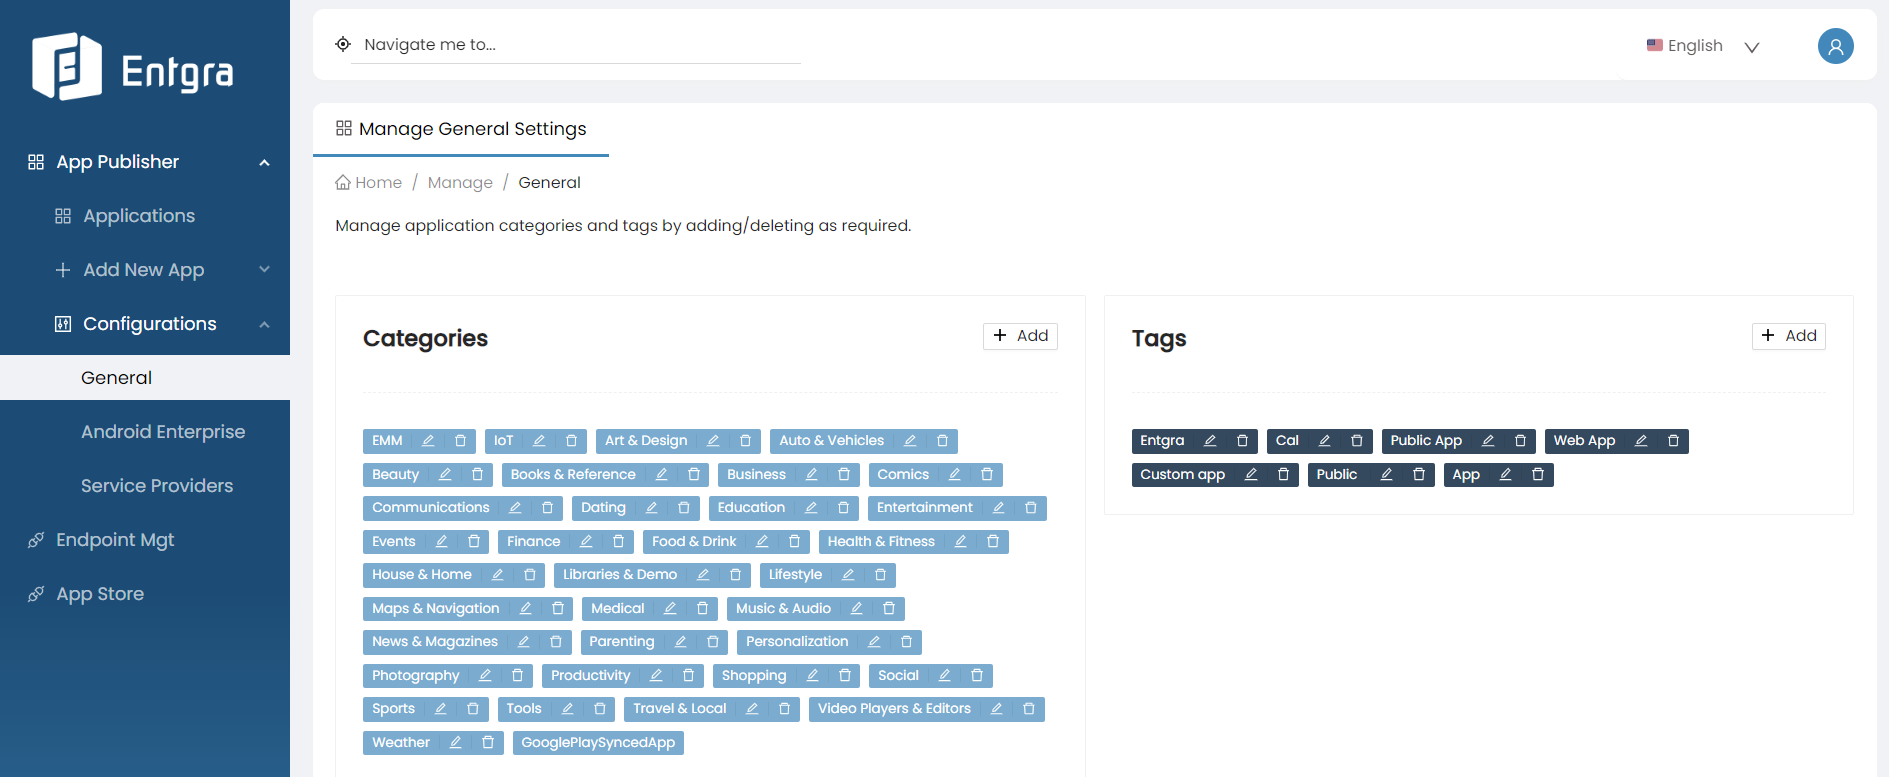
General Configuration Settings
You can manage application categories and tags by adding or deleting them as needed.
Android Enterprise
When enrolling a device as Google enterprise enabled work profile, the work profile will inherit the capabilities to manage apps within the work profile using the Google Play store. Once the server/tenant of the UEM server is configured with Google Enterprise program, the server is able to communicate with the Google Play APIs and manage a private Google Play store for your organisation. Note the admin account for this Google play account is the Google account used when registering for Android enterprise. By enrolling with Android enterprise program, you have automatically created a private space in the Google Playstore to manage both public and private apps for your organisation.
Prior to moving into the concepts of managing apps under Google enterprise, please note the two district entities involved in app management.
-
App management component of Entgra UEM server (which will be referred here on as App manager) that includes app store and publisher.
-
Private Google Playstore
Approve Apps for Organisation
When an admin want to push an app in the playstore to a user’s device, the first step is to approve the apps that the users are allowed to install. In order to do this Entgra App manager embeds the Google playstore and automatically log to the account of the admin user. Let’s look at how this can be achieved.
Approve Public Apps
- Login to publisher web app. For example
https://localhost:9443/publisher -
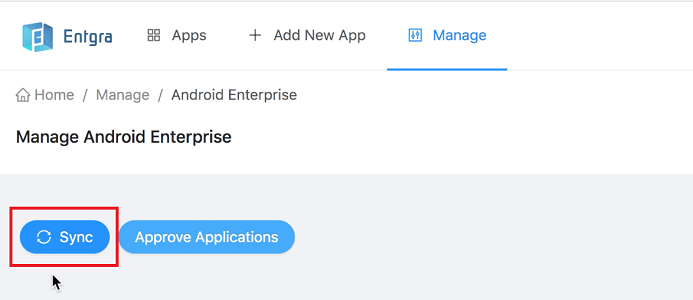
Go to Manage -> Android Enterprise.
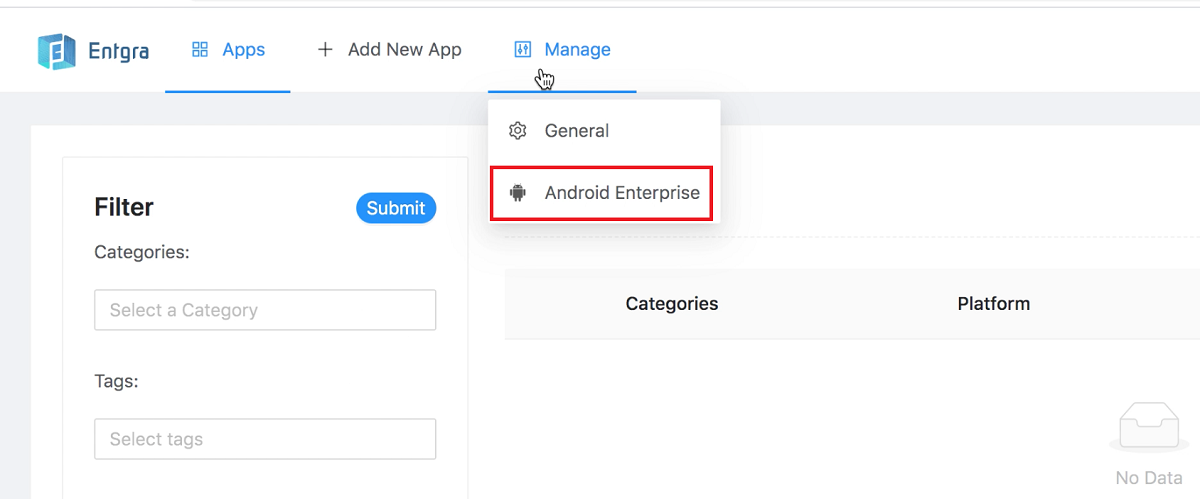
-
Click Approve Applications.
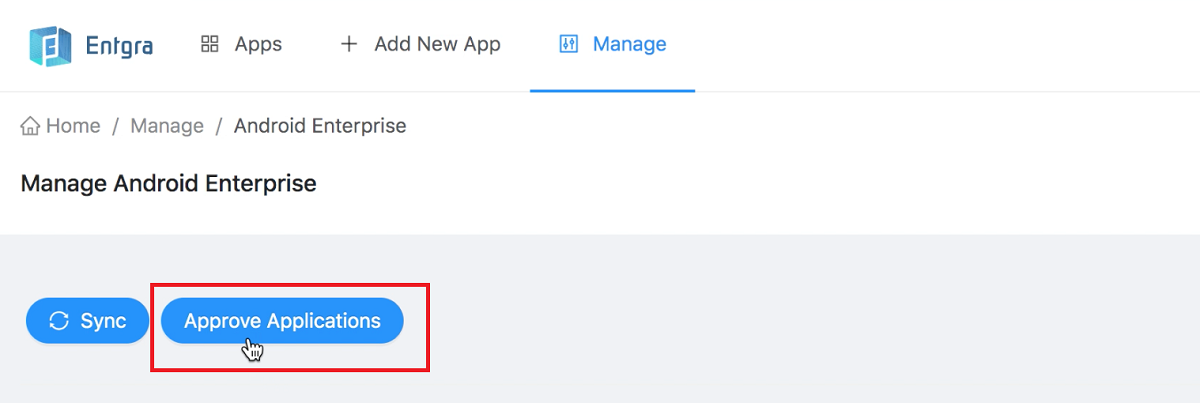
-
Play Store will open up where you can search for the app to be approved.
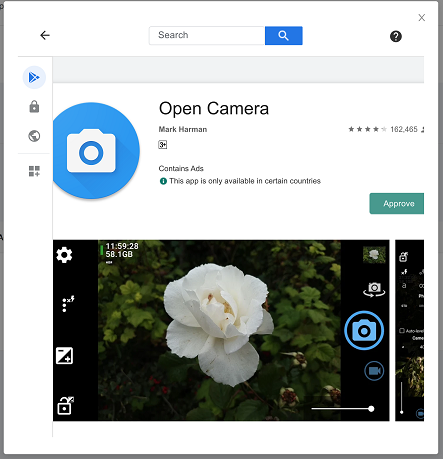
-
Click Approve.
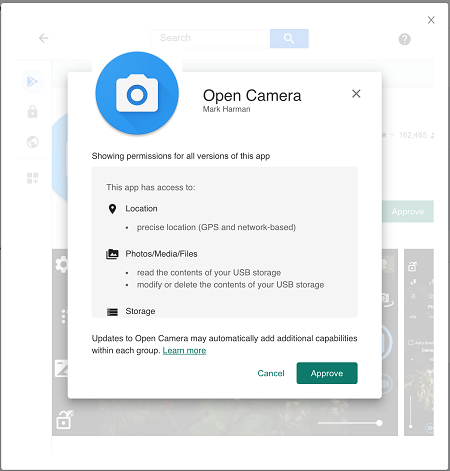
-
Read through the follow-up dialogs and approve the app.
-
To make the App manager aware of the approvals, the server has to be synced by clicking Sync.
-
Once the syncing is successful, click Apps at the top bar to view the newly synced apps.
Approve Private Apps
- Log in to publisher web app. For example
https://localhost:9443/publisher -
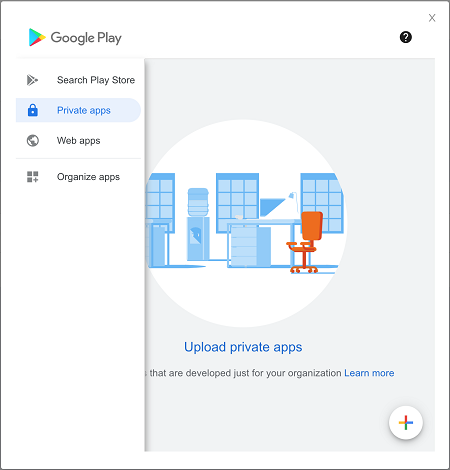
Go to Manage -> Android Enterprise.
-
Click Approve Applications.
-
Play Store will open up. Click private apps from the left side bar. Then click on the + sign at the bottom right of the screen.
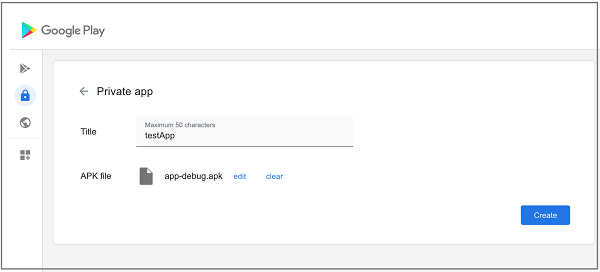
-
Type a title and upload the apk file. Then click Create.
-
When app creation is successful, go to app list to view the published app.

-
Once the syncing is successful, click Apps on the top bar to view the newly synced apps.
Create Play Store Structure
After approving the apps, the admin should also define how the approved app appears on the user’s playstore in the device. If this is not done, the user will not see any approved apps. Regere to Google documentation for further information on this.
Create a minimum of one cluster prior to installing the apps. This can be done as follows:
- Login to publisher web app. For example
https://localhost:9443/publisher -
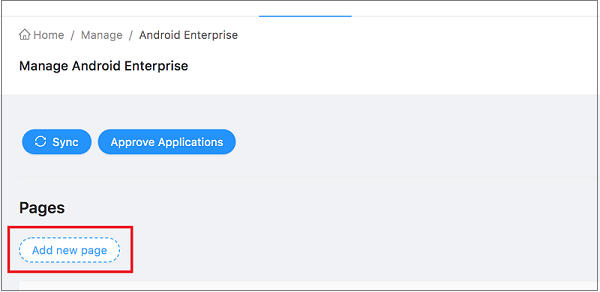
Go to Manage -> Android Enterprise.
-
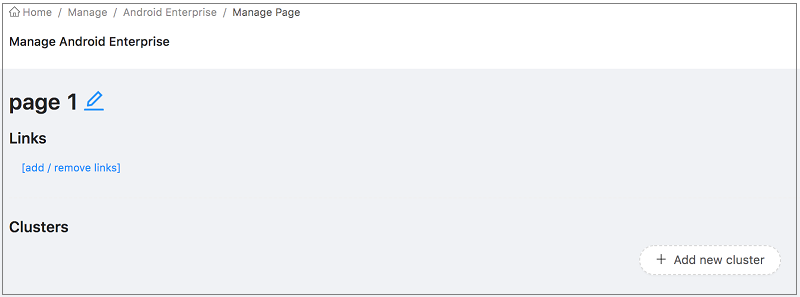
Click Add new page and type a name to create a page.
-
Next click Add new cluster.
-
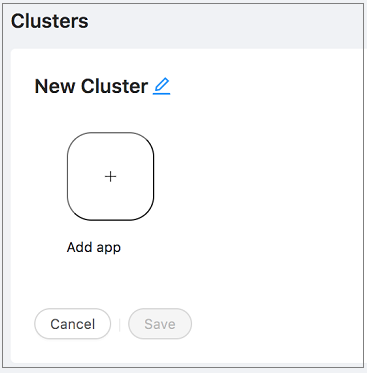
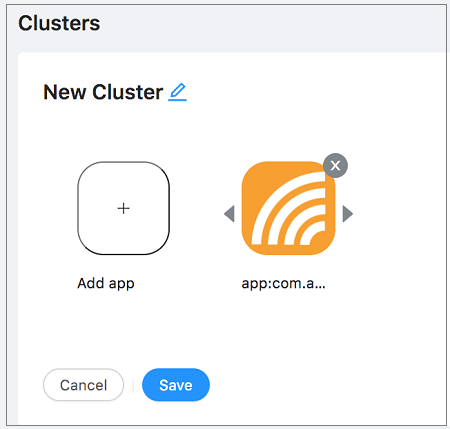
Title of the cluster can be edited with the button next to cluster.
-
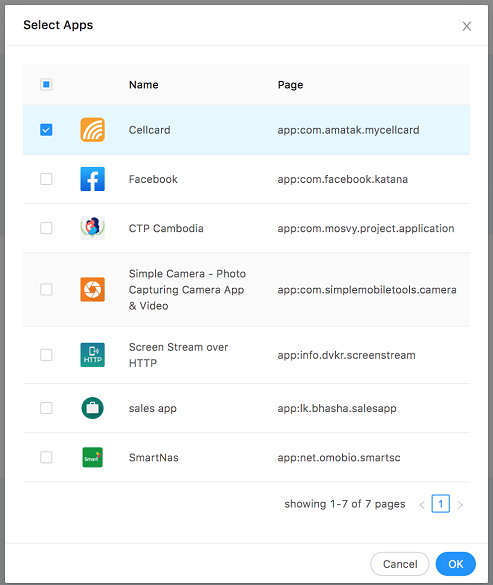
Click on the Add app + button, select the apps to be added to the cluster, and click OK.
-
Click SAVE to save the cluster.
Associate an App with a Device/User
In order to associate a device and an app, a policy has to be defined. At the time the policy is applied, the Google Play store gets updated with the selection.
- Log in to Endpoint Management web app.
-
Select Enrollment Application Install.
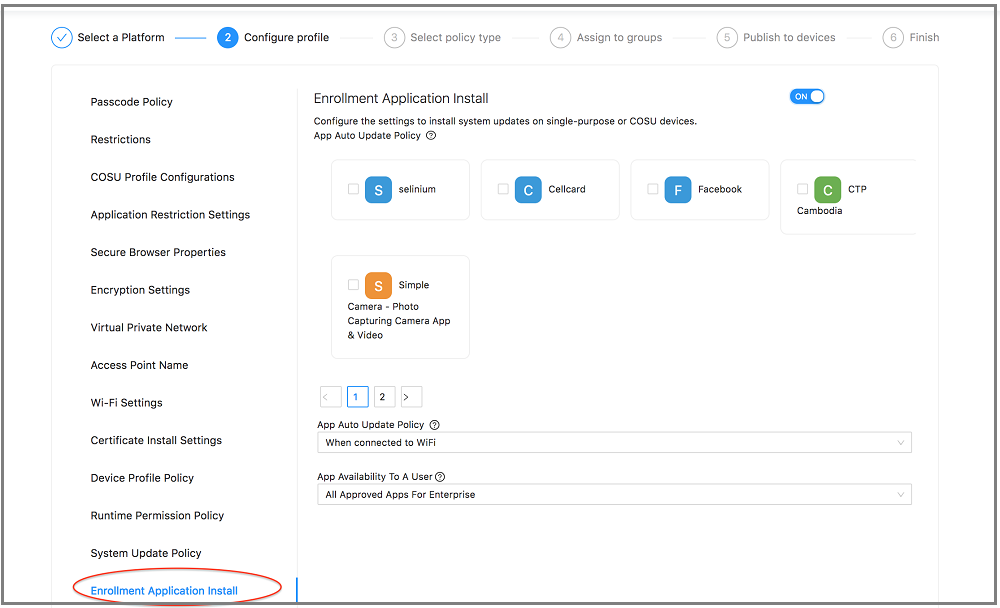
-
Select the apps you wish to make available from Work Profile Availability column. Note with each tick, a form to define how the app should be installed will be available. Make sure to click Save with each tick.
- Apply the policy to devices.
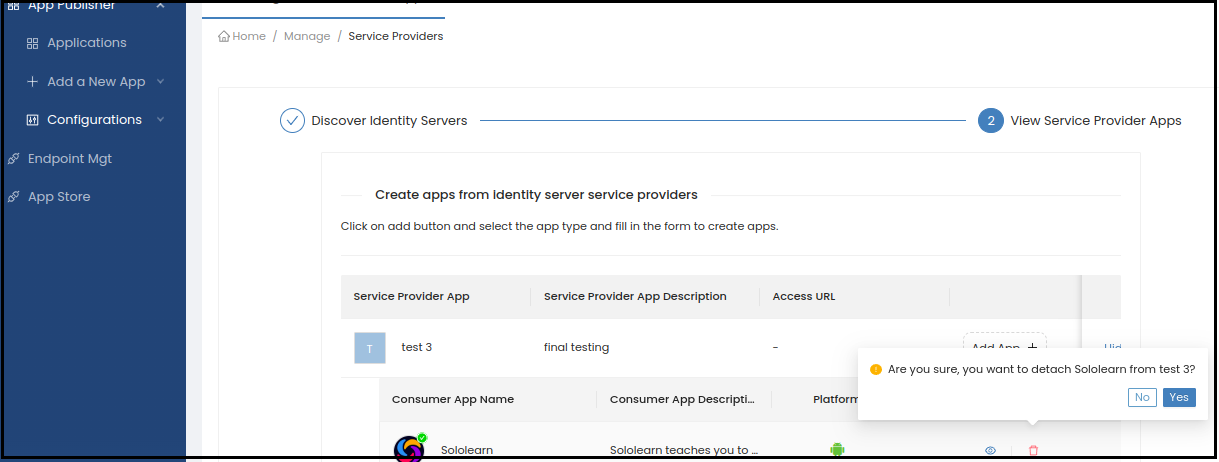
Manage Service Provider Apps
The Identity Server App Integration feature enables you to connect to multiple Identity Server instances through the Entgra App Publisher, and to manage the Service Provider Apps. It also facilitates mapping new or existing public, enterprise, web or custom apps in Entgra App Publisher to one or more Service Provider Apps.
Configuring Identity Server App Integration
- Log in to the Entgra App Publisher.
-
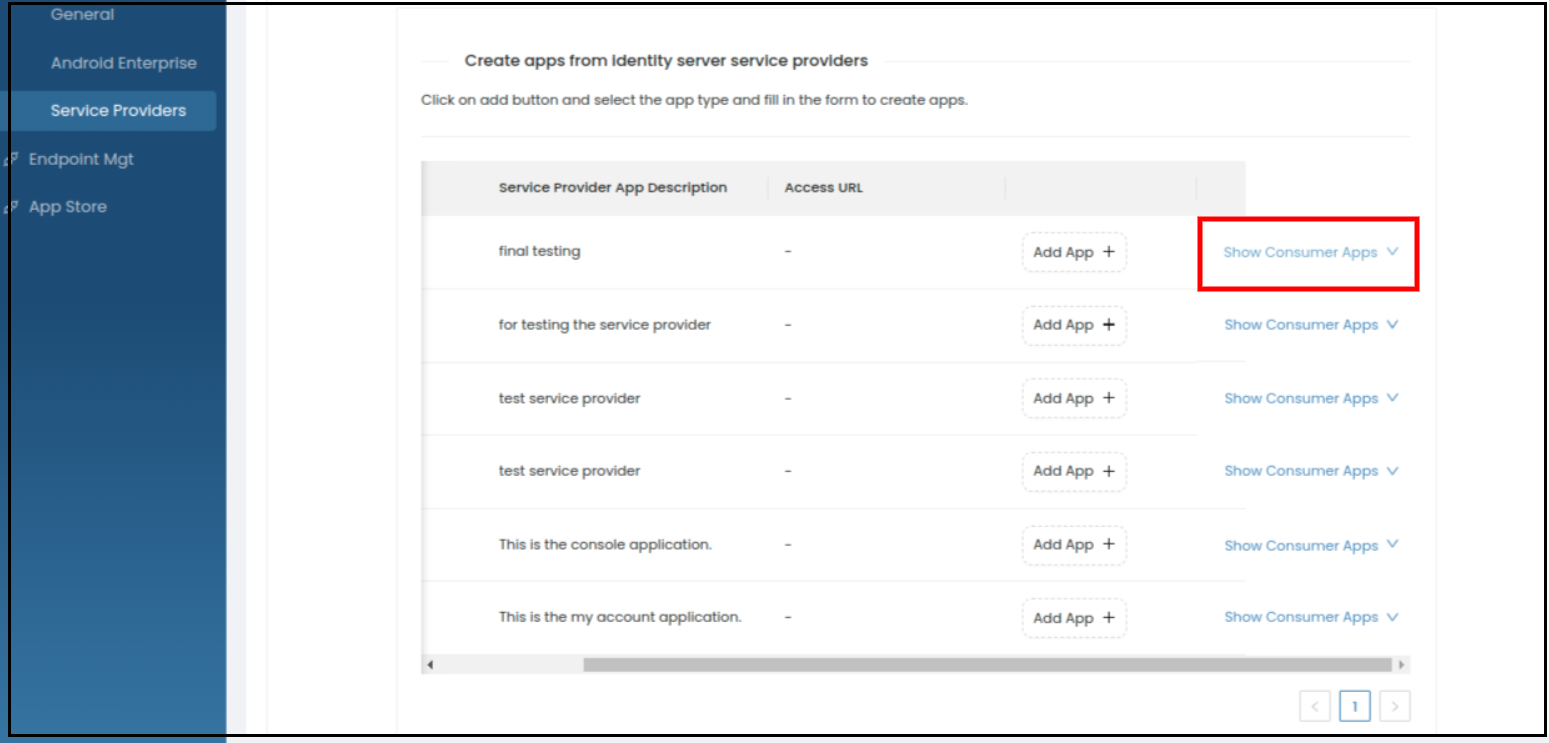
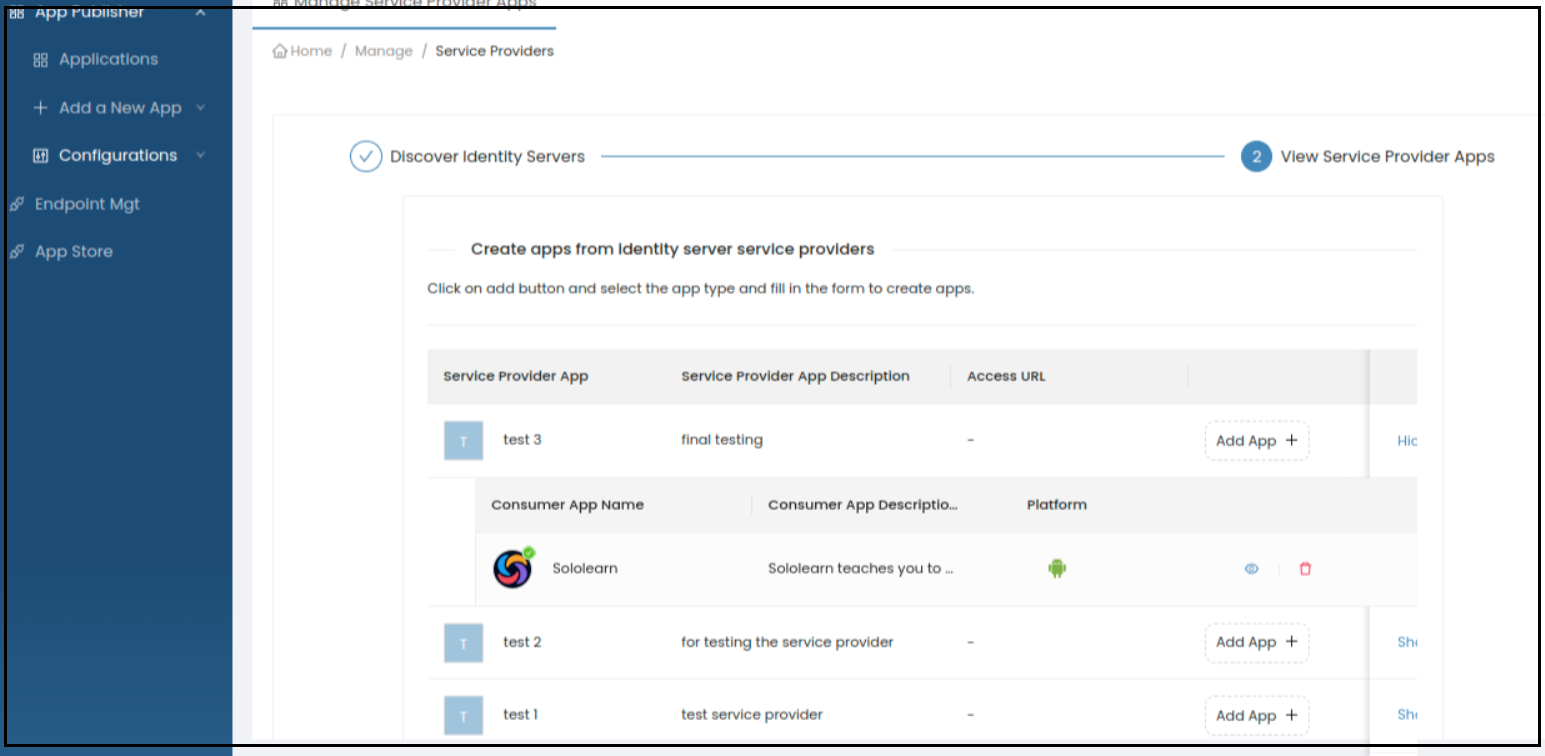
Navigate to Configurations > Service Providers. All available Identity Servers appear under Discover Identity Servers.
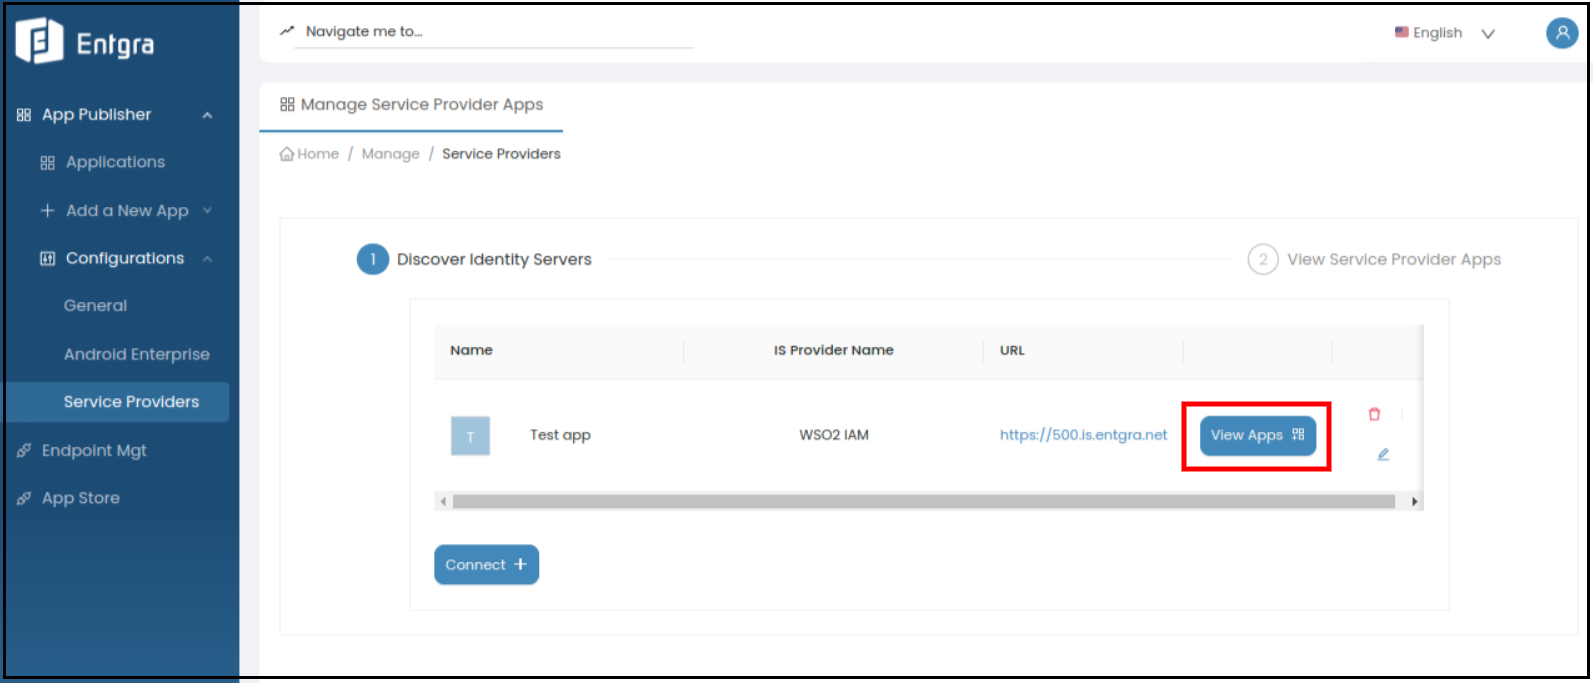
-
Click View Apps to view the existing and any newly created Service Providers from the IS carbon console.Go to Configuring Identity Server App Integration section for more information on how to create Service Providers.
-
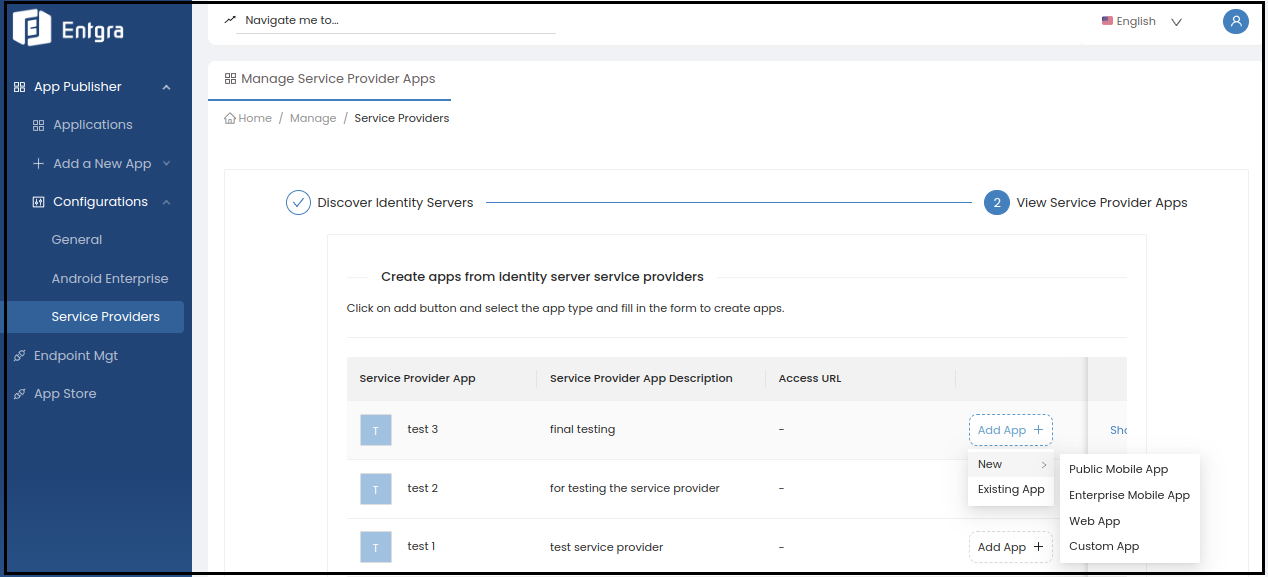
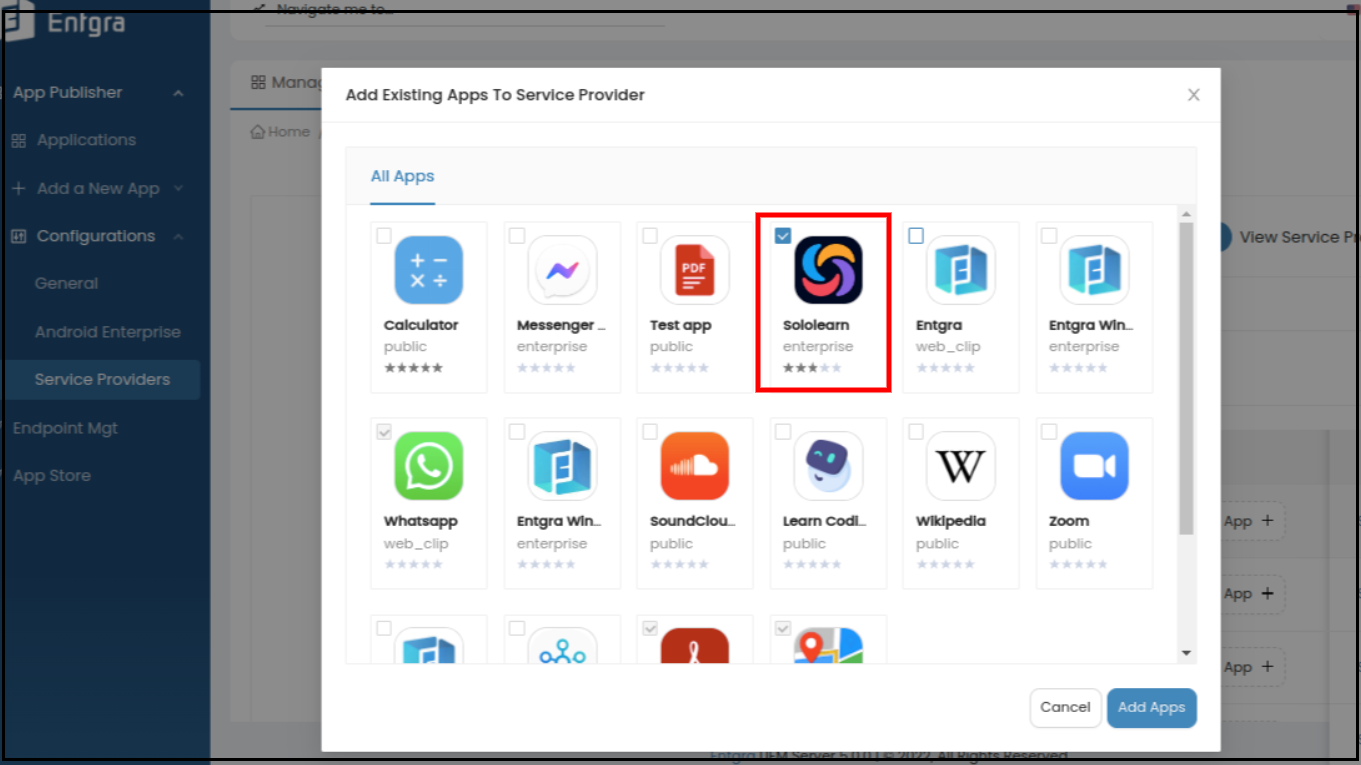
Click Add App + to map an existing application or to create a new one.
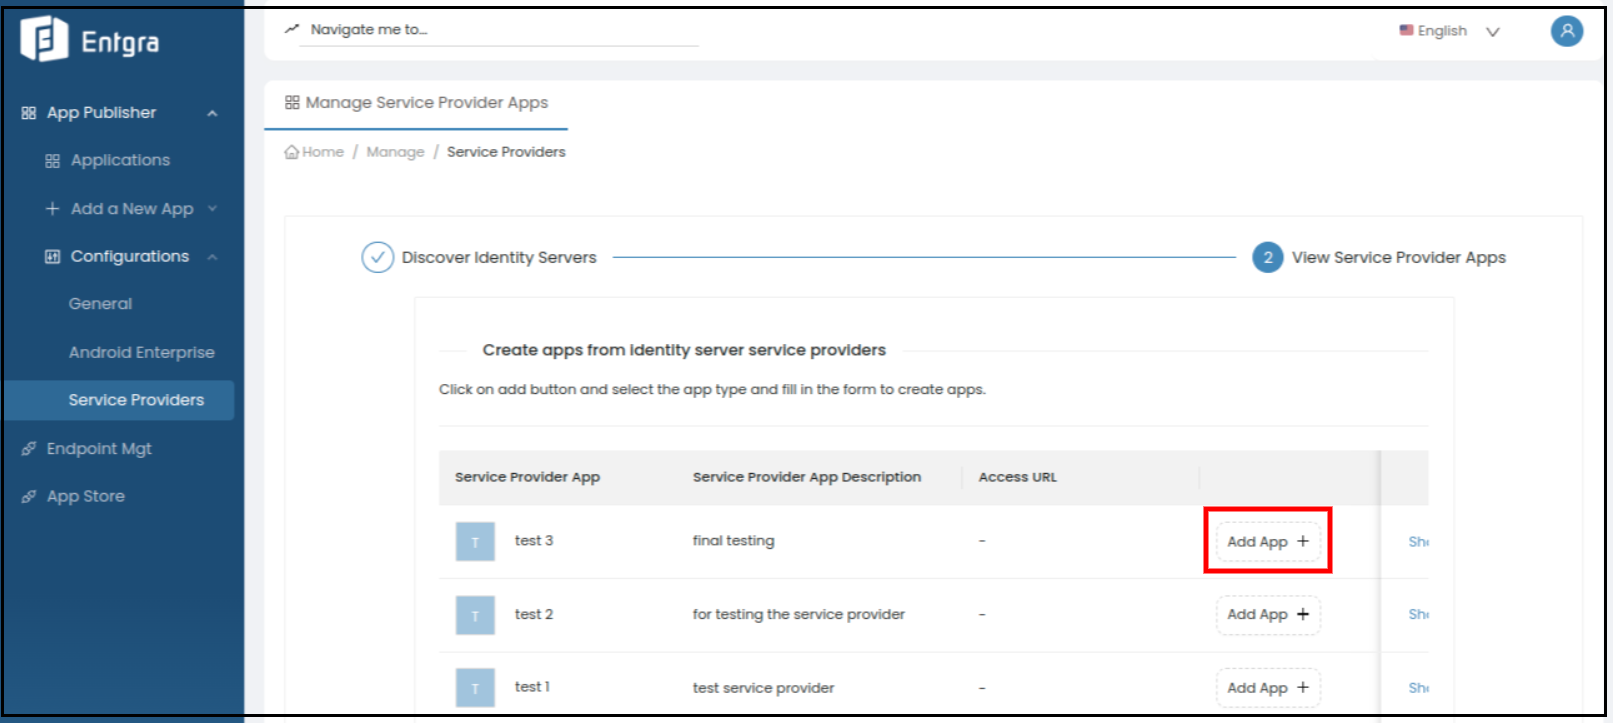
-
You can create a public, enterprise, web or a custom app.
-
You can add any existing apps, by simply selecting the required apps from the app list and clicking Add Apps.
-
After adding a new app or selecting an existing app, it will be displayed under Consumer Apps which can be reached by clicking Show Consumer Apps.
-
You can delete the app from the consumer app list by clicking Detach.